Thingiverse
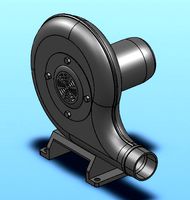
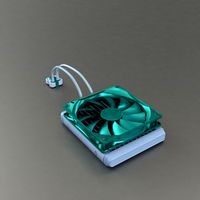
QIDI rear mounted dual blower for active print cooling by whited3
by Thingiverse
Last crawled date: 2 years, 12 months ago
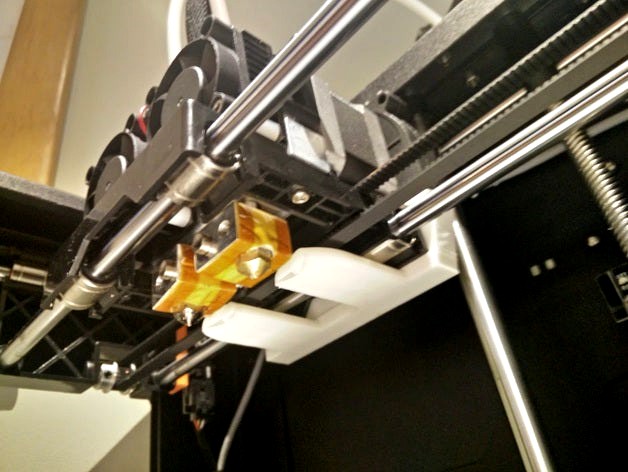
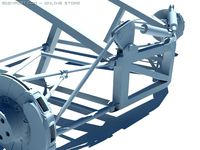
FIRST THING FIRST: this needs a 5mm shim on the Y-axis in order to allow clearance for the blowers and assembly behind the print head. This is critical because when both the build plate is raised all the way up, and the Y-axis is all the way to the rear of the printer, there is no clearance between this blower and Z-axis bearings as the X-axis jogs past.
The Z-axis bearings are wider than the Z-axis rods, so once the Z-axis bearings are lower than the blower assembly, there are no more clearance issues. You can do without the shim if you modify your start script and build plan accordingly, but I personally strongly recommend the shim.
Ok now that that's over with:
This accomplishes 3 things I really wanted.
First, both print heads have cooling so I do not have to keep switching spools based on cooling needs.
Second, each print head has its own blower. I found that simply using the stock blower to cool both heads at once was giving me sub-par cooling and warping issues.
Third, REAR MOUNTED. To me, this is way better than blocking the view of the print via a front mounted assembly.
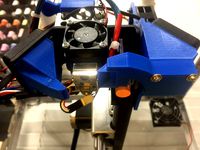
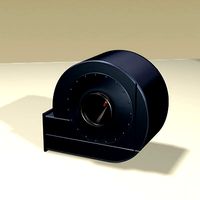
Bonus stuff - I opted to use blowers rather than fans because these printers simply do not have the space to smoothly transition from the large diameter of a fan down to the small diameter cooling ducts. All the cooling assemblies I see that use fans sharply transition to a small set of ducts directly in front of the fan, reducing the capability of the fans. Blowers, due to their design, higher static pressure, smaller exit, are better suited to this application of forcing air into these smaller cooling assemblies. That's my take on the situation and I do not have test data to back this up - so take it with a grain of salt.
I purchased blowers here :http://www.ebay.com/itm/262351228368?_trksid=p2057872.m2749.l2649&ssPageName=STRK%3AMEBIDX%3AIT
They are the same manufacturer and dimensions as the stock QIDI blower. They have slightly higher current draw and probably higher CFM.
Also, googling this will put you in the right direction: 24v 5015s blower
The main criteria are
50x50x15mm - some are wider than 15mm so be careful
24v
I chose .14 amp blowers while the stock was .11 or .12 from memory.
Blowers are simply wired in parallel; plugged into the original QIDI harness.
Another note - the two blowers are isolated from each other, so i suppose you could use this with only one blower while waiting for another in the mail, or if you simply want a rear mounted blower.
Mounting: tabs interface with the top of the X-axis carriage, but allow translation left & right (along the X-axis). I left it this way as this is my beta product if you will, and in case there were clearance issues. There aren't, and I simply affixed a small piece of double stick foam tape to the same surface as the tabs. This snugs everything up nicely and I didn't even remove the backing to expose the adhesive to the print head carriage.
The Z-axis bearings are wider than the Z-axis rods, so once the Z-axis bearings are lower than the blower assembly, there are no more clearance issues. You can do without the shim if you modify your start script and build plan accordingly, but I personally strongly recommend the shim.
Ok now that that's over with:
This accomplishes 3 things I really wanted.
First, both print heads have cooling so I do not have to keep switching spools based on cooling needs.
Second, each print head has its own blower. I found that simply using the stock blower to cool both heads at once was giving me sub-par cooling and warping issues.
Third, REAR MOUNTED. To me, this is way better than blocking the view of the print via a front mounted assembly.
Bonus stuff - I opted to use blowers rather than fans because these printers simply do not have the space to smoothly transition from the large diameter of a fan down to the small diameter cooling ducts. All the cooling assemblies I see that use fans sharply transition to a small set of ducts directly in front of the fan, reducing the capability of the fans. Blowers, due to their design, higher static pressure, smaller exit, are better suited to this application of forcing air into these smaller cooling assemblies. That's my take on the situation and I do not have test data to back this up - so take it with a grain of salt.
I purchased blowers here :http://www.ebay.com/itm/262351228368?_trksid=p2057872.m2749.l2649&ssPageName=STRK%3AMEBIDX%3AIT
They are the same manufacturer and dimensions as the stock QIDI blower. They have slightly higher current draw and probably higher CFM.
Also, googling this will put you in the right direction: 24v 5015s blower
The main criteria are
50x50x15mm - some are wider than 15mm so be careful
24v
I chose .14 amp blowers while the stock was .11 or .12 from memory.
Blowers are simply wired in parallel; plugged into the original QIDI harness.
Another note - the two blowers are isolated from each other, so i suppose you could use this with only one blower while waiting for another in the mail, or if you simply want a rear mounted blower.
Mounting: tabs interface with the top of the X-axis carriage, but allow translation left & right (along the X-axis). I left it this way as this is my beta product if you will, and in case there were clearance issues. There aren't, and I simply affixed a small piece of double stick foam tape to the same surface as the tabs. This snugs everything up nicely and I didn't even remove the backing to expose the adhesive to the print head carriage.
Similar models
thingiverse
free

Z Axis Motor Mount for Voxelab Aquila by MDHR
...coming version but they will fit with some persuasion. it looks melted to fix clearance issues. plus i think it looks kinda cool.
thingiverse
free
40mm cooling fan adaptor for Satsana - replaces stock blower - uses stock fixings. by hairyfacedhooman
...g of parts as they print.
no supports are needed to print this if you orientate it with the completely flat side towards the bed.
thingiverse
free

MY3D Dual fan mod
...o this as it is set to 80% stock but thats a simple change..
also you will have to splice into the other fan to get power for it.
thingiverse
free

Rear Active Cooling Duct for FlashForge Creator Pro by itsbrian
...r.
i've attached the solidworks (2013) file in case you need to modify it. please excuse the sloppy modeling techniques. :)
thingiverse
free

Shorty Y-Endstop Bracket for D-Bot by alterob
...f this works with the stock part cooling fan, but i replaced that with a 50mm blower that slides below the rear 20x40 horizontal.
thingiverse
free
Printrbot Second Cooling Fan by matt448
...r that. i haven't tested it yet with an ubis. i designed this in two parts so the shroud could be adapted for other hot ends.
thingiverse
free

Monoprice MP10 E3DV6 Mount/Dual Fan by Plastic_Isotope
...d than its original position. so if do a prime line in the front, it will probably off the bed, but otherwise, it should be fine.
thingiverse
free
K8200 y-axis pulley upgrade by Jivemat
...fixed some of the clearance issues and also enlarged the mounting holes so that you can use the bolts that came in the k8200 kit.
thingiverse
free

Z-Axis 1/4" Z-shim for Qidi Tech with 10mm Z-Axis Smooth Rods by rcleav
... need a different thickness just change the objects z-thickness in your slicer.
resemblance to a batarang is purely coincidental.
thingiverse
free

50mm Wanhao Duplicator i3 v2.1 Rear fan - updated with blower adapters by rdsail
...and petg at .2 resolution with no issues.
i added 2 blower adapters for a 50mm x15mm. one is for single and the other is double.
Whited3
thingiverse
free

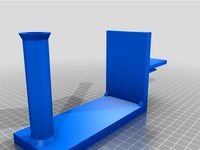
1/8 inch glass plate holder by whited3
.../8 inch glass plate holder by whited3
thingiverse
simple plate holder spaced @ 4mm, so it will fit up to 1/8" thick plates.
thingiverse
free

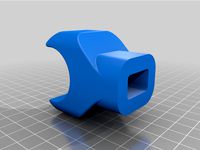
Another glass bed corner bracket by whited3
...s clip is it doesn't protrude above the build plate. this means the printhead will never accidentally collide with this clip.
thingiverse
free

Qidi magnetic door stop; 10mm magnet by whited3
... screws.
note: oh right - i made the through-holes for the handle for 3mm screws instead of 4mm, but they ream out to 4mm easily.
thingiverse
free

Improved open hinge for QIDI printer by whited3
...9;t accidentally separate.
note: the best orientation to print, for me, is as shown in the 3rd photo of the orange models.
enjoy!
thingiverse
free

QIDI Tech 1 Glass Bed Corner Brackets by MrMinimizer
...brackets by mrminimizer thingiverse this is based off of whited3 - another glass bed corner bracket at: https://www.thingiverse.com/thing:1697880 i...
Qidi
thingiverse
free

Qidi XMAX Spool Clamp
...qidi xmax spool clamp
thingiverse
a simple spool clamp for qidi tech xmax or xplus spool holder(30mm diameter).
thingiverse
free
QIDI Upper spool holder by Shibatam
...qidi upper spool holder by shibatam
thingiverse
upper spool holder for qidi.
use this when the back space is narrow.
thingiverse
free

Qidi Z axis brace by mjgrundmann
...qidi z axis brace by mjgrundmann
thingiverse
used to stiffen up the z axis guide rods on a qidi tech i.
thingiverse
free
DEROULEUR BOBINE QIDI by bil26
...i by bil26
thingiverse
bonjour,
c'est un montage pour imprimante qidi xmax .
montage avec 2 x roulements 6002.
cordialement,
thingiverse
free
QIDI Glass Bed Clips by ChrisX35
...idi glass bed clips by chrisx35
thingiverse
qidi glass bed upgrade.
new clips are here https://www.thingiverse.com/thing:2480107
thingiverse
free

Bed level QIDI - Microsoft LifeCam by lemacs
...bed level qidi - microsoft lifecam by lemacs
thingiverse
bed level camera mount for qidi - microsoft lifecam
thingiverse
free

Qidi X-One cooler duct by rpagyc
...qidi x-one cooler duct by rpagyc
thingiverse
extruder cooling duct for the qidi tech x-one
thingiverse
free

Qidi Tech PTFE adapter by sewallman
...h ptfe adapter by sewallman
thingiverse
adapter for a 6mm ptfe tube to fit ontop the qidi tech xmax/xplus/imates extruder cover.
thingiverse
free

QIDI Shadow filter plug by shifter
... by shifter
thingiverse
this is a cap/plug for the qidi tech shadow 5.5s. to cover the spot where the pointless air filter goes.
thingiverse
free

QIDI Door Latch by TobyC84
...i created for the qidi printer. it holds the door open while you print pla or while you remove a print from the print bed! enjoy!
Blower
3d_export
$5
ball blower
...ball blower
3dexport
ball blower
3d_export
$10

engine blower assambly
...engine blower assambly
3dexport
engine blower assambly
3d_export
$5
air pipe blower
...air pipe blower
3dexport
air pipe blower
3d_export
$5
air hand blower
...air hand blower
3dexport
air hand blower
3d_export
$5
Blower Boom 3D Model
...blower boom 3d model
3dexport
boom blower
blower boom 3d model bkl1989 63079 3dexport
turbosquid
$44
blower-dxf
... available on turbo squid, the world's leading provider of digital 3d models for visualization, films, television, and games.
turbosquid
$39

Old Blower
...l old blower for download as ma, max, gltf, fbx, obj, and stl on turbosquid: 3d models for games, architecture, videos. (1638848)
3d_export
$7
zy series centrifugal blower
...zy series centrifugal blower
3dexport
zy series centrifugal blower
3d_export
$5
root blower compressor
...oot blower compressor
3dexport
you will get both .stl and .sldprt format of root blower compressor from here at very cheap rate.
turbosquid
$5
V8 engine with blower
... available on turbo squid, the world's leading provider of digital 3d models for visualization, films, television, and games.
Active
3ddd
$1

Active
...active
3ddd
стул
офисный стул active
3ddd
$1

Умывальник ACTIVE
...смеситель activeihttp://www.idealstandard.ru/product-details/active-umyvalnik-64-sm-1-otverstie-pod-smesitel/t0547.html
3ddd
$1

CILEK SL ACTIVE
...cilek sl active
3ddd
cilek
cilek active (sl active white) sla-1304 кровать «selen»
3ddd
$1

Cilek SL ACTIVE
...k sl active
3ddd
cilek , стеллаж
cilek active (sl active white) 1501-sla стеллаж «hayal»
turbosquid
$30
Active Speakers
...odel active speakers for download as blend, dae, fbx, and obj on turbosquid: 3d models for games, architecture, videos. (1713003)
3ddd
$1

CILEK SL ACTIVE
...cilek sl active
3ddd
cilek
шкаф фирмы cilek из коллекции sl active white
3ddd
$1
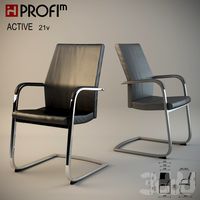
PROFIM active 21v
...dd
profim , стул
кресло "profim"
модель "active 21v"
материал: кожа
3ddd
$1

PROFIM active 11sl
..., кресло
офисное кресло "profim"
модель "active 11sl"
материал: кожа
turbosquid
$19

chilren activity table
...ree 3d model activity table for download as max, fbx, and obj on turbosquid: 3d models for games, architecture, videos. (1643610)
turbosquid
$19
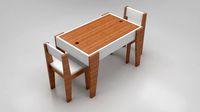
activity table and chairs
...l activity table and chairs for download as max, fbx, and obj on turbosquid: 3d models for games, architecture, videos. (1641128)
Dual
turbosquid
free

Dual Pistols
...ls
turbosquid
free 3d model dual pistols for download as fbx on turbosquid: 3d models for games, architecture, videos. (1320360)
turbosquid
$2

Dual Axe
...urbosquid
royalty free 3d model dual axe for download as fbx on turbosquid: 3d models for games, architecture, videos. (1332372)
turbosquid
$10

Dual Lesaths
... available on turbo squid, the world's leading provider of digital 3d models for visualization, films, television, and games.
3ddd
$1

плитка Dual Bianco (Испания)
...й плитки venis dual (испания). технические качества: устойчивость к стирания, отличная геометрия, отсутствие проблем при укладке.
turbosquid
$35

Dual Mesh Fonts
...ree 3d model dual mesh fonts for download as ma, obj, and fbx on turbosquid: 3d models for games, architecture, videos. (1352989)
turbosquid
$29

Dual Flask with Bungs
...del dual flask with bungs for download as obj, fbx, and blend on turbosquid: 3d models for games, architecture, videos. (1210512)
turbosquid
$19

Dual Socket Plug
...3d model dual socket plug for download as obj, fbx, and blend on turbosquid: 3d models for games, architecture, videos. (1303912)
turbosquid
$13

Dual Adjustable Pulley
... available on turbo squid, the world's leading provider of digital 3d models for visualization, films, television, and games.
turbosquid
$10

Amoi N809 Dual
... available on turbo squid, the world's leading provider of digital 3d models for visualization, films, television, and games.
turbosquid
$5

Dual Turret Tank
... available on turbo squid, the world's leading provider of digital 3d models for visualization, films, television, and games.
Rear
3d_export
$48
engine case rear
...re efficient as it eliminates the need for the propeller shaft while the differential merges with the transmission to save space.
turbosquid
$39
rear rim
... available on turbo squid, the world's leading provider of digital 3d models for visualization, films, television, and games.
3d_export
$5
Rear Suspension 3D Model
... suspension 3d model
3dexport
rear suspension spring sport car disc brake chasis
rear suspension 3d model bayazoff 30675 3dexport
turbosquid
$39
tractor rim rear
... available on turbo squid, the world's leading provider of digital 3d models for visualization, films, television, and games.
turbosquid
$39

rear trailer rim
... available on turbo squid, the world's leading provider of digital 3d models for visualization, films, television, and games.
turbosquid
$39

rear rim smart
... available on turbo squid, the world's leading provider of digital 3d models for visualization, films, television, and games.
turbosquid
$39

rear motorcycle rim
... available on turbo squid, the world's leading provider of digital 3d models for visualization, films, television, and games.
turbosquid
$12

Bike rear hub
... available on turbo squid, the world's leading provider of digital 3d models for visualization, films, television, and games.
turbosquid
free

Rear view mirror
... available on turbo squid, the world's leading provider of digital 3d models for visualization, films, television, and games.
3d_export
$5
Volvo XC90 Rear Wiper Mechanism
...volvo xc90 rear wiper mechanism
3dexport
gear gear for volvo xc90 rear wiper
Cooling
3d_export
$5

cool penguin
...cool penguin
3dexport
cool penguin
turbosquid
$1
cooling
... available on turbo squid, the world's leading provider of digital 3d models for visualization, films, television, and games.
3d_export
$26
cooling tower
...ers.<br>model with full detail in real size. all nodes and bolted connections are built. it was designed for nuclear power.
3ddd
$1
Mantra Cool
...14 версиях и obj-файл, а также материал для включенного и для выключенного светильника. turbosmooth/meshsmooth при необходимости.
3d_export
$5
cool electric guitar
...cool electric guitar
3dexport
cool electric guitar
turbosquid
$5

Cooling glass
...quid
royalty free 3d model cooling glass for download as obj on turbosquid: 3d models for games, architecture, videos. (1193829)
turbosquid
$30
CPU Cooling
...royalty free 3d model cpu cooling for download as max and fbx on turbosquid: 3d models for games, architecture, videos. (1386263)
turbosquid
$5

Cool CLoud
...
royalty free 3d model cool cloud for download as ma and obj on turbosquid: 3d models for games, architecture, videos. (1572300)
3d_export
$5
table cooling fan
...table cooling fan
3dexport
table cooling fan made of black plastic. individual small size cooling fan for office desk.
turbosquid
$29

cooling tower
... model cooling tower for download as obj, fbx, blend, and dae on turbosquid: 3d models for games, architecture, videos. (1396294)
Mounted
3d_export
free

mounting bracket
...mounting plate is the portion of a hinge that attaches to the wood. mounting plates can be used indoors, cabinetry and furniture.
turbosquid
$2

MOUNTING
... available on turbo squid, the world's leading provider of digital 3d models for visualization, films, television, and games.
turbosquid
free

Mounts
... available on turbo squid, the world's leading provider of digital 3d models for visualization, films, television, and games.
turbosquid
free

Mount Fuji
...fuji
turbosquid
free 3d model mount fuji for download as obj on turbosquid: 3d models for games, architecture, videos. (1579977)
3d_export
$5

Headphone mount LR
...headphone mount lr
3dexport
headphone mount l+r
turbosquid
$39

Mount rainier
...quid
royalty free 3d model mount rainier for download as fbx on turbosquid: 3d models for games, architecture, videos. (1492586)
turbosquid
$5

pipe mounting
...quid
royalty free 3d model pipe mounting for download as obj on turbosquid: 3d models for games, architecture, videos. (1293744)
turbosquid
$3

Mounting Tires
...uid
royalty free 3d model mounting tires for download as fbx on turbosquid: 3d models for games, architecture, videos. (1708511)
3d_export
$5

Magnetic GoPro Mount
...pro mount
3dexport
cool magnetic mount for gopro. allows you to mount the camera on flat metal surfaces and get exclusive shots.
turbosquid
$5

Stone Mount
...ty free 3d model stone mount for download as ma, obj, and fbx on turbosquid: 3d models for games, architecture, videos. (1370306)
design_connected
$27

...print
designconnected
moroso print computer generated 3d model. designed by wanders, marcel.
3ddd
free

Eichholtz Prints
...- eichholtz print central station i
13 - eichholtz print central station ii
14 - eichholtz print marisa
15 - eichholtz print tish
3ddd
$1

Eichholtz Prints
...print abstract - set of 2
10 - eichholtz print orange abstract
11 - eichholtz print buddha right
12 - eichholtz print buddha left
turbosquid
$1

... available on turbo squid, the world's leading provider of digital 3d models for visualization, films, television, and games.
3ddd
free

Eichholtz Prints
...of 4
2 - print dunbar 2 set of 4
3 - print guadeloupe 1 set of 4
4 - print guadeloupe 2 set of 4
5 - print giles
6 - print trett
3ddd
$1

Eichholtz Prints
...nt tutti frutti
3 - eichholtz prints watson - set of 2
4 - eichholtz prints antique nautilus - set of 2
5 - eichholtz print tiara
3d_export
$5

Monster for printing
...monster for printing
3dexport
monster 3d model printing
3ddd
free

printed rug
...printed rug
3ddd
ковер
very creative printed rug
3ddd
free

Eichholtz Prints
...иал: бумага
габариты (вхш): 72 x 62 см
описание: print sweetmeat - постер в деревянной раме.
3 - prints varsity set of 2
арти
3ddd
free

Art Print Posters
...art print posters
3ddd
прованс
art print posters by patrician prints