Thingiverse
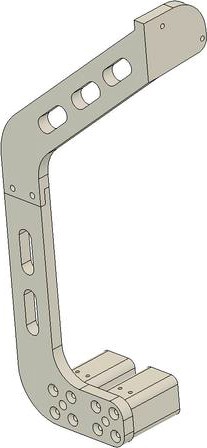
PRUSA MK3 Frame Brace by Skiid
by Thingiverse
Last crawled date: 3 years ago
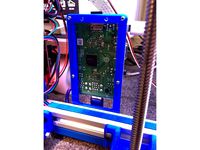
EDIT 2/26/2019 : Added a Raspberry Pi mount remixed from https://www.thingiverse.com/thing:2334119 by hackaholic to the top mount.
EDIT 8/30/2018 : I finally got around to adding this to my newer machine and found the upper mounting holes have been moved. They are 5.5mm higher on my newer machine so I am adding a second, longer bottom. Measure down to the outermost tapped hole from the frame top. If it is approximately 74mm, use the long lower mount.
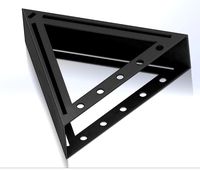
MK3 Frame brace for the Einsey side. Connect the 3030 rear extrusion to existing M3 Threaded holes in the upper frame.(If you have not used them for another purpose)
Print 2 each of the Spacer and nuts. Not required but this is designed to 3d print with plastic so 2 will make it much stronger. I modified the Extrusion nuts from https://www.thingiverse.com/thing:2805753 by JLTX and made them turn 90 degrees clockwise and stop.
You will need:
(2) M3 x 20mm Screws (For the center of the spacers. Any head style except counter
sinks as long as they fit in the clearance holes.)
(4) M3 x 10mm Screws (Same as comes with the kit or similar. These attach the top and
bottom brace parts together and the top to the frame. Do not use
a screw that will protrude to the front side of the frame.)
(4) M3 Nuts (I prefer lock nuts. 2 go in the extrusion nuts and 2 for connecting
the top and bottom together.)
(4-8) Flat head Screws (Attaching the brace to the spacers. I find drywall or wood crews
hold very well in the plastic.There are 4 holes for each spacer but
not necessary.
I also used super glue for the joint when connecting the top and bottom braces together. The only reason the joint is there was to be able fit the MK3 print bed.
If you use two spacers, you can fix one to the brace and only have to attach the second after aligning the brace at the top. Set the spacer in place on the extrusion so there is no gap at the top mount to the frame! You do not want to pull this joint together with the screws and twist the frame.
I may edit to be able to add a metal plate to the brace in the future for those with the ability if popular enough.
EDIT 8/30/2018 : I finally got around to adding this to my newer machine and found the upper mounting holes have been moved. They are 5.5mm higher on my newer machine so I am adding a second, longer bottom. Measure down to the outermost tapped hole from the frame top. If it is approximately 74mm, use the long lower mount.
MK3 Frame brace for the Einsey side. Connect the 3030 rear extrusion to existing M3 Threaded holes in the upper frame.(If you have not used them for another purpose)
Print 2 each of the Spacer and nuts. Not required but this is designed to 3d print with plastic so 2 will make it much stronger. I modified the Extrusion nuts from https://www.thingiverse.com/thing:2805753 by JLTX and made them turn 90 degrees clockwise and stop.
You will need:
(2) M3 x 20mm Screws (For the center of the spacers. Any head style except counter
sinks as long as they fit in the clearance holes.)
(4) M3 x 10mm Screws (Same as comes with the kit or similar. These attach the top and
bottom brace parts together and the top to the frame. Do not use
a screw that will protrude to the front side of the frame.)
(4) M3 Nuts (I prefer lock nuts. 2 go in the extrusion nuts and 2 for connecting
the top and bottom together.)
(4-8) Flat head Screws (Attaching the brace to the spacers. I find drywall or wood crews
hold very well in the plastic.There are 4 holes for each spacer but
not necessary.
I also used super glue for the joint when connecting the top and bottom braces together. The only reason the joint is there was to be able fit the MK3 print bed.
If you use two spacers, you can fix one to the brace and only have to attach the second after aligning the brace at the top. Set the spacer in place on the extrusion so there is no gap at the top mount to the frame! You do not want to pull this joint together with the screws and twist the frame.
I may edit to be able to add a metal plate to the brace in the future for those with the ability if popular enough.
Similar models
thingiverse
free

Universal Frame Mount for MK3s by agenkin
...ersion (for clamping to the top of the frame), or a 50 mm m3 screw for the long version (for clamping to the sides of the frame).
thingiverse
free
Raspberry Pi 3 Mount for 2020 Extrusion by minko
...ead of m2. i tapped the holes in the mount for m3 (so don't need nuts) and drilled the mounting holes in raspberry pi to 3mm.
thingiverse
free

6DOF Robot arm by ThatNewMaker_101
...on the bracket and then screw in the servo with m4 screws and nuts.
attach the gripper to the last servo with m3 screws and nuts.
thingiverse
free

MK3S Frame Mounted Raspberry PI 4
...k3 frame
designed for use with:
2 m3 12mm socket head screw
2 m3 16mm socket head screw
2 m3 heatset insert (i used m3xd5.0xl4.0)
thingiverse
free

20° joint ball by obuibo11
...d m3 nut.
you can attach it with up to 4 m3 screw below and 4 m3 screw above for that you can put m3 nuts in the hexagonal holes.
thingiverse
free

MKS GEN Motherboard mount bracket for 2020 v-slot extrusion alu profile by nekobasu
... -- 2 m4x10 screws.
attension for solidworks users: sldprt files were created using onshape export procedure, so no guarantees.
thingiverse
free
20mm Extrusion uses ONLY M3 hardware, screws and nuts by xdmlaser
...n upload one, you would have to print it vertical, my goal was to print horizontal since i enlarged my printer to about 10inches.
thingiverse
free

Simple Raspi Mount for 4040 extrusions on 3D printer by Dres
...nd 10% infill. printed in petg but any other filament will work as well.
if you have any suggestions or ideas, just let me know!
thingiverse
free

Adafruit 16 NeoPixel Ring Mount by oshoham
...ount to the underside of a 1/8" enclosure panel.
i used this grabcad model of the 16 neopixel ring to help design the mount.
thingiverse
free

Ё Bot BMG Aero mount by drshats
...for melt in m3 nuts to attach bltouch or similar standart sized bltouch needs to be cut in order...
Skiid
thingiverse
free

Ford Galaxie Emblem by Skiid
...ford galaxie emblem by skiid
thingiverse
thingiverse
free

Water pitcher 8oz. by Skiid
...veryday measuring cup.
this will hold 8oz. to the horizontal line in the model which is the same as the fill line in our machine.
thingiverse
free

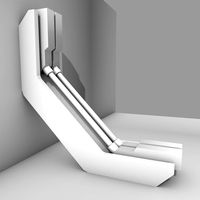
LED Strip Channel 90 by Skiid
...hatever reason, at this time they do not make one for turning outside corners.
added a 120° for a roof gable top corner i needed.
thingiverse
free
Petzi Funnel by Skiid
...s all over. i use purina naturals cat food which is small and it never clogs. i'm sure larger kibbles would not always work.
thingiverse
free
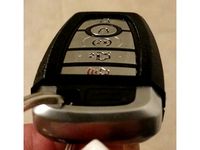
Ford Keyless Remote Protector by Skiid
...elieve this will also fit the version without remote start but i do not have one to test. please let me know if anyone confirms.
thingiverse
free

Vent cap for plastic gas can by Skiid
...olding up nice with pla. found it best to print these in a bright color so you can find them if dropped....or just print another.
thingiverse
free

Threaded Vent Cap for Gas Can by Skiid
...its does not get much sun.
update 6/13/2018: same original print in pla still working, no cracking or warping from the gasoline.
thingiverse
free

Token/Coin Dispenser and Storage Container by Skiid
...dify the spring slots in the cap and spacer to fit another spring but beware it needs to stay near the spring rate/load capacity.
thingiverse
free

Restaurant Table Shim Leveler
...restaurant table shim leveler thingiverse i loved skiid#39;s design for a restaurant table leveler, but wanted something...
Mk3
turbosquid
$50

cention mk3
...ty free 3d model cention mk3 for download as ma, obj, and fbx on turbosquid: 3d models for games, architecture, videos. (1454148)
turbosquid
$129

MK3 Tank
... available on turbo squid, the world's leading provider of digital 3d models for visualization, films, television, and games.
turbosquid
$100

Toyota Supra MK3
... available on turbo squid, the world's leading provider of digital 3d models for visualization, films, television, and games.
turbosquid
$44

cention mk3 low poly
...d model cention mk3 low poly for download as ma, obj, and fbx on turbosquid: 3d models for games, architecture, videos. (1454666)
turbosquid
$30

Challenger I Mk3 Falcon
... available on turbo squid, the world's leading provider of digital 3d models for visualization, films, television, and games.
turbosquid
$10

American Frag hand grenade MK3
...free 3d model american frag hand grenade mk3 for download as on turbosquid: 3d models for games, architecture, videos. (1393624)
turbosquid
$20

Mk3 US Navy Combat Knife
...ty free 3d model mk3 us navy combat knife for download as fbx on turbosquid: 3d models for games, architecture, videos. (1172791)
3d_export
$29

Ford Fiesta MK3 Modified 3D Model
...7 tumerfx mtumer mehmet t?mer 1993 1995 1996 wrc special modifed modifiye
ford fiesta mk3 modified 3d model mtumer 30698 3dexport
3d_export
$99

Toyota Supra Mk3 19861993 3D Model
...ort fast coupe japan 1986 1987 1988 1989 1990 1991 1992 1993 tuning turbo
toyota supra mk3 19861993 3d model squir 62530 3dexport
turbosquid
$5

Timothy Oulton Mars Chair MK3
...on mars chair mk3 for download as 3ds, max, obj, fbx, and dae on turbosquid: 3d models for games, architecture, videos. (1209782)
Brace
archive3d
free
Bracing 3D Model
...
holder bracing strengthening
bracing 4 - 3d model (*.gsm+*.3ds) for interior 3d visualization.
archive3d
free
Bracing 3D Model
...
bracing strengthening holder
bracing 2 - 3d model (*.gsm+*.3ds) for interior 3d visualization.
turbosquid
$5

brace PARIS
...osquid
royalty free 3d model brace paris for download as max on turbosquid: 3d models for games, architecture, videos. (1284415)
archive3d
free
Bracing 3D Model
...older fastening strengthening
bracing 1 - 3d model (*.gsm+*.3ds) for interior 3d visualization.
archive3d
free
Bracing 3D Model
...older fastening strengthening
bracing 3 - 3d model (*.gsm+*.3ds) for interior 3d visualization.
turbosquid
$20
Corner Brace Bracket
...oyalty free 3d model corner brace bracket for download as stl on turbosquid: 3d models for games, architecture, videos. (1322777)
turbosquid
$10

Craftsman Handtools - Brace
... available on turbo squid, the world's leading provider of digital 3d models for visualization, films, television, and games.
turbosquid
$2
Degree Brace 4
...el degree brace 4 for download as 3ds, max, obj, c4d, and fbx on turbosquid: 3d models for games, architecture, videos. (1205705)
turbosquid
$1
Degree Brace 3
...el degree brace 3 for download as 3ds, max, obj, c4d, and fbx on turbosquid: 3d models for games, architecture, videos. (1205719)
turbosquid
$1
Degree Brace 2
...el degree brace 2 for download as 3ds, max, obj, c4d, and fbx on turbosquid: 3d models for games, architecture, videos. (1205714)
Prusa
turbosquid
$2

Frame Filament Guide Clip-On for Prusa Mk3
...rame filament guide clip-on for prusa mk3 for download as stl on turbosquid: 3d models for games, architecture, videos. (1634730)
3d_export
free

prusa i3 mk3s laser mount for opt lasers
...to learn more about the blue laser technology that conceived the cutting and engraving laser heads from opt lasers, please visit:
turbosquid
free

Prusa small printer adapter holder
...er for download as ipt, skp, dwg, dxf, fbx, ige, obj, and stl on turbosquid: 3d models for games, architecture, videos. (1642936)
3d_export
$30

geisha by jonathan adler
...** i did a 3d printing test in the prusa software, you can find it among the attached images.<br>exchange:<br>.blend...
thingiverse
free

Prusa without Prusa (rc2) by madless
...prusa without prusa (rc2) by madless
thingiverse
just the main part of prusa rc2 faceshield, without writing.
enjoy :)
thingiverse
free

Prusa by acejbc
...prusa by acejbc
thingiverse
prusa knob info
m3 8mm screw
thingiverse
free

Prusa house
...prusa house
thingiverse
how prusa house could look like...
thingiverse
free

Prusa Mk2 "Fake Prusa" LCD cover by anraf1001
...r by anraf1001
thingiverse
version of prusa's lcd cover with "fake prusa" instead of "original prusa"
thingiverse
free

Prusa stabilizator by gutiueugen
...prusa stabilizator by gutiueugen
thingiverse
prusa stabilizator
thingiverse
free

Keychain Prusa by rbarbalho
...keychain prusa by rbarbalho
thingiverse
keychain with text prusa.
Frame
archibase_planet
free

Frame
...frame
archibase planet
frame photo frame
frame n190813 - 3d model (*.gsm+*.3ds) for interior 3d visualization.
archibase_planet
free

Frame
...frame
archibase planet
frame photo frame
frame n071113 - 3d model (*.gsm+*.3ds) for interior 3d visualization.
3ddd
$1

Frame
...frame
3ddd
frame
3ddd
free

Frame
...frame
3ddd
frame
archibase_planet
free

Frame
...frame
archibase planet
frame mirror frame ornament
frame n260113 - 3d model (*.gsm+*.3ds) for interior 3d visualization.
archibase_planet
free

Frame
...frame
archibase planet
frame photo frame
frame photo n190813 - 3d model (*.gsm+*.3ds) for interior 3d visualization.
archibase_planet
free

Frame
...frame
archibase planet
frame window window frame
frame 1 - 3d model (*.gsm+*.3ds) for interior 3d visualization.
archibase_planet
free

Frame
...frame
archibase planet
frame window frame window
frame 3 - 3d model (*.gsm+*.3ds) for interior 3d visualization.
archibase_planet
free

Frame
...frame
archibase planet
frame wall frame decoration
frame 1 - 3d model (*.gsm+*.3ds) for interior 3d visualization.
archibase_planet
free

Frame
...frame
archibase planet
frame window window frame
frame 2 - 3d model (*.gsm+*.3ds) for interior 3d visualization.