Thingiverse
Prusa mk3 easy linear rail mod
by Thingiverse
Last crawled date: 4 years, 3 months ago
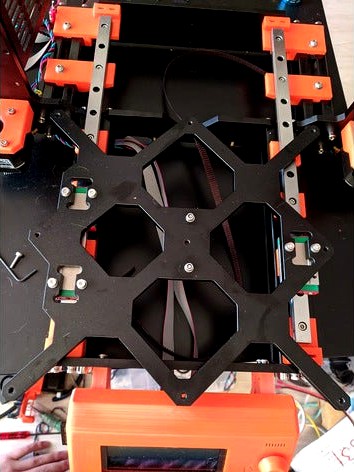
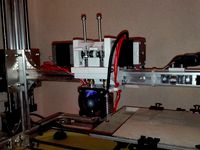
Linear rail mod for Prusa mk3
This mod use 300mm MGN12 linear rails.
No need to cut the rail.
The parts are design to match the original build height and movement spaces, so NO build volume lost and NO needed to modify the firmware. It will pass all the self-tedt calibration.
Easy to setup, the springs will keep the bed secure while leave the blocks some space to align itself.
You will need to modify the PSU holder if you have the old sliver-PSU
-> Demo video https://www.youtube.com/watch?v=MpT0MBIkZBg
Why
The Chinese liner rail is cheap and it much stable and quieter than the smooth rod - bushing combo.
The linear rail look neat.
Parts list
Bolts and washers
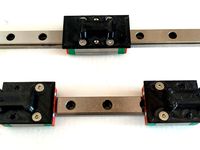
2x 300mm MGN12 rail
2x MGN12C block
1x MGN12H block(MGN12C will mork too)
14x M3x12 bolt
4x M3x15 countershunk bolt
6x M3 washer
14x M3 spring washer
4x 4x10mm spring (or can be cut from ball point pen sping)
4x M3 nut
4x M4 nut
4x M4 washer
4x spring washer
4x M4 T-nut
8x M3 T-nut
spring washer are optional
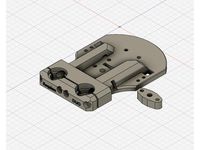
Printable part
2x head mount
6x node mount
2x node-bridge mount (need to be mirrored in slicer)
2x tail mount (need to be mirrored in slicer)(support needed)
Print with high resolution setting.(Printed mine with 0.12 layer height - Ender 3)
Installation
Install 2x MGN12C on the left side, 1x MGN12H on the right side
Use M3x12 bolt,washer,spring washer to secure the Y carrier to the MGN12H block. Make sure it nice and tight.
Use M1x15 countershunk bolt, 4x10 springx m3 washer to secure the Y carrier to the MGN12C block. DO NOT tighten the bolts too much, leave it some space to align the block itself.
I'm too lazy to write the full tutorial, check the pictures for more details.
This mod use 300mm MGN12 linear rails.
No need to cut the rail.
The parts are design to match the original build height and movement spaces, so NO build volume lost and NO needed to modify the firmware. It will pass all the self-tedt calibration.
Easy to setup, the springs will keep the bed secure while leave the blocks some space to align itself.
You will need to modify the PSU holder if you have the old sliver-PSU
-> Demo video https://www.youtube.com/watch?v=MpT0MBIkZBg
Why
The Chinese liner rail is cheap and it much stable and quieter than the smooth rod - bushing combo.
The linear rail look neat.
Parts list
Bolts and washers
2x 300mm MGN12 rail
2x MGN12C block
1x MGN12H block(MGN12C will mork too)
14x M3x12 bolt
4x M3x15 countershunk bolt
6x M3 washer
14x M3 spring washer
4x 4x10mm spring (or can be cut from ball point pen sping)
4x M3 nut
4x M4 nut
4x M4 washer
4x spring washer
4x M4 T-nut
8x M3 T-nut
spring washer are optional
Printable part
2x head mount
6x node mount
2x node-bridge mount (need to be mirrored in slicer)
2x tail mount (need to be mirrored in slicer)(support needed)
Print with high resolution setting.(Printed mine with 0.12 layer height - Ender 3)
Installation
Install 2x MGN12C on the left side, 1x MGN12H on the right side
Use M3x12 bolt,washer,spring washer to secure the Y carrier to the MGN12H block. Make sure it nice and tight.
Use M1x15 countershunk bolt, 4x10 springx m3 washer to secure the Y carrier to the MGN12C block. DO NOT tighten the bolts too much, leave it some space to align the block itself.
I'm too lazy to write the full tutorial, check the pictures for more details.
Similar models
thingiverse
free
Carriage Block MGN12H Prusa Mk3 Bear by Zen3Dhu
...
thingiverse
mgn12h carriage block for full bear mk3 y-axis lineal rails mgn12
mgn12c carriage block: bear 2.1 linear rail addon
thingiverse
free

MGN12 Linear Guide + MGN12H Long linear carriage by Artu66
...//pl.aliexpress.com/item/free-shipping-for-12mm-linear-guide-mgn12-l-300mm-linear-rail-way-mgn12c-or-mgn12h-long/32540712851.html
cg_trader
$5

ANYCUBIC CHIRON Y AXIS LINEAR GUIDE | 3D
... rail mount:
mgn7c
mgn7h
mgn9c
mgn9h
mgn12c
mgn12h
mgn15c
mgn15h anycubic chiron axis linear gear hobby diy hobby diy electronics
thingiverse
free
Dual Extruder by Psycho1981
...ng:
4x allen screw m5
4x square nut m5
4x washer m5
electronic:
-ramps 1.4 board
-atx power supply
-firmware "marlin"
grabcad
free

MGN12 Rail 500mm
...00mm
grabcad
linear block meant to go with the rail : https://grabcad.com/library/mgn12c-2, https://grabcad.com/library/mgn12h-8
thingiverse
free

Y Rail Holder MGN12 350mm by Zen3Dhu
...remix from: bear 2.1 linear rail addon for 350mm mgn12 linear guide
full bear mk3 y-axis lineal rails mgn12
mgn12h carriage block
thingiverse
free
Requiem E3D Single/Duo Modular Remix BLTouch + MGN12C by Ron888
... m3 x 8mm
4x m3 x 20mm
nuts
2x m4
4x m3
todo:
plan to include mgn12h and stock wheels options
chimera and stock hotends
thingiverse
free

Ball Bearing Mount Linear Rail Mod Micromake C1 by 0qwertz0
...eeded:
2x m3 screw
2x m3 nut
2x m3 or m4 screw with t-nut or square nut to fix it to the frame
10x ball bearings mr63-zz 362,5 mm
thingiverse
free

Mgn12 4040 guide by peanutwarrior
... just bolt 3 spaced out underneath a linear rail with m3 nuts and bolts, then push into the slot of the extrusion for a push fit.
thingiverse
free

MGN12H Linear Rail Endstop
...for the mgn12 linear rail after converting my cr-10 y-axis to rails. secured the frame extrusion with an m3 screw and hammer nut.
Mk3
turbosquid
$50

cention mk3
...ty free 3d model cention mk3 for download as ma, obj, and fbx on turbosquid: 3d models for games, architecture, videos. (1454148)
turbosquid
$129

MK3 Tank
... available on turbo squid, the world's leading provider of digital 3d models for visualization, films, television, and games.
turbosquid
$100

Toyota Supra MK3
... available on turbo squid, the world's leading provider of digital 3d models for visualization, films, television, and games.
turbosquid
$44

cention mk3 low poly
...d model cention mk3 low poly for download as ma, obj, and fbx on turbosquid: 3d models for games, architecture, videos. (1454666)
turbosquid
$30

Challenger I Mk3 Falcon
... available on turbo squid, the world's leading provider of digital 3d models for visualization, films, television, and games.
turbosquid
$10

American Frag hand grenade MK3
...free 3d model american frag hand grenade mk3 for download as on turbosquid: 3d models for games, architecture, videos. (1393624)
turbosquid
$20

Mk3 US Navy Combat Knife
...ty free 3d model mk3 us navy combat knife for download as fbx on turbosquid: 3d models for games, architecture, videos. (1172791)
3d_export
$29

Ford Fiesta MK3 Modified 3D Model
...7 tumerfx mtumer mehmet t?mer 1993 1995 1996 wrc special modifed modifiye
ford fiesta mk3 modified 3d model mtumer 30698 3dexport
3d_export
$99

Toyota Supra Mk3 19861993 3D Model
...ort fast coupe japan 1986 1987 1988 1989 1990 1991 1992 1993 tuning turbo
toyota supra mk3 19861993 3d model squir 62530 3dexport
turbosquid
$5

Timothy Oulton Mars Chair MK3
...on mars chair mk3 for download as 3ds, max, obj, fbx, and dae on turbosquid: 3d models for games, architecture, videos. (1209782)
Linear
3ddd
$1
Linear Diffusers
...linear diffusers
3ddd
диффузор
set of linear diffusers for ceiling.
design_connected
$27

Linear Sofa
...linear sofa
designconnected
scp linear sofa computer generated 3d model.
design_connected
$18

Atlantis linear
...atlantis linear
designconnected
terzani atlantis linear pendant lights computer generated 3d model. designed by barlas baylar.
3d_export
$5
light linear unit
...light linear unit
3dexport
light linear unit
turbosquid
$5

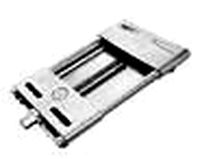
Linear Actuator
...
royalty free 3d model linear actuator for download as blend on turbosquid: 3d models for games, architecture, videos. (1589061)
turbosquid
$29
Linear panel
...oyalty free 3d model linear panel for download as max and obj on turbosquid: 3d models for games, architecture, videos. (1391254)
turbosquid
$12
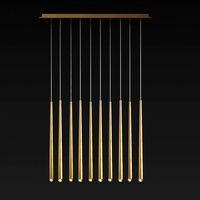
Linear Chandelier
...y free 3d model linear chandelier for download as max and obj on turbosquid: 3d models for games, architecture, videos. (1574289)
turbosquid
$10

Grohe Lineare
... available on turbo squid, the world's leading provider of digital 3d models for visualization, films, television, and games.
turbosquid
$10

Linear Axis
... available on turbo squid, the world's leading provider of digital 3d models for visualization, films, television, and games.
3d_export
$5

Linear Unit 3D Model
...linear unit 3d model
3dexport
linear unit force torque velocity
linear unit 3d model fau 71218 3dexport
Prusa
turbosquid
$2

Frame Filament Guide Clip-On for Prusa Mk3
...rame filament guide clip-on for prusa mk3 for download as stl on turbosquid: 3d models for games, architecture, videos. (1634730)
3d_export
free

prusa i3 mk3s laser mount for opt lasers
...to learn more about the blue laser technology that conceived the cutting and engraving laser heads from opt lasers, please visit:
turbosquid
free

Prusa small printer adapter holder
...er for download as ipt, skp, dwg, dxf, fbx, ige, obj, and stl on turbosquid: 3d models for games, architecture, videos. (1642936)
3d_export
$30

geisha by jonathan adler
...** i did a 3d printing test in the prusa software, you can find it among the attached images.<br>exchange:<br>.blend...
thingiverse
free

Prusa without Prusa (rc2) by madless
...prusa without prusa (rc2) by madless
thingiverse
just the main part of prusa rc2 faceshield, without writing.
enjoy :)
thingiverse
free

Prusa by acejbc
...prusa by acejbc
thingiverse
prusa knob info
m3 8mm screw
thingiverse
free

Prusa house
...prusa house
thingiverse
how prusa house could look like...
thingiverse
free

Prusa Mk2 "Fake Prusa" LCD cover by anraf1001
...r by anraf1001
thingiverse
version of prusa's lcd cover with "fake prusa" instead of "original prusa"
thingiverse
free

Prusa stabilizator by gutiueugen
...prusa stabilizator by gutiueugen
thingiverse
prusa stabilizator
thingiverse
free

Keychain Prusa by rbarbalho
...keychain prusa by rbarbalho
thingiverse
keychain with text prusa.
Mod
design_connected
$13

MOD. 4233 - MOD. 4234 Table Lamp
...mod. 4233 - mod. 4234 table lamp
designconnected
arcahorn mod. 4233 - mod. 4234 table lamp computer generated 3d model.
design_connected
$11

MOD.1095
...mod.1095
designconnected
mod.1095 computer generated 3d model. designed by sarfatti, gino.
3ddd
$1

fireplaces mod Spec
...fireplaces mod spec
3ddd
камин
fireplaces mod spec 180x90x125h
3ddd
free

Flos Mod. 2129
... mod
фабрика: flos
модель: mod. 2129
описание: подвесной светильник, металл, белый, черный.
сайт: www.flos.com
turbosquid
$34
Mod Lamp.c4d
... available on turbo squid, the world's leading provider of digital 3d models for visualization, films, television, and games.
turbosquid
$32

MOD A 001
... available on turbo squid, the world's leading provider of digital 3d models for visualization, films, television, and games.
turbosquid
$29

Maars Mod
... available on turbo squid, the world's leading provider of digital 3d models for visualization, films, television, and games.
turbosquid
$15

Mod 70..
... available on turbo squid, the world's leading provider of digital 3d models for visualization, films, television, and games.
turbosquid
$10

MOD Sofa
... available on turbo squid, the world's leading provider of digital 3d models for visualization, films, television, and games.
turbosquid
$1

Mod-Lite
... available on turbo squid, the world's leading provider of digital 3d models for visualization, films, television, and games.
Rail
3d_ocean
$5
rails
...rails
3docean
old rails rails sleepers
old rails
archibase_planet
free
Rail
...chibase planet
rail railing handrail guard-rail
rail forged fence n310814 - 3d model (*.gsm+*.3ds) for exterior 3d visualization.
archibase_planet
free

Rail
...rail
archibase planet
handrail railing guard-rail
rail n220914 - 3d model (*.gsm+*.3ds) for interior 3d visualization.
archibase_planet
free

Rail
...rail
archibase planet
railing hand-rail banisters
rail n130309 - 3d model (*.gsm+*.3ds) for interior 3d visualization.
archibase_planet
free
Rail
...rail
archibase planet
railing hand-rail banisters
rail n270510 - 3d model (*.gsm+*.3ds) for interior 3d visualization.
archibase_planet
free
Railing
...
archibase planet
railing handrail fence guard-rail
railing n140314 - 3d model (*.gsm+*.3ds+*.max) for exterior 3d visualization.
archibase_planet
free

Railing
...railing
archibase planet
railing
railing- 3d model (*.gsm+*.3ds) for interior 3d visualization.
archibase_planet
free
Railing
...railing
archibase planet
railing enclosure barrier
light railing - 3d model for interior 3d visualization.
archibase_planet
free
Rail
...rail
archibase planet
metal railing
rail n280608 - 3d model (*.gsm+*.3ds) for interior 3d visualization.
archibase_planet
free

Railing
...railing
archibase planet
railing kitchen ware
railing 1 - 3d model (*.gsm+*.3ds) for interior 3d visualization.
Easy
design_connected
$16

Easy
...easy
designconnected
sollos easy computer generated 3d model. designed by almeida, jader.
design_connected
$20

Easy
...easy
designconnected
established & sons easy armchairs computer generated 3d model. designed by ed carpenter.
3d_ocean
$1

Easy Button
... it is accurate in close-ups. you can drop this model right into any setting. the textures are included as well as links to do...
design_connected
$16

Easy Armchair
...easy armchair
designconnected
easy armchair computer generated 3d model. designed by jeanneret, pierre.
3ddd
$1

Pouf EASY
... easy
3ds max 2010.v-ray 2.40.03.file formats fbx,obj. pouf desiree 2014 easy. dimensions 100x100x45 cm.
design_connected
$18

Easy Armchair
...easy armchair
designconnected
fsm easy armchair computer generated 3d model. designed by hartmann, markus.
design_connected
$16

Easy Chair
...easy chair
designconnected
magis easy chair computer generated 3d model. designed by seymour, jerszy.
design_connected
$16

Easy Rider
...easy rider
designconnected
bulo easy rider computer generated 3d model. designed by venlet, danny.
design_connected
$11

Easy Footstool
...easy footstool
designconnected
fsm easy footstool computer generated 3d model. designed by hartmann, markus.
design_connected
$18

Doda - Easy
...doda - easy
designconnected
molteni & c doda - easy computer generated 3d model. designed by laviani, ferruccio.