Thingiverse

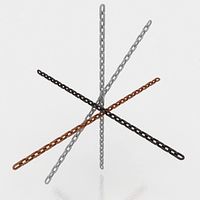
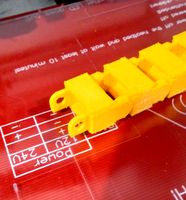
Prusa Mini Cable Chains (z-axis, headbed) by Autotilt
by Thingiverse
Last crawled date: 4 years, 1 month ago
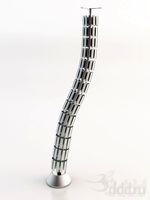
Cable Chain Setup for Prusa Mini z-axis and the heatbed.
This has some other prints remixed in it.
Prusa i3 MK3 Cable Chain Add-on (ALL AXIS)https://www.thingiverse.com/thing:2862375
X Stepper sleeve wire clamphttps://www.prusaprinters.org/prints/3436-x-stepper-sleeve-wire-clamp
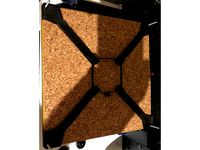
The default heatbed cover from Prusa
Print Instructions
Additional Parts:
3 - Small Zipties
3 - m3*10 Bolts
3 - m3 nuts
Print one each of parts 1-8
23 each - part 9 for the z axis
25 each - part 10 for the z axis
15 each - part 9 for the Heatbed
16 each - part 10 for the Heatbed
PLA or PETG work great.
0.20 Layer height.
15% infill.
No support needed.
All parts are pre-oriented for printing.
Z-AXIS:
Remove electronics covers on the MINI and reroute z-axis wires under the frame. Slight cutting away of the electronics case will probably be necessary for cleanest look.
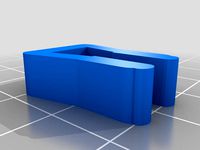
Place 2 nuts into part 1.
Ziptie part 1 to the z-axis motor.
Bolt part 3 to part 1 with the cable between them.
Place part 2 against part 1, route cable and ziptie part 2 and cable to part 1.
Place nut in t-nut, slide into bottom of z-axis frame, loosely bolt part 4 and route cable through.
Add z-axis Chain and clip parts starting from the motor side.
Tighten bolt on part 4.
HEATBED:
Replace bed cover with part 6.
Unplug heatbed wires and reroute through y-axis wire hole.
Add 15 chain and clip pieces starting from the headbed side.
Place part 8 Adapter on heatbed cables and snap into part 7 Mount with the adapter open end Up.
Some finagling may be necessary to get the cable length correct.
Attach part 7 mount to frame with the y-axis motor cables between the mount and the frame.
Reconnect heatbed and replace electronics cover.
This has some other prints remixed in it.
Prusa i3 MK3 Cable Chain Add-on (ALL AXIS)https://www.thingiverse.com/thing:2862375
X Stepper sleeve wire clamphttps://www.prusaprinters.org/prints/3436-x-stepper-sleeve-wire-clamp
The default heatbed cover from Prusa
Print Instructions
Additional Parts:
3 - Small Zipties
3 - m3*10 Bolts
3 - m3 nuts
Print one each of parts 1-8
23 each - part 9 for the z axis
25 each - part 10 for the z axis
15 each - part 9 for the Heatbed
16 each - part 10 for the Heatbed
PLA or PETG work great.
0.20 Layer height.
15% infill.
No support needed.
All parts are pre-oriented for printing.
Z-AXIS:
Remove electronics covers on the MINI and reroute z-axis wires under the frame. Slight cutting away of the electronics case will probably be necessary for cleanest look.
Place 2 nuts into part 1.
Ziptie part 1 to the z-axis motor.
Bolt part 3 to part 1 with the cable between them.
Place part 2 against part 1, route cable and ziptie part 2 and cable to part 1.
Place nut in t-nut, slide into bottom of z-axis frame, loosely bolt part 4 and route cable through.
Add z-axis Chain and clip parts starting from the motor side.
Tighten bolt on part 4.
HEATBED:
Replace bed cover with part 6.
Unplug heatbed wires and reroute through y-axis wire hole.
Add 15 chain and clip pieces starting from the headbed side.
Place part 8 Adapter on heatbed cables and snap into part 7 Mount with the adapter open end Up.
Some finagling may be necessary to get the cable length correct.
Attach part 7 mount to frame with the y-axis motor cables between the mount and the frame.
Reconnect heatbed and replace electronics cover.
Similar models
thingiverse
free

(remix 2021) Prusa Mini Cable Chains (x-axis, headbed) by vasilyd
...t 7 mount to frame with the y-axis motor cables between the mount and the frame.
reconnect heatbed and replace electronics cover.
thingiverse
free

Prusa Mini X Axis Cable Chain and Mounts by Djkirkendall
...he chain housing.
it has a slight uphill angle to account for wear and time. this can be printed in pla and at 15% infill
enjoy!
thingiverse
free

Prusa Mini Z axis dust cover by aussieinkguy
... on the z axis motor to prevent dust from entering the motor. designed with cutouts to allow the cables at back of motor to exit.
thingiverse
free

Electronics Case Cover Mod for Z Axis Cable Chain by GopherRancher
...ver for the electronics case to allow wires to pass through to my z axis cable chain. (https://www.thingiverse.com/thing:2600877)
thingiverse
free

FLSUN Prusa I3 Z Axis Cable Chain by jondevos
...ou will require longer screws to attach the top to the motor. where it attaches to the frame just requires a m4x10 screw and nut.
thingiverse
free

TronXY X3S Z-axis cable chain by spectrelabs
...tronxy x3s z-axis. best printed in abs or other similar material that is heat resistant. you will need to...
thingiverse
free

Cable chain heatbed Prusa i3 by iTopia
...e. added a new version voor the chain. it was missing the indent on one site (thanks jlipavsky79). and a new more solid end part.
thingiverse
free

Prusa Mini Raspberry PI Fisheye Camera X-Axis Mount by nad_22
...nice view on e.g.octoprint of the headbed.
i also added some basic cable clips to moutn the ffc cable to the x-axis motors cable
thingiverse
free

Prusa i3 MK3 60 degree heatbed cable cover by OakMountain
...with screw connectors.
you will need
m3x10 screw (3x)
m3n nut (3x)
to complete this modification (same as original prusa cover).
thingiverse
free

Prusa i3 MK3 60 degree heatbed cable cover (screws) by T1miverse
...e nuts and bolts as the original part:
m3x10 screw (3x)
m3n nut (3x)
the edited mesh looks a litte rough in a 3d but prints fine.
Autotilt
thingiverse
free

Blind Opener by DDRBoxman
...by ddrboxman thingiverse an electric imp powered blind opener. https://github.com/uncodin/things/tree/master/autotiltr ...
thingiverse
free

Prusa Mini Cable Chain Upgrade Heatbed fix by Clon1998
...i encountered while installing the cable chain upgrade by autotilt for the print bed of the prusa mini: base/src:...
thingiverse
free

The JAx Violin (5 String & 6 String) by Jaxelsson
...and tested. i like the result. thank you to autotilt for the inspiration. if you're curious about how this...
thingiverse
free
(remix 2021) Prusa Mini Cable Chains (x-axis, headbed) by vasilyd
...(x-axis, headbed) by vasilyd thingiverse i'm very greatfull to @autotilt for the original model. thus, while printing and assembling...
Headbed
thingiverse
free

headB by sirchaos17
...headb by sirchaos17
thingiverse
headb by mike [created on 3dtin]
thingiverse
free

C270 Cammount for Headbed Holder
...c270 cammount for headbed holder
thingiverse
cameramount for headbed holder 3,5mm
thingiverse
free

HeadBed Tuerca 8mm by peslatino
...headbed tuerca 8mm by peslatino
thingiverse
para utilizar con tuerca 8mm y espacio salida de tornillo de 3mm.
thingiverse
free

i3 Mega headbed cork insulation holder revised by meistertlow
...sulation holder revised by meistertlow
thingiverse
revised version of https://www.thingiverse.com/thing:4680951, easier to print
thingiverse
free
Heizbett Klammer / Headbed Clip by Lucifor
...n können, 7mm breit, 6 stück davon, je drei pro seite und ggf hinten 4 dann sollte die glasplatte deutlich besser am bett sitzen.
thingiverse
free

Heizbett Level Hilfe / Headbed Level Helper by Lucifor
...es druckens gelevelt werden kann. druck von aussen nach innen. unbedingt ohne brim und skirt drucken! druck mit 10mm pro sekunde!
thingiverse
free
i3 Mega headbed cork insulation holder by meistertlow
...inted mounting holes need to be drilled to 3.5mm to fit the heatbed screws.
inspired by https://www.thingiverse.com/thing:2753110
thingiverse
free

Kossel- MicromakeDelta - HeatBedHolder by srini91
...kossel- micromakedelta - heatbedholder by srini91 thingiverse headbed holder and leveler for micromake delta...
thingiverse
free
G2S / Delta Heatbed Calibration Test by TeeZee
...is a simple test object to check if the headbed is aligned correctly....
Prusa
turbosquid
$2

Frame Filament Guide Clip-On for Prusa Mk3
...rame filament guide clip-on for prusa mk3 for download as stl on turbosquid: 3d models for games, architecture, videos. (1634730)
3d_export
free

prusa i3 mk3s laser mount for opt lasers
...to learn more about the blue laser technology that conceived the cutting and engraving laser heads from opt lasers, please visit:
turbosquid
free

Prusa small printer adapter holder
...er for download as ipt, skp, dwg, dxf, fbx, ige, obj, and stl on turbosquid: 3d models for games, architecture, videos. (1642936)
3d_export
$30

geisha by jonathan adler
...** i did a 3d printing test in the prusa software, you can find it among the attached images.<br>exchange:<br>.blend...
thingiverse
free

Prusa without Prusa (rc2) by madless
...prusa without prusa (rc2) by madless
thingiverse
just the main part of prusa rc2 faceshield, without writing.
enjoy :)
thingiverse
free

Prusa by acejbc
...prusa by acejbc
thingiverse
prusa knob info
m3 8mm screw
thingiverse
free

Prusa house
...prusa house
thingiverse
how prusa house could look like...
thingiverse
free

Prusa Mk2 "Fake Prusa" LCD cover by anraf1001
...r by anraf1001
thingiverse
version of prusa's lcd cover with "fake prusa" instead of "original prusa"
thingiverse
free

Prusa stabilizator by gutiueugen
...prusa stabilizator by gutiueugen
thingiverse
prusa stabilizator
thingiverse
free

Keychain Prusa by rbarbalho
...keychain prusa by rbarbalho
thingiverse
keychain with text prusa.
Axis
3ddd
$1

Мария Axis
...
3ddd
кухня , классическая , axis
модель кухни.
3d_export
$22

Axis robot 6-axis robotic arm
...ing parts drawings, standard parts purchased parts list, can be produced directly according to the drawings, welcome to download!
3ddd
free

Versatile Axis
...ddd
nexus , плитка
http://bvtileandstone.com/ceramic-porcelain/versatile-axis/
3d_export
$19

robot 2 axis
...robot 2 axis
3dexport
robot 2 axis
turbosquid
$40

Axis R5F
... available on turbo squid, the world's leading provider of digital 3d models for visualization, films, television, and games.
turbosquid
$40

Axis S5F
... available on turbo squid, the world's leading provider of digital 3d models for visualization, films, television, and games.
turbosquid
$30

Axis Athlon
... available on turbo squid, the world's leading provider of digital 3d models for visualization, films, television, and games.
turbosquid
$10

Linear Axis
... available on turbo squid, the world's leading provider of digital 3d models for visualization, films, television, and games.
3d_export
$15

drawing axis
...drawing axis
3dexport
simple rendering of the scene file
3ddd
$1

versatile axis ARC
...versatile axis arc
3ddd
versatile , плитка
versatile axis arc red dot design award
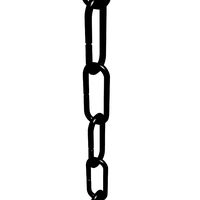
Chains
archibase_planet
free
Chain
...chain
archibase planet
chain chain link chain loop
chain n020708 - 3d model (*.gsm+*.3ds) for interior 3d visualization.
3d_export
$5
chain
...chain
3dexport
3d model chain
3d_export
$5
chain
...chain
3dexport
chain. obj,fbx,blend
archibase_planet
free

Chain
...se planet
chain circuit catena
chain - archicad parametrical gdl 3d model (*.gsm). regulation of the length, curvature and angle.
archibase_planet
free
Chain
...n
archibase planet
chain circuit catena
chain - archicad parametrical gdl 3d model(*.gsm). regulation of the length and angle xyz
3d_ocean
$5
Chain
...chain
3docean
3d models chain design elements
3d models, design elements
3d_ocean
$5

Chain
...chain
3docean
3d models chain design elements
3d models, design elements
turbosquid
$10
Chain
...hain
turbosquid
royalty free 3d model chain for download as on turbosquid: 3d models for games, architecture, videos. (1329200)
turbosquid
$9

chain
...hain
turbosquid
royalty free 3d model chain for download as on turbosquid: 3d models for games, architecture, videos. (1549461)
turbosquid
$2
Chain
...hain
turbosquid
royalty free 3d model chain for download as on turbosquid: 3d models for games, architecture, videos. (1148668)
Cable
3d_export
free

Cables
...cables
3dexport
cables for your purposes
3d_export
free
cable belt for cable organization
...ze your cables in 3d printers. it will bend only to one direction. the area to put the cables per piece is aprox. 1,6cmx2,6cmx1cm
3d_ocean
$16
Ethernet Cable
...ethernet cable
3docean
cable computer electronics ethernet internet network connected
ethernet cable 3d model
3d_export
$65

cable
...cable
3dexport
simple rendering of the scene file
turbosquid
$14

Cable
...l cable for download as ma, max, fbx, 3ds, gltf, obj, and stl on turbosquid: 3d models for games, architecture, videos. (1631358)
3ddd
$1
Cable Cover
...cable cover
3ddd
кабель
vertebra passacavo - cable cover
max + vray 2.20.03
3d_export
$15
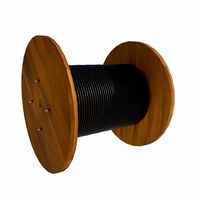
Cable reel
...without cable. textures 4k 4096x4096 targa, png, jpeg.<br>number of polygons without cable: 2896<br>with cable: 35328
3d_export
$7

short cable
...short cable
3dexport
rubber cord. very detailed. cable thickness: 2.55 mm total length: 55mm
3d_export
$5

USB CABLE
...usb cable
3dexport
turbosquid
$30
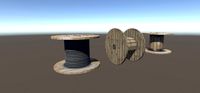
Cable Reels
...osquid
royalty free 3d model cable reels for download as fbx on turbosquid: 3d models for games, architecture, videos. (1439507)
Z
3d_export
$5

nissan z
...nissan z
3dexport
nissan z
3ddd
$1

Vase Z
...vase z
3ddd
vase z
3ddd
$1

полотенцесушить Z
...полотенцесушить z
3ddd
полотенцесушитель
полотенцесушить z
design_connected
free

Z-Chair
...z-chair
designconnected
free 3d model of z-chair designed by karman, aleksei.
design_connected
$11

Z Lamp
...z lamp
designconnected
phillips z lamp computer generated 3d model. designed by kalff, louis.
3d_export
$5

Dragon balls z
...dragon balls z
3dexport
dragon ball z
turbosquid
$20

Fighter Z
...
turbosquid
royalty free 3d model fighter z for download as on turbosquid: 3d models for games, architecture, videos. (1292563)
turbosquid
$9

Pen Z
...pen z
turbosquid
free 3d model pen z for download as obj on turbosquid: 3d models for games, architecture, videos. (1686775)
turbosquid
free

z chair
...z chair
turbosquid
free 3d model z chair for download as max on turbosquid: 3d models for games, architecture, videos. (1410230)
turbosquid
$5

Letter Z
...urbosquid
royalty free 3d model letter z for download as max on turbosquid: 3d models for games, architecture, videos. (1408540)
Mini
turbosquid
$10

Mini Mini Luceplan
...
royalty free 3d model mini mini luceplan for download as max on turbosquid: 3d models for games, architecture, videos. (1227359)
3d_ocean
$39

Mini Cooper
...mini cooper
3docean
cabrioler cooper mini
mini cooper cabrioler
3d_export
$30

Mini lathe
...mini lathe
3dexport
mini lathe
3d_export
$5

mini mouse
...mini mouse
3dexport
mini mouse
3d_export
$5

mini house
...mini house
3dexport
mini house
3d_export
free

Mini Mecha
...mini mecha
3dexport
concept of mini mecha
3d_ocean
$20

Mini Gun
...mini gun
3docean
gatling gun gun machine gun mini gun weapon
model of a mini gatling gun.
3ddd
free

Herve mini
... кофейный , herve
http://www.mobiliavenanti.it/ru/products/hervè-mini
3d_export
$5

mini wall
...mini wall
3dexport
mini wall for living room
3d_export
$5

mini bank
...mini bank
3dexport
mini bank 3d model