Thingiverse
Proteus Power Control by ProteanMan
by Thingiverse
Last crawled date: 3 years ago
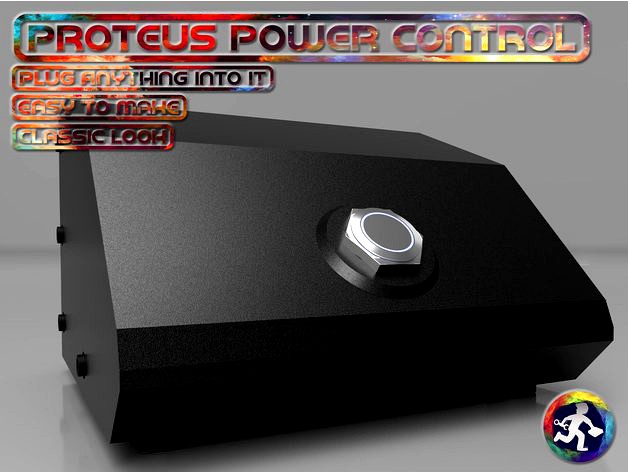
Proteus Power Control
This is a very handy project that I created to easily control multiple things from my desk. Anything plugged into this will be turned on and off by the button. The one in the photos is for specialized speakers and hardware that needs to be turned on/off multiple times while working/testing - instead of unplugging each one individually!
Safety Disclaimer:
Please test and check your wiring before leaving it plugged in. This is meant to be left running 24/7, ensure that it works properly before leaving it. You are responsible for all parts and wiring.
Printing
Use any filament
No supports needed
Models should lay flat by default. If not you need to print models with the back on your build plate (plug side).
Electronics/WiringPlease ensure you follow the wiring diagram and use proper wire gauge.
Power wires must be Single Strand (solid) Wire - 12 gauge.
Button wires can be Stranded Wire - 20 gauge or larger.
Suggested parts:this is designed for these part sizes
1X US/Canada Standard Wall Outlet
This is the exact model it is designed for.https://www.homedepot.ca/product/leviton-duplex-tamper-resistant-receptacle-white/1000659839
1X 19mm LED 110-220V Self Locking Buttonhttps://www.aliexpress.com/item/4001291695467.html?spm=a2g0o.productlist.0.0.6bb82da3SiB7ZD&algo_pvid=4f807a96-f1af-4923-a7b7-6753fdc7c352&algo_expid=4f807a96-f1af-4923-a7b7-6753fdc7c352-3&btsid=0bb0624716207940485652955ef312&ws_ab_test=searchweb0_0,searchweb201602_,searchweb201603_
14X M3x4x4 Brass Inserts (use soldering iron to melt into printed holes)https://www.aliexpress.com/item/4000232858343.html?spm=a2g0o.productlist.0.0.6b108ad6RdGirY&algo_pvid=null&algo_expid=null&btsid=0b0a556116207930102041044ea72d&ws_ab_test=searchweb0_0,searchweb201602_,searchweb201603_
14X M3X6 Bolthttps://www.aliexpress.com/item/10000150053486.html?spm=a2g0o.productlist.0.0.54af6ce2uY7eU2&algo_pvid=558ba376-2f41-4ac7-8814-4b93b5f0b7b8&algo_expid=558ba376-2f41-4ac7-8814-4b93b5f0b7b8-1&btsid=0b0a555f16207933229985340ec332&ws_ab_test=searchweb0_0,searchweb201602_,searchweb201603_
1X SSR-40 VA Solid State Relayhttps://www.aliexpress.com/item/32846658289.html?spm=a2g0o.productlist.0.0.59c98a3bTcE9q3&algo_pvid=e63033eb-b9ce-44a9-aaca-37554cf92a2e&algo_expid=e63033eb-b9ce-44a9-aaca-37554cf92a2e-18&btsid=0b0a556416207930853913947eba1c&ws_ab_test=searchweb0_0,searchweb201602_,searchweb201603_
1X AC Power Plug AC-07https://www.aliexpress.com/item/33062019990.html?spm=a2g0o.productlist.0.0.3e7d7d0eCEJHI3&algo_pvid=null&algo_expid=null&btsid=0b0a556616207932323306953e6626&ws_ab_test=searchweb0_0,searchweb201602_,searchweb201603_
1X AC Power Cord - UShttps://www.aliexpress.com/item/32947880662.html?spm=a2g0o.productlist.0.0.53b9693dtt7Tqr&algo_pvid=null&algo_expid=null&btsid=0bb0623c16207937223567533e991c&ws_ab_test=searchweb0_0,searchweb201602_,searchweb201603_
Assembly
1 - Heat up solder iron, clean solder tip and remove any solder, push brass inserts into plastic with soldering iron. The holes on the "Base Plate" are for the brass inserts.
2 - Bolt on AC-07 Power Outlet onto base plate
3 - Bolt on SSR-40 Relay
4 - Connect/Solder solid wire from relay (1) to AC-07 (right)
5 - Connect/Solder solid wire from relay (2) to Power Outlet (hot)
6 - Connect/Solder solid wire from AC-07 (left) to Power Outlet (white)
7 - Connect/Solder AC-07 (bottom/ground) to Power Outlet (ground/green)
8 - Connect/Solder relay (3 & 4) to Button NO & C
9 - Connect/Solder AC-07 (left & right) to Button (+ & -)
10 - Bolt Power Outlet into base plate
11 - Plug AC-07 into wall to test power. LED on button should light up all the time. Power meter set to AC 200V+ on Power Outlet should test 1V average when button is off, and 90-110V when button is pressed.
12 - Put cover on and enjoy!
Questions
Please let me know if there are any issues or concerns or ideas.
Any ideas for add-ons please let me know! Other clip types, front tray types, etc.
Similar models
thingiverse
free

GaPa Radio Mini (Karadio32) by yamaha_xg
...b-4a5f-95a1-8987412cf988-1&btsid=0bb0623e16034350037585008e69f6&ws_ab_test=searchweb0_0,searchweb201602_,searchweb201603_
thingiverse
free

Peltier holder waterblock and heatsink holder 40x40x20 by Dskill3Dlovethings
...8-4806-bca5-427f454c8183-0&btsid=0ab6d69f15866887037078335e08c6&ws_ab_test=searchweb0_0,searchweb201602_,searchweb201603_
thingiverse
free

Simple helping hands (soldering) by salami738
...88e72e-2&btsid=0b0a01f816148695362425184e33ff&ws_ab_test=searchweb0_0,searchweb201602_,searchweb201603_
to complete this.
thingiverse
free

Power supply cover by parek
...b-49a3-a06e-a7be7ef71152-8&btsid=0ab6f83a15854357046013239e05ba&ws_ab_test=searchweb0_0,searchweb201602_,searchweb201603_
thingiverse
free

Car starter with USB by yanew
...-4ca4-901e-7c286ce789c9-10&btsid=0bb0624216018388590743668ebb2e&ws_ab_test=searchweb0_0,searchweb201602_,searchweb201603_
thingiverse
free

Temperature control SMD flow Furnace by Titanschiff
...746973c25b9b-37&btsid=2100bdf116179958203702947e3593&ws_ab_test=searchweb0_0,searchweb201602_,searchweb201603_)
1x socket
thingiverse
free

Among Us by GrowingUp
...-4bfd-8334-497c14944e74-13&btsid=0b0a555c16057673539875365e55dc&ws_ab_test=searchweb0_0,searchweb201602_,searchweb201603_
thingiverse
free

Among Us flower pot by GrowingUp
...e0ffb&ws_ab_test=searchweb0_0,searchweb201602_,searchweb201603_
see yt video for details:https://youtu.be/m5pru19mqem
enjoy !
thingiverse
free

among us led flower pot by GrowingUp
...6-4214-8d79-daf0bbe2e09b-1&btsid=0bb0623316072553736731770e914d&ws_ab_test=searchweb0_0,searchweb201602_,searchweb201603_
grabcad
free

RFID 13.56Mhz IC USB Reader
...-4ee0-9ea2-bbec68f5d2b2-26&btsid=0bb0622d16140586744082817e7981&ws_ab_test=searchweb0_0,searchweb201602_,searchweb201603_
Proteanman
thingiverse
free

GoPro Tripod Mount (Targus) by ProteanMan
...erent brands of tripod. there is a clip at the back of the tripod attaches to this insert.
this was designed for a targus tripod.
thingiverse
free

Ukulele Wall Mount by ProteanMan
... tear.
check out my vlog and 3d printing videos on youtube - protean manhttps://www.youtube.com/channel/ucz64raasrj9v66rt3bdeo2w
thingiverse
free

Instrument Mustaches by ProteanMan
...n for some of them since the clips may break with pla. i haven't tried pla so let me know if they are strong enough with pla?
thingiverse
free

Dreadnought Fidget Spinner by ProteanMan
... of the spinner. be careful not to get glue on the bearing.
7-clamp the handles together to that they are straight, then let dry.
thingiverse
free

Whiteboard Pen Holder X5 by ProteanMan
...that if your printer prints with a larger tolerance around tight fitting parts then you will need to drill or sand out the holes.
thingiverse
free

Proteus Headphone Stand by ProteanMan
...back face. if you have amazing bridging capabilities on your printer then you can print it on the bottom face.
print, use, enjoy!
thingiverse
free

Proteus Cable Roller by ProteanMan
...way that does not earn you monetary value.
if you do wish to sell these products please let me know and we can come an agreement.
thingiverse
free
Box Making Parts by ProteanMan
...way that does not earn you monetary value.
if you do wish to sell these products please let me know and we can come an agreement.
thingiverse
free

Proteus Key Holder by ProteanMan
...d. this should work perfectly for any printer.
try using high infill - 50% or above when printing.
any ideas let me know. enjoy!
thingiverse
free

Custom Speaker Cover Plates by ProteanMan
...e option and type in 0.796. this resizes the file to the right size for my speaker.
now you have a perfectly sized speaker cover!
Proteus
3d_export
$199

Proteus 3D Model
...proteus 3d model
3dexport
sci-fi spaceship warship cruiser destroyer
proteus 3d model psicore 4922 3dexport
turbosquid
$25

Proteus PEC 2025
...d
royalty free 3d model proteus pec 2025 for download as c4d on turbosquid: 3d models for games, architecture, videos. (1275757)
thingiverse
free
Proteus Proxy Detailed
...proteus proxy detailed
thingiverse
this is a version of the proteus proxy with a detailed interior.
unity_asset_store
$36

PROTEUS Frigate
...te your workflow with the proteus frigate asset from cgpitbull. find this & other space options on the unity asset store.
3dcadbrowser
free
Proteus
...software.this 3d object can be downloaded in .max, .obj, .3ds, .fbx, .dxf, .lwo, .stl, .wrl, .ma, .dae, .x and .asc file formats.
unity_asset_store
$7

Proteus Mech Robot
...r workflow with the proteus mech robot asset from polyanarchy. find this & other robots options on the unity asset store.
thingiverse
free

Proteus Concept Boat by omega
...is is my grabcad entry for the
makerbot replicator 2 desktop 3d printer challenge
http://grabcad.com/library/proteus-boat-concept
thingiverse
free
Proteus with Fuse Rear Motor mount by MADRobotNO
...tor cables.
this is 200 version of proteus: https://www.thingiverse.com/thing:2086413
2 last parts er designet for gopro session.
thingiverse
free
Proteus (halved) by guydebored
...e made a few changes on this version. the rear fins should be better conected now and you won't need rafts or support.
enjoy!
thingiverse
free
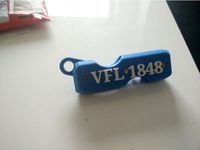
VFL Bochum 1848 - Proteus Key Holder by MacNite
...e
i made this quick mod of the proteus key holder by proteanman for my grand-father-in-law.
i hope, it may help someone as well.
Control
3d_ocean
$4
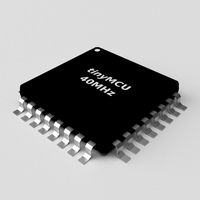
Controller TQFP32
...qfp32
3docean
chip controller cpu electronic gpu mcu micro controller silicon smd tqfp wafer
a micro controller in tqfp32 package
3d_ocean
$4
Controller TQFP44
...44
3docean
chip controller cpu electronic gpu mcu micro controller package smd tqfp tqfp44
a micro controller in a tqfp44 package
3d_export
$15
control unit
...control unit
3dexport
control unit
3ddd
$1
Yacht control
...yacht control
3ddd
yacht control
3d_export
$5
controle pgdm
...controle pgdm
3dexport
carcaca controle pgdm
turbosquid
free

controler
... available on turbo squid, the world's leading provider of digital 3d models for visualization, films, television, and games.
3ddd
$1

Control
...
http://www.schmitz-leuchten.de/html-ru/einzelleuchten-lampentyp-details.php?lamptype_no=700&group;=917&id;=731
3d_ocean
$4

Controller TQFP100
...100
3docean
chip computer cpu electronic gpu mcu micro controller pin platine silicon wafer
a micro controller in tqfp100 package
3d_ocean
$4
Controller TQFP64
...qfp64
3docean
chip computer cpu gpu mcu micro controller package silicon tqfp tqfp64 wafer
a micro controller in a tqfp64 package
3d_ocean
$7

Remote controller
... control switcher tv remote
remote controller for tv, sound systems etc easy to edit textures photo real rendered with mental ray
Power
turbosquid
$100

power
...ower
turbosquid
royalty free 3d model power for download as on turbosquid: 3d models for games, architecture, videos. (1421990)
3d_export
$5

Power
...power
3dexport
3d_export
$5

power outlets
...power outlets
3dexport
power outlets
3ddd
$1

lion power
...lion power
3ddd
лев , статуя
lion power gold sculpture
3ddd
$1

Sea Power
...
компас , море , часы
часы с компасом sea power
3ddd
free

Meridiani / Power
...power
3ddd
meridiani , круглый
стол power производитель meridiani, диаметр 120,высота 67
3d_export
$5

Power Surge
...power surge
3dexport
the power surge is a all mesh carnival ride to lower in game part count and lag
turbosquid
$8

Airport Ground Power Unit (AXA Power )
... available on turbo squid, the world's leading provider of digital 3d models for visualization, films, television, and games.
turbosquid
$50

Power Houser
...rbosquid
royalty free 3d model power houser for download as on turbosquid: 3d models for games, architecture, videos. (1333800)
3d_export
$5

power outlet
...power outlet
3dexport
power outlet<br>format file maya 2018, 3d max 2017, obj, fbx