Thingiverse
Programmable Flute Project by RettMikhal
by Thingiverse
Last crawled date: 4 years, 7 months ago
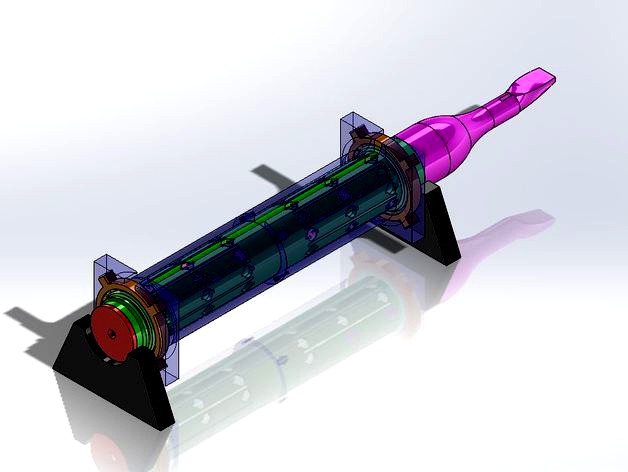
Designed for the Make it Loud competition, I thought it would be a unique idea to combine a flute with a music box. Being that it is 3D printed, I went one step further to make it so the holes could be 'programmed' to play the notes in sequence. The holes can be plugged (just like your fingers would) with inserts, then as the housing rotates around, it will play the notes in the sequence. The slits in the flute are to allow air to always flow through to prevent a flat note between the other notes, such as the sound you get when you plug all the holes of a flute. I'm also experimenting with different plugs for the end to change the pitch.
This is an experiment; I'm not sure if the very wide diameter needed to add the hole series will make for a good flute. I DO know plastic flutes exist and I have followed a blog on making PVC tin whistles for advice in this design. I doubt a plastic flute will ever sound AS nice as a metal one, but prototyping is what 3D printing is for, amiright?
UPDATE: 12/6/15 at 10:38 PM. Nothing like waiting til the last minute. The real challenge on the last leg of the project was assembly; to solve this I tried various snap fit designs in a non-linear analysis (that's my dayjob). Having that software through SolidWorks and knowing how to use it is a big advantage. Originally I was going to use a mixture of snap fittings, rings, and threads, but it quickly became obvious (and the snap fitting worked beaaaaaauuuutifuuuuully in FEA) that it would be far less headache to just use them for all parts and I'm glad I did that. The problem with threads is timing; this design depends on exact rotational alignment.
UPDATE 1/25/16: I redesigned the body to be much slimmer in order to conserve on plastic and time. The amount of ABS required is now reduced from 3.3 kg to 1.4 kg. This can be further reduced by using percent infill for things like the supports; I still recommend 100% infill for the flute taper, housing, and barrels. I'm in the process of making a prototype to test. I will post a video... if it works.
The other challenge was usability of the design. At the eleventh hour I had a revelation about the easiest way to play this thing; just put it on a stand. Then the user can blow into the flute while spinning the box on the bearings. By the way, this design requires bearings, there is no getting around it. This is my first 3D printed bearing so I hope it works; there is little information about designing them for printing out there. I also added a lip on the end so that the box will not fall off if you want to pick it up and play it. The bearing should keep it on, but I figured added insurance couldn't hurt. I haven't played it yet so I'm not sure how ergonomic it is. Future versions will be made easier to play, I imagine.
While soluble supports would make your life MUCH easier, I designed this to print as easy as possible, which chamfers and fillets on flat sections in the direction of gravity. Having said that, the flute will still be a difficult print, and the bearings will most likely require a small amount of work. Tolerances on this are also very tight (to maintain air sealing), so sanding may be required.
I have yet to test it as my printer decided to jam and have other problems I have yet to fix. Maybe that will be my new year's resolution.
I realized when I uploaded it I used the old version of the plug. The new version has holes cut into it so you can more easily grip them with a pair of pliers or multitool.
I recommend this assembly order:
Clip the flute sections together.
Fit the bearings onto both ends of the assembled flute section to test that they fit snugly and the insides can freely rotate. Once you have verified this, remove the bearing closer to the cavity side, leaving the bearing on the extruded tab side for later.
Clip the housing sections together.
Slide the flute section into the assembled housing section so that the bearing goes in last and slides into the recess. The bearings are not snap fit; the four extending arms will allow them to grip the housing cavity and rotate it.
Slide the second bearing onto the flute section that is exposed on the other side of the housing. If you followed Step 2 correctly it should be easy enough to slip the bearing onto the cavity side now that the tab side is secured.
Once the bearings are installed, snap on the whistle mouthpiece. Rotational orientation does not matter. The design is such that it cannot be assembled backwards.
Select which tone changer you wish to use and snap it onto the rear. Like the mouthpiece, it only fits on one way.
Place the device on the stands and test its ability to rotate and make a seal. If there are any restrictions, take it apart and sand it slightly. Dykem is a great tool for finding grind locations. If it seems too loose or not airtight, I suggest printing out a thin layer of ABS (0.12 mm) and insert it as a shim until an air seal is formed. With proper print settings this shouldn't be necessary.
Insert the plugs into whichever finger holes you need in the proper sequence. You are ready to play. The device can be played on the stands or by holding the end of the flute with one hand, blowing into the whistle, and rotating the housing with another hand.
Future versions will include gearing to control speed, and a better housing design.
You're on your own for sheet music. Or flute lessons. I'm sure you'll be fine; I have faith in you.