Thingiverse

Printrbot Second Cooling Fan by matt448
by Thingiverse
Last crawled date: 3 years, 1 month ago
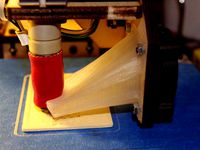
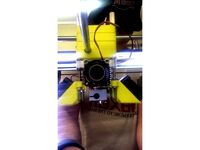
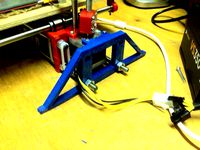
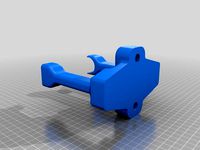
[ UPDATE ]: Crap.... I just found a big design flaw. The shroud hits the cap head bolts on the right side of the heated print bed. You have been warned. Temporarily I replaced the cap head screws with a lower profile pan head but I need to redesign the shroud so it clears the stock cap head screws. YOU MUST REPLACE THE STOCK CAP HEAD SCREWS WITH PAN HEAD SCREWS. There is a photo showing the type of screws I used. This may only apply to the E3D V6 hotend since it is shorter. The stock hot end may not have the same clearance issues. I would recommend manually moving the X and Y axis's to all the possible positions to check for any clearance issues with screws.
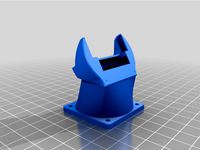
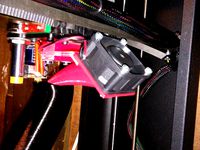
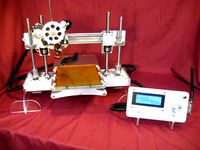
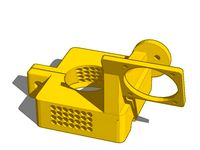
I was having some print quality issue with areas that were furthest away from the stock cooling fan on the left side of the Printrbot. I saw the Ultimaker 2 has cooling fans on both sides of its hot end and decided to rig up a temporary second cooling fan mount on my printer and try some prints. The quality of my prints improved dramatically so I set about designing a permanent second cooling fan mount and shroud for my printer.
This is my second design and it is still a work in progress. I'm planning on adding a small bracket to the fan mount and the shroud needs to be smoothed out. Even though it needs some small tweaks it is working well for me so I thought I would post it up in its current state.
One thing to note is I'm using the E3D V6 hot end on my printer so the current shroud is designed for that. I haven't tested it yet with an UBIS. I designed this in two parts so the shroud could be adapted for other hot ends.
Similar models
thingiverse
free

Taz 5 Extended Fan Mount for E3D Hot End by Wolfie
...n't fit.
the extended mount is designed to accommodate the e3d v6 hot end when mounted on the stock lulz extruder and head.
thingiverse
free
E3D v6 Fan Shroud for Printrbot Simple Metal by olla
...shroud to fit my printrbot simple metal that i equipped with an e3d v6 hot end.
successfully printed in pla on a prusa i3 mk3s+
thingiverse
free

MP Select Mini V2 E3D Dual 30mm Fan Shroud & Mount
...re needed to print the fan shroud. they are hard to remove but pliers and a small flat-head screwdriver will help to remove them.
thingiverse
free

Chimera Layer Fan Shroud by Cutlass
...d.
there is enough clearance for a dual volcano, cyclops, or dual v6 print head.
this shroud will fit the original layer fan.
thingiverse
free

XYZ Davinci E3D V6 40mm Cooling Fan Shroud by njmerola
...o make the fan functional, i needed to modify the configuration.h file. once i find the instructions i used, i will add the link.
thingiverse
free
2014 Printrbot Simple Fan shroud. by ajosepi
...arance, but i have not printed a test part as of yet. this is my first uploaded thing, so forgive me if i have made any mistakes.
thingiverse
free

E3D Dual 40mm Fan Mount (Clampable) by Cjoutwest
...arm"
in order to use this design you will also need
14 - 1 inch 6/32 inch screws
2 - 2 inch 6/32 inch screws
16 - 6/32 nuts
thingiverse
free

Fan Shroud - Printrbot Metal Plus V0.2 by Phaenom
...irects airflow from blower fan around the nozzle to cool the part.
this design is still a work in progress so expect more changes
thingiverse
free
PrintRBot Metal Plus Fan Shroud for E3D Hot End by goose117
...i have been using epoxy to glue to two pieced together rather than use the screw holes, it's easier and more robust that way.
thingiverse
free
UM2 E3D Fan Mount by Mudaseem
...my e3d v6, so i chose to use the stock um2 fan.
it mounts to the screws just like the cooling fans.
thanks e3d for the files!
-mm
Matt448
thingiverse
free
Spool adapter cone and knob by matt448
...tt448
thingiverse
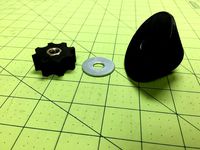
yet another spool adapter. it uses a 3/8"-16 nut. the mcmaster-carr part number for the nut is 94895a031.
thingiverse
free
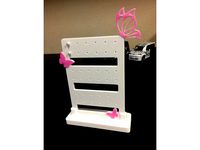
Butterfly Ear Ring Holder by matt448
...and display her earrings so we designed this together. i did a mid-print color change when printing to make the butterflies pink.
thingiverse
free

MOLLE Bag Decorations by matt448
...d add something fun to them. for the two color prints i paused the print and switched filaments.
i'm working on several more.
thingiverse
free
X-Carve mounting bracket by matt448
...threads. i used low profile m5 screws to attach it to the x-carve and then regular cap head m5 screws to attach it to the bench.
thingiverse
free
![Froggit - Undertale [REPAIRED] by matt448](/t/8830935.jpg)
Froggit - Undertale [REPAIRED] by matt448
...problem is the feet weren't flat. i used netfabb to trim off a small bit of the bottom so the model will sit flat on the bed.
thingiverse
free

Girl Scout Symbol for SWAPs by matt448
... to things.
on the final version i made for her on the back i put her name, troop number and the outline of the state we live in.
thingiverse
free

Minecraft Nightlight by matt448
...spot.com/2015/09/ble-controlled-minecraft-nightlight.html
https://youtu.be/au4su1hr1p4https://www.youtube.com/watch?v=3vdpqhp6_fw
thingiverse
free

X-Carve Dial Gauge Mount by matt448
...ool clamp.
needs three m4 x 12mm screws to mount it to the machine. the dial gauge uses a 1" long 1/4"-20 bolt and nut.
thingiverse
free

Case for Intel Edison with Arduino Expander Board by matt448
...uld print it on my printrbot simple. also removed the ears from the corners. remixed from http://www.thingiverse.com/thing:457434
thingiverse
free
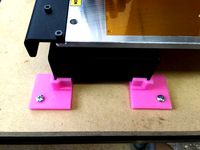
Screw Down Feet for Printrbot Simple Metal by matt448
...screw hole. i printed mine at 35% infill with two shells and it turned out pretty sturdy. the screw hole is sized for a #8 screw.
Printrbot
thingiverse
free

printrbot gasket by Usernameunavailible
...printrbot gasket by usernameunavailible
thingiverse
a part for printrbots
thingiverse
free
Printrbot Aluminum by Chris_the_Carpenter
...printrbot aluminum by chris_the_carpenter
thingiverse
a redesign of the awesome printrbot, in aluminum.
thingiverse
free
PrintrBot keychain by SuperMaku
...printrbot keychain by supermaku
thingiverse
printrbot keychain. may need to be scaled up.
thingiverse
free
Printrbot foot by aliekens
...printrbot foot by aliekens
thingiverse
add wider feet to a printrbot for improved stability.
thingiverse
free
Printrbot to CNC by mmrrsiam
...printrbot to cnc by mmrrsiam
thingiverse
make your printrbot also a small cnc machine....
thingiverse
free

Printrbot Keychain by jackbivona
...printrbot keychain by jackbivona
thingiverse
printrbot keychain for all you pb customers out there
thingiverse
free

Printrbot+ Nutkeepr by DonaldJ
...printrbot+ nutkeepr by donaldj
thingiverse
clip to retain nut on z-axis threaded rod of printrbot+
thingiverse
free

PrintrBot Tool Caddy by spr_consulting
...printrbot tool caddy by spr_consulting
thingiverse
printrbot tool caddy.
thingiverse
free
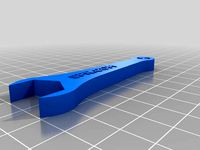
Printrbot Sensor Wrench by spr_consulting
...printrbot sensor wrench by spr_consulting
thingiverse
curvaceous printrbot sensor wrench.
thingiverse
free
Spool Holder for Printrbot by doubleAdoubleU
...spool holder for printrbot by doubleadoubleu
thingiverse
spool holder for a printrbot simple metal
Second
turbosquid
$18
Lower Second Premolar
... available on turbo squid, the world's leading provider of digital 3d models for visualization, films, television, and games.
cg_studio
$16

Second Genesis book3d model
...esis book3d model
cgstudio
.max - second genesis book 3d model, royalty free license available, instant download after purchase.
turbosquid
$10
Second cervical vertebra axis
...del second cervical vertebra axis for download as obj and stl on turbosquid: 3d models for games, architecture, videos. (1617262)
turbosquid
$20
second premolar mandibular.3DS
... available on turbo squid, the world's leading provider of digital 3d models for visualization, films, television, and games.
turbosquid
$10

Smith and Wesson Second Gun Model
...d model smith and wesson second gun model for download as fbx on turbosquid: 3d models for games, architecture, videos. (1304643)
3d_export
$18
meteor dragon purgatory-second dragon bone
...meteor dragon purgatory-second dragon bone
3dexport
meteor dragon purgatory-second dragon bone<br>3ds max 2015
3d_export
$18

meteorite purgatory-second dragon bone 02
...meteorite purgatory-second dragon bone 02
3dexport
meteorite purgatory-second dragon bone 02<br>3ds max 2015
cg_studio
$60

Second genreration iPod Touch3d model
...ds .c4d .dxf .fbx .obj - second genreration ipod touch 3d model, royalty free license available, instant download after purchase.
turbosquid
$30
second molar maxilar crown.3DS
... available on turbo squid, the world's leading provider of digital 3d models for visualization, films, television, and games.
turbosquid
$20
second premolar mandibular crown.3DS
... available on turbo squid, the world's leading provider of digital 3d models for visualization, films, television, and games.
Fan
3d_export
$5

fan
...fan
3dexport
fan 3d model, table fan, fan, electric fan, ventilator
archibase_planet
free

Fan
...fan
archibase planet
fan large fan
fan out n260707 - 3d model for interior 3d visualization.
archibase_planet
free

Fan
...fan
archibase planet
fan ceiling fan ventilator
fan stealth n300615 - 3d model (*.gsm+*.3ds) for interior 3d visualization.
3d_export
$15

fan
...fan
3dexport
is an ancient fan
3ddd
$1

Fan-C-Fan by marco gallegos
...n-c-fan by marco gallegos
3ddd
вентилятор , marco gallegos
fan-c-fan by marco gallegos
3d_export
$10

fan
...fan
3dexport
a detailed fan designed for home or space blowing is now available for only 19.99!
turbosquid
$1

Fan
...fan
turbosquid
free 3d model fan for download as on turbosquid: 3d models for games, architecture, videos. (1427865)
turbosquid
$14

Fan
...fan
turbosquid
royalty free 3d model fan for download as on turbosquid: 3d models for games, architecture, videos. (1415642)
3ddd
$1

Светильник Fan
...светильник fan
3ddd
fan , italamp
светильник fan, производитель italamp
turbosquid
$25

Fan
...fan
turbosquid
royalty free 3d model fan for download as c4d on turbosquid: 3d models for games, architecture, videos. (1483246)
Cooling
turbosquid
free
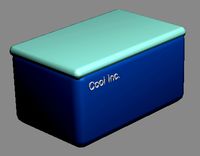
Cool Inc. Cool Box
... available on turbo squid, the world's leading provider of digital 3d models for visualization, films, television, and games.
3d_export
$5

cool penguin
...cool penguin
3dexport
cool penguin
turbosquid
$1
cooling
... available on turbo squid, the world's leading provider of digital 3d models for visualization, films, television, and games.
3d_export
$26
cooling tower
...ers.<br>model with full detail in real size. all nodes and bolted connections are built. it was designed for nuclear power.
3ddd
$1

Mantra Cool
...14 версиях и obj-файл, а также материал для включенного и для выключенного светильника. turbosmooth/meshsmooth при необходимости.
3d_export
$5
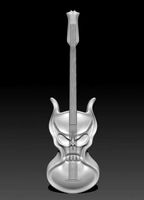
cool electric guitar
...cool electric guitar
3dexport
cool electric guitar
turbosquid
$5

Cooling glass
...quid
royalty free 3d model cooling glass for download as obj on turbosquid: 3d models for games, architecture, videos. (1193829)
turbosquid
$30

CPU Cooling
...royalty free 3d model cpu cooling for download as max and fbx on turbosquid: 3d models for games, architecture, videos. (1386263)
turbosquid
$5

Cool CLoud
...
royalty free 3d model cool cloud for download as ma and obj on turbosquid: 3d models for games, architecture, videos. (1572300)
3d_export
$5
table cooling fan
...table cooling fan
3dexport
table cooling fan made of black plastic. individual small size cooling fan for office desk.