Thingiverse
Printing Tips for Glass Beds
by Thingiverse
Last crawled date: 4 years, 3 months ago
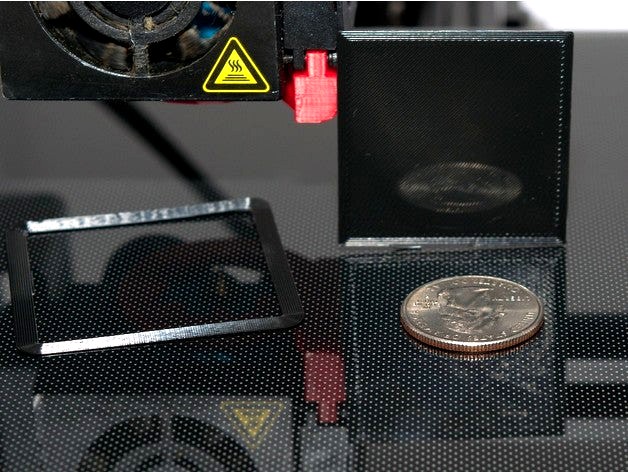
I've had some pretty good results printing on a glass bed with no adhesives and thought I would share what works for me.
(Feedback and other advice welcome)
Setup
Print Surface: Printing on the smooth glass side of one of these.
Other Mods
In the interest of full disclosure all other mods are listed here. These mods have not improved print quality as the same results were achieved with the stock hot end.
Hot End: Micro Swiss
Firmware: Marlin 1.1.19
Stepper Isolators: Isolators installed for X and Y steppers only.
Preflight Checks
Clean
Clean the print surface thoroughly a glass bed will give your first layer a mirror like finish. The bad news is that all dirt and defects will be visible.I've had prints pick up a fingerprint from the glass bed, the stuff is basically silly putty.
Once the bed has been properly cleaned a quick wipe down with some alcohol and a paper towel is usually all that is required. However, if you've been printing with an adhesive a good scrubbing with water and dish soap will remove everything.Be sure to dry well and wipe with alcohol to remove any soap residue.
Preheat
Warm up the bed allowing enough time for both the glass and any surrounding metal to reach temperature. If you are unsure how long this takes on your printer, repeatedly level the bed during warm up until it stops "changing".
Preheat the nozzle to 80% of print temp.
Home and Level
Give your bed a quick check before every print using a series of 9 points. This will help you visualize the surface of your bed.
Remember a bed is a flat sheet of metal secured at four points and will therefore behave a bit like a lever. When one corner is pulled down, two other point(s) will act as a pivot and the fourth point will want to go up slightly.
There is a detailed write up in the appendix section about leveling a bed "from scratch". It's a little bit of a read but I've had very good success using this method on several printers.
Executing the Print
Please see the appendix regarding recommended tweaks to printer profiles.
PLA
Material: 198-210; Bed: 52-55 (C).
If it's very cold out or I have had previous warping/adhesion issues I will "build" a temporary enclosure.
Since I haven't built a cabinet yet I use some cheap poster board to create an ad-hoc box around the printer. It isn't elegant but, the poster board stores nicely when not in use, holds plenty of heat, and doubles as a nice white backdrop when taking photos.
First Layer Won't Adhere
Caused by incorrect bed distance / level, dirt, or incorrect print temperature settings
Clean the bed; clean it again.
Check the bed height and level
Higher nozzle and/or bed temp
Less speed
Warping / Corners lifting
This is usually caused by heat differentials near the edge of the print.
Use a brim (they can really help here)
Use an enclosure
Higher bed temp
Print Pops Off Bed (serveral layers in)
Caused by excessive heat differentials, nozzle collisions or "gooey" filament pulling on the print during z moves.
Check bed level
Increase bed temp
Increase nozzle temp
Check z-hop and comb settings
ABS
Material 220-230 bed temp 75-90 (C).
Unless it's the middle of summer ABS will probably need an enclosure.
[To be expanded...]
Appendix
Level From Scratch
When starting with a bed that is wildly out of level identify and set the high point first.
Then, make your adjustments from the center outward, splitting the difference between the high and low points. Always adjust corners last.
Center high point(s)
Front to back
Left to right
Corners
After each adjustment step, return to the previous step(s), in order, and check clearance.
You may need to repeat this cycle several times but the amount of adjustment should decrease each cycle.
Please see the two examples below which will hopefully illustrate this concept.
Example 1 (center high): . My print bed has a slight "upside down U" shape. The center rail is the high point so I adjust in the order shown below.
Adjust for point 1 by turning all four knobs equally
Adjust for points 2 by turning both front or both rear knobs equally
Recheck point 1; split the difference between point 1 and points 2
Adjust for points 3 by turning both left or both right knobs equally
Recheck point 1 and points 2; split the difference between points 1,2,&3
Adjust corners by turning knobs individually
Recheck all points; split the difference between all points
Repeat as needed
Example 2 (center low): My friend's printer is the opposite, a regular U shape where the center rail is the lowest.
Adjust for points 1 by turning both left or both right knobs equally
Adjust for point 2 by turning all four knobs equally
Recheck points 1 and point 2; split the difference between point 1 and points 2
Adjust for points 3 by turning both front or both rear knobs equally
Recheck points 1,point 2, and points 3; split the difference between points 1,2,&3
Adjust corners by turning knobs individually
Recheck all points; split the difference between all points
Repeat as needed
Profile Tweaks
Here are some settings I have altered on my profile.
(links are not hot as they appear in my thumbnails where not desired
Calibrate: (watch this video) www.youtube.com/watch?v=3yIebnVjADMProfiles: all have been set to "magic number" heights (watch this video) www.youtube.com/watch?v=WIkT8asT90ASpeed Print speed is 45mm/sRetraction: 4.2mm @ 17mm/sZ-hop: set to initial layer heightZ-hop height: height is set to initial layer heightShell: typically 3 walls and at least .8 mm top and bottom.
Cheats
Hair Spray Tease
Occasionally all of this trickery still isn't enough. When that happens it's Aquanet to the rescue. Use the stuff in the purple can and spray a small amount on a paper towel. Allow to mostly dry and rub down the bed. You probably won't see much difference but you'll feel it.
If that doesn't work you can always fog the glass. (Don't do this while it's on the printer unless you like everything sticky.)
Similar models
thingiverse
free

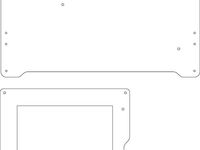
MakerFarm 8" 3mm Borosilicate Glass Bed Leveling Corners by mayaway
...hing in nice, neat proximity.
doesn't hurt to {split} and {auto arrange} in slicer. give your printer an easier time of it...
thingiverse
free
Hank's 3-point bed leveling for Printrbot by Hank-Cowdog
... holes for attaching it may need to be adjusted. the svg file included can be edited using inkscape ( http://www.inkscape.org ).
thingiverse
free

Glass Bed Clip Back by tnsi
...ngiverse
this is a modified piece of nikki81's glass bed clip for printers that use a center point for leveling at 3 points.
thingiverse
free

First Layer Calibration Square (25mm x 25mm x 0.2mm) by GeodeLX
...e same job). if they come out in the 0.19 to 0.21 range, i call it "good" and i move on.
i hope you find this helpful!
thingiverse
free

Creality Ender 5+ Bed Leveling Knob & Indicator Set by jonwienke
...erence between the highest and lowest corners to be less than 0.03mm, but anything less than 0.05mm is good enough in most cases.
thingiverse
free

Bed adjuster for Davinci 2.0 by georgarloese
...0 by georgarloese
thingiverse
bed adjusting knobs for davinci 2.0
60 deg turn (1 knob) gives 8 point on the calibration numbers.
thingiverse
free

Test Cubes by craigj
...re advanced test tools like temp towers and overhang tests to fine tune temps, speeds, fans if you want to really dial things in.
thingiverse
free

Anet A8, Prusa glass bed bracket / holder by schnuffi
...
you'll need 2 x corner a and 2x corner b.
mount the corners with the higher side pointing to the front/back of your printer.
thingiverse
free
Tevo Tornado Leveler Knob by ianj001
...ra
this may work on a cr-10 too.
if you make one, please post a make on here, that's what keeps me publishing to thingiverse.
thingiverse
free

FlashForge Creator Pro Print Bed Stabilizer by DaddyOh5150
...nable to turn them (hand tight, do not over tighten!).
proceed with your preferred method for leveling your bed. happy printing!
Tips
archibase_planet
free

Felt-tips
...felt-tips
archibase planet
felt-tips felt-tips soft-tip pen
felt-tips - 3d model (*.gsm+*.3ds) for interior 3d visualization.
design_connected
$16

Tip Ton
...tip ton
designconnected
vitra tip ton computer generated 3d model. designed by osgerby , jay.
design_connected
$16
Tip toe
...tip toe
designconnected
bonaldo tip toe chairs computer generated 3d model. designed by mauro lipparini.
turbosquid
$30

Tip of toes
...osquid
royalty free 3d model tip of toes for download as ige on turbosquid: 3d models for games, architecture, videos. (1338675)
turbosquid
$7

Tip Ton
...turbosquid
royalty free 3d model tip ton for download as max on turbosquid: 3d models for games, architecture, videos. (1647484)
turbosquid
$5
Tip of the Tongue
...alty free 3d model tip of the tongue for download as and obj on turbosquid: 3d models for games, architecture, videos. (1658556)
turbosquid
$5

jar to tip
...bosquid
royalty free 3d model jar to tip for download as max on turbosquid: 3d models for games, architecture, videos. (1335825)
turbosquid
$2

Tip for stick
...id
royalty free 3d model tip for stick for download as blend on turbosquid: 3d models for games, architecture, videos. (1491971)
3ddd
$1

Bonaldo / Tip Toe
...bonaldo / tip toe
3ddd
bonaldo
bonaldo tip toe
3ddd
$1
VITRA TIP TON
...a , tip ton
vitra tip ton
rocking chair
meshsmooth with iterations = 3
as render values
Beds
3ddd
$1

bed
...bed
3ddd
bed , постельное белье
bed
3ddd
$1

bed
...bed
3ddd
bed , постельное белье
bed
3ddd
$1

bed
...bed
3ddd
bed , постельное белье
bed
3ddd
$1

bed
...bed
3ddd
bed , постельное белье
bed
3ddd
$1

bed
...bed
3ddd
bed , постельное белье
bed
3ddd
$1

bed
...bed
3ddd
bed , постельное белье
bed
3ddd
free

bed
...bed
3ddd
bed , постельное белье
bed
3ddd
free

bed
...bed
3ddd
bed , постельное белье
bed
3ddd
$1

Bed
...bed
3ddd
bed , постельное белье , постель
bed
3d_export
$7

bed adairs bed
...rs bed
3dexport
bed adairs bed in modern style. if you want a smoother surface, please turn on turbosmooth in the modifier list.
Glass
archibase_planet
free
Glasses
...glasses
archibase planet
glass wine-glass liqueur-glass
glasses- 3d model for interior 3d visualization.
archibase_planet
free

Glass
...archibase planet
glass cocktail glass tall wine glass martini glass
glass - 3d model (*.gsm+*.3ds) for interior 3d visualization.
archibase_planet
free

Glass
...glass
archibase planet
glass wine-glass glass-ware
glass n030209 - 3d model (*.gsm+*.3ds) for interior 3d visualization.
archibase_planet
free

Glass
...glass
archibase planet
glass-ware glass glass ware
glass n141109 - 3d model (*.gsm+*.3ds) for interior 3d visualization.
3d_ocean
$2
Glass
...liquid container low-poly glass nice glass obj r15 water glass
3d model of a beautiful glass. created the model in cinema 4d r15.
archibase_planet
free
Glass
...glass
archibase planet
glass tall wine glass wine-glass
glass n300514 - 3d model (*.gsm+*.3ds) for interior 3d visualization.
archibase_planet
free

Glass
...glass
archibase planet
glass wine-glass tall wine glass
glass n091210 - 3d model (*.gsm+*.3ds) for interior 3d visualization.
archibase_planet
free
Glass
...glass
archibase planet
glass tall wine glass glass-ware
glass n081011 - 3d model (*.gsm+*.3ds) for interior 3d visualization.
3d_ocean
$9
glasses
...glasses
3docean
glasses
max glasses v-ray
archibase_planet
free
Glass
...glass
archibase planet
glass-ware glass
glass - 3d model (*.gsm+*.3ds) for interior 3d visualization.
Printing
design_connected
$27

...print
designconnected
moroso print computer generated 3d model. designed by wanders, marcel.
3ddd
free

Eichholtz Prints
...- eichholtz print central station i
13 - eichholtz print central station ii
14 - eichholtz print marisa
15 - eichholtz print tish
3ddd
$1

Eichholtz Prints
...print abstract - set of 2
10 - eichholtz print orange abstract
11 - eichholtz print buddha right
12 - eichholtz print buddha left
turbosquid
$1

... available on turbo squid, the world's leading provider of digital 3d models for visualization, films, television, and games.
3ddd
free

Eichholtz Prints
...of 4
2 - print dunbar 2 set of 4
3 - print guadeloupe 1 set of 4
4 - print guadeloupe 2 set of 4
5 - print giles
6 - print trett
3ddd
$1

Eichholtz Prints
...nt tutti frutti
3 - eichholtz prints watson - set of 2
4 - eichholtz prints antique nautilus - set of 2
5 - eichholtz print tiara
3d_export
$5

Monster for printing
...monster for printing
3dexport
monster 3d model printing
3ddd
free

printed rug
...printed rug
3ddd
ковер
very creative printed rug
3ddd
free

Eichholtz Prints
...иал: бумага
габариты (вхш): 72 x 62 см
описание: print sweetmeat - постер в деревянной раме.
3 - prints varsity set of 2
арти
3ddd
free

Art Print Posters
...art print posters
3ddd
прованс
art print posters by patrician prints