Thingiverse
Presto Dehydrator Control Kit by truglodite
by Thingiverse
Last crawled date: 3 years ago
Updated code: https://github.com/truglodite/Dehydrator
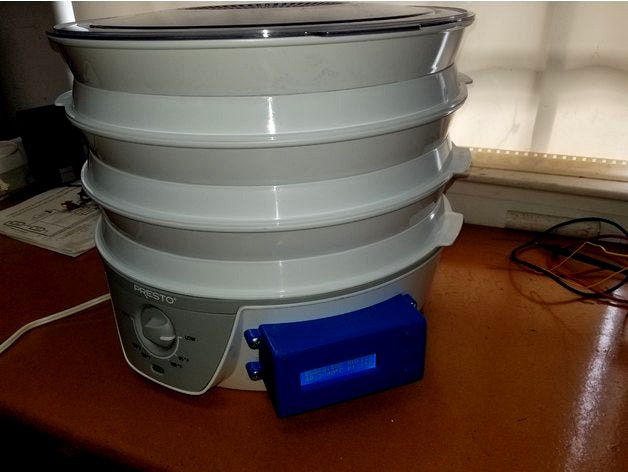
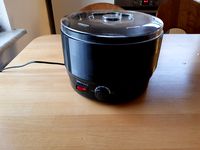
I decided to hack my Presto 6302 food dehydrator to control it with an Arduino 328p. The result is a smart dehydrator that uses a table of drying profiles (temperature and time) based on suggestions at printdry.com. The heater and fan are separately relay controlled, so the fan can run a little longer in holding mode after the heater turns off to prevent overheating of the appliance. In dry mode the temperature is controlled to the recommended drying temperature +- a hysterisis value, for the time recommended for the selected filament, and the fan is always on. After drying time has elapsed, it enters a holding mode, where humidity is controlled by hysterisis within +-1%, and the fan turns off when not needed. During holding mode the controller also makes sure the temperature does not exceed the holding temperature for the selected filament. The code makes use of #defines so you can customize almost every aspect of operation (max/min temps, hysterisis, edit the filament table...). There is also a hidden bootup mode (hold the select button until the splash screen shows) that allows the user to adjust temperature hysterisis to a value other than the one configured at compile time. This may be useful once in a while if you are doing something that requires tighter or looser tolerances on temperature. The LCD displays humidity, temperature, setpoints, and heater duty cycle % as appropriate depending on the mode it's in. The duty cycle in the code is just a factor used to calculate the timing of on/off events. That's the basics of the Arduino program ... the code has more details and comments (please at least read my wiring notes in the code... there for your safety).
I'll assume builders of this project meet the minimum requirements of being comfortable working with high voltage, as well as knowing how to get around designing and building a typical arduino based project (ie soldering, protoboards, wiring sensors/buttons/lcds, strain relief, separation from high voltage, 5V supply w/ filtering...).
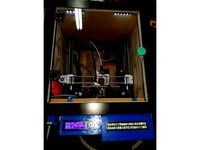
The project makes use of the Presto 6302 dehydrator, however based on photos I suspect it will also fit other Presto models you typically find on Amazon (6300 & 6301). I chose the 6302 because it has a 600W heater and is similarly sized to the more expensive 6301. The 6300 has a significantly smaller heater that I thought might struggle to reach 70C (for Nylon). In my testing, the 6302 proved easily capable of holding 80C in a room of 18C ambient. It also has a thermal fuse near the heating element for safety.
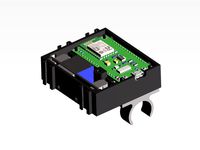
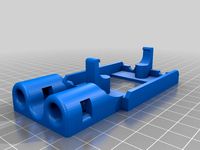
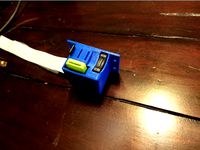
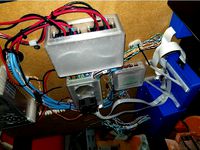
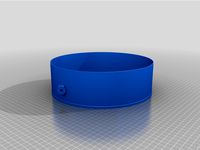
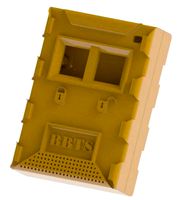
The relay box is designed to accomodate 2 DAOKI brand relay boards I got from Amazon:https://www.amazon.com/DAOKI-Channel-optocoupler-Support-Trigger/dp/B00XAGT052
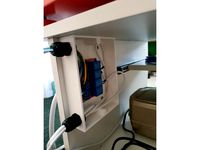
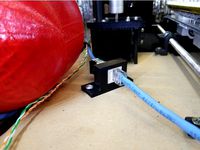
These have optoisolators and high voltage notching for safety, and work perfectly with the 5V output on the Arduino pro mini I used. I didn't take enough pictures probably, but the relay box lid is such a tight fit so I didn't need screws to secure it. In fact I had to cut off one of the outer tabs to get it to snap in. You will have to drill your dehydrator to pass wires the relay box. The box has a notch in front to fit a 1" grommet on the hole... may want to print first so you can line that hole up with the notch. The relay box is secured underneath the dehydrator using 2 of the original screws for the motor cover.
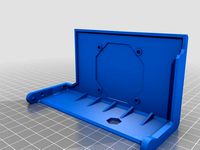
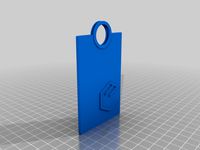
The controller box is designed to fit a standard 1602 lcd display and 6x6x5mm momentary NO tactile buttons like these:https://www.mouser.com/ProductDetail/ALPS/SKHHAKA010?qs=seHrhfPpLDyPUsCTaeDTPQ%3D%3D
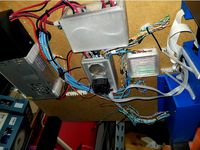
I used an LCD with an i2c backpack, but you can use whatever else if you can edit the code. There is also plenty of room left for a pro-mini and a 5V bus board to distribute 5V to everything. I didn't provide mounts for these because with all the wiring the pro-mini can be securely tucked in on top of the buttons, and my diy bus board (with 1000uF and 0.1uF caps... trust me you will want these to filter motor & relay noise). I just heatshrinked the bus board and stuffed it over the LCD. Note that I'm not 100% pleased with the button mounts; the supports (from Cura) were placed between the button and switch, which made them sorta hard to remove for proper movement. I used pliers and an xacto blade to work them out to where I had enough movement to operate the switches. The controller box is held to the Dehydrator using 8-32 screws I had lying around. I just drilled/tapped the Dehydrator to match the control box, and cut the screws short enough so they wouldn't cause problems with the high voltage wiring on the other side of that plastic. As you can see in the pics, I also drilled a hole in the control box and glued in my 3mm indicator led (super glue).
I used a DHT11 sensor for humidity, and a Dallas sensor for temperature. The DHT11 can certainly be improved upon. Just edit the code to make use of whatever you like. I suggest placing the sensors near the middle of the drying enclosure. Placing them near the bottom you will get latent heat from the heating element after things turn off in holding mode. The sensors are basically on a small protoboard at the end of a piece of shielded 90C rated USB cable. The sensor wire passes through a grommet I installed on the grey bottom of the dehydrator base (you'll see how to route it near the original thermostat once it's open).
For a 5V supply, I just used an old bluetooth wallwart type headset charger I had lying around. You can use a USB supply or whatever as long as it has enough juice for the relays (~400mA for both). On the Presto 6302 there was a perfect spot next to the side hole in the relay box to mount my wallwart (ziptied to vent slots behind the original thermostat). To connect the wallwart to line voltage, I solder/heatshrinked some THHN 14awg wiring to the wallwart's outlet prongs, and fed it through the hole in the relay box. The 5V line passes through the relay box and in to the controller box, where I soldered it to my 5V bus board.
Have a look at the stock wiring in the dehydrator and determine what needs to be wired to where. I made notes on how I wired my relays in the code to help (14awg THHN is great for this). I used wire nuts to secure the THHN near the plug cord strain relief. I used electrical tape and zipties for additional security.
I hope someone finds this project fun and doable... please do share photos or comments here if you pull it off.
=======================================$
UPDATE 5.8.18:
I uploaded a version 2 ino file, with the button delay shortened from 4sec to 1sec. Also the fan now stays on the whole time it is in drying mode. The continuous fan should get filaments dryer faster. I also haven't had any LCD corruption with the shorter delay (adding a bigger 5V line ripple capacitor helped a lot).
UPDATE 5.9.18:
Uploaded version 3, which removes the button delay and adds an off mode. Tests without the delay worked fine now that my 5V supply has decent ripple capacitors. Boot up goes to off mode. Modes now follow the cycle: OFF - Filament Select - Dry - Holding - OFF...
Update 5-19-2018:
So the phantom button presses persisted despite the strong input ripple capacitors I added. I noticed it mainly happened in holding mode when the motor turns off. So I figured it was a bad induced spike that was too much for the internal pullups to handle (about 30-50kOhm on arduinos). So instead of bringing back the code delays, I installed a set of 4k7 pullup resistors. This is a proper solution I put off due to the labor involved. Glad I got to it because there have been no problems since adding them.
Update 5-21-2018:
The weather is starting to warm up where I live, and it is time for me to toss the PLA relay box and lid in the bin and replace them with ABS parts. Before doing so, I wanted to fix up some things. I uploaded version 2 stl files for the relay box and lid, with correct printing orientations, and no rectangular window where fingers could pry in to the relays.
Update 5-30-2019: Version 2!
I didn't like how the original buttons were designed on this thing. So I redesigned the control part with a 2 piece button mount design that have worked great on my more recent things. The part is much easier to print now, with only build plate supports required on the control box and no supports on the button mount. It's also easier to get a good gap for smooth button operation using the newer mount. Once you have the button gap set, melt down the posts to lock them in place... no hardware required! :D
Update 6-2-2019: RC Snubber
I had a few more "phantom button press" events, and decided to check it out on my oscope. Turns out the real problem was inductive transients when the fan relay turns off. The resulting voltage spike was more than enough to upset the uC. So I added an rc snubber in parallel to the motor lines (0.1uF+120ohm), which absorbs the transients and cures the problem reliably. Here is a good safe snubber for this purpose:https://www.mouser.com/ProductDetail/KEMET/PMR209MC6100M100R30?qs=sGAEpiMZZMv1cc3ydrPrF85GIl804cbNwDuOA8wseDk%3D
I decided to hack my Presto 6302 food dehydrator to control it with an Arduino 328p. The result is a smart dehydrator that uses a table of drying profiles (temperature and time) based on suggestions at printdry.com. The heater and fan are separately relay controlled, so the fan can run a little longer in holding mode after the heater turns off to prevent overheating of the appliance. In dry mode the temperature is controlled to the recommended drying temperature +- a hysterisis value, for the time recommended for the selected filament, and the fan is always on. After drying time has elapsed, it enters a holding mode, where humidity is controlled by hysterisis within +-1%, and the fan turns off when not needed. During holding mode the controller also makes sure the temperature does not exceed the holding temperature for the selected filament. The code makes use of #defines so you can customize almost every aspect of operation (max/min temps, hysterisis, edit the filament table...). There is also a hidden bootup mode (hold the select button until the splash screen shows) that allows the user to adjust temperature hysterisis to a value other than the one configured at compile time. This may be useful once in a while if you are doing something that requires tighter or looser tolerances on temperature. The LCD displays humidity, temperature, setpoints, and heater duty cycle % as appropriate depending on the mode it's in. The duty cycle in the code is just a factor used to calculate the timing of on/off events. That's the basics of the Arduino program ... the code has more details and comments (please at least read my wiring notes in the code... there for your safety).
I'll assume builders of this project meet the minimum requirements of being comfortable working with high voltage, as well as knowing how to get around designing and building a typical arduino based project (ie soldering, protoboards, wiring sensors/buttons/lcds, strain relief, separation from high voltage, 5V supply w/ filtering...).
The project makes use of the Presto 6302 dehydrator, however based on photos I suspect it will also fit other Presto models you typically find on Amazon (6300 & 6301). I chose the 6302 because it has a 600W heater and is similarly sized to the more expensive 6301. The 6300 has a significantly smaller heater that I thought might struggle to reach 70C (for Nylon). In my testing, the 6302 proved easily capable of holding 80C in a room of 18C ambient. It also has a thermal fuse near the heating element for safety.
The relay box is designed to accomodate 2 DAOKI brand relay boards I got from Amazon:https://www.amazon.com/DAOKI-Channel-optocoupler-Support-Trigger/dp/B00XAGT052
These have optoisolators and high voltage notching for safety, and work perfectly with the 5V output on the Arduino pro mini I used. I didn't take enough pictures probably, but the relay box lid is such a tight fit so I didn't need screws to secure it. In fact I had to cut off one of the outer tabs to get it to snap in. You will have to drill your dehydrator to pass wires the relay box. The box has a notch in front to fit a 1" grommet on the hole... may want to print first so you can line that hole up with the notch. The relay box is secured underneath the dehydrator using 2 of the original screws for the motor cover.
The controller box is designed to fit a standard 1602 lcd display and 6x6x5mm momentary NO tactile buttons like these:https://www.mouser.com/ProductDetail/ALPS/SKHHAKA010?qs=seHrhfPpLDyPUsCTaeDTPQ%3D%3D
I used an LCD with an i2c backpack, but you can use whatever else if you can edit the code. There is also plenty of room left for a pro-mini and a 5V bus board to distribute 5V to everything. I didn't provide mounts for these because with all the wiring the pro-mini can be securely tucked in on top of the buttons, and my diy bus board (with 1000uF and 0.1uF caps... trust me you will want these to filter motor & relay noise). I just heatshrinked the bus board and stuffed it over the LCD. Note that I'm not 100% pleased with the button mounts; the supports (from Cura) were placed between the button and switch, which made them sorta hard to remove for proper movement. I used pliers and an xacto blade to work them out to where I had enough movement to operate the switches. The controller box is held to the Dehydrator using 8-32 screws I had lying around. I just drilled/tapped the Dehydrator to match the control box, and cut the screws short enough so they wouldn't cause problems with the high voltage wiring on the other side of that plastic. As you can see in the pics, I also drilled a hole in the control box and glued in my 3mm indicator led (super glue).
I used a DHT11 sensor for humidity, and a Dallas sensor for temperature. The DHT11 can certainly be improved upon. Just edit the code to make use of whatever you like. I suggest placing the sensors near the middle of the drying enclosure. Placing them near the bottom you will get latent heat from the heating element after things turn off in holding mode. The sensors are basically on a small protoboard at the end of a piece of shielded 90C rated USB cable. The sensor wire passes through a grommet I installed on the grey bottom of the dehydrator base (you'll see how to route it near the original thermostat once it's open).
For a 5V supply, I just used an old bluetooth wallwart type headset charger I had lying around. You can use a USB supply or whatever as long as it has enough juice for the relays (~400mA for both). On the Presto 6302 there was a perfect spot next to the side hole in the relay box to mount my wallwart (ziptied to vent slots behind the original thermostat). To connect the wallwart to line voltage, I solder/heatshrinked some THHN 14awg wiring to the wallwart's outlet prongs, and fed it through the hole in the relay box. The 5V line passes through the relay box and in to the controller box, where I soldered it to my 5V bus board.
Have a look at the stock wiring in the dehydrator and determine what needs to be wired to where. I made notes on how I wired my relays in the code to help (14awg THHN is great for this). I used wire nuts to secure the THHN near the plug cord strain relief. I used electrical tape and zipties for additional security.
I hope someone finds this project fun and doable... please do share photos or comments here if you pull it off.
=======================================$
UPDATE 5.8.18:
I uploaded a version 2 ino file, with the button delay shortened from 4sec to 1sec. Also the fan now stays on the whole time it is in drying mode. The continuous fan should get filaments dryer faster. I also haven't had any LCD corruption with the shorter delay (adding a bigger 5V line ripple capacitor helped a lot).
UPDATE 5.9.18:
Uploaded version 3, which removes the button delay and adds an off mode. Tests without the delay worked fine now that my 5V supply has decent ripple capacitors. Boot up goes to off mode. Modes now follow the cycle: OFF - Filament Select - Dry - Holding - OFF...
Update 5-19-2018:
So the phantom button presses persisted despite the strong input ripple capacitors I added. I noticed it mainly happened in holding mode when the motor turns off. So I figured it was a bad induced spike that was too much for the internal pullups to handle (about 30-50kOhm on arduinos). So instead of bringing back the code delays, I installed a set of 4k7 pullup resistors. This is a proper solution I put off due to the labor involved. Glad I got to it because there have been no problems since adding them.
Update 5-21-2018:
The weather is starting to warm up where I live, and it is time for me to toss the PLA relay box and lid in the bin and replace them with ABS parts. Before doing so, I wanted to fix up some things. I uploaded version 2 stl files for the relay box and lid, with correct printing orientations, and no rectangular window where fingers could pry in to the relays.
Update 5-30-2019: Version 2!
I didn't like how the original buttons were designed on this thing. So I redesigned the control part with a 2 piece button mount design that have worked great on my more recent things. The part is much easier to print now, with only build plate supports required on the control box and no supports on the button mount. It's also easier to get a good gap for smooth button operation using the newer mount. Once you have the button gap set, melt down the posts to lock them in place... no hardware required! :D
Update 6-2-2019: RC Snubber
I had a few more "phantom button press" events, and decided to check it out on my oscope. Turns out the real problem was inductive transients when the fan relay turns off. The resulting voltage spike was more than enough to upset the uC. So I added an rc snubber in parallel to the motor lines (0.1uF+120ohm), which absorbs the transients and cures the problem reliably. Here is a good safe snubber for this purpose:https://www.mouser.com/ProductDetail/KEMET/PMR209MC6100M100R30?qs=sGAEpiMZZMv1cc3ydrPrF85GIl804cbNwDuOA8wseDk%3D
Similar models
thingiverse
free

Presto Dehydrator Filament Drying Adapter (06300,06301) by Papa_Oso
...ectric-dehydrator/dp/b008h2oely
and presto 06301: https://www.amazon.com/presto-dehydro-digital-electric-dehydrator/dp/b008h2oekk
grabcad
free

0-60Min Delay Timer Timing Infinite Cycle Switch Relay ON OFF Trigger Module
...ge(uc) of resistor. take a 5v 15min module as example. if uc=2v, time=2v/5v*15min=6min.
package included:
1pc*timer relay module
thingiverse
free

Printdry Bezel - adds digital temp control by makerbotman
... in one fell swoop.
if you are not qualified with high-voltage, cabinet wiring, you should not attempt.
proceed at your own risk.
thingiverse
free
Modular thermostat NodeMCU Hassio by njosef
... hassio.
design is modular. on sides are holder for another sensors. not used now. box can be holded by two holders on water tube
thingiverse
free

Arduino DHT22 with LCD by dplumly
...giverse
box to house an lcd, arduino, and a dht22 humidity and temperature sensor.
i will upload code and a fritzing shortly.
thingiverse
free

Filament Dehydrator Temperature controller - Thermostat by MirageC
...ruit-gfx-library
https://github.com/adafruit/adafruit_ssd1306
arduino code: https://github.com/miragec79/filamentdryer_controller
thingiverse
free

Relais Box (with SRD-05VDC-SL-C)
...d-05vdc-sl-c)
thingiverse
relais box
relais : srd-05vdc-sl-c
low level trigger (5v)
to control high voltage devices (10v 250vac)
thingiverse
free
K40 Laser Relay control box
...9851?hash=item3d5d71e31b:m:mmiqmrdyubao0bu3hzbuxza
uses x6 3.5 x 16mm screws
uses x4 3.0 x 12mm screws
uses x2 pg11 cable glands
thingiverse
free
Arduino MEGA Project Box by Jurie
... from blank to others able to hold a tft/lcd screen and buttons. front cover has holes to allow wiring from external connections.
thingiverse
free

Omron ice cube relay box by Old-Steve
...duino boxes.https://www.thingiverse.com/thing:1719567
that box is 40mm tall.
this box is 30mm tall so it fits the relay perfectly
Truglodite
thingiverse
free
RCWL-0516 Cover by truglodite
... made it thin but with some clearance, to save filament and minimize interference. it fits nicely for me printed in abs on my a8.
thingiverse
free
SSR Cover (Remix) by truglodite
.... a pair of zipties may be used to secure the wires in their tubes. sized to work with larger wires and crimp on spade terminals.
thingiverse
free
8mm LED Strip Clip by truglodite
... have to remove the adhesive backing, but loose enough to where you can still slide the strip in even if the adhesive is exposed.
thingiverse
free
Ramps Enclosure Remix (lid pin added) by truglodite
.... so i did this remix to add a flange and holes to accept a pin/bolt that locks the lid shut (so it won't fall from gravity).
thingiverse
free
Keystone Surface Mount (single) by truglodite
...small gap on 2 sides of the keystone's face once installed, but it's barely noticeable and they still hold very securely.
thingiverse
free
Anet A8 20mm Printed Rubber Foot by truglodite
... flat headed screws. i just used some small self tapping flat heads, but a set of machine screws and nuts could also get it done.
thingiverse
free
Micro SD Card Extension, Cards, & Stick Mount by truglodite
... room is for my larger usb3 readers to fit, but the standard usb hole inside secures smaller sticks too. prints without supports.
thingiverse
free
4ch Mosfet Enclosure by truglodite
...assive cooling. the slots alone are adequate for my application, but comment if you need me to add a lid with a fan port instead.
thingiverse
free
Double Mosfet Box by truglodite
...n to save filament. the dimensions are designed for a 0.45mm printer line width (0.4mm nozzle), but other settings may work fine.
thingiverse
free
IEE VFD Enclosure Control Box by truglodite
...cts where you want a honkin' big vfd with "3 button menus". i made the rear compartment over sized for this reason.
Dehydrator
3d_ocean
$1
Pumpkin Seeds Seamless Background
...tiling pattern • 1024×1024 pix texture • .jpg and flat .png file • tiling texture click here if you need bigger file at photodune
3d_export
$7

electric fruit dryer machine
...electric fruit dryer machine 3dexport fruit dehydrator machine 3d model:<br>dryer include fruits models that are randomly...
sketchfab
$4
Food Dehydrator
...food dehydrator
sketchfab
low poly food dehydrator - food dehydrator - buy royalty free 3d model by sunny (@sunny7610)
thingiverse
free

Dehydrator Extension by fluffywhitewolf
...the trays.
specific dehydrator model : http://www.amazon.com/gp/product/b075zb3v9s/
diameter is 240mm. printed on an ender5plus
thingiverse
free
food dehydrator filamentdryer mod
...ys, so you can still use it as food dehydrator.
the diameter of the dehydrator is 235mm.
rolls up to 100mm width will fit inside.
thingiverse
free
dehydrator with filament outlet by jemad871
...or with filament outlet by jemad871
thingiverse
ring for the cheap diy dehydrator to allow for 2 roles and outlet for 1 filament
thingiverse
free

DIY Filament Dehydrator
...n be used simultaneously to recharge desiccant packets. by printing additional collars more than two reels could be accommodated.
thingiverse
free

Dehydrator Spool Holder by mslivkoff
...he post on the bottom of the dehydrator to hold the filament spool up and allow the warm are to circulate freely around the spool
thingiverse
free

Dehydrator Filament guide and spool holder by 3dphaus
...er by 3dphaus
thingiverse
filament guide and spool holder for food dehydrator.
this is for dehydrator with diameter of 27.5 cm.
thingiverse
free

Lower Tray Westinghouse Dehydrator WFD100W by jtgraphics
...lower tray westinghouse dehydrator wfd100w by jtgraphics
thingiverse
lower tray for westinghouse dehydrator wfd100w
Presto
turbosquid
$15

Presto nightstand
...
royalty free 3d model presto nightstand for download as 3ds on turbosquid: 3d models for games, architecture, videos. (1372298)
turbosquid
$6

Floor Presto Memphis 592
... free 3d model presto memphis 592 for download as max and fbx on turbosquid: 3d models for games, architecture, videos. (1297972)
3ddd
$1

Круглый накладной светильник Odeon Light 2405/1A Presto
...тр (см) 23,5
кол-во ламп (шт.) 1
макс. мощность лампы (w) 60
напряжение лампы (v) 220
тип ламп (цоколь) e14
тип лампы накаливания
archive3d
free

Fireplace 3D Model
...fireplace 3d model archive3d fireplace chimney hearth fireplace presto n091113 - 3d model (*.gsm+*.3ds) for interior 3d...
sketchfab
$35

Nike React Presto
...
shown: multi-color/pistachio frost/white/black
style: cw7303-900
- nike react presto - buy royalty free 3d model by chrisprice
3d_sky
free

Fireplace "Presto"
...fireplace "presto"
3dsky
fireplace
fireplace "presto". archiving everything there.
thingiverse
free

Presto by KingRahl
...ingrahl
thingiverse
a 3d model created from a concept drawing found here.https://twitter.com/fatceliac/status/891355891202641920
thingiverse
free

Presto logs gauge by stainless
...gs gauge for the 1:8 eaglemoss delorean.
included the gauge image as well.
i`ve attached some black wire to the connection point.
thingiverse
free
Presto Dehydrator Filament Drying Adapter (06300,06301) by Papa_Oso
...ectric-dehydrator/dp/b008h2oely
and presto 06301: https://www.amazon.com/presto-dehydro-digital-electric-dehydrator/dp/b008h2oekk
thingiverse
free
Single card holder (metro, presto)
...single card holder (metro, presto)
thingiverse
cardkolder for single use: metro, subway, ttc, prestocards
Kit
turbosquid
$3

Bathroom Kit Baño kit
... available on turbo squid, the world's leading provider of digital 3d models for visualization, films, television, and games.
turbosquid
$19

Kit
... available on turbo squid, the world's leading provider of digital 3d models for visualization, films, television, and games.
3d_export
$20

Drift Kit
...drift kit
3dexport
turbosquid
$40

BitCoin Kit
...urbosquid
royalty free 3d model bitcoin kit for download as on turbosquid: 3d models for games, architecture, videos. (1519068)
turbosquid
$9

Industrial kit
...osquid
royalty free 3d model industrial kit for download as on turbosquid: 3d models for games, architecture, videos. (1144117)
turbosquid
$6

Kit Vases
...
turbosquid
royalty free 3d model kit vases for download as on turbosquid: 3d models for games, architecture, videos. (1285114)
turbosquid
free

Survival Kit
...rbosquid
royalty free 3d model survival kit for download as on turbosquid: 3d models for games, architecture, videos. (1637721)
turbosquid
$50

Ninja Kit
...rbosquid
royalty free 3d model ninja kit for download as fbx on turbosquid: 3d models for games, architecture, videos. (1672364)
turbosquid
$35

Brushes Kit
...osquid
royalty free 3d model brushes kit for download as max on turbosquid: 3d models for games, architecture, videos. (1216721)
turbosquid
$19
Medical kit
...osquid
royalty free 3d model medical kit for download as fbx on turbosquid: 3d models for games, architecture, videos. (1486089)
Control
3d_ocean
$4
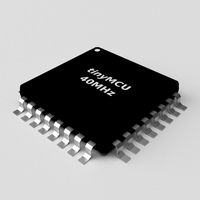
Controller TQFP32
...qfp32
3docean
chip controller cpu electronic gpu mcu micro controller silicon smd tqfp wafer
a micro controller in tqfp32 package
3d_ocean
$4
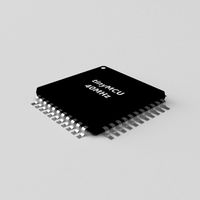
Controller TQFP44
...44
3docean
chip controller cpu electronic gpu mcu micro controller package smd tqfp tqfp44
a micro controller in a tqfp44 package
3d_export
$15
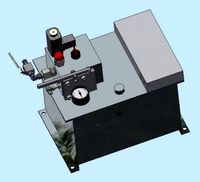
control unit
...control unit
3dexport
control unit
3ddd
$1
Yacht control
...yacht control
3ddd
yacht control
3d_export
$5
controle pgdm
...controle pgdm
3dexport
carcaca controle pgdm
turbosquid
free

controler
... available on turbo squid, the world's leading provider of digital 3d models for visualization, films, television, and games.
3ddd
$1

Control
...
http://www.schmitz-leuchten.de/html-ru/einzelleuchten-lampentyp-details.php?lamptype_no=700&group;=917&id;=731
3d_ocean
$4
Controller TQFP100
...100
3docean
chip computer cpu electronic gpu mcu micro controller pin platine silicon wafer
a micro controller in tqfp100 package
3d_ocean
$4
Controller TQFP64
...qfp64
3docean
chip computer cpu gpu mcu micro controller package silicon tqfp tqfp64 wafer
a micro controller in a tqfp64 package
3d_ocean
$7

Remote controller
... control switcher tv remote
remote controller for tv, sound systems etc easy to edit textures photo real rendered with mental ray