Thingiverse
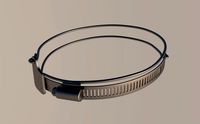
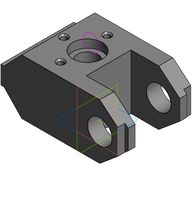
pneumatic extruder clamp, carriage adapter, and solenoid bracket by nicksears
by Thingiverse
Last crawled date: 3 years, 1 month ago
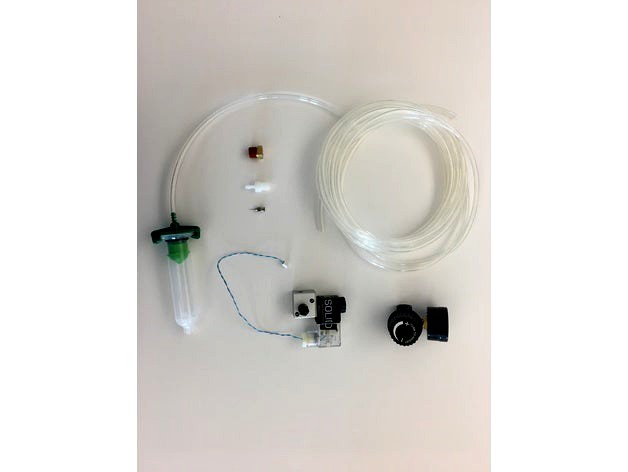
Pneumatic extrusion printing is actually very simple on almost any open source 3D printer. All you have to do is make this pneumatic extruder and set up post-processing scripts to turn on an output - this output opens a valve and applies pressurized air to dispense material.
Pressure
The hardest part may be a consistent source of high pressure air. If you have an air compressor/tank or house air at a lab/shop this will work best. I'm also working on an adaptation of a 2L soda bottle, these can hold up to 100 psi! (50psi safely) even still, use at your own risk). You should not need much more than 30 psi, and we will use a 30psi max regulator to the pressure we need (only ~10-15psi). Again the flow is: pressure source/regulator, solenoid to control flow, dispensing syringe.
Electronics
You do not use the existing extruder motor, but you do need an extra output like a controllable fan that can handle ~500mA (some fans are only 20-50mA). Alternatively, you can use the extruder heater output, but you will not be able to heat and control a nozzle tip and you may have to make firmware modifications to make it work. You will have to make sure a safety feature is disabled that kills the printer if the heater is on but an increase in temperature is not detected. This can be dangerous for (hot) plastic printing though, so use at your own risk! Some printers don't have this enabled by default, so for example the Monoprice Mini does not have an extra fan or open source firmware, but can use the extruder with this setup.
Toolpath
To automate the use of these outputs, you will have to install python and point your slicer to scripts that add lines of code (only a semicolon between scripts with the full path). One script turns the solenoid ON AFTER an UNretraction (make sure retraction is >0 in your slic3r) and unretraction should only and always happens when you want to start dispensing. Another script turns the solenoid OFF BEFORE a retraction to stop dispensing (if it stops AFTER the retraction it will leave a blob at the end of a line). A final script may be helpful to give a small pause (100ms) to let the material start extruding or there may be a delay and gap in the line. These scripts will run after slicing a file and insert the respective lines, and the order is critical (pause, on, off).
Extruder
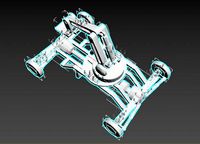
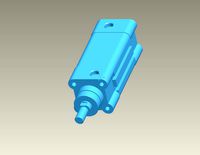
For the physical setup, you will need the printed parts, solenoid valve, and some cheap dispensing syringes/tubing/connectors. The design includes a carriage mount for an anet a8-style printer, but I included the *.step file so you could more easily modify it. I also made a bracket to hold the solenoid so both it and the regulator could be on the top of the frame (pictures to come!) You need to use a 3-way solenoid - if you use a 2-way, the pressure will be trapped in the syringe and ooze, rather than venting.
Calibration
I've included custom calibration scripts that are in coarse, medium, and fine increments. You may need to change some of the coordinates if you printer size is different. First run the coarse calibration - it will begin with a loop tat the average speed that will allow you get a ballpark pressure with the regulator. It will then extrude 5 lines at the lowest speed through the highest. Whichever line is closest to the appropriate width is the correct speed to use with the medium and/or fine calibrations. It's really helpful to have a camera mounted directly to the extruder - the absolute cheapest "6 LED webcam" (~$4!) on ebay or amazon work great for this because they can be manually focused close like we need. You might get 2-3 because they are pretty cheap and you might get one DOA. Additionally, for the exact type linked, you remove the base, tap the stem with m3 thread, and screw into it with the bolt that retains the dispensing syringe. I've included "@pause" commands for use with Repetier Host to simplify taking pictures after printing calibration lines.
Bed Leveling
I highly recommend using auto-bed leveling with a conductive nozzle and metal bed to eliminate variability measuring line width. I may post this as a separate thing with details about how to enable it in the firmware. The physical setup is easy - fix a 3/16" thick 8x8" aluminum sheet from mcmaster-carr to the bed with binder clips. A precision ground surface or extreme flatness is not necessary (you will end up scratching it a bunch anyways). Then connect one alligator clip to the bed and one to the needle, and use those two wires in place of a typical mechanical endstop switch.
The links aren't working, you'll have to copy and paste the text into your browser, sorry!
https://www.amazon.com/dp/B000KKQIZG/ 3/8-18 NPT to 1/8-27 NPT adapterhttps://www.amazon.com/dp/B017VNO33S/ 1/8-27 NPT to 1/8 barbhttps://www.amazon.com/dp/B017VNOMZM/ 1/8 barb to 1/4-18 NPThttps://www.amazon.com/dp/B01BPQDG62/ Precision regulator (3-30 PSI)https://www.amazon.com/dp/B00VU14L4Y/ 3 way solenoid valvehttps://www.amazon.com/dp/B017UXCAQ6/ 1/8-27 NPT thread plughttps://www.amazon.com/dp/B01LH81EC6/ dispensing syringe (set of 5, 10, 30cc)https://www.amazon.com/dp/B003VY4M42/ Generic U19-A Night Vision Webcamhttps://www.mcmaster.com/#89015k239/ 6061 Aluminum Sheet 1/8" Thick, 8x8"https://www.mcmaster.com/#5108k43/ 1/8x1/4 PU tubing (25ft)
Pressure
The hardest part may be a consistent source of high pressure air. If you have an air compressor/tank or house air at a lab/shop this will work best. I'm also working on an adaptation of a 2L soda bottle, these can hold up to 100 psi! (50psi safely) even still, use at your own risk). You should not need much more than 30 psi, and we will use a 30psi max regulator to the pressure we need (only ~10-15psi). Again the flow is: pressure source/regulator, solenoid to control flow, dispensing syringe.
Electronics
You do not use the existing extruder motor, but you do need an extra output like a controllable fan that can handle ~500mA (some fans are only 20-50mA). Alternatively, you can use the extruder heater output, but you will not be able to heat and control a nozzle tip and you may have to make firmware modifications to make it work. You will have to make sure a safety feature is disabled that kills the printer if the heater is on but an increase in temperature is not detected. This can be dangerous for (hot) plastic printing though, so use at your own risk! Some printers don't have this enabled by default, so for example the Monoprice Mini does not have an extra fan or open source firmware, but can use the extruder with this setup.
Toolpath
To automate the use of these outputs, you will have to install python and point your slicer to scripts that add lines of code (only a semicolon between scripts with the full path). One script turns the solenoid ON AFTER an UNretraction (make sure retraction is >0 in your slic3r) and unretraction should only and always happens when you want to start dispensing. Another script turns the solenoid OFF BEFORE a retraction to stop dispensing (if it stops AFTER the retraction it will leave a blob at the end of a line). A final script may be helpful to give a small pause (100ms) to let the material start extruding or there may be a delay and gap in the line. These scripts will run after slicing a file and insert the respective lines, and the order is critical (pause, on, off).
Extruder
For the physical setup, you will need the printed parts, solenoid valve, and some cheap dispensing syringes/tubing/connectors. The design includes a carriage mount for an anet a8-style printer, but I included the *.step file so you could more easily modify it. I also made a bracket to hold the solenoid so both it and the regulator could be on the top of the frame (pictures to come!) You need to use a 3-way solenoid - if you use a 2-way, the pressure will be trapped in the syringe and ooze, rather than venting.
Calibration
I've included custom calibration scripts that are in coarse, medium, and fine increments. You may need to change some of the coordinates if you printer size is different. First run the coarse calibration - it will begin with a loop tat the average speed that will allow you get a ballpark pressure with the regulator. It will then extrude 5 lines at the lowest speed through the highest. Whichever line is closest to the appropriate width is the correct speed to use with the medium and/or fine calibrations. It's really helpful to have a camera mounted directly to the extruder - the absolute cheapest "6 LED webcam" (~$4!) on ebay or amazon work great for this because they can be manually focused close like we need. You might get 2-3 because they are pretty cheap and you might get one DOA. Additionally, for the exact type linked, you remove the base, tap the stem with m3 thread, and screw into it with the bolt that retains the dispensing syringe. I've included "@pause" commands for use with Repetier Host to simplify taking pictures after printing calibration lines.
Bed Leveling
I highly recommend using auto-bed leveling with a conductive nozzle and metal bed to eliminate variability measuring line width. I may post this as a separate thing with details about how to enable it in the firmware. The physical setup is easy - fix a 3/16" thick 8x8" aluminum sheet from mcmaster-carr to the bed with binder clips. A precision ground surface or extreme flatness is not necessary (you will end up scratching it a bunch anyways). Then connect one alligator clip to the bed and one to the needle, and use those two wires in place of a typical mechanical endstop switch.
The links aren't working, you'll have to copy and paste the text into your browser, sorry!
https://www.amazon.com/dp/B000KKQIZG/ 3/8-18 NPT to 1/8-27 NPT adapterhttps://www.amazon.com/dp/B017VNO33S/ 1/8-27 NPT to 1/8 barbhttps://www.amazon.com/dp/B017VNOMZM/ 1/8 barb to 1/4-18 NPThttps://www.amazon.com/dp/B01BPQDG62/ Precision regulator (3-30 PSI)https://www.amazon.com/dp/B00VU14L4Y/ 3 way solenoid valvehttps://www.amazon.com/dp/B017UXCAQ6/ 1/8-27 NPT thread plughttps://www.amazon.com/dp/B01LH81EC6/ dispensing syringe (set of 5, 10, 30cc)https://www.amazon.com/dp/B003VY4M42/ Generic U19-A Night Vision Webcamhttps://www.mcmaster.com/#89015k239/ 6061 Aluminum Sheet 1/8" Thick, 8x8"https://www.mcmaster.com/#5108k43/ 1/8x1/4 PU tubing (25ft)
Similar models
grabcad
free

propane regulator
...model 597fa pressure regulator for liquid or vapor propane service. it is adjustable from 1 - 15 psi and has 1/4" npt ports.
grabcad
free

3/8 NPT Pressure Regulator
...3/8 npt pressure regulator
grabcad
3/8 npt pressure regulator
grabcad
free

Pressure gauge
...pressure gauge
grabcad
1/4" npt psi gauge
thingiverse
free

Loc Line 1/4id, 1/8 NPT by jvanick
...oc line 1/4id, 1/8 npt by jvanick
thingiverse
1/4" loc line fitting by oscarino93, remixed to have a 1/8" npt fitting.
3dwarehouse
free

Pressure switch XMLF with adjustable...psi). Fluid connection 1/4 NPT female
...h adjustable differential. relay output. fluid connection 1/4 npt female #data_detection #telemecanique #traceparts #xmlfm01e2046
grabcad
free

Ashcroft Gauge 0.250 NPT 0-30 PSI
...ashcroft gauge 0.250 npt 0-30 psi
grabcad
pressure gauge
1/4" npt
0-30 pisg
3dwarehouse
free

Universal pressure sensor XMLF. 1 analogue...psi). Fluid connection 1/4 NPT female
...0 ma. pressure range -008 bar à 600 bar. fluid connection 1/4 npt female #data_detection #telemecanique #traceparts #xmlfm01d2026
grabcad
free

1/4"NPT Air Filter Regulator MAFRL1N14
...uot;npt air filter regulator mafrl1n14
grabcad
air filter/regulator, for 1/4"npt air line. max-air technology pn: mafrl1n14
3dwarehouse
free

7305 - PRESSURE REGULATOR MALE BSPT AND NPT DIAM D 1/4 INC C NPT1/8
...nd npt #7305_56_11 #legris__low_pressure #pneumatic_function_fittings #pressure_reducer_fittings #pressure_regulators #traceparts
3dwarehouse
free

Pressure transmitter XMLF. Analogue output...psi). Fluid connection 1/4 NPT female
....10 v pressure range -008 bar à 600 bar. fluid connection 1/4 npt female #data_detection #telemecanique #traceparts #xmlfm01d2016
Nicksears
thingiverse
free

smiley cube man body no support by nicksears
...pport by nicksears
thingiverse
i made a version of the smiley cube man's body that doesn't need support material.
enjoy!
thingiverse
free

individual buttons for Mmintbox by nicksears
... separate them, so modified the design to cut away the solid flat portion so it's usable as-printed. probably needs supports.
thingiverse
free

nicks peripump peristaltic pump by nicksears
... peripump itself definitely works (with a hand drill) but i'm currently assembling the gear reducer and will test it shortly.
thingiverse
free

McCormick salt or pepper grinder adapter (for drill, etc) by nicksears
...it with most printers for the actual diameter of ~42.75mm. adapted to 1/4" hexagonal bit to work with just about any drill.
thingiverse
free

plantronic voyager edge case by nicksears
...nt, but it allows you to remove easily. will add pictures when i can.
i've provided step and sldprt in case you want to edit.
thingiverse
free

nicks hysteresis calibrator by nicksears
...he file name (ie 0.5, 0.25mm). going in the opposite direction reverses this.
i tested this with a rather thick nozzle, so ymmv.
thingiverse
free

E3D clone M6 thread bowden to direct adapter by nicksears
...quests and i can make one that fits more recessed into the heatsink itself (but this will get complicated to screw it into place.
thingiverse
free

Magic chef replacement ice bucket by nicksears
...ing or rubber washer. if you are going to use the single piece version, i would verify the angle and let me know if it's off.
thingiverse
free

cubex e3d adapter for stock extruder by nicksears
... drawing of the e3d-v6 since it requires a model to post. let me know if you want one, i can ship you one for shipping cost ($7).
thingiverse
free
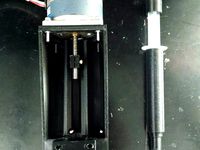
Nicks linear actuator paste extruder by nicksears
..., and holes for access to tighten the flag bolt - all so you can print two of them and mount them, side by side. (pictures soon).
Solenoid
turbosquid
$10

Solenoid table lamp
... available on turbo squid, the world's leading provider of digital 3d models for visualization, films, television, and games.
3d_export
$14
automatic switch detection equipment
...plate yadeke cylinder photoelectric induction switch silver guide rail solenoid valve equal height bolt instrument hexagon pillar drag chain...
3d_export
$20
large hydraulic workstation
...station need: hydraulic pump, motor, cartridge valve, cartridge valve, solenoid valve, safety valve, etc. the motor drives the oil...
3d_export
$10
qvv5zl5 series manifold air distribution area valve plate valve seat air circuit board 14 spec
...air outlet is connected to the components (such as solenoid valve) that need air in the complete set of...
3d_export
$16
DMC24 pulse dust collector with CADbom caxa
...strip 18x15x3500 rubber 1<br>9 m12x219 u-clamp steel 2<br>10 pulse solenoid valve (1") 4<br>11 gb/t 3287-2000 flat seat union dn25...
3dfindit
free
Solenoid
...solenoid
3dfind.it
catalog: wandfluh
thingiverse
free
Solenoid by AaronAaronAaron
...perfectly, i forgot the size but will post it soon, it should cut a lot of time out of trying to set up a nice powerful solenoid.
thingiverse
free

Solenoid Case (sparkfun Solenoid - 5v small) by Revody_inc
...ase (sparkfun solenoid - 5v small) by revody_inc
thingiverse
for a solenoid - 5v (small) https://www.sparkfun.com/products/11015
3dfindit
free

Solenoids tubular
...solenoids tubular
3dfind.it
catalog: transmotec
thingiverse
free

Key to Rainbird solenoid
...key to rainbird solenoid
thingiverse
i needed a key -tool - for easier rotating a rainbird solenoid.
Pneumatic
3d_export
$7
pneumatic charging car
...pneumatic charging car
3dexport
pneumatic charging car
turbosquid
$20

pneumatic flap
...model pneumatic flap for download as dxf, ige, stl, and sldas on turbosquid: 3d models for games, architecture, videos. (1410890)
turbosquid
$2

pneumatic actuator
...l pneumatic actuator for download as 3ds, obj, blend, and stl on turbosquid: 3d models for games, architecture, videos. (1333375)
turbosquid
$30
Cylinder pneumatic
... available on turbo squid, the world's leading provider of digital 3d models for visualization, films, television, and games.
turbosquid
$20
booster pneumatic
... available on turbo squid, the world's leading provider of digital 3d models for visualization, films, television, and games.
turbosquid
$10

Pneumatic Fitting
... available on turbo squid, the world's leading provider of digital 3d models for visualization, films, television, and games.
turbosquid
$5

pneumatic wheel
... available on turbo squid, the world's leading provider of digital 3d models for visualization, films, television, and games.
3d_export
$5

Pneumatic Unit 3D Model
...pneumatic unit 3d model
3dexport
pneumatic unit pressure velocity
pneumatic unit 3d model fau 71223 3dexport
turbosquid
$3

Pneumatic grinder
...r download as 3ds, dxf, obj, xsi, wrl, fbx, dwg, dae, and skp on turbosquid: 3d models for games, architecture, videos. (1389593)
3d_export
free

pneumatic manifold block
...atic manifold block
3dexport
modified pneumatic manifold block for shooting particles, using festo valves installed on its face.
Carriage
archibase_planet
free

Carriage
...arriage
archibase planet
perambulator baby carriage pram
carriage n250908 - 3d model (*.gsm+*.3ds) for interior 3d visualization.
3d_export
free

carriage
...carriage
3dexport
old fashion carriage model, more files here:
turbosquid
$140

Carriage
...urbosquid
royalty free 3d model carriage for download as max on turbosquid: 3d models for games, architecture, videos. (1482052)
turbosquid
$25

Carriage
...urbosquid
royalty free 3d model carriage for download as max on turbosquid: 3d models for games, architecture, videos. (1285944)
3d_export
free

carriage
...carriage
3dexport
game cart
3d_ocean
$15

Barrel Carriage
...ieval oak old transport wheels wine wood
this model contains a barrel and a carriage. it is a medieval type of wood oak carriage.
turbosquid
$40

Carriage
...ty free 3d model carriage for download as obj, fbx, and blend on turbosquid: 3d models for games, architecture, videos. (1290094)
turbosquid
free

Carriage
...yalty free 3d model carriage for download as ma, obj, and fbx on turbosquid: 3d models for games, architecture, videos. (1239157)
3d_export
$5

Medieval carriage
...medieval carriage
3dexport
medieval carriage in fairy style
turbosquid
$58

Carriage
...d model carriage with scene for download as max, obj, and fbx on turbosquid: 3d models for games, architecture, videos. (1276262)
Clamp
3d_export
$11
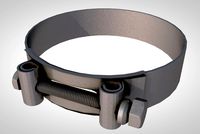
clamp
...clamp
3dexport
clamp
3ddd
free

Clamp
... enricо zanolla , капитоне
дизайнерenrico zanollмодель clamp
3ddd
$1

Clamp
...ricо zanolla , капитоне
дизайнеры
enrico zanolla
andrea di filippo
модель clamp
dzstudio
3d_export
free
clamp
...clamp
3dexport
simple clamp model, more free 3d models here:
3d_export
$5
clamping handle
...clamping handle
3dexport
clamping handle
3ddd
$1

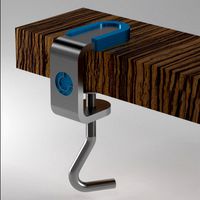
Clamp / DZstudio
... dzstudio , капитоне
люстра clamp от dzstudio/enrico zanolla(италия).
3ddd
$1
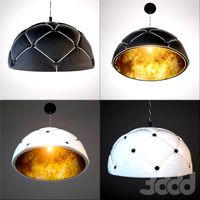
Светильник Clamp
...светильник clamp
3ddd
clamp
стеганый светильник clamp в двух цветах в черном и белом.
turbosquid
$29
clamp
...ty free 3d model clamp for download as 3ds, obj, c4d, and fbx on turbosquid: 3d models for games, architecture, videos. (1442049)
turbosquid
$29
clamp
...ty free 3d model clamp for download as 3ds, obj, c4d, and fbx on turbosquid: 3d models for games, architecture, videos. (1442041)
3d_export
$5
Clamp-14
...clamp-14
3dexport
3d model of clamp name 14
Extruder
3ddd
$1

Extruded Chair
...extruded chair
3ddd
extruded , tom dixon
inspired by tom dixon extruded chair
turbosquid
$15

Extruded Table
... extruded table for download as blend, dae, fbx, obj, and stl on turbosquid: 3d models for games, architecture, videos. (1634137)
turbosquid
$2

3D Printer Extruder
...d
royalty free 3d model 3d printer extruder for download as on turbosquid: 3d models for games, architecture, videos. (1537359)
turbosquid
$1

Zombie extruded text
...oyalty free 3d model zombie extruded text for download as obj on turbosquid: 3d models for games, architecture, videos. (1322198)
turbosquid
$4

Extruder conical screw
...el extruder conical screw for download as sldpr, ige, and stl on turbosquid: 3d models for games, architecture, videos. (1524433)
turbosquid
$50

3d PRINTER - Extruder
... available on turbo squid, the world's leading provider of digital 3d models for visualization, films, television, and games.
turbosquid
$15

Extruded Table 2
...xtruded table 2 for download as blend, dae, fbx, obj, and stl on turbosquid: 3d models for games, architecture, videos. (1621846)
turbosquid
$10

Maya Extrude Tool
... available on turbo squid, the world's leading provider of digital 3d models for visualization, films, television, and games.
3d_export
$5

world earth extrude map
...world earth extrude map
3dexport
3ddd
$1

Simply Elegant Extruded Tree Coffee Table Design
...ble by link studios. the silhouette of a tree is visible at one angle, extruded from the surface to create the support structure.
Bracket
archibase_planet
free

Bracket
...bracket
archibase planet
bracket corbel holder
bracket 1 - 3d model (*.gsm+*.3ds) for interior 3d visualization.
archibase_planet
free

Bracket
...bracket
archibase planet
bracket corbel console
bracket 5 - 3d model (*.gsm+*.3ds) for interior 3d visualization.
archibase_planet
free

Bracket
...bracket
archibase planet
corbel holder bracket
bracket 6 - 3d model (*.gsm+*.3ds) for interior 3d visualization.
archibase_planet
free

Bracket
...bracket
archibase planet
bracket corbel console
bracket 8 - 3d model (*.gsm+*.3ds) for interior 3d visualization.
archibase_planet
free

Bracket
...bracket
archibase planet
bracket corbel holder
bracket n280911 - 3d model (*.gsm+*.3ds) for interior 3d visualization.
archibase_planet
free

Bracket
...bracket
archibase planet
holder corbel bracket
bracket 9 - 3d model (*.gsm+*.3ds) for interior 3d visualization.
archibase_planet
free

Bracket
...bracket
archibase planet
corbel holder bracket
bracket 10 - 3d model (*.gsm+*.3ds) for interior 3d visualization.
archibase_planet
free

Bracket
...bracket
archibase planet
corbel console bracket
bracket 11 - 3d model (*.gsm+*.3ds) for interior 3d visualization.
archibase_planet
free

Bracket
...bracket
archibase planet
holder console bracket
bracket 12 - 3d model (*.gsm+*.3ds) for interior 3d visualization.
archibase_planet
free

Bracket
...bracket
archibase planet
bracket corbel holder
bracket 13 - 3d model (*.gsm+*.3ds) for interior 3d visualization.
Adapter
3d_export
$10
Adapter 3D Model
...adapter 3d model
3dexport
adapter
adapter 3d model mur 20260 3dexport
archive3d
free
Adapter socket 3D Model
...dapter socket adapter
adapter socket n090211 - 3d model (*.3ds) for interior 3d visualization.
turbosquid
$400

cell adaptation
...
royalty free 3d model cell adaptation for download as blend on turbosquid: 3d models for games, architecture, videos. (1701655)
archive3d
free
Adapter 3D Model
...ups pc equipment
adapter extron n180813 - 3d model (*.gsm+*.3ds) for interior 3d visualization.
turbosquid
$5
usb adapter
...royalty free 3d model usb adapter for download as ige and stl on turbosquid: 3d models for games, architecture, videos. (1582234)
turbosquid
$15
Power adapter
...free 3d model power adapter for download as max, obj, and fbx on turbosquid: 3d models for games, architecture, videos. (1510024)
turbosquid
$8
USB adapter
...e 3d model usb adapter for download as max, fbx, obj, and dwg on turbosquid: 3d models for games, architecture, videos. (1713542)
turbosquid
$30
adapter.3ds
... available on turbo squid, the world's leading provider of digital 3d models for visualization, films, television, and games.
turbosquid
$15
Nokia Adapter
... available on turbo squid, the world's leading provider of digital 3d models for visualization, films, television, and games.
turbosquid
$15
Universal adapter
... available on turbo squid, the world's leading provider of digital 3d models for visualization, films, television, and games.