Thingiverse
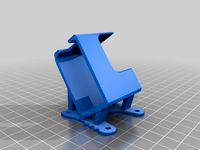
Plastic Beast by the_colorist
by Thingiverse
Last crawled date: 2 years, 12 months ago
UPDATE
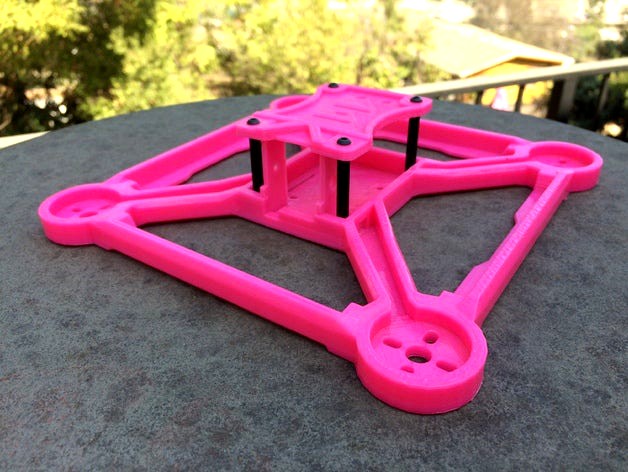
Here are the things that changed between Plastic Beast version 4 (the frame I released a few weeks ago) to version 6
1) Raised the motors mounts by 2mm. This should make the corner section of the frame more durable for direct hits, it should also help with the "area thrust" problem by adding more space for the prop to move air.2) lowered the "cross arms" vertical channels to help save on weight since they did not add much structural integrity. It is still just as strong in those axis.3) "Rounded" all the edges of the build. Because of the software I used to build this I could not easily round my corners in my design. So I opted for using more 45 degree angles to achieve the rounded corner. With the vapor bath, the corners are close to round.4) added a 2mm lip to the "box" part of the frame. This add strength but more important, rigidity. The frame already had very little flex during flight, this is the last step to ensure there is absolutely no flex during flight. So far I am very happy with the results5) Thicken the sides and front wall of the "inner box" (where the electronics go) this helps with durability and also the flex from pushing the middle part of the plate in compared to the "square"6) perfected the vapor bathing method, I use a 5 gallon bucket with a retro fitted coffee maker sitting in the bottom. I put 1/3 cut of acetone in and have the quad frame sitting on a flat piece of aluminum. I turn on the coffee maker and cover the bucket with a lid (make sure it is no air tight, you get a better result that way since acetone will vaporize better) and let it do its thing for 17 mins. I then pull out the frame and let it cure outside for over 12 hours, I still think you might need to wait a full 24 hours to ensure all the acetone is vaporized out of the frame.7) redesigned the top plate and made different version.8) lowered the cross arms horizontal plate to save on weight since it add no extra strength.
New wieght specs for plastic beast v6 version: (weight depends on how you print it and changes from printer to printer)
Baseplate weight= 100 - 105g
Topplate weight= 4 - 6g
Camera mounts weight= 2g
Total frame weight minus mounting hardware= 105 -115 grams
Backstory: I recently got a 3d printer with the hopes to make custom parts for my quad hobby. I came across a 3d printed quad frame online and thought I would try it out. I did not have high hopes and it was very flexible and had weird flight characteristics. So I decided to try to design a better/stronger 3d printed quadcopter frame.
The problem: So I am a very aggressive flyer and I tend to break a lot of carbon fiber frames, that stuff is very expensive and I had to stay with companies that offer warranties on the frames to help keep down on cost but that can result in downtime waiting for shipping. Half of the flying I do is at night at locations that are pure cement and steel. Obviously this is the cause of many of my broken frames. On another note, I have bent over 30+ motors and I wanted to incorporate into my design a way to help protect the motor better.
The Solution: To make a 3d printed frame that is;
cheap (around 5 dollars)
strong
durable
does not jeopardize any flight characteristics from flex
made for freestyle with a true X design, perfect center mounted FC, and stronger engineered front arms
motor protection
realitivly light weight
The goal is NOT to make a stronger frame then carbon fiber but to make the strongest 3d printed frame that is comparable to some market level carbon frames; in terms of durability. My idea behind this frame is to use it as my "night flyer" or otherwise "risky area flyer" When I break a frame, no sweat, that was a 5 dollar hit. I can print a new one in 11 hours over night and be flying the next day.
After many different revisions and testing I give you the Plastic Beast. All the files are free to download from thingiverse.com http://www.thingiverse.com/thing:1806046
I have not scoured the corners of the internet for other durable 3d printed quad frames but hope the Plastic Beast might be one of them.
Here is a video of it in action with plenty of crashes to show its durability https://www.youtube.com/watch?v=hGIZm6Ppm4M&feature=youtu.be
imgur with pictures http://imgur.com/gallery/2Xjn4
Here are the specs on the frame:
226mm size
5in prop
Baseplate weight= 100 - 105g
Topplate weight= 4 - 6g
Camera mounts weight= 2g
Total frame weight minus mounting hardware= 105 -115 grams
true X motor configuration
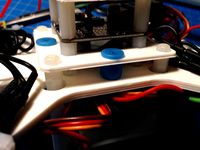
uses standard standoffs for topplate 35mm
ABS material
So is it all cake and beer? no problems just pure awesomeness? well...I have to be honest, there is a problem with going with a "X" "Square" combo for a frame. More of the prop "thrust area” is blocked resulting is less power. I went through 3 designs before I landed on the current one for just this reason. I think I found the perfect balance between power and strength. Also, because of the channel system I use for strength, there is weird turbulence that results in a louder sounding quad. I have done lots of testing with it and to my Knowles, it does not noticeably effect the flight characteristics.
There are 4 STL files for download and this can be printed on any 200mm by 200mm bed:
square_base_v6
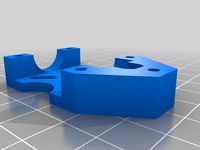
square_camera_mounts_v3
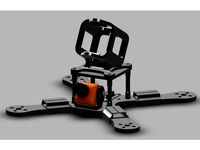
square_top_plate_v3_for_gopro
Square_top_plate_v3_light_version
Part of what makes this a strong plastic frame is the printing technique. I used simplify3d but you can use any software that allows you to adjust these settings.
3d printer settings for best results:
100-105g base plate - print height of .2m
27% 60degree triangular infill
3 print layers for top of build
4 print layers for bottoms of build
3 print layers for sides of build
4-6g top plate (light)- print height of .2m
27% 60degree triangular infill
3 print layers for top of build
4 print layers for bottoms of build
3 print layers for sides of build
6-8g top plate (gopro)- print hieght of .2m
30% 60degree triangular infill
3 print layers for top of build
4 print layers for bottoms of build
3 print layers for sides of build
2g camera mounts- print hieght of .2m
27% 60degree triangular infill
3 print layers for top of build
4 print layers for bottoms of build
3 print layers for sides of build
Here are some notes about the build:To help keep down on weight I decided to go with a system where you mount the ESC on the center plate instead of the arms. Two ESC will go, upright, on both sides of the FC. Then the other two will mount, one on top of another, on the back section of the center plate. This was designed with the modern micro ECS in mind so massive ESC might not fit. Little bee, Ubad, AIkon all fit.3d printing is not exact and every printer is different. For this reason I has to incorporate tolerances to certain parts of the frame. I notice that the holes for screws would shrink or not print accurately down to the . mm so I had to do some test before I could find the best tolerance.The tolerances on the camera mounts are very close to machine grade so you might have a hard time the first time you try to assemble that part of the frame. The best thing to do is use a exacto knife to slice away a little bit of the plastic until you get a nice snug fit. The reason I did not want to make the camera mounts have to low of a tolerance is because it helps with the over all durability when there is a snug, machine like, connections between the parts.The cables to the motors run through a small channel through the armsBecause of the wider center plate, the build is not too challenging compared to some micro builds these days.Use a exacto knife to widen any holes that might have shrunk during the printing process. They will only need .mm taken off to fit the bolt in.Make cables from motor to ESC 3 1/4 inchs long.Install the battery strap before you mount PDB.I designed this frame to mount the receiver and VTX on the top plateThe VTX is meant to run out the back of the top plate with the antenna attracted by a zip tie. I find this the most durable way to mount a VTX so you dont rip the antenna out.
*the battery cable is made to go out the front of the quad frame to a bottom mounted battery.
Here are some experimental settings for the 3d printer for a more durable quad but at the price of 11 grams heavier. I am still experimenting on how much more durability this adds to the frame.
115-120g base plate - print height of .2m
30% 60degree triangular infill
4 print layers for top of build
4 print layers for bottoms of build
4 print layers for sides of build
Here are the things that changed between Plastic Beast version 4 (the frame I released a few weeks ago) to version 6
1) Raised the motors mounts by 2mm. This should make the corner section of the frame more durable for direct hits, it should also help with the "area thrust" problem by adding more space for the prop to move air.2) lowered the "cross arms" vertical channels to help save on weight since they did not add much structural integrity. It is still just as strong in those axis.3) "Rounded" all the edges of the build. Because of the software I used to build this I could not easily round my corners in my design. So I opted for using more 45 degree angles to achieve the rounded corner. With the vapor bath, the corners are close to round.4) added a 2mm lip to the "box" part of the frame. This add strength but more important, rigidity. The frame already had very little flex during flight, this is the last step to ensure there is absolutely no flex during flight. So far I am very happy with the results5) Thicken the sides and front wall of the "inner box" (where the electronics go) this helps with durability and also the flex from pushing the middle part of the plate in compared to the "square"6) perfected the vapor bathing method, I use a 5 gallon bucket with a retro fitted coffee maker sitting in the bottom. I put 1/3 cut of acetone in and have the quad frame sitting on a flat piece of aluminum. I turn on the coffee maker and cover the bucket with a lid (make sure it is no air tight, you get a better result that way since acetone will vaporize better) and let it do its thing for 17 mins. I then pull out the frame and let it cure outside for over 12 hours, I still think you might need to wait a full 24 hours to ensure all the acetone is vaporized out of the frame.7) redesigned the top plate and made different version.8) lowered the cross arms horizontal plate to save on weight since it add no extra strength.
New wieght specs for plastic beast v6 version: (weight depends on how you print it and changes from printer to printer)
Baseplate weight= 100 - 105g
Topplate weight= 4 - 6g
Camera mounts weight= 2g
Total frame weight minus mounting hardware= 105 -115 grams
Backstory: I recently got a 3d printer with the hopes to make custom parts for my quad hobby. I came across a 3d printed quad frame online and thought I would try it out. I did not have high hopes and it was very flexible and had weird flight characteristics. So I decided to try to design a better/stronger 3d printed quadcopter frame.
The problem: So I am a very aggressive flyer and I tend to break a lot of carbon fiber frames, that stuff is very expensive and I had to stay with companies that offer warranties on the frames to help keep down on cost but that can result in downtime waiting for shipping. Half of the flying I do is at night at locations that are pure cement and steel. Obviously this is the cause of many of my broken frames. On another note, I have bent over 30+ motors and I wanted to incorporate into my design a way to help protect the motor better.
The Solution: To make a 3d printed frame that is;
cheap (around 5 dollars)
strong
durable
does not jeopardize any flight characteristics from flex
made for freestyle with a true X design, perfect center mounted FC, and stronger engineered front arms
motor protection
realitivly light weight
The goal is NOT to make a stronger frame then carbon fiber but to make the strongest 3d printed frame that is comparable to some market level carbon frames; in terms of durability. My idea behind this frame is to use it as my "night flyer" or otherwise "risky area flyer" When I break a frame, no sweat, that was a 5 dollar hit. I can print a new one in 11 hours over night and be flying the next day.
After many different revisions and testing I give you the Plastic Beast. All the files are free to download from thingiverse.com http://www.thingiverse.com/thing:1806046
I have not scoured the corners of the internet for other durable 3d printed quad frames but hope the Plastic Beast might be one of them.
Here is a video of it in action with plenty of crashes to show its durability https://www.youtube.com/watch?v=hGIZm6Ppm4M&feature=youtu.be
imgur with pictures http://imgur.com/gallery/2Xjn4
Here are the specs on the frame:
226mm size
5in prop
Baseplate weight= 100 - 105g
Topplate weight= 4 - 6g
Camera mounts weight= 2g
Total frame weight minus mounting hardware= 105 -115 grams
true X motor configuration
uses standard standoffs for topplate 35mm
ABS material
So is it all cake and beer? no problems just pure awesomeness? well...I have to be honest, there is a problem with going with a "X" "Square" combo for a frame. More of the prop "thrust area” is blocked resulting is less power. I went through 3 designs before I landed on the current one for just this reason. I think I found the perfect balance between power and strength. Also, because of the channel system I use for strength, there is weird turbulence that results in a louder sounding quad. I have done lots of testing with it and to my Knowles, it does not noticeably effect the flight characteristics.
There are 4 STL files for download and this can be printed on any 200mm by 200mm bed:
square_base_v6
square_camera_mounts_v3
square_top_plate_v3_for_gopro
Square_top_plate_v3_light_version
Part of what makes this a strong plastic frame is the printing technique. I used simplify3d but you can use any software that allows you to adjust these settings.
3d printer settings for best results:
100-105g base plate - print height of .2m
27% 60degree triangular infill
3 print layers for top of build
4 print layers for bottoms of build
3 print layers for sides of build
4-6g top plate (light)- print height of .2m
27% 60degree triangular infill
3 print layers for top of build
4 print layers for bottoms of build
3 print layers for sides of build
6-8g top plate (gopro)- print hieght of .2m
30% 60degree triangular infill
3 print layers for top of build
4 print layers for bottoms of build
3 print layers for sides of build
2g camera mounts- print hieght of .2m
27% 60degree triangular infill
3 print layers for top of build
4 print layers for bottoms of build
3 print layers for sides of build
Here are some notes about the build:To help keep down on weight I decided to go with a system where you mount the ESC on the center plate instead of the arms. Two ESC will go, upright, on both sides of the FC. Then the other two will mount, one on top of another, on the back section of the center plate. This was designed with the modern micro ECS in mind so massive ESC might not fit. Little bee, Ubad, AIkon all fit.3d printing is not exact and every printer is different. For this reason I has to incorporate tolerances to certain parts of the frame. I notice that the holes for screws would shrink or not print accurately down to the . mm so I had to do some test before I could find the best tolerance.The tolerances on the camera mounts are very close to machine grade so you might have a hard time the first time you try to assemble that part of the frame. The best thing to do is use a exacto knife to slice away a little bit of the plastic until you get a nice snug fit. The reason I did not want to make the camera mounts have to low of a tolerance is because it helps with the over all durability when there is a snug, machine like, connections between the parts.The cables to the motors run through a small channel through the armsBecause of the wider center plate, the build is not too challenging compared to some micro builds these days.Use a exacto knife to widen any holes that might have shrunk during the printing process. They will only need .mm taken off to fit the bolt in.Make cables from motor to ESC 3 1/4 inchs long.Install the battery strap before you mount PDB.I designed this frame to mount the receiver and VTX on the top plateThe VTX is meant to run out the back of the top plate with the antenna attracted by a zip tie. I find this the most durable way to mount a VTX so you dont rip the antenna out.
*the battery cable is made to go out the front of the quad frame to a bottom mounted battery.
Here are some experimental settings for the 3d printer for a more durable quad but at the price of 11 grams heavier. I am still experimenting on how much more durability this adds to the frame.
115-120g base plate - print height of .2m
30% 60degree triangular infill
4 print layers for top of build
4 print layers for bottoms of build
4 print layers for sides of build
Similar models
thingiverse
free
Evolution Tube Frame Quad
...pter using 14mm tube arms. print 2 plates and 8 motor mount plates, 4 for top and 4 for bottom. i will upload the arm mount soon.
thingiverse
free

Bolt 210 GoPro / Yi Mount by propwashed
... plate for the yi:http://www.thingiverse.com/thing:1394934
here is a plate for the gopro:http://www.thingiverse.com/thing:1685250
thingiverse
free

Spinner - Hubsan Quadcopter Frame Inprovment (H107L) by 3dsource
...n bolts. the holes are 3mm wide. there are wire guides on the bottom to help keep it looking nice and tidy!
pictures coming soon!
thingiverse
free
Micro (13.5mm motor span) Quad Frame by emdzej
...itional plates: top cover for the fc (designed with naze32 in mind) and bottom one to serve as landing skid/battery holder/cover.
thingiverse
free

Nacelle/mounting plate 1103 brushless by seppilin
... and come out the bottom in the back
suggest print 1mm bottom/top so firewall is solid plastic; 0% infill; 0.8 shell; 0.1mm layer
thingiverse
free

Smaller plate for the Gladiator NXT by Longwing
... layers
infill: 30%
infill pattern: gyroid
this yields a very strong build that's more than enough for what i put it through.
thingiverse
free

Joza TX130 quadcopter frame
...are to be threaded m2.
i have had the plates cut out of 3mm carbon fiber plates. 1,5mm for the top plate. stand offs are printed.
thingiverse
free
Wicked-1X mini quad frame - true x 200mm by rgbskills
...'t brake of your vbat pads.
fusion 360 link - http://a360.co/2bxtfkp
i would love your feedback and remixes a very welcome :)
thingiverse
free
TQF SkilZaw 30° Hero6 "bikini" mount by Nobody_FPV
...n than the "granny panty" but is lighter weight and uses less tpu.
for best results, print sideways on the build plate.
thingiverse
free

ZMR250 Camera Mount by idnarbjm
...zmr250 and i have a body on my quad, so i use this to mount the camera on the bottom of the frame using the front support screws.
Colorist
cgriver
$89

Red Giant Magic Bullet Colorista III
... editing timeline. no need to leave your host app to grade your footage.* please use the drop down menu to choose your product.
cgriver
$284

HitFilm 3 Pro
...you need to be an editor, vfx artist and colorist it merges a non-linear editor with advanced 3d compositing...
grabcad
free

NCC
...a new cabrio design. soon more renders with more coloristc ...
grabcad
free

Crockmeter
...published by the american association of textile chemists and colorist. ...
cg_trader
$4

Spiderman - Back in Black | 3D
...by ron garney (penciler), bill reinhold (inker), matt milla (colorist and vc's cory petit (letterer) published in the comic...
3dwarehouse
free
design your dwelling competition - house in san francisco
...from old carriages. impregnated old paint my give interesting coloristc effect....
Beast
3d_export
$10
Beast
...beast
3dexport
beast
turbosquid
$15
Beast
...east
turbosquid
royalty free 3d model beast for download as on turbosquid: 3d models for games, architecture, videos. (1508813)
turbosquid
$26

The Beast
...
royalty free 3d model the beast for download as obj and fbx on turbosquid: 3d models for games, architecture, videos. (1296186)
turbosquid
$1

beast
... available on turbo squid, the world's leading provider of digital 3d models for visualization, films, television, and games.
turbosquid
$1

beast
... available on turbo squid, the world's leading provider of digital 3d models for visualization, films, television, and games.
turbosquid
$120

Beast warriour
...osquid
royalty free 3d model beast warriour for download as on turbosquid: 3d models for games, architecture, videos. (1645066)
turbosquid
$5
Beast Spear
...urbosquid
royalty free 3d model beast spear for download as on turbosquid: 3d models for games, architecture, videos. (1279108)
turbosquid
$20

Beast Hunter
...squid
royalty free 3d model beast hunter for download as c4d on turbosquid: 3d models for games, architecture, videos. (1679139)
turbosquid
$49
Cyberpunk beast
...ee 3d model cyberpunk beast for download as max, obj, and fbx on turbosquid: 3d models for games, architecture, videos. (1231057)
turbosquid
$9

The beauty and the beast
...e beauty and the beast for download as 3ds, obj, c4d, and fbx on turbosquid: 3d models for games, architecture, videos. (1511942)
Plastic
archibase_planet
free
Plastic
...plastic
archibase planet
moulding friezes moldings border pilaster
deco plastic dw - 3d model for interior 3d visualization.
turbosquid
$1
Plastics
...
royalty free 3d model plastics for download as blend and fbx on turbosquid: 3d models for games, architecture, videos. (1581776)
archibase_planet
free
Plastic
...lastic
archibase planet
moulding friezes moldings border pilaster decor
deco plastic rz - 3d model for interior 3d visualization.
3ddd
$1

Plastic Playground
... kids , toy , child
plastic playground
3d_export
$5
plastic lid
...plastic lid
3dexport
plastic lid
3d_export
$5
plastic clothespin
...plastic clothespin
3dexport
plastic clothespin
3d_ocean
$3

Plastic Packaging
...ging plastic
intended for blender, cycles: plastic packaging to place your product in. subdivision modifier has not been applied.
3ddd
$1

plastic box
... ящик
model of plastic box for fruits in 3 levels of detail. highpoly - 23,6k, midpoly - 7,3k and lowpoly - 2,6k polygons.
3d_ocean
$12
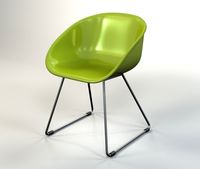
Plastic Chair
...furniture plastic chair side chair
3d model of plastic chair. 3ds and obj multi format files included. scanline renderer version.
3d_ocean
$1

Glossy Plastic
...glossy plastic
3docean
3dsmax glossy meterials glow plastic vray
easy usable meterials