Thingiverse

PisaBot by BlinkMaker
by Thingiverse
Last crawled date: 3 years, 1 month ago
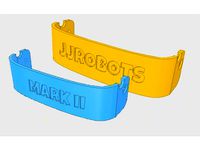
This is (probably a world-first) one-stepper motor self-balancing robot! I named it 'PisaBot' based on the popular Leaning Tower of Pisa since the robot has to constantly move (or lean) back and forth so as to keep its balance.
I designed the chassis in Autodesk Inventor (except for the Pisa Tower cover which i edited in Tinkercad from utechlab's design: https://www.thingiverse.com/thing:1129396) and 3D printed all the parts. This is the final version after more than a dozen prototypes in order to shrink the overall design and make it as compact as possible, to further reduce the robot’s height (minus the cover) to keep the centre of gravity as low as possible.
The code and smartphone app are from JJrobots’ B-ROBOT EVO 2 and unmodified: https://github.com/jjrobots/B-ROBOT_EVO2
But the PisaBot can currently only move forwards and backwards since there is no turning mechanism. In the app, the “PRO” mode also works to give more power when controlling the robot.
Here is a video of my prototype:https://youtu.be/m9uo7Uep0QY
List of parts used:
1 x Double Shaft Stepper Motor 42mm Nema 17 1.7A 17HS4401B https://www.aliexpress.com/item/Double-Shaft-Stepper-Motors-42mm-Motors-Nema-17-Motor-1-7A-17HS4401B/32849735638.html
2 x LiitoKala 18650 3400mAh rechargeable battery 3.7V Li-ion
1 x 18650 battery case with 2 slots https://www.aliexpress.com/item/Black-Plastic-1x-2x-3x-4x-18650-Battery-Storage-Box-Case-1-2-3-4-Slot/32847696147.html
2 x Hex coupling, 30 mm length, 5 mm hole diameter.
2 x RC wheels 1/10 Off Road Hex 12mm. Tires Outside Diameter: 85mm and Rim Width: 34mm.
2 x Rubber Bumpers Pads https://www.aliexpress.com/item/Practical-10Pcs-21mm-x-12mm-Black-Conical-Recessed-Rubber-Feet-Bumpers-Pads/32702629332.html
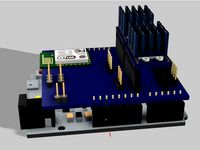
1 x JJrobots Electronic Brain Shield https://www.jjrobots.com/product/b-robot-electronic-brain-shield/
1 x MPU-6050 (gyroscope and accelerometer)
2 x A4988 stepper motor drivers
1 x Arduino Leonardo
M3 stainless steel button head screws
The washer (for each bumper on the front and back side of the robot) goes into the rubber bumper hole so that you can use an M3 screw to hold it tightly to the motor mounting plate extension that juts out in the front and back. The selected wheels allow the motor and chassis to stay above ground as high as possible without the outer diameter rubbing against the electronics plate. You could also use some other wheels but keep the outer diameter under 90 mm.
Notice: This project is not sponsored by JJrobots. I used their shield only because i had purchased it a while back when i first started to experiment and learn about balancing robots so it was easier and faster to test my one-stepper motor robot design. But it's a good learning resource as their work is fully opensource. You could also try making your own compatible shield with MPU-6050 and ESP8266. The shield schematic is available at: https://github.com/jjrobots/B-ROBOT_EVO2/tree/master/Hardware/electronics
I designed the chassis in Autodesk Inventor (except for the Pisa Tower cover which i edited in Tinkercad from utechlab's design: https://www.thingiverse.com/thing:1129396) and 3D printed all the parts. This is the final version after more than a dozen prototypes in order to shrink the overall design and make it as compact as possible, to further reduce the robot’s height (minus the cover) to keep the centre of gravity as low as possible.
The code and smartphone app are from JJrobots’ B-ROBOT EVO 2 and unmodified: https://github.com/jjrobots/B-ROBOT_EVO2
But the PisaBot can currently only move forwards and backwards since there is no turning mechanism. In the app, the “PRO” mode also works to give more power when controlling the robot.
Here is a video of my prototype:https://youtu.be/m9uo7Uep0QY
List of parts used:
1 x Double Shaft Stepper Motor 42mm Nema 17 1.7A 17HS4401B https://www.aliexpress.com/item/Double-Shaft-Stepper-Motors-42mm-Motors-Nema-17-Motor-1-7A-17HS4401B/32849735638.html
2 x LiitoKala 18650 3400mAh rechargeable battery 3.7V Li-ion
1 x 18650 battery case with 2 slots https://www.aliexpress.com/item/Black-Plastic-1x-2x-3x-4x-18650-Battery-Storage-Box-Case-1-2-3-4-Slot/32847696147.html
2 x Hex coupling, 30 mm length, 5 mm hole diameter.
2 x RC wheels 1/10 Off Road Hex 12mm. Tires Outside Diameter: 85mm and Rim Width: 34mm.
2 x Rubber Bumpers Pads https://www.aliexpress.com/item/Practical-10Pcs-21mm-x-12mm-Black-Conical-Recessed-Rubber-Feet-Bumpers-Pads/32702629332.html
1 x JJrobots Electronic Brain Shield https://www.jjrobots.com/product/b-robot-electronic-brain-shield/
1 x MPU-6050 (gyroscope and accelerometer)
2 x A4988 stepper motor drivers
1 x Arduino Leonardo
M3 stainless steel button head screws
The washer (for each bumper on the front and back side of the robot) goes into the rubber bumper hole so that you can use an M3 screw to hold it tightly to the motor mounting plate extension that juts out in the front and back. The selected wheels allow the motor and chassis to stay above ground as high as possible without the outer diameter rubbing against the electronics plate. You could also use some other wheels but keep the outer diameter under 90 mm.
Notice: This project is not sponsored by JJrobots. I used their shield only because i had purchased it a while back when i first started to experiment and learn about balancing robots so it was easier and faster to test my one-stepper motor robot design. But it's a good learning resource as their work is fully opensource. You could also try making your own compatible shield with MPU-6050 and ESP8266. The shield schematic is available at: https://github.com/jjrobots/B-ROBOT_EVO2/tree/master/Hardware/electronics
Similar models
grabcad
free

Two-Wheel Self-Balancing Robot
...l298n-1
wheel with tire and bracket for robot design:
https://grabcad.com/library/wheel-with-tire-and-bracket-for-robot-design-1
grabcad
free

Arduino Balancing Cam Robot
...bot with camera
-elegoo uno r3
-mpu-6050
-esp32-cam
-geared dc motors
-l298n motor driver
-wheels
-aa battery holder
-9v battery
thingiverse
free
B-robot EVO2 bumper CUSTOMIZER by jjrobots
...1
.
.
thingiverse
free

Candle with 18650 battery and TP4056 charger by amihaita
...ic for micro usb variant - 1 pcs
mini switchhttps://www.aliexpress.com/item/32813343281.html?spm=a2g0s.9042311.0.0.27424c4drnqwil
thingiverse
free
jjRobots electronic brain shield by mundsen
... not an official jjrobots model)
in the image where it is combined with an arduino leonardo, i used a leonardo model from grabcad
thingiverse
free

Case for MPU 6050 by MaximvonAZ
...case for mpu 6050 by maximvonaz
thingiverse
case for a mpu-6050 sensor.
screwholes are 2,5 mm in diameter.
grabcad
free

18650 single battery enclosure aliexpress
...enclosure for 18650
https://www.aliexpress.com/item/1005004761225701.html?spm=a2g0o.order_list.order_list_main.11.21ef1802htb4ac
thingiverse
free

18650 battery + wemos 18650 battery shield v3 + 3d printing box by EunchanPark
...18650 https://goo.gl/gm5peq
[ more detailed information ]https://youtu.be/yyvqsjjpdqkhttps://sites.google.com/view/100happythings
grabcad
free

QM-4208
...qm-4208
grabcad
42mm size brushless multirotor motor by qx-motor.
https://www.aliexpress.com/item/32798733144.html
thingiverse
free

Electronic Load Housing (Battery Powered XY-FZ35)
...om/item/32748606671.html
battery holder (glue it in):https://www.aliexpress.com/item/4000022535765.html
fusion 360 file included.
Blinkmaker
thingiverse
free

18650 dual battery holder by BlinkMaker
...stores, such as aliexpress.
i was inspired by a similar battery holder for one battery: https://www.thingiverse.com/thing:2744505
thingiverse
free

Speed encoder wheel for 5 mm shaft (stepper motor) by BlinkMaker
...lly to add optical speed encoder functionality when used with a double shaft nema 17 stepper motor. it was tested and works fine.
thingiverse
free

B-Robot EVO 2 enhanced chassis for 2 servo arms by BlinkMaker
...rinted and tested by myself. i also attached a picture of the slightly updated electronics plate with the four nuts installed. :)