Thingiverse
Ping Pong Pixels by ObsoleteNerd
by Thingiverse
Last crawled date: 3 years, 3 months ago
Introduction
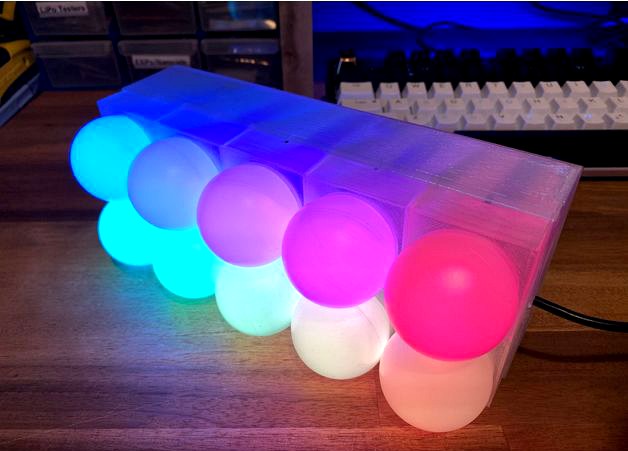
Ping Pong Pixels are a modular clickable chassis for creating easy RGB lighting decorations for your room/home.
There's a "Matrix" chassis for making flat matrix displays of any dimension you want (photos show 3x3 and a 5x2 wider style), and there's a "Cylinder" chassis for making Decagon based cylindrical lamps.
They click together with no glue and have optional back covers (for some common shapes) to hide the electronics or stop prying fingers.
I'll update this page with better assembly instructions and photos soon, it's a work in progress but I've built multiple different shapes so far and the general modular system works great.
Basic Instructions
If you want a 5 wide 2 high lamp like the rainbow one in the photos:
Print 10 "Matrix Chassis" pieces and 13 "Clip" pieces. Refer to the photos for how to click them together but no glue is required.
Cut holes in your ping ping balls the same size as the holes in the chassis pieces, hot glue the ping pong balls to the chassis pieces then click your WS2811 lights in from behind (no glue required here either).
You can optionally print the "5x2 Rear Cover" piece (or the 3x3 one if you went that route) to cover up the electronics, but it will hold together fine without the rear cover too.
Connect your microcontroller of choice (I use ESP8266's with WLED flashed onto them) and you're done.
I'm working on better photos and a full blog post detailing the builds, with code and wiring diagrams. I'll edit the link in here when it's done.
Similar models
thingiverse
free

ws2811 pixel matrix
...y size matrix. you'll need to use glue to attach the pieces together. fits 12mm ws2811 pixels. they are spaced 2" apart.
thingiverse
free

Inspirational Ping Pong balls by snigdhapaka
...lls. that way, if you are losing a ping pong match, you can just take a second to read the ping pong ball and boost your spirit=)
thingiverse
free

Ping Pong Sword by JebusTSS
... snug fit.
by the way, it works great! this paddle brings awe and fear to those you face against in the fierce game of ping pong.
thingiverse
free
Ping Pong Trophy by leimapapa
...ping pong trophy by leimapapa
thingiverse
you didn't "win" the ping pong tournament. you dominated it.
thingiverse
free

Table Tennis Paddle (Ping Pong) by ZioFester
... paddle (ping pong)
you can even download the rubber piece if you want to try to print it in tpu.
share photos of your prints! :d
thingiverse
free
Ping Pong Ball Dispenser by j_reef2019
...pick it up. the function of the piece is to make it easier to organize ping pong balls and to make it easy to not lose any balls.
thingiverse
free
Cannon for ping pong balls by Rays_is
... ply wood. would be best made out of birch plywood but works fine in mdf. add two rubber bands and a ping pong ball. have fun :).
thingiverse
free

Ping Pong Ball Canister by anewsome
...everywhere.
edit 2013-12-03: added a version that reads ping pong, instead of beer pong. both canister stls are included. enjoy
thingiverse
free

ping pong table fix - arreglos mesa ping pong by Gork10
...ng by gork10
thingiverse
pieces to fix ping pong table
piezas para reparar la mesa de ping pong
ping pong-a erreparatzeko piezak
3dwarehouse
free
ping pong
...ping pong
3dwarehouse
'ping pong, or as the chinese say it, ping pong'
Obsoletenerd
thingiverse
free

Wu-Tang Tray (aka the Wu-Tray) by ObsoleteNerd
... vector of the wu-tang logo, then i manually added in the cross-bar and text pulled from another vector, then extrude/fillet/etc.
thingiverse
free

Kids Magnetic Fishing Rod by ObsoleteNerd
...down between each go. i'm going to redesign the hook to actually look like a hook and add some washers as weights to it soon.
Pong
3d_export
free

Ping Pong
...ping pong
3dexport
ping pong 3d model created in blender,cycles
design_connected
$7
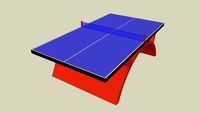
Ping Pong
...ping pong
designconnected
vincent sheppard ping pong computer generated 3d model. designed by sheppard, vincent.
design_connected
$13
Pong Floor Lamp
...pong floor lamp
designconnected
ligne roset pong floor lamp computer generated 3d model. designed by nopper, hans.
3d_export
$9
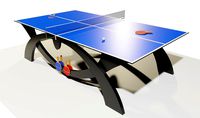
Ping Pong Table
...ping pong table
3dexport
ping pong table 274 x 152,5 x 76 cm - 4k png textures
turbosquid
$25
Ping Pong Table
...id
royalty free 3d model ping pong table for download as c4d on turbosquid: 3d models for games, architecture, videos. (1354763)
turbosquid
$2
Ping-pong table
...id
royalty free 3d model ping-pong table for download as max on turbosquid: 3d models for games, architecture, videos. (1243268)
turbosquid
$20

Ping Pong Paddle
... free 3d model ping pong paddle for download as blend and fbx on turbosquid: 3d models for games, architecture, videos. (1597196)
turbosquid
free

Ping Pong Paddle
...lty free 3d model ping pong paddle for download as ma and fbx on turbosquid: 3d models for games, architecture, videos. (1335962)
turbosquid
$85

Ping Pong Table
...e 3d model ping pong table for download as 3ds, max, and wire on turbosquid: 3d models for games, architecture, videos. (1298814)
turbosquid
$29

ping pong paddle
... available on turbo squid, the world's leading provider of digital 3d models for visualization, films, television, and games.
Ping
3d_export
$5

ping ping
...nt to share for those looking for 3d model that has the characteristics of asian women.<br>seperated hair, head, body, eyes
3ddd
$1
Ширма giorgetti Ping
... ширма , giorgetti ping
ширма giorgetti ping 175х173/348х4
3d_export
free
Ping Pong
...ping pong
3dexport
ping pong 3d model created in blender,cycles
design_connected
$7
Ping Pong
...ping pong
designconnected
vincent sheppard ping pong computer generated 3d model. designed by sheppard, vincent.
turbosquid
$20
ping-pong.max
... available on turbo squid, the world's leading provider of digital 3d models for visualization, films, television, and games.
turbosquid
free

ping 0027
... available on turbo squid, the world's leading provider of digital 3d models for visualization, films, television, and games.
3d_export
$9
Ping Pong Table
...ping pong table
3dexport
ping pong table 274 x 152,5 x 76 cm - 4k png textures
turbosquid
$25
Ping Pong Table
...id
royalty free 3d model ping pong table for download as c4d on turbosquid: 3d models for games, architecture, videos. (1354763)
turbosquid
$2
Ping-pong table
...id
royalty free 3d model ping-pong table for download as max on turbosquid: 3d models for games, architecture, videos. (1243268)
turbosquid
$20
Ping Pong Paddle
... free 3d model ping pong paddle for download as blend and fbx on turbosquid: 3d models for games, architecture, videos. (1597196)
Pixels
3d_ocean
$3

Pixel Heart
...pixel heart
3docean
3d heart love lowpoly old pixel school valentine
3d low poly model of a retro pixel heart
3d_ocean
$6
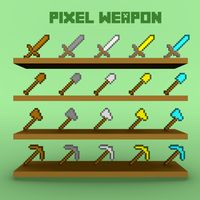
pixel weapon
...el tool weapon
pixel weapon pack available in the obj format. this model is suitable for making games etc. available in 20 models
3ddd
$1
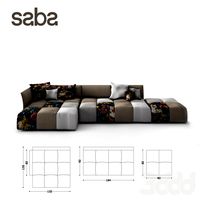
Saba / Pixel
...saba / pixel
3ddd
saba , угловой
http://sabaitalia.it/en/?prodotto=pixel
3ddd
$1
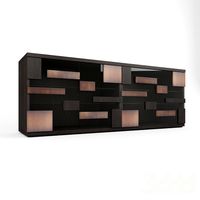
Cabinet Pixel
... pixel фирмы emmemobili, дизайн ferruccio laviani. 240х55х90 дерево, стекло, бронза.
polys: 10068
verts: 8896
obj присутствует
design_connected
$29
Pixel 04
...pixel 04
designconnected
saba italia pixel 04 computer generated 3d model. designed by bicego, sergio.
design_connected
$29
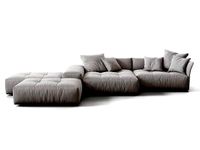
Pixel 02
...pixel 02
designconnected
saba italia pixel 02 computer generated 3d model. designed by bicego, sergio.
design_connected
$29
Pixel 03
...pixel 03
designconnected
saba italia pixel 03 computer generated 3d model. designed by bicego, sergio.
design_connected
$18

Pixel 01
...pixel 01
designconnected
saba italia pixel 01 computer generated 3d model. designed by bicego, sergio.
turbosquid
$2

Pixelated Hammer
...quid
royalty free 3d model pixelated hammer for download as on turbosquid: 3d models for games, architecture, videos. (1518656)
turbosquid
$29

Monster Pixel
...squid
royalty free 3d model monster pixel for download as ma on turbosquid: 3d models for games, architecture, videos. (1387121)