Thingiverse

Peopoly Moai Dial Gauge Bracket by Aero3D
by Thingiverse
Last crawled date: 3 years, 1 month ago
IMPORTANT!!! THIS GAUGE BRACKET IS DESIGNED TO BE USED AFTER YOU HAVE DONE THE INITIAL LEVELLING PROCESS FOLLOWING THE GUIDE IN THE BUILD MANUAL. IT IS NOT DESIGNED TO SET INITIAL LEVEL HEIGHT OF THE VAT BUT RATHER TO ENSURE ALL SIDES OF THE VAT ARE LEVEL ONCE THE INITIAL VAT HEIGHT / LEVEL HAS BEEN COMPLETED.
ENSURE YOU FOLLOW STEP 7 IN THE BUILD INSTRUCTIONS PRIOR TO USING THIS BRACKET AND GAUGE.
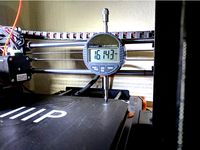
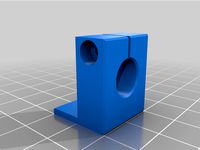
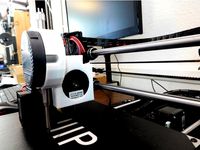
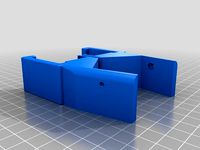
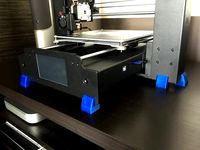
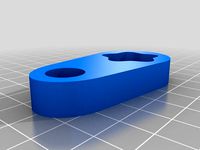
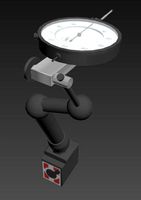
This is a dial gauge bracket that friction fits on all sides of the build plate. The dial gauge can then be used to ensure the gap between build plate and vat is level on all sides.
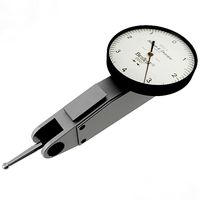
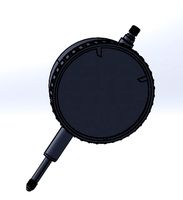
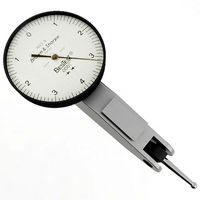
The bracket has been designed around the digital dial indicator gauge available from Amazon and other places. It is available under several brand names, such as Neoteck and Wiysond. Here is a link to the Neoteck version on Amazon.
https://www.amazon.co.uk/gp/product/B01H035DRO
Simply attach the dial gauge to the btracket and secure tight to the bracket with an M6 bolt and nut. Then simply push the bracket onto the edge of the build plate at the required locations. Depending on how central your build plate is in relation to the vat you may need to adjust the bracket in or out slightly to ensure the tip is central on the vat top edges.
NOTE: You will need to adjust the Z Reset Position in the Advanced Menu to 60 to have the right position for the gauge to measure. Once the build plate has settled at the reset position attach the bracket, not before. When measurements and adjustments are complete do not forgot to set the Z Reset Position back to 188.
ENSURE YOU FOLLOW STEP 7 IN THE BUILD INSTRUCTIONS PRIOR TO USING THIS BRACKET AND GAUGE.
This is a dial gauge bracket that friction fits on all sides of the build plate. The dial gauge can then be used to ensure the gap between build plate and vat is level on all sides.
The bracket has been designed around the digital dial indicator gauge available from Amazon and other places. It is available under several brand names, such as Neoteck and Wiysond. Here is a link to the Neoteck version on Amazon.
https://www.amazon.co.uk/gp/product/B01H035DRO
Simply attach the dial gauge to the btracket and secure tight to the bracket with an M6 bolt and nut. Then simply push the bracket onto the edge of the build plate at the required locations. Depending on how central your build plate is in relation to the vat you may need to adjust the bracket in or out slightly to ensure the tip is central on the vat top edges.
NOTE: You will need to adjust the Z Reset Position in the Advanced Menu to 60 to have the right position for the gauge to measure. Once the build plate has settled at the reset position attach the bracket, not before. When measurements and adjustments are complete do not forgot to set the Z Reset Position back to 188.
Similar models
thingiverse
free
Bed Leveling Bracket by kbrint
...%2f0.00005%27%27+digital+probe+indicator+dial+test+gauge+range+0-25.4mm%2f1%27%27+dial+test+indicators+electronic+indicator+gauge
thingiverse
free

Flashforge bracket to hold dial gauge for accurate setup by mistavia
... the x/y controls to move around the platform, adjusting each of the lower screws until you have a perfectly level build surface.
thingiverse
free
Dial Gauge Holder
...u to pinpoint dips in your bed so you can attempt to fix them. please ensure you heat the bed to get the most accurate readings.
thingiverse
free

AnyCubic i3 Dial Gauge Holder by ltlowe
...l location and my z axis homed.
adjusted slot for mounting bracket to fit neoteck - 16mm x 9mm with bolt hole 12mm from the gauge
thingiverse
free

WhamBam Mutant Pen holder and Dial Gauge mount by brotherchris
...oteck-digital-indicator-25-4mm-resolution/dp/b01jycvhlk/ref=sr_1_8?dchild=1&keywords=dial+gauge&qid=1610326418&sr=8-8
thingiverse
free

Elegoo Saturn Build Plate Aligner by rsavell
... provides a straight edge to use to ensure the build plate is square when leveling the build plate.
i hope you find this helpful.
thingiverse
free
Dial Gauge Mount extruder motor MP Maker Select v2 by cmdctrl
...e is at most 2mm of possible collision with the print. i use a twist tie to hold the feeler up if i think it will hit the print.
thingiverse
free

Dial Indicator/ Gauge Stand - Bed Leveling Tool
...urate measurements to be taken between the nozzle and the bed.
this is an extremely effective and accurate way to level your bed.
thingiverse
free

Dial gauge leveler for Prusa i3 by Special_Works
...adjust your printer bed.
hang the part with the mounted dial gauge first in the upper x-axis rod, after clip it in the lower rod.
thingiverse
free

Dial Gauge Mount for Anet A8
... i follow the reference measurement from the carriage created by mohd azizul baharuddin https://www.thingiverse.com/thing:3599905
Aero3D
thingiverse
free

Predator Action Pliers - Multicolour by Aero3D
...version (simply saves you linking the files in your slicer) and a 6 colour version.
huge thanks to ecoiras for the amazing model.
thingiverse
free

Sigma Filament Cleaner (screw fit) by Aero3D
...h the ability to screw into the plastic base using short (5mm or thereabouts) self tapping screws foir a more permanent solution.
thingiverse
free
Ultimaker 2 Brackets for Rasperry Pi 7" Screen Case by Aero3D
...ckets to attach a pi 7" screen to the upper front of the u2 frame. these will fit any derivative of the ultimaker 2 series.
thingiverse
free
Wanhao Duplicator i3 Plus feet by Aero3D
...quired stability.
they are a simple adaptation of the model from imgineering4 found here
http://www.thingiverse.com/thing:1261720
thingiverse
free

Prusa Multi Material Spool Holder with cross braces by Aero3D
...ace (print x2 of them plus x4 of the uprights) and added holes in the uprights to accept a 12mmxm3 bolt and nut to add stability.
thingiverse
free

Creality CR-10 Sidebar with Integrated Pi3 by Aero3D
... accessible. there is a cover for the pi included which can be installed or not (as it sits between the sidebar and control box.
thingiverse
free
Raise3D N1 Door Hinge Spacer by Aero3D
... plate without tilting or hitting the door frame.
you will need
4 x printed spacers
8 x m4x16mm countersunk bolts/machine screws
thingiverse
free

Mosaic Palette Scroll Wheel Holder for Raise3D N1 & N2 by Aero3D
... of the upper frame.
v2 - updated to sit the scroll wheel slightly off the rear top frame due to the oval shape of the housing.
thingiverse
free

Prusa i3 Mk2 Camera Mount for Pi Zero W by Aero3D
... a pi zero w.
edit: v2 of the zero w mount plate added which has slightly better fit due to added shaped rear internal corners.
thingiverse
free

Wanhao Duplicator D6 Corner feet/bumpers by Aero3D
...s of the frame.
update 18.09.16: i have added a second version which is a taller foot allowing greater airflow below the printer.
Peopoly
thingiverse
free

Peopoly Door Lock by 3D-IN
...peopoly door lock by 3d-in
thingiverse
peopoly door lock
thingiverse
free

Peopoly moai label by customizer1
...se
hi guys this is a label for the peopoly moai printer. it was created large so that you can scale it down and keep the detail.
thingiverse
free

Peopoly Moai faceplate by sylus
...peopoly moai faceplate by sylus
thingiverse
to identiy your printer in multi color
thingiverse
free
Peopoly Moai Spanner by Bitshift
...ai spanner by bitshift
thingiverse
remix of pelmoggian's design to save a bit of filament and make it slightly more shapely.
thingiverse
free

Peopoly Moai VAT by mharter
...peopoly moai vat by mharter
thingiverse
just tweaked a few dimensions so the vat better fits the moai sla resin printer.
thingiverse
free

Build Platform Holder for peopoly MOAI vat by johnniewhiskey
...al inside air tight container.
.
official peopoly support forum
official facebook group >> moai laser sla 3d printer owners
thingiverse
free

Peopoly Moai Spanner by Pelmoggian
...undo it afterwards.
so here it is - perhaps the most sophisticated model you'll see on the site. over 2 million moving parts.
thingiverse
free

Peopoly Moai Vat Comb by kstanley250
...peopoly moai vat comb by kstanley250
thingiverse
print in pla
ver 2 has rounded edges on comb
thingiverse
free

vat dripping bracket for peopoly MOAI by johnniewhiskey
...oaivatbracket_mharterfdm.stl
.
.
official peopoly support forum
official facebook group >> moai laser sla 3d printer owners
thingiverse
free

Peopoly Moai Door Latch 0.3" magnets by Londonbrig0
...t shut without needing to use the key lock.
remixed from 3d-in's design to work with .3in x .11in magnets sold by home depot.
Moai
turbosquid
$75

Moai
... available on turbo squid, the world's leading provider of digital 3d models for visualization, films, television, and games.
3ddd
$1

Scarabeo Moai 8603
... 8603
3ddd
scarabeo , moai
раковина scarabeo moai 8603 напольная 500 х 430 мм цвет белый
turbosquid
$5

Neo Moai
...urbosquid
royalty free 3d model neo moai for download as obj on turbosquid: 3d models for games, architecture, videos. (1635315)
turbosquid
$2

Moai sculpt
...osquid
royalty free 3d model moai sculpt for download as max on turbosquid: 3d models for games, architecture, videos. (1332686)
turbosquid
$15

Moai statue
...y free 3d model moai statue for download as obj, c4d, and fbx on turbosquid: 3d models for games, architecture, videos. (1415607)
turbosquid
$1

Moai Statue
...e 3d model moai statue for download as 3ds, max, obj, and fbx on turbosquid: 3d models for games, architecture, videos. (1489983)
turbosquid
$45

Moai Statue
... available on turbo squid, the world's leading provider of digital 3d models for visualization, films, television, and games.
turbosquid
$39

Moai Statue
... available on turbo squid, the world's leading provider of digital 3d models for visualization, films, television, and games.
turbosquid
$20

Moai Statue
... available on turbo squid, the world's leading provider of digital 3d models for visualization, films, television, and games.
turbosquid
$19

Moai Statues
... available on turbo squid, the world's leading provider of digital 3d models for visualization, films, television, and games.
Dial
3ddd
$1

Hidra Dial
...a dial , биде , унитаз
hidra dial унитаз + биде
turbosquid
$30
Dial Indicator
...ree 3d model dial indicator for download as 3ds, max, and obj on turbosquid: 3d models for games, architecture, videos. (1302779)
3d_export
$7
dial indicator
...r is any of various instruments used to accurately measure small distances and angles, and amplify them to make them more obvious
turbosquid
$99

Phone Dialing
... available on turbo squid, the world's leading provider of digital 3d models for visualization, films, television, and games.
turbosquid
$25
Dial Indicator
... available on turbo squid, the world's leading provider of digital 3d models for visualization, films, television, and games.
turbosquid
$15

Dial Indicator
... available on turbo squid, the world's leading provider of digital 3d models for visualization, films, television, and games.
3d_ocean
$12

Old Rotary Dial Telephone
...ial phone telephone
this is a model of a rotary dial telephone made in cinema4d file contains the following files: .obj .c4d .3ds
3ddd
$1

Dialing kitchen
...зон , базилик , лук
polys: 48 893
verts: 54 349
3d_export
$45
Dial Indicator 3D Model
...tion metalworking hurco indicating geometric dimensioning tolerancing bridgeport
dial indicator 3d model plutonius 63521 3dexport
turbosquid
$38

Sun Dial 3ds
... available on turbo squid, the world's leading provider of digital 3d models for visualization, films, television, and games.
Gauge
3d_ocean
$10

Gauges
...rim to them. each gauge has an xpresso tag to give them an automatic animation without the need for keyframing and can be chan...
3d_export
$5

pressure gauge
...pressure gauge
3dexport
pressure gauge
3d_export
$5
gauge protector
...gauge protector
3dexport
gauge protector
3d_export
$5

Gauge 3D Model
...gauge 3d model
3dexport
gauge pressure gas air liquid
gauge 3d model fau 71180 3dexport
3d_export
$5

protected pressure gauge
...protected pressure gauge
3dexport
protected pressure gauge
3d_export
$5

hard gauge protector
...hard gauge protector
3dexport
hard gauge protector
turbosquid
$29
Screw Gauge
... available on turbo squid, the world's leading provider of digital 3d models for visualization, films, television, and games.
turbosquid
$29
Marking Gauge
... available on turbo squid, the world's leading provider of digital 3d models for visualization, films, television, and games.
turbosquid
$20

Blade Gauge
... available on turbo squid, the world's leading provider of digital 3d models for visualization, films, television, and games.
3d_export
$5

12 Gauge 3D Model
...12 gauge 3d model
3dexport
shotgun shell gauge 12
12 gauge 3d model pirog 54511 3dexport
Bracket
archibase_planet
free

Bracket
...bracket
archibase planet
bracket corbel holder
bracket 1 - 3d model (*.gsm+*.3ds) for interior 3d visualization.
archibase_planet
free

Bracket
...bracket
archibase planet
bracket corbel console
bracket 5 - 3d model (*.gsm+*.3ds) for interior 3d visualization.
archibase_planet
free

Bracket
...bracket
archibase planet
corbel holder bracket
bracket 6 - 3d model (*.gsm+*.3ds) for interior 3d visualization.
archibase_planet
free

Bracket
...bracket
archibase planet
bracket corbel console
bracket 8 - 3d model (*.gsm+*.3ds) for interior 3d visualization.
archibase_planet
free

Bracket
...bracket
archibase planet
bracket corbel holder
bracket n280911 - 3d model (*.gsm+*.3ds) for interior 3d visualization.
archibase_planet
free

Bracket
...bracket
archibase planet
holder corbel bracket
bracket 9 - 3d model (*.gsm+*.3ds) for interior 3d visualization.
archibase_planet
free

Bracket
...bracket
archibase planet
corbel holder bracket
bracket 10 - 3d model (*.gsm+*.3ds) for interior 3d visualization.
archibase_planet
free

Bracket
...bracket
archibase planet
corbel console bracket
bracket 11 - 3d model (*.gsm+*.3ds) for interior 3d visualization.
archibase_planet
free

Bracket
...bracket
archibase planet
holder console bracket
bracket 12 - 3d model (*.gsm+*.3ds) for interior 3d visualization.
archibase_planet
free

Bracket
...bracket
archibase planet
bracket corbel holder
bracket 13 - 3d model (*.gsm+*.3ds) for interior 3d visualization.