Thingiverse
PC Case Modification (Homemade) by KnockOutTR
by Thingiverse
Last crawled date: 4 years, 7 months ago
1-Kasanın kapağı istenilen boyutlara göre ölçütlenir ve kesilir.
2-Aynı ölçülerde pvc,cam,mika vs. kesilir.
3-Sıcak silikon tarafından kesilen malzeme bilgisayar kasasının yan kapağına tutturulur.
4-Kasanızda 120mm fan yuvası yoksa , kasanızın ön ve yan taraflarına satın aldığınız fanın ölçülerine göre delik açılır.
5-Fanlar monte edilmiş ve upload ettiğim STL'ler baskıdan alınır ve fanların korunması için koruyucular montelenir.
6-RGB set satın alınır (benimki https://urun.n11.com/sogutucu-ve-fan/dark-ultra-bright-rgb-multi-led-fan-ve-serit-kit-2x120mm-fan-ve-P227470155?gclid=Cj0KCQjwpvzZBRCbARIsACe8vyKMrMpoahn5ro5aptFZtVwu76TNtXKkcI2UQ9Nlf_pLv8XvatOt5UcaAvZJEALw_wcB) ve montelenir.
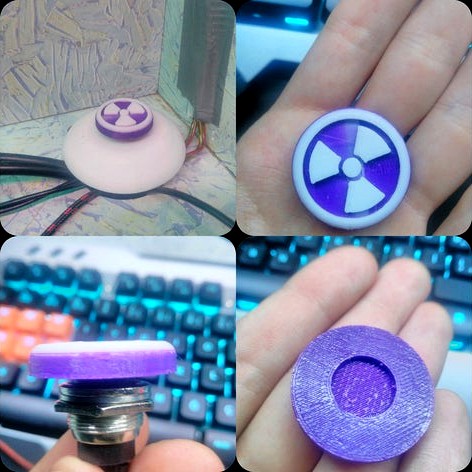
7-Pc'nin açma butonunu değiştirmek için linkdeki (https://www.direnc.net/dc180-siyah-buton) butonu satın alındırktan sonra uzunluğunu sizin belirleyeceğiniz kablolar butonun iki ucundan anakartınızdaki POWER SW kısmına takılır(kasanızın on/off butonunu söktüğünüz yerdir)
8-Buton STL'leri baskıdan alındıktan sonra masanıza sabitlenir.
Google Translate -sry-
1- The cover of the frame is measured and cut according to the desired dimensions.
2-Pvc, glass, mica etc. in the same dimensions. cut.
3-The material cut by the hot silicone is attached to the side cover of the computer case.
4-If you do not have a 120mm fan socket on your case, you will drill holes according to the dimensions of the fan you bought on the front and side of your cup.
5-The fans are installed and the STLs I uploaded are taken from the press and the protectors are installed to protect the fans.
6-RGB set is purchased (mine is https://urun.n11.com/sogutucu-ve-fan/dark-ultra-bright-rgb-multi-led-fan-ve-serit-kit-2x120mm-fan-ve- P227470155? Gclid = Cj0KCQjwpvzZBRCbARIsACe8vyKMrMpoahn5ro5aptFZtVwu76TNtXKkcI2UQ9Nlf_pLv8XvatOt5UcaAvZJEALw_wcB) and is mounted.
7-To change the power-on switch on the board, you need to remove the on / off button of your chassis from the two ends of the cords button that you will determine after you purchase the button on the link (https://www.direnc.net/dc180-siyah-buton) place)
After the
8-Button STLs are taken out of print, the your pc table is fixed.
2-Aynı ölçülerde pvc,cam,mika vs. kesilir.
3-Sıcak silikon tarafından kesilen malzeme bilgisayar kasasının yan kapağına tutturulur.
4-Kasanızda 120mm fan yuvası yoksa , kasanızın ön ve yan taraflarına satın aldığınız fanın ölçülerine göre delik açılır.
5-Fanlar monte edilmiş ve upload ettiğim STL'ler baskıdan alınır ve fanların korunması için koruyucular montelenir.
6-RGB set satın alınır (benimki https://urun.n11.com/sogutucu-ve-fan/dark-ultra-bright-rgb-multi-led-fan-ve-serit-kit-2x120mm-fan-ve-P227470155?gclid=Cj0KCQjwpvzZBRCbARIsACe8vyKMrMpoahn5ro5aptFZtVwu76TNtXKkcI2UQ9Nlf_pLv8XvatOt5UcaAvZJEALw_wcB) ve montelenir.
7-Pc'nin açma butonunu değiştirmek için linkdeki (https://www.direnc.net/dc180-siyah-buton) butonu satın alındırktan sonra uzunluğunu sizin belirleyeceğiniz kablolar butonun iki ucundan anakartınızdaki POWER SW kısmına takılır(kasanızın on/off butonunu söktüğünüz yerdir)
8-Buton STL'leri baskıdan alındıktan sonra masanıza sabitlenir.
Google Translate -sry-
1- The cover of the frame is measured and cut according to the desired dimensions.
2-Pvc, glass, mica etc. in the same dimensions. cut.
3-The material cut by the hot silicone is attached to the side cover of the computer case.
4-If you do not have a 120mm fan socket on your case, you will drill holes according to the dimensions of the fan you bought on the front and side of your cup.
5-The fans are installed and the STLs I uploaded are taken from the press and the protectors are installed to protect the fans.
6-RGB set is purchased (mine is https://urun.n11.com/sogutucu-ve-fan/dark-ultra-bright-rgb-multi-led-fan-ve-serit-kit-2x120mm-fan-ve- P227470155? Gclid = Cj0KCQjwpvzZBRCbARIsACe8vyKMrMpoahn5ro5aptFZtVwu76TNtXKkcI2UQ9Nlf_pLv8XvatOt5UcaAvZJEALw_wcB) and is mounted.
7-To change the power-on switch on the board, you need to remove the on / off button of your chassis from the two ends of the cords button that you will determine after you purchase the button on the link (https://www.direnc.net/dc180-siyah-buton) place)
After the
8-Button STLs are taken out of print, the your pc table is fixed.