Thingiverse
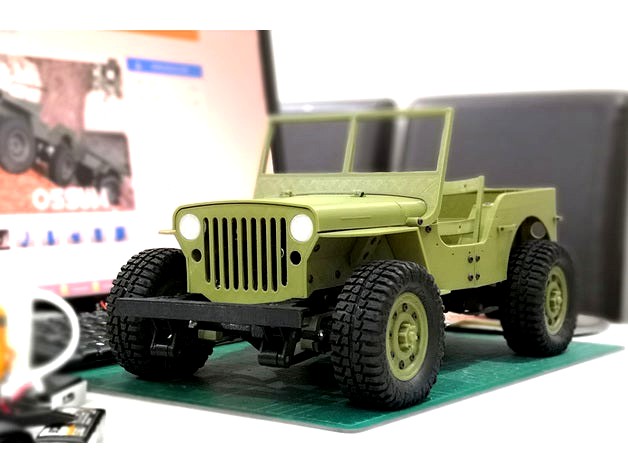
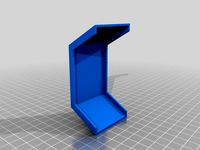
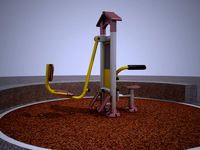
Parts for 133% Ossum Jeep to fit RC 1/10 by edwardchew
by Thingiverse
Last crawled date: 3 years, 1 month ago
Video : https://www.youtube.com/watch?v=ZGB7M1b0JCo
Ok. Now you be wondering why 133%? In real life, an Army Jeep is quite small vs the general size of vehicles, so if you scale it down by 1/10, it uses 1/18 or 1/16 scale of RC parts. But RC 1/10 scale is the more common type of scale we play, more parts & choices available so you can get even higher performance, torque, grip and tires and using the more commonly M3 size of screws and nut.
Still confused? just follow the below step/instructions. haha
Step 1
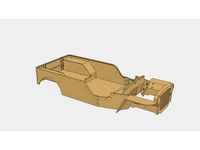
First head to the original Ossum listing and download all the parts.https://www.thingiverse.com/thing:2056923
The files you need to print from the ABOVE LINK are as follows,NOTE 1 : always remember to apply 133% or 1.33 on the "scale" setting in your cura.NOTE 2 : most are printed at 10% infill and 1 piece only, unless otherwise stated below
bumper_front.stl
bumper_rear.stl
dashboard_et_al.stl
fender_left.stl
fender_right.stl
front_floor_and_tub.stl
grill.stl
handle_side.stl (2x)
headlamp.stl (2x in transparent filament)
hitch.stl
hood.stl
leaf_thin.stl (4x at 50% infill has the right flex for my weight)
rail_front_left.stl (100% infill)
rail_front_right.stl (100% infill)
rail_rear_left.stl (100% infill)
rail_rear_right.stl (100% infill)
rear_floor
rear_handle.stl (2x)
seat_frame_left.stl (2x) then pair with right frame during assembly
seat_frame_right.stl (2x)
servo_and_Shock_supports.stl (you will need to cut the middle bridge of this)
shackle_a.stl (4x)
shackle_b.stl (4x)
suspension_bracket.stl (4x)
tailgate.stl
tub_wall_rear_left.stl
tub_wall_rear_right.stl
windscreen_frame.stl
windscreen_insert.stl
last part. Tip me cause I've figured out all above for you haha just kidding. Just share the photos here and in the fb group after you've printed.
Step 2
Now download and print the parts I uploaded here, which will make these 133% parts of Ossum to work with your RC 1/10 parts.
*Print as it is, do not scale up any
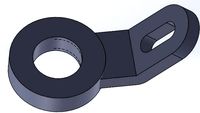
HG_Axle_Clamp_A.stl (2x 100% infill)
HG_Axle_Clamp_B.stl (2x 100% infill)
Clamp_Spacer_1mm_A.stl (2x 100% infill)
Clamp_Spacer_1mm_B.stl (2x 100% infill)
Engine_mount_V2.stl (50% infill)
Engine_Bay_Servo_Mount_V2.stl (50% infill)
Steering_rack.stl (100% infill)
Engine_bay_cover.stl (2x. if you are using HG axle like me, you need to cut the bridge, then glue and cover the hole with this)
Steering_rack_Spacer_3mm & 5mm.stl (optional. in the case your screw not long enough)
Step 3
As for the 4 wheels, you can print from the below link, just the Wheels/Rim, 4 of them.https://www.myminifactory.com/object/3d-print-mb-jeep-wheel-and-tyre-1-6-1-7-scale-49380
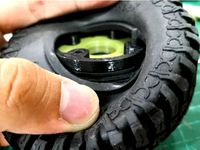
Then, print this Ring when you use aftermarket Tires. The one that fits well for me as link below.https://www.thingiverse.com/thing:2668092
Step 4
1/10 parts to use/buy. Link below,
HG Axle Rear (affordable)https://www.banggood.com/HG-P401P402P601-110-RC-Car-Rear-Gear-Box-HG-BX03-p-977819.html?p=DG23031123036201501P
HG Axle Front (affordable)https://www.banggood.com/HG-P401P402P601-110-RC-Car-Front-Gear-Box-HG-BX02-p-977820.html?p=DG23031123036201501P
Gearbox (comes with bearing inside!)https://www.banggood.com/HSP-94180-Gear-Box-Set-18024-Aluminum-Alloy-110-RC-Rock-Crawler-Car-Part-p-1172466.html?p=DG23031123036201501P
17kg Servohttps://www.banggood.com/1501MG-17KG-Big-Torque-Winch-Multi-axis-gear-robot-manipulator-and-FUTABAv-p-1015646.html?p=DG23031123036201501P
Tires (cheap and grippy! well worth the money!)https://www.banggood.com/AUSTAR-4PCS-1_9Climbing-Car-Tyre-For-110-Climbing-Car-Red-Color-p-1110296.html?p=DG23031123036201501P
320A brushed ESChttps://www.banggood.com/320A-Brushed-Speed-Controller-ESC-for-RC-Car-Truck-Boat-1-or-8-1-or-10-p-919886.html?p=DG23031123036201501P
or waterproof onehttps://www.banggood.com/Waterproof-Brushed-ESC-320A-3S-with-Fan-5V-3A-BEC-T-Plug-For-110-RC-Car-p-1030021.html?p=DG23031123036201501P
3channel Remote controlhttps://www.banggood.com/New-Version-AUSTAR-AX5-3CH-2_4G-Transmitter-With-Receiver-For-RC-Car-p-1046802.html?p=DG23031123036201501P
90mm-115mm drive shaft (Cut it shorter by 7mm)https://www.banggood.com/Stainless-Steel-Universal-Drive-Shaft-90mm-115mm-for-rc-crawlers-D90-SCX10-p-1209569.html?p=DG23031123036201501P
100mm-140mm drive shafthttps://www.banggood.com/2PCS-Speed-Steel-Center-Drive-Shaft-100-140mm-For-Axial-SCX10-110-RC-Car-Crawler-p-1180716.html?p=DG23031123036201501P
Ball joint to be used for the servo. the middle rod use for the steering rackhttps://www.banggood.com/DHK-Hobby-8382-9Z0-Assembly-Steering-Tie-Rod-18-8382-Maximus-RC-Car-Part-p-1225686.html?p=DG23031123036201501P
then, you need a long M3 grub screw at least 10mm for the steering rack. if you can't find it, just screw a M3 screw into the "steering_rack.stl", then cut the head and screw in the rod end
Steel leaf spring (optional)https://www.banggood.com/4pcs-110-Leaf-Springs-Set-HighLift-Chassis-For-110-D90-RC-Crawler-Car-Parts-Black-p-1172465.html?p=DG23031123036201501P
CR10. Fits all parts 3D Printer I usedhttps://www.banggood.com/DIY-Creality-CR-10-3D-Printer-300300400mm-Printing-Size-1_75mm-0_4mm-Nozzle-p-1085645.html?p=DG23031123036201501P
*** For those who's going to use Axial axles, you may request me to make a different clamp for the leaf spring. I don't have one.
**Screws needed ( exact to be updated)
lots of 15mm and 20mm M3 Allen CAP screw
some 30-50 M2 allen screw
Ok. Now you be wondering why 133%? In real life, an Army Jeep is quite small vs the general size of vehicles, so if you scale it down by 1/10, it uses 1/18 or 1/16 scale of RC parts. But RC 1/10 scale is the more common type of scale we play, more parts & choices available so you can get even higher performance, torque, grip and tires and using the more commonly M3 size of screws and nut.
Still confused? just follow the below step/instructions. haha
Step 1
First head to the original Ossum listing and download all the parts.https://www.thingiverse.com/thing:2056923
The files you need to print from the ABOVE LINK are as follows,NOTE 1 : always remember to apply 133% or 1.33 on the "scale" setting in your cura.NOTE 2 : most are printed at 10% infill and 1 piece only, unless otherwise stated below
bumper_front.stl
bumper_rear.stl
dashboard_et_al.stl
fender_left.stl
fender_right.stl
front_floor_and_tub.stl
grill.stl
handle_side.stl (2x)
headlamp.stl (2x in transparent filament)
hitch.stl
hood.stl
leaf_thin.stl (4x at 50% infill has the right flex for my weight)
rail_front_left.stl (100% infill)
rail_front_right.stl (100% infill)
rail_rear_left.stl (100% infill)
rail_rear_right.stl (100% infill)
rear_floor
rear_handle.stl (2x)
seat_frame_left.stl (2x) then pair with right frame during assembly
seat_frame_right.stl (2x)
servo_and_Shock_supports.stl (you will need to cut the middle bridge of this)
shackle_a.stl (4x)
shackle_b.stl (4x)
suspension_bracket.stl (4x)
tailgate.stl
tub_wall_rear_left.stl
tub_wall_rear_right.stl
windscreen_frame.stl
windscreen_insert.stl
last part. Tip me cause I've figured out all above for you haha just kidding. Just share the photos here and in the fb group after you've printed.
Step 2
Now download and print the parts I uploaded here, which will make these 133% parts of Ossum to work with your RC 1/10 parts.
*Print as it is, do not scale up any
HG_Axle_Clamp_A.stl (2x 100% infill)
HG_Axle_Clamp_B.stl (2x 100% infill)
Clamp_Spacer_1mm_A.stl (2x 100% infill)
Clamp_Spacer_1mm_B.stl (2x 100% infill)
Engine_mount_V2.stl (50% infill)
Engine_Bay_Servo_Mount_V2.stl (50% infill)
Steering_rack.stl (100% infill)
Engine_bay_cover.stl (2x. if you are using HG axle like me, you need to cut the bridge, then glue and cover the hole with this)
Steering_rack_Spacer_3mm & 5mm.stl (optional. in the case your screw not long enough)
Step 3
As for the 4 wheels, you can print from the below link, just the Wheels/Rim, 4 of them.https://www.myminifactory.com/object/3d-print-mb-jeep-wheel-and-tyre-1-6-1-7-scale-49380
Then, print this Ring when you use aftermarket Tires. The one that fits well for me as link below.https://www.thingiverse.com/thing:2668092
Step 4
1/10 parts to use/buy. Link below,
HG Axle Rear (affordable)https://www.banggood.com/HG-P401P402P601-110-RC-Car-Rear-Gear-Box-HG-BX03-p-977819.html?p=DG23031123036201501P
HG Axle Front (affordable)https://www.banggood.com/HG-P401P402P601-110-RC-Car-Front-Gear-Box-HG-BX02-p-977820.html?p=DG23031123036201501P
Gearbox (comes with bearing inside!)https://www.banggood.com/HSP-94180-Gear-Box-Set-18024-Aluminum-Alloy-110-RC-Rock-Crawler-Car-Part-p-1172466.html?p=DG23031123036201501P
17kg Servohttps://www.banggood.com/1501MG-17KG-Big-Torque-Winch-Multi-axis-gear-robot-manipulator-and-FUTABAv-p-1015646.html?p=DG23031123036201501P
Tires (cheap and grippy! well worth the money!)https://www.banggood.com/AUSTAR-4PCS-1_9Climbing-Car-Tyre-For-110-Climbing-Car-Red-Color-p-1110296.html?p=DG23031123036201501P
320A brushed ESChttps://www.banggood.com/320A-Brushed-Speed-Controller-ESC-for-RC-Car-Truck-Boat-1-or-8-1-or-10-p-919886.html?p=DG23031123036201501P
or waterproof onehttps://www.banggood.com/Waterproof-Brushed-ESC-320A-3S-with-Fan-5V-3A-BEC-T-Plug-For-110-RC-Car-p-1030021.html?p=DG23031123036201501P
3channel Remote controlhttps://www.banggood.com/New-Version-AUSTAR-AX5-3CH-2_4G-Transmitter-With-Receiver-For-RC-Car-p-1046802.html?p=DG23031123036201501P
90mm-115mm drive shaft (Cut it shorter by 7mm)https://www.banggood.com/Stainless-Steel-Universal-Drive-Shaft-90mm-115mm-for-rc-crawlers-D90-SCX10-p-1209569.html?p=DG23031123036201501P
100mm-140mm drive shafthttps://www.banggood.com/2PCS-Speed-Steel-Center-Drive-Shaft-100-140mm-For-Axial-SCX10-110-RC-Car-Crawler-p-1180716.html?p=DG23031123036201501P
Ball joint to be used for the servo. the middle rod use for the steering rackhttps://www.banggood.com/DHK-Hobby-8382-9Z0-Assembly-Steering-Tie-Rod-18-8382-Maximus-RC-Car-Part-p-1225686.html?p=DG23031123036201501P
then, you need a long M3 grub screw at least 10mm for the steering rack. if you can't find it, just screw a M3 screw into the "steering_rack.stl", then cut the head and screw in the rod end
Steel leaf spring (optional)https://www.banggood.com/4pcs-110-Leaf-Springs-Set-HighLift-Chassis-For-110-D90-RC-Crawler-Car-Parts-Black-p-1172465.html?p=DG23031123036201501P
CR10. Fits all parts 3D Printer I usedhttps://www.banggood.com/DIY-Creality-CR-10-3D-Printer-300300400mm-Printing-Size-1_75mm-0_4mm-Nozzle-p-1085645.html?p=DG23031123036201501P
*** For those who's going to use Axial axles, you may request me to make a different clamp for the leaf spring. I don't have one.
**Screws needed ( exact to be updated)
lots of 15mm and 20mm M3 Allen CAP screw
some 30-50 M2 allen screw
Similar models
thingiverse
free

Suspension Pin for 133% Ossum Jeep by edwardchew
...ww.banggood.com/diy-creality-cr-10-3d-printer-300300400mm-printing-size-1_75mm-0_4mm-nozzle-p-1085645.html?p=dg23031123036201501p
thingiverse
free

1/10 RC Car - 4WD Climbing Car - upgrade kit for HG P401 by Addriano1
...under the metal motor grip. use self tapping screws
steering rods
^^^^^^^^^^^^^
assemble it with m3 ball rod ends from aliexpress
thingiverse
free

RC crawler high bridge for 1/24 scale by JakesterDS
...rt1.stl
4x part2.stl
2x part3.stl
2x part4.stl
2x part5.stl or part5_short_version.stl
4x support.stl (needs to be glued on)
glue
thingiverse
free

Spacer for WPL 1:16 Army Truck Servo Horn Steering Rack Mod Upgrade by edwardchew
...ww.banggood.com/diy-creality-cr-10-3d-printer-300300400mm-printing-size-1_75mm-0_4mm-nozzle-p-1085645.html?p=dg23031123036201501p
thingiverse
free

Austar AX5S FPV Display Gopro Mount by edwardchew
...ww.banggood.com/diy-creality-cr-10-3d-printer-300300400mm-printing-size-1_75mm-0_4mm-nozzle-p-1085645.html?p=dg23031123036201501p
thingiverse
free
WPL 1/16 Hilux C14 FPV Gopro Mobius Mount by edwardchew
...ww.banggood.com/diy-creality-cr-10-3d-printer-300300400mm-printing-size-1_75mm-0_4mm-nozzle-p-1085645.html?p=dg23031123036201501p
thingiverse
free

Tiny Whoov FC Lipo Battery Holder by edwardchew
...ww.banggood.com/diy-creality-cr-10-3d-printer-300300400mm-printing-size-1_75mm-0_4mm-nozzle-p-1085645.html?p=dg23031123036201501p
thingiverse
free

RC crawler bridge for 1/24 scale by JakesterDS
...make an bridge. to connect you will also need 2x 10mm m10 screws.
you need an 200x250mm bed to to print the bridge in full length
thingiverse
free

Upright 1/10 Servo Mount Bracket Holder by edwardchew
...www.banggood.com/1501mg-17kg-big-torque-winch-multi-axis-gear-robot-manipulator-and-futabav-p-1015646.html?p=dg23031123036201501p
thingiverse
free
Ring for 133% Ossum Jeep Wheel by edwardchew
...ap!https://www.banggood.com/austar-4pcs-1_9climbing-car-tyre-for-110-climbing-car-red-color-p-1110296.html?p=dg23031123036201501p
Edwardchew
thingiverse
free

Gopro Alu Bar Mount by edwardchew
...ww.banggood.com/diy-creality-cr-10-3d-printer-300300400mm-printing-size-1_75mm-0_4mm-nozzle-p-1085645.html?p=dg23031123036201501p
thingiverse
free

Double Alu Bar Clamp Extension by edwardchew
...make an adjustable length bar!
just screw onto one bar on either end of the 2 bars so it becomes a clamp and end stopper as well.
thingiverse
free

Hexagon Cover for M5 Screw Gopro Knob Remix by edwardchew
...on this is made is because as you push the knob in, the resistance pushes the screw out of the knob, so this cover act as a stop.
thingiverse
free

Skyhunter 1.8m Servo Horn Protector by edwardchew
...icehttps://www.banggood.com/2x-emax-es08ma-ii-12g-mini-metal-gear-analog-servo-for-rc-model-p-1065375.html?p=dg23031123036201501p
thingiverse
free

Tripod Mount Base Cube Naked by edwardchew
...ww.banggood.com/diy-creality-cr-10-3d-printer-300300400mm-printing-size-1_75mm-0_4mm-nozzle-p-1085645.html?p=dg23031123036201501p
thingiverse
free

FMS 70mm EDF Fan Cap Replacement by edwardchew
...with-2845-kv2750-motor-for-rc-airplane-p-1023640.html?utm_campaign=t0002_1123036&utm_content=11033&p=dg23031123036201501p
thingiverse
free
Austar AX5S FPV Display Gopro Mount by edwardchew
...ww.banggood.com/diy-creality-cr-10-3d-printer-300300400mm-printing-size-1_75mm-0_4mm-nozzle-p-1085645.html?p=dg23031123036201501p
thingiverse
free
Suspension Pin for 133% Ossum Jeep by edwardchew
...ww.banggood.com/diy-creality-cr-10-3d-printer-300300400mm-printing-size-1_75mm-0_4mm-nozzle-p-1085645.html?p=dg23031123036201501p
thingiverse
free

18500 Li-Ion Battery Holder for charging Frsky X-lite by edwardchew
...ww.banggood.com/diy-creality-cr-10-3d-printer-300300400mm-printing-size-1_75mm-0_4mm-nozzle-p-1085645.html?p=dg23031123036201501p
thingiverse
free

Micromake Delta Printer LED Strip Lighting Mount by edwardchew
...striphttps://www.banggood.com/5m-white-3528-smd-led-strip-light-non-waterproof-12v-dc-300-led-p-77079.html?p=dg23031123036201501p
Ossum
thingiverse
free

Ossum diff by zxcvbn
...ossum diff by zxcvbn
thingiverse
narrow diffs to fit the ossum jeep, to many projects to do anymore at the moment
thingiverse
free
Ossum Jeep Long Wheelbase by ossum
...details on its width, from outside to outside of wheels, and inside to inside of wheels, i'd be very interested to hear them!
thingiverse
free

Ossum transfer box by zxcvbn
...by zxcvbn
thingiverse
made this transfer box for the ossum jeep, needs a mount, but i can't make up my mind how to build it.
thingiverse
free

Ossum Jeep Alternative Knuckles by ossum
...ill update this when i get feedback.
the rear knuckles can just be swapped around, no mods needed, since there is no shock mount.
thingiverse
free

axle clamp for Ossum Jeep with mrcrankyface axles by jjpython
... clamp for ossum jeep with mrcrankyface axles by jjpython
thingiverse
this is to hold the mrcrankyface axles onto the ossum jeep
thingiverse
free

Servo mount for ossum jeep by jonas_the3dguy
...signed in the ossum servo mount.
so i decieded to make my own one for the normal 1:10 scale servos and it really works quit well.
thingiverse
free

RC MB Jeep Front Bumper with winch (Ossum) by nice_3d
... nice_3d
thingiverse
another front bumper for the ossum jeep, this time with a typical winch.
you jeep needs a new look? try it.
thingiverse
free

Losi Motor Mount for Ossum Jeep by PERTEGAZ
...instead of the kulak's on the ossum jeep.
still working on the jeep with losi parts, so it's possible more parts to come.
thingiverse
free
Phillip's - Ossum Trailer parts by Bishop75
... of necessity for my trailer and my axial scx10 ii. the tail gate hinge is designed to use raw 1.75 filament as the pivot point.
thingiverse
free

Servo mount bumper for the OSSUM Jeep by 3DAnarchy
...as the ossum group on facebook:https://www.facebook.com/groups/1358672314201686/https://www.facebook.com/groups/1883252011928341/
133
turbosquid
$6
MR-133
...
turbosquid
royalty free 3d model mr-133 for download as fbx on turbosquid: 3d models for games, architecture, videos. (1343031)
turbosquid
$15

Curtain 133
...e 3d model curtain 133 for download as max, max, fbx, and obj on turbosquid: 3d models for games, architecture, videos. (1707514)
turbosquid
$14

Chair 133
...d model chair 133 for download as max, max, 3ds, fbx, and obj on turbosquid: 3d models for games, architecture, videos. (1578532)
turbosquid
$9
Office 133
... available on turbo squid, the world's leading provider of digital 3d models for visualization, films, television, and games.
turbosquid
$25
basin (133)
...n (133) for download as tga, 3ds, max, fbx, 3dm, dwg, and skp on turbosquid: 3d models for games, architecture, videos. (1484281)
evermotion
$7
railing 133 am79
...key sculptures 133 am79 railing
highly detailed architecture railing with all textures and materials.. evermotion 3d models shop.
evermotion
$7

chair 133 AM147
...model of chair with textures, shaders and materials. it is ready to use, just put it into your scene.. evermotion 3d models shop.
evermotion
$15

rocks 133 am126
...s with ivy with all textures, shaders and materials. it is ready to use, just put it into your scene.. evermotion 3d models shop.
evermotion
$14
Furniture 133 AM29
...el of sofa with all textures, shaders and materials. it is ready to use, just put it into your scene.. evermotion 3d models shop.
turbosquid
$18

Ficus plant 133
...lty free 3d model ficus plant 133 for download as max and fbx on turbosquid: 3d models for games, architecture, videos. (1215567)
Jeep
3d_export
$5

jeep
...jeep
3dexport
jeep toy
3d_export
$5

jeep
...jeep
3dexport
this is a 3d jeep created in solidworks.
archibase_planet
free

Jeep
...jeep
archibase planet
jeep motor-car car
jeep-wrangler - 3d model for interior 3d visualization.
3d_export
$14
jeep
...jeep
3dexport
turbosquid
$100

Jeep
...ep
turbosquid
royalty free 3d model jeep for download as max on turbosquid: 3d models for games, architecture, videos. (1364849)
turbosquid
$40

jeep
...eep
turbosquid
royalty free 3d model jeep for download as ma on turbosquid: 3d models for games, architecture, videos. (1183919)
turbosquid
$29

Jeep
...eep
turbosquid
royalty free 3d model jeep for download as ma on turbosquid: 3d models for games, architecture, videos. (1377059)
turbosquid
$5

Jeep
...eep
turbosquid
royalty free 3d model jeep for download as ma on turbosquid: 3d models for games, architecture, videos. (1153064)
turbosquid
$5

Jeep
...ep
turbosquid
royalty free 3d model jeep for download as c4d on turbosquid: 3d models for games, architecture, videos. (1391581)
turbosquid
$1

JEEP
...
turbosquid
royalty free 3d model jeep for download as blend on turbosquid: 3d models for games, architecture, videos. (1608181)
Rc
3ddd
$1
RC Helicopter
...rc helicopter
3ddd
вертолет
mini rc helicopter
93.329 polys
3d_export
$7
rc helicopter model
...rc helicopter model
3dexport
rc helicopter model
3d_ocean
$25
RC F1
...rc f1
3docean
auto car control f1 formula race rc remote speed
remote control f1 car
turbosquid
$10
rc plane
...lane
turbosquid
free 3d model rc plane for download as blend on turbosquid: 3d models for games, architecture, videos. (1295828)
turbosquid
$100
RC Helicopter
...free 3d model rc helicopter for download as 3ds, max, and obj on turbosquid: 3d models for games, architecture, videos. (1298511)
turbosquid
$59
Drone with RC
...3d model drone with rc for download as 3ds, max, obj, and fbx on turbosquid: 3d models for games, architecture, videos. (1363601)
3d_export
$70
rc helicopter 3D Model
...rc helicopter 3d model
3dexport
rc helocopter
rc helicopter 3d model babay 10536 3dexport
turbosquid
$75
RC buggy
... available on turbo squid, the world's leading provider of digital 3d models for visualization, films, television, and games.
turbosquid
$39

RC Plane001
... available on turbo squid, the world's leading provider of digital 3d models for visualization, films, television, and games.
turbosquid
$30
RC Jet
... available on turbo squid, the world's leading provider of digital 3d models for visualization, films, television, and games.
10
turbosquid
$25

10
... available on turbo squid, the world's leading provider of digital 3d models for visualization, films, television, and games.
turbosquid
$10

a-10
... available on turbo squid, the world's leading provider of digital 3d models for visualization, films, television, and games.
3ddd
$1

EX 10
...ex 10
3ddd
samsung , фотоаппарат
ex 10
3ddd
$1

Bed 10
...bed 10
3ddd
постельное белье
bed 10
evermotion
$25

Scene 10 Archinteriors vol. 10
...dering design interior
take a look at textured and shadered visualization scene ready to be rendered.. evermotion 3d models shop.
3ddd
$1

Curtains 10
...curtains 10
3ddd
curtains 10
3ds max 2011,fbx + textures
polys: 100355
3ddd
free

PLANTS 10
...plants 10
3ddd
цветок , горшок
plants 10,, with 3 different color planter boxes
turbosquid
$24

Chandelier MD 89310-10+10 Osgona
... chandelier md 89310-10+10 osgona for download as max and fbx on turbosquid: 3d models for games, architecture, videos. (1218762)
design_connected
$29

Nuvola 10
...nuvola 10
designconnected
gervasoni nuvola 10 computer generated 3d model. designed by navone, paola.
design_connected
$22

Kilt 10
...kilt 10
designconnected
zanotta kilt 10 computer generated 3d model. designed by progetti, emaf.
Fit
turbosquid
$21

Fitting
... available on turbo squid, the world's leading provider of digital 3d models for visualization, films, television, and games.
turbosquid
$20

fitness
... available on turbo squid, the world's leading provider of digital 3d models for visualization, films, television, and games.
turbosquid
$5

Fitness
... available on turbo squid, the world's leading provider of digital 3d models for visualization, films, television, and games.
turbosquid
$1
fitness
... available on turbo squid, the world's leading provider of digital 3d models for visualization, films, television, and games.
3d_export
$5

fittings
...fittings
3dexport
low poly 3d model for games
3d_export
$5

fittings
...fittings
3dexport
low poly 3d model for game
3d_export
$30

pipe fit
...pipe fit
3dexport
this models basically used for pipe fitting
3d_ocean
$19

Fitting room
...m fitting fitting room furniture interior materials photorealistic restaurant table textured wardrobe
fitting room with textures.
turbosquid
free
Fitness equipment, technogym tools, fitness ball
... available on turbo squid, the world's leading provider of digital 3d models for visualization, films, television, and games.
3ddd
$1
ITRE FIT
...itre fit
3ddd
itre
itre fit, моделировалась по фото. высота 800 мм, диаметр одного - 130 мм.
Parts
3d_export
$5
Parts
...parts
3dexport
parts
3d_export
$5
Part
...part
3dexport
part
3d_export
$5

Part
...part
3dexport
machine part
3d_export
$65

Part
...part
3dexport
simple rendering of the scene file
3d_export
$65

Part
...part
3dexport
simple rendering of the scene file
3d_export
$30

fan part
...fan part
3dexport
this is a part of fan of pedastal
3d_export
$10
machine parts
...machine parts
3dexport
3d part modeling work ,contact for 3d work
turbosquid
$59

Mechanical Part
...id
royalty free 3d model mechanical part for download as c4d on turbosquid: 3d models for games, architecture, videos. (1410833)
turbosquid
$17
Road parts
...bosquid
royalty free 3d model road parts for download as 3ds on turbosquid: 3d models for games, architecture, videos. (1192967)
turbosquid
$9

Cutter Parts
...squid
royalty free 3d model cutter parts for download as stl on turbosquid: 3d models for games, architecture, videos. (1220010)
1
turbosquid
$69

armchairs(1)(1)
... available on turbo squid, the world's leading provider of digital 3d models for visualization, films, television, and games.
turbosquid
$15

ring 1+1
... available on turbo squid, the world's leading provider of digital 3d models for visualization, films, television, and games.
turbosquid
$10

chair(1)(1)
... available on turbo squid, the world's leading provider of digital 3d models for visualization, films, television, and games.
turbosquid
$8

Chair(1)(1)
... available on turbo squid, the world's leading provider of digital 3d models for visualization, films, television, and games.
turbosquid
$2

RING 1(1)
... available on turbo squid, the world's leading provider of digital 3d models for visualization, films, television, and games.
turbosquid
$1

house 1(1)
... available on turbo squid, the world's leading provider of digital 3d models for visualization, films, television, and games.
turbosquid
$1

Table 1(1)
... available on turbo squid, the world's leading provider of digital 3d models for visualization, films, television, and games.
turbosquid
$59

Formula 1(1)
...lty free 3d model formula 1 for download as max, fbx, and obj on turbosquid: 3d models for games, architecture, videos. (1567088)
design_connected
$11

No 1
...no 1
designconnected
sibast no 1 computer generated 3d model. designed by sibast, helge.
turbosquid
$2

desert house(1)(1)
...3d model desert house(1)(1) for download as 3ds, max, and obj on turbosquid: 3d models for games, architecture, videos. (1055095)