Thingiverse

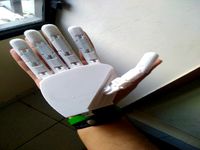
Palm Harness for Knick's Prosthetic Finger by swoozle
by Thingiverse
Last crawled date: 3 years, 1 month ago
This is a palm harness to use with Knick's Prosthetic Finger (http://www.thingiverse.com/thing:1340624).
This harness is an alternative to the bracelet-based tendon anchor design that Knick uses. I found this to work better with two Knick's fingers (as I need), both in keeping the anchor tendons where they should be as well as a little more comfortable with the increased pull force that two fingers requires. It is, however, visually more obtrusive.
Needed:
Flexible filament (TPU, eLastic, NinjaFlex, etc)
Hard filament (PLA, ABS, PETG, etc)
M2.5 x 3 mm set screw
Buckle for 10mm wide strap
The harness and straps are designed to be printed with the flexible filament. Since you are making a Knick's Finger if you are interested in this, you already have the flexible filament. I used eSun eLastic but I'm sure that many others will work just as well. You might want to make the straps and harness thinner if a stiffer filament is used. eLastic is fairly soft, akin to NinjaFlex I think.
The harness can be used on either hand and also worn with the smooth (print surface) out or against the skin. It's up to your preference. Figure out what you want and then use the regular or reversed versions of the harness and palm straps. The palm strap end near the thumb is a little closer to the fingers than the little finger side.
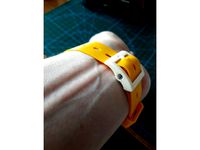
Two wrist straps are needed. Length is not important as they are over-long and trimmed depending on your buckle setup.
One palm strap is needed. This length needed is dependent on your hand size. Probably the easiest way to size the wrist strap is to print the main harness, then place the harness around your hand and measure the distance between the harness ends (A second person makes this a lot easier). Resize the palm strap to suit either by simply stretching the appropriate axis in your printing software, or loading the model in Sketchup and editing.
The anchor block is designed to be printed with a standard hard filament such as PLA, ABS, PETG, etc. I used a clear PETG for the block in the picures.
The block needs a set screw. Again, this is the same M2.5x3 set screw needed for Knick's Finger so you are covered.
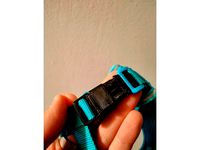
The buckle is up to you. I used a plastic buckle designed for 10mm wide straps. I'm not sure where to get those in the states (I'm currently in South Korea), but I would imagine that craft stores have this sort of thing. I think a watch band buckle could also be made to work well.
Assembly:
The palm and wrist straps are attached to the harness by melting the ends together. This is easily done with a soldering iron at low temp. Specific temp and technique depend on your filament. I found that a wider tip than normally used for soldering makes this easier. A paper clip can be wrapped around the soldering iron tip and then bent perpendicular to make a smooth, wider tip. This also keeps stray solder bits out of the melted filament. The bent section needs to be quite close to the iron tip to stay hot.
Take some time to practice on scraps before you dive into assembling the harness.
There are v-grooves and ridges designed into the ends of the harness and straps. Place the ends against each other and melt the ridges into the v-grooves. Flip the joint over and melt the flush mating ends together.
The palm strap is of course attached to either end of the harness to make a loop to go around the palm. The wrist straps are initially attached at one end each.
The buckle is attached to the wrist straps in the same way (looped through and then melted together). Or they can be left adjustable (as one of the ends is in the pictures).
Assembly of the anchor block is self-evident.
This harness is an alternative to the bracelet-based tendon anchor design that Knick uses. I found this to work better with two Knick's fingers (as I need), both in keeping the anchor tendons where they should be as well as a little more comfortable with the increased pull force that two fingers requires. It is, however, visually more obtrusive.
Needed:
Flexible filament (TPU, eLastic, NinjaFlex, etc)
Hard filament (PLA, ABS, PETG, etc)
M2.5 x 3 mm set screw
Buckle for 10mm wide strap
The harness and straps are designed to be printed with the flexible filament. Since you are making a Knick's Finger if you are interested in this, you already have the flexible filament. I used eSun eLastic but I'm sure that many others will work just as well. You might want to make the straps and harness thinner if a stiffer filament is used. eLastic is fairly soft, akin to NinjaFlex I think.
The harness can be used on either hand and also worn with the smooth (print surface) out or against the skin. It's up to your preference. Figure out what you want and then use the regular or reversed versions of the harness and palm straps. The palm strap end near the thumb is a little closer to the fingers than the little finger side.
Two wrist straps are needed. Length is not important as they are over-long and trimmed depending on your buckle setup.
One palm strap is needed. This length needed is dependent on your hand size. Probably the easiest way to size the wrist strap is to print the main harness, then place the harness around your hand and measure the distance between the harness ends (A second person makes this a lot easier). Resize the palm strap to suit either by simply stretching the appropriate axis in your printing software, or loading the model in Sketchup and editing.
The anchor block is designed to be printed with a standard hard filament such as PLA, ABS, PETG, etc. I used a clear PETG for the block in the picures.
The block needs a set screw. Again, this is the same M2.5x3 set screw needed for Knick's Finger so you are covered.
The buckle is up to you. I used a plastic buckle designed for 10mm wide straps. I'm not sure where to get those in the states (I'm currently in South Korea), but I would imagine that craft stores have this sort of thing. I think a watch band buckle could also be made to work well.
Assembly:
The palm and wrist straps are attached to the harness by melting the ends together. This is easily done with a soldering iron at low temp. Specific temp and technique depend on your filament. I found that a wider tip than normally used for soldering makes this easier. A paper clip can be wrapped around the soldering iron tip and then bent perpendicular to make a smooth, wider tip. This also keeps stray solder bits out of the melted filament. The bent section needs to be quite close to the iron tip to stay hot.
Take some time to practice on scraps before you dive into assembling the harness.
There are v-grooves and ridges designed into the ends of the harness and straps. Place the ends against each other and melt the ridges into the v-grooves. Flip the joint over and melt the flush mating ends together.
The palm strap is of course attached to either end of the harness to make a loop to go around the palm. The wrist straps are initially attached at one end each.
The buckle is attached to the wrist straps in the same way (looped through and then melted together). Or they can be left adjustable (as one of the ends is in the pictures).
Assembly of the anchor block is self-evident.
Similar models
thingiverse
free

Prosthetic Finger by Natalie2980
... the finger on and attach the string to your wrist! feedback is appreciated and i will try to incorporate it into future versions
thingiverse
free
Lucina's Mask (Fire Emblem) by OnyxIbex
...l (it melts some of the elastic into the filament).
i printed in black pla and then went over the edges with a gold paint marker.
thingiverse
free

Buckle replacement for Ortlieb bike panniers by Mape
...d the strap in the buckle, thus eliminating need for extra screws. the actual buckle end is identical to bustamania's buckle.
thingiverse
free
Compact strap buckle (originally for rcpets adventurer kitty harness) by nosock
... it directly to the stock fasteners on my harness, also uploading a female part with standard belt fasteners.
no supports needed.
thingiverse
free

Nintendo Switch Joy-Con wrist strap buckle by ShengWD
... i liked, so i made this one, simple design, exactly meet my needs, let the wrist strap work again.
share it for everyone, enjoy!
thingiverse
free

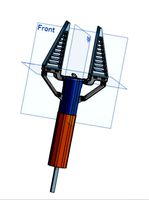
Cosplay Finger paint stand by TKCC71
...k about 3 hours to print both parts. once the parts are done you assemble. i used a soldering gun to melt the two parts together.
thingiverse
free
20 mm watch strap and buckle by robwhi
...is used to hold the buckle to the strap and the latch to the buckle. the ends have been heated and deformed so the pin stays put.
thingiverse
free

Pixel XL Wrist Mount by RobohamLincoln
...to mount your pixel xl to your wrist. you will need your own strap to fasten it to your wrist. i used a wide strap with velcro.
cg_trader
$5

Staps and Buckles Zbrush Curve IMM Kitbash
... of the same strap hanging by sides! have fun with strapping! equipment design strap buckles kitbash clothing imm curve character
thingiverse
free

Ergonomic Hex Screwdriver Bit Handle by maxkrippler
...is wide enough for you to apply some decent torque if you need to. i would encourage you to use petg filament when making these.
Swoozle
thingiverse
free

Cat Deterrent Spike Strip by swoozle
...ou will still need a drop of acetone (or glue) to keep it together. it just makes it much easier to assemble a bunch all at once.
thingiverse
free

Auger feeder remix by swoozle
...ong stepper turned out to be perfect. the stepper stalls when a piece of food is caught rather than breaking the auger or trough.
thingiverse
free

Hubsan X4 Frame remix with Eachine TX01 cam mount remix by swoozle
...#39;s to sketchup to make the changes, so sketchup files included.
cam mount fits eachine tx01/02
this is for 7mm diameter motors
Knick
3d_export
$35

Knick Knack Shelf 3D Model
...port
knick knack wall shelf furniture wood vray household unit storage shelves
knick knack shelf 3d model plutonius 7698 3dexport
turbosquid
$7

Knick-knack – N.27 in M4D Vol.1
... available on turbo squid, the world's leading provider of digital 3d models for visualization, films, television, and games.
3d_export
$15
Bear figurine 3D Model
...bear toys fugare sculpture decoration decorative accessory glass tchotchke knick knack material detailed bear figurine 3d model nailgun 38803...
3d_export
$15
Snail figurine 3D Model
...3dexport snail sculpture decoration decorative accessory crystal glass tchotchke knick knack material detailed escargot mollusk coiled shell slug limpet...
cg_studio
$35

Wooden Shelf Unit3d model
...wooden shelf unit3d model cgstudio household bookshelf wooden shelf knick knack curio wall furniture vray .3ds .max .wrl -...
3d_export
$21
Decorative Accessories Finials 3D Model
...accessories finials 3d model 3dexport decoration decorative accessory tchotchkes knick knack realistic ornament decor interior design furnishing sculpture art...
cg_studio
$19

Decorative Accessories Finials3d model
...decorative accessories finials3d model cgstudio decorative accessory tchotchke knick knack realistic ornament decor interior design furnishing sculpture art...
thingiverse
free

Knick Knack the snowman
...knick knack the snowman
thingiverse
just a simple remodle of knick knack the snowman, from an old short made by pixar.
thingiverse
free

Knick Knack hanger. by CursingFisherman
...d secured my items to it by running bread ties through the 2 holes, and then mounting the hanger to the wall with a picture nail.
unrealengine
$32

Knick Knacks Vol 1
...knick knacks vol 1
unreal engine marketplace
this package has indoor knick-knacks that will adorn your indoor environments!
Prosthetic
turbosquid
$49

Prosthetic Arm
...uid
royalty free 3d model prosthetic arm for download as max on turbosquid: 3d models for games, architecture, videos. (1556291)
turbosquid
$20

Prosthetic for small dogs 3D print model v2
...osthesis for small dogs 3d print model v2 for download as stl on turbosquid: 3d models for games, architecture, videos. (1290474)
3d_export
$10
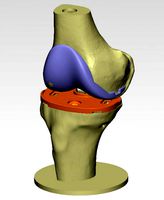
knee joint prosthesis with guides sample of individual prosthetics
...mm, 20 grams tibial component: ti6al4v material, 76×77×70 mm, 90 grams femoral component: cocrmo material, 70×52×62 mm, 290 grams
3d_export
$5
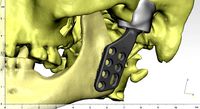
individual tmj prosthesis real operation
...left tmj. it consists of the following parts:: * prosthetic condylar process (ti6al4v); * joint cavity prosthesis (high molecular...
3d_export
$44
Hip Replacement
...damaged bone and cartilage is removed and replaced with prosthetic components. the damaged femoral head is removed and replaced...
3d_export
$10

itap implant osteointegration operation
...the implant. tested on more than 15 operations. itap prosthetic is an installation of "intraosseous transcutaneous amputation prosthesis". in...
thingiverse
free
Prosthetic arm
...prosthetic arm
thingiverse
prosthetics arm
3d printable
thingiverse
free

Prosthetic Arm
...prosthetic arm
thingiverse
a prosthetic arm purely for asthetic purposes. it was made for a client's wedding.
thingiverse
free

Dog Prosthetic by 3DESIGNER27
...animal allies. cheap alternative for dog prosthetic limb. scale in your slicer to fit the dog you are looking to apply prosthetic
thingiverse
free

XOR Prosthetic Hand by chandlersupple
...xor prosthetic hand by chandlersupple
thingiverse
prosthetic hand - two part
Harness
3ddd
$1
Horse harness puff
...horse harness puff
3ddd
пуф
horse harness puff
turbosquid
$30

Saddle Greek Mycenaean Bridle Harness
... available on turbo squid, the world's leading provider of digital 3d models for visualization, films, television, and games.
turbosquid
$7

double harness bend with parallel ends
... parallel ends for download as dae, obj, x, stl, fbx, and 3ds on turbosquid: 3d models for games, architecture, videos. (1666254)
turbosquid
$9

VD - H07V-R 95mm2 HAR brown.max
... available on turbo squid, the world's leading provider of digital 3d models for visualization, films, television, and games.
turbosquid
$9
VD - H07V-R 70mm2 HAR brown.max
... available on turbo squid, the world's leading provider of digital 3d models for visualization, films, television, and games.
turbosquid
$9
VD - H07V-R 50mm2 HAR brown.max
... available on turbo squid, the world's leading provider of digital 3d models for visualization, films, television, and games.
turbosquid
$9

VD - H07V-R 35mm2 HAR brown.max
... available on turbo squid, the world's leading provider of digital 3d models for visualization, films, television, and games.
turbosquid
$9

VD - H07V-R 25mm2 HAR brown.max
... available on turbo squid, the world's leading provider of digital 3d models for visualization, films, television, and games.
turbosquid
$9
VD - H07V-R 16mm2 HAR brown.max
... available on turbo squid, the world's leading provider of digital 3d models for visualization, films, television, and games.
turbosquid
$9

VD - H07V-R 10mm2 HAR brown.max
... available on turbo squid, the world's leading provider of digital 3d models for visualization, films, television, and games.
Palm
archibase_planet
free
Palms
...palms
archibase planet
palm palm tree plant
palms - 3d model (*.gsm+*.3ds) for interior 3d visualization
3d_export
$6
palm
...palm
3dexport
palm height 2300mm
3ddd
$1
Vioski Palms
...vioski palms
3ddd
palms , vioski
кресло фабрика vioski, модель palms
3d_ocean
$10
Palm Model
...ful model to complete your interior or landscape design! just click on render button and you will get model like on mine picture.
3d_ocean
$17

Palm
... palm plant rainforest subtropic succulent summer tree tropical vegetation
very detailed high poly 3d models of the coconut palm.
3d_export
free
palm 3d
...palm 3d
3dexport
palm 3d
turbosquid
$60

Palms
...s
turbosquid
royalty free 3d model palms for download as fbx on turbosquid: 3d models for games, architecture, videos. (1212986)
turbosquid
$2

palm
...id
royalty free 3d model palm for download as , fbx, and obj on turbosquid: 3d models for games, architecture, videos. (1592575)
turbosquid
$32
Palm
...
royalty free 3d model palm for download as stl, obj, and fbx on turbosquid: 3d models for games, architecture, videos. (1549720)
turbosquid
$11

Palm
...
royalty free 3d model palm for download as max, obj, and fbx on turbosquid: 3d models for games, architecture, videos. (1255342)
Finger
3d_export
$5

finger screw
...finger screw
3dexport
finger screw
3d_export
$5
Middle finger
...middle finger
3dexport
middle finger
turbosquid
$12

finger
... available on turbo squid, the world's leading provider of digital 3d models for visualization, films, television, and games.
3d_export
$10
flex fingers
...around an object. the triangle fingers on the top should be made out of a flexible material but everything elts should be ridged.
3d_ocean
$15

Finger man :D
...finger man :d
3docean
3ds arman3dg characters finger games low max poly
finger man finger man tris: 1,202
3d_export
$5
Middle finger grid
...middle finger grid
3dexport
middle finger grid
turbosquid
$5

Evidence Finger
...lty free 3d model evidence finger for download as tga and obj on turbosquid: 3d models for games, architecture, videos. (1343097)
turbosquid
$18
ladies finger
...3d model ladies finger for download as max, fbx, obj, and 3ds on turbosquid: 3d models for games, architecture, videos. (1518818)
turbosquid
$53

Finger Face
... available on turbo squid, the world's leading provider of digital 3d models for visualization, films, television, and games.
turbosquid
$20
Finger Ring
... available on turbo squid, the world's leading provider of digital 3d models for visualization, films, television, and games.