Thingiverse
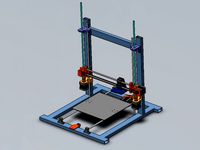
OTTO DIY with 48:1 DC Motors by s4snow
by Thingiverse
Last crawled date: 3 years ago
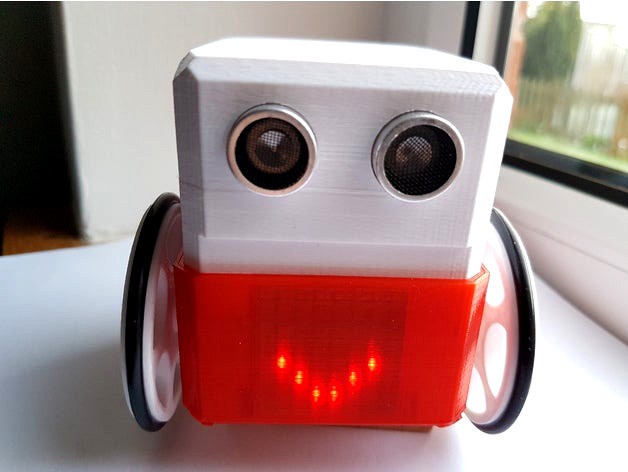
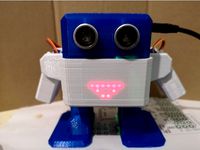
OTTO robot with 48:1 DC Motors
List of parts:
I used a 3.7V 1200mAH LIPO and a new DC MOTOR driver NANO SHIELD PCB
You can use a Arduino NANO with I/O shield and a L9110S H-bridge Dual driver (some modifactions to the sketch will be required)
Small female to female jumper wires
Buzzer
2 x DAGU 48:1 DC Motors (yellow DC motors with right-angled gearboxes)
HC-SR04 Ultrasound sensor module
MAX 7219 LED matrix module
2 x Screws - small self tapping screws to secure PCB in place
4 x Screws - 3mm x 15mm screws with 3mm nuts (to secure castor and motor clamp in place)
You can use a 3.7V 1200mAH LIPO and a 5 volt DC to DC booster
CONNECTIONS:
The HC-SR04 Ultrasound sensor is connected (TRIG to pin 8 and ECHO to pin 9)
The MAX 7219 LED matrix is connected (CLK to pin 11, DIN to pin 12, CS to pin 10)
The BUZZER is connected (pin 13),
The Left Motor PWM pin is pin 6,
The Left Motor DIRECTION pin is pin 2,
The Right Motor PWM pin is pin 5,
The Right Motor DIRECTION pin is pin 4,
Code and libraries are :https://github.com/jarsoftelectrical/OTTO-DC-Motor
Check the OTTO DIY+ for more details as this is based on that project.https://www.thingiverse.com/thing:2398231
For the Arduino programming:
Download & Install Arduino IDE:https://www.arduino.cc/
This is still work in progress,
I used a bespoke Nano PCB and this is shown in the pictures,
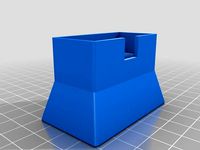
Additional STL for use with a standard NANO and I/O shield is included, make sure you print the correct head, you will need to select a suitable motor driver PCB as well.
List of parts:
I used a 3.7V 1200mAH LIPO and a new DC MOTOR driver NANO SHIELD PCB
You can use a Arduino NANO with I/O shield and a L9110S H-bridge Dual driver (some modifactions to the sketch will be required)
Small female to female jumper wires
Buzzer
2 x DAGU 48:1 DC Motors (yellow DC motors with right-angled gearboxes)
HC-SR04 Ultrasound sensor module
MAX 7219 LED matrix module
2 x Screws - small self tapping screws to secure PCB in place
4 x Screws - 3mm x 15mm screws with 3mm nuts (to secure castor and motor clamp in place)
You can use a 3.7V 1200mAH LIPO and a 5 volt DC to DC booster
CONNECTIONS:
The HC-SR04 Ultrasound sensor is connected (TRIG to pin 8 and ECHO to pin 9)
The MAX 7219 LED matrix is connected (CLK to pin 11, DIN to pin 12, CS to pin 10)
The BUZZER is connected (pin 13),
The Left Motor PWM pin is pin 6,
The Left Motor DIRECTION pin is pin 2,
The Right Motor PWM pin is pin 5,
The Right Motor DIRECTION pin is pin 4,
Code and libraries are :https://github.com/jarsoftelectrical/OTTO-DC-Motor
Check the OTTO DIY+ for more details as this is based on that project.https://www.thingiverse.com/thing:2398231
For the Arduino programming:
Download & Install Arduino IDE:https://www.arduino.cc/
This is still work in progress,
I used a bespoke Nano PCB and this is shown in the pictures,
Additional STL for use with a standard NANO and I/O shield is included, make sure you print the correct head, you will need to select a suitable motor driver PCB as well.
Similar models
thingiverse
free

OTTO with Wheels by s4snow
...bluetooth code for use with the zowi app,
https://github.com/jarsoftelectrical/otto-wheeled/blob/master/20170827_200142_mpeg4.avi
thingiverse
free

Tito biped robot PLUS by s4snow
....
any problems printing or making or programming?
join and create a topic in our group http://www.thingiverse.com/groups/ottodiy/
thingiverse
free
OTTO with ARMS by s4snow
... battery 3.7volt and a suitable dc-dc converter module (optional)
gstduino pcb (instead of the arduino nano and shield, optional)
thingiverse
free

top cover for smars robot by xplp
...838 for arduino
3x tcrt5000 tracker sensor
ultrasonic module hc-sr04
l9110s dc stepper motor driver
2x 16340 3.7v
arduino nano v3
thingiverse
free

SMARS meets OTTO DIY by s4snow
...and two dc motor drivers – as can be seen in the pictures.
please visit smars for originalstl files and take time to visit ottdiy
thingiverse
free

Roaming Robot by lynce9956
...5v dc 4-phase 5-wire + uln2003 driver board
range finder: hc-sr04
microcontroller: arduino uno
https://youtu.be/n5mby3c59hc
thingiverse
free

HC-SR04 Sensor Holder for servomotors by Joze_
...duino project, to a common servomotor by the motor screw. doesn't need any other screw or glue, everything is joined by join.
thingiverse
free
Ultrasound House for HC-SR04 by Thors
...ultrasound house for hc-sr04 by thors
thingiverse
housing for hc-sr04 ultrasound range finder
thingiverse
free

arduino nano io shield with bluetooth HC-05
...arduino nano io shield with bluetooth hc-05
thingiverse
arduino nano io shield with bluetooth hc-05
cults
free

Otto DIY build your own robot
...magnetized)
micro switch 8x8mm
3d printed head.
3d printed body.
3d printed leg x2.
3d printed right foot.
3d printed left foot.
S4Snow
thingiverse
free
OTTO with ARMS by s4snow
... battery 3.7volt and a suitable dc-dc converter module (optional)
gstduino pcb (instead of the arduino nano and shield, optional)
thingiverse
free
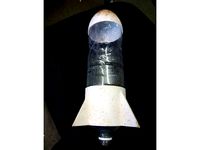
Water Rocket Fins and Nose cone by s4snow
...h.
remember safety first and only launch in a open space free from people, a weighted pointed nose cone will do some damage......
thingiverse
free
OTTO with Wheels by s4snow
...bluetooth code for use with the zowi app,
https://github.com/jarsoftelectrical/otto-wheeled/blob/master/20170827_200142_mpeg4.avi
thingiverse
free

OTTO meets SMARS by s4snow
... your choice !
1 x arduino : your choice, either nano or uno !
please visit otto and smars for more information on their design.
thingiverse
free
Tito biped robot PLUS by s4snow
....
any problems printing or making or programming?
join and create a topic in our group http://www.thingiverse.com/groups/ottodiy/
thingiverse
free
SMARS meets OTTO DIY by s4snow
...and two dc motor drivers – as can be seen in the pictures.
please visit smars for originalstl files and take time to visit ottdiy
thingiverse
free

Pro Tracks for OTTO meets SMARS
...smars thingiverse i really liked "otto meets smars" by s4snow but i liked the pro tracks by tristomietitoredeituit more...
Otto
3ddd
free

OTTO
...otto
3ddd
otto , стол
stol ot otto
3ddd
$1
otto
... otto
вентилятор карло борера,
исходник:http://www.cbindustries.ch/d/otto-gallery
design_connected
$7

Otto
...otto
designconnected
zanotta otto computer generated 3d model. designed by for use.
3ddd
$1
Otto Wagner
... комод , шкаф
otto wagner - cupboard.
obj and fbx inside.
turbosquid
$60

otto
...lty free 3d model otto for download as ztl, ztl, obj, and stl on turbosquid: 3d models for games, architecture, videos. (1674218)
turbosquid
$15

otto
... available on turbo squid, the world's leading provider of digital 3d models for visualization, films, television, and games.
3ddd
free
Софа Otto
...софа otto
3ddd
gervasoni
софа otto, фабрика gervasoni. италия. текстуры в архиве
3ddd
$1
Rolf Benz OTTO
...d
rolf benz , otto , ковер
ковер rolf benz otto
3ddd
$1

809057 OTTO Lightstar
... lightstar
3ddd
otto , lightstar
809057 otto lightstarhttp://www.lightstar.ru/
3ddd
$1

809616 OTTO Lightstar
... lightstar
3ddd
otto , lightstar
809616 otto lightstarhttp://www.lightstar.ru/
Diy
3d_export
free
DIY 3D Printer
...diy 3d printer
3dexport
diy 3d printer model
turbosquid
$10

Diy tiered
...l diy tiered for download as max, max, max, max, fbx, and obj on turbosquid: 3d models for games, architecture, videos. (1603709)
turbosquid
$3
Diy Desk to Bench
...odel diy desk to bench for download as 3ds, max, obj, and fbx on turbosquid: 3d models for games, architecture, videos. (1506589)
turbosquid
$2

DIY Moon Light
...model diy moon light for download as obj, fbx, blend, and dae on turbosquid: 3d models for games, architecture, videos. (1501170)
3d_export
$8
DIY CNC Router 3D Model
...diy cnc router 3d model
3dexport
cnc; router; diy; homemade
diy cnc router 3d model maikeru86 58463 3dexport
turbosquid
$5
Diy Kitchen Cabinets
...itchen cabinets for download as 3ds, obj, fbx, blend, and dae on turbosquid: 3d models for games, architecture, videos. (1197373)
3d_export
free

Download free Diying Plant 3D Model
...download free diying plant 3d model
3dexport
diying plant blender
diying plant 3d model visitorsama 98607 3dexport
3ddd
$1
DIY coffee table + decor
... рамка для фото
кофейный столик diy 400х350х600(h) мм. моделился по фото. внимание: материалы - corona.
turbosquid
$3
Diy Wire Lamp Shade
...free 3d model diy wire lamp shade for download as 3ds and fbx on turbosquid: 3d models for games, architecture, videos. (1347605)
cg_studio
$12
DIY MONGOLIAN LAMB STOOLS3d model
... hair soft pile white
.max - diy mongolian lamb stools 3d model, royalty free license available, instant download after purchase.
48
3ddd
free
Pillows 48
...pillows 48
3ddd
подушка
pillows 48
design_connected
$18

Dezza 48
...dezza 48
designconnected
poltrona frau dezza 48 computer generated 3d model. designed by ponti, gio.
design_connected
$16

48 Chair
...48 chair
designconnected
niels vodder 48 chair computer generated 3d model. designed by juhl, finn.
turbosquid
$9

building 48
...osquid
royalty free 3d model building 48 for download as max on turbosquid: 3d models for games, architecture, videos. (1362768)
turbosquid
$6
Bedcloth 48
...osquid
royalty free 3d model bedcloth 48 for download as max on turbosquid: 3d models for games, architecture, videos. (1522740)
turbosquid
$15

Curtain 48
...
royalty free 3d model curtain 48 for download as max and obj on turbosquid: 3d models for games, architecture, videos. (1341865)
turbosquid
$15
Chair 48
...alty free 3d model chair 48 for download as max, obj, and fbx on turbosquid: 3d models for games, architecture, videos. (1497278)
turbosquid
$15

Sofa 48
...yalty free 3d model sofa 48 for download as max, obj, and fbx on turbosquid: 3d models for games, architecture, videos. (1503068)
turbosquid
$8

Table 48
...alty free 3d model table 48 for download as max, obj, and fbx on turbosquid: 3d models for games, architecture, videos. (1503871)
turbosquid
$6
Lamp 48
...yalty free 3d model lamp 48 for download as max, obj, and fbx on turbosquid: 3d models for games, architecture, videos. (1500775)
Dc
design_connected
$27

DC 290
...dc 290
designconnected
ceccotti collezioni dc 290 computer generated 3d model. designed by de cotiis, vincenzo.
design_connected
$27

DC 300
...dc 300
designconnected
ceccotti collezioni dc 300 computer generated 3d model. designed by de cotiis, vincenzo.
design_connected
$27

DC Bed
...dc bed
designconnected
ceccotti collezioni dc bed sleep furniture computer generated 3d model. designed by vincenzo de cotiis.
turbosquid
$1

DC motor
...urbosquid
royalty free 3d model dc motor for download as 3dm on turbosquid: 3d models for games, architecture, videos. (1188219)
3ddd
$1
Ceccotti | DC
...ceccotti | dc
3ddd
ceccotti
фабрика ceccotti
turbosquid
$35
DC Skateboard
... available on turbo squid, the world's leading provider of digital 3d models for visualization, films, television, and games.
turbosquid
$13
DC Motor
...l dc motor for download as max, ige, obj, fbx, stl, and sldas on turbosquid: 3d models for games, architecture, videos. (1493908)
3ddd
free
Ceccotti / DC Bed
...://freshome.com/2009/05/12/dc-bed-by-ceccotti-collezioni/ http://www.switchmodern.com/beds/ceccotti-dc-bed.asp
3ddd
$1
Кресло CECCOTTI DC 90
...кресло ceccotti dc 90
3ddd
ceccotti
кресло ceccotti dc 90
3ddd
$1
Ceccotti Collezioni DC 90
... кресло , armchair
кресло ceccotti collezioni dc 90. размеры:850-800-406.7
Motors
archibase_planet
free

Motor
...base planet
motor motor engine engine electric motor
motor wagner n250213 - 3d model (*.gsm+*.3ds) for interior 3d visualization.
archibase_planet
free

Motor
...motor
archibase planet
motor motor engine engine
motor n151112 - 3d model (*.gsm+*.3ds) for interior 3d visualization.
archibase_planet
free

Motor
...motor
archibase planet
motor motor engine engine
motor n150615 - 3d model (*.gsm+*.3ds+*.max) for interior 3d visualization.
turbosquid
$15

Motor
...otor
turbosquid
royalty free 3d model motor for download as on turbosquid: 3d models for games, architecture, videos. (1639404)
3d_ocean
$5

Electric motor
...electric motor
3docean
car electric engine industry motor phase train vehicle
an electric motor enjoy!
3d_ocean
$18

Electric Motor
...electric motor
3docean
electric motor engine machine mover parts
3d model electric motor for hoist crane
turbosquid
$29

Motor
... available on turbo squid, the world's leading provider of digital 3d models for visualization, films, television, and games.
turbosquid
$5

Motor
... available on turbo squid, the world's leading provider of digital 3d models for visualization, films, television, and games.
3d_export
$5

electric motor
...electric motor
3dexport
electric motor use for industrial purposes
3d_export
$5

servo motor
...tor
3dexport
it's a simple part of servo motor 0.75kw for used in machines assembly to show specified motor in own project.
1
turbosquid
$69

armchairs(1)(1)
... available on turbo squid, the world's leading provider of digital 3d models for visualization, films, television, and games.
turbosquid
$15

ring 1+1
... available on turbo squid, the world's leading provider of digital 3d models for visualization, films, television, and games.
turbosquid
$10

chair(1)(1)
... available on turbo squid, the world's leading provider of digital 3d models for visualization, films, television, and games.
turbosquid
$8

Chair(1)(1)
... available on turbo squid, the world's leading provider of digital 3d models for visualization, films, television, and games.
turbosquid
$2

RING 1(1)
... available on turbo squid, the world's leading provider of digital 3d models for visualization, films, television, and games.
turbosquid
$1

house 1(1)
... available on turbo squid, the world's leading provider of digital 3d models for visualization, films, television, and games.
turbosquid
$1

Table 1(1)
... available on turbo squid, the world's leading provider of digital 3d models for visualization, films, television, and games.
turbosquid
$59

Formula 1(1)
...lty free 3d model formula 1 for download as max, fbx, and obj on turbosquid: 3d models for games, architecture, videos. (1567088)
design_connected
$11

No 1
...no 1
designconnected
sibast no 1 computer generated 3d model. designed by sibast, helge.
turbosquid
$2

desert house(1)(1)
...3d model desert house(1)(1) for download as 3ds, max, and obj on turbosquid: 3d models for games, architecture, videos. (1055095)