Thingiverse
Orbiter v1.5 fan mount system for Ender 3 and 5 by thrutheframe
by Thingiverse
Last crawled date: 4 years, 8 months ago
Update 7 Apr 2021:
Update on the design of the BLT bracket to V3. The original version was too thin for the M3x8 to secure properly.
reduce the diameter of self-tap M3 from 3mm - 2.8mm. If you are using the "M3_FDGen3_1 Orbiter_XXXXX" for M3 self tap, please wait for the part to fully cool down before tapping. This is because I have taken account that for shrinkage.
This is a work in progress design. It is currently installed on my Ender3 and 5 using stock hotend. If you see any improvement that can be made to the design, please provide your feedback. Do read the write up before printing. NOTE: Not suitable for Ender3 V2 as the mounting holes are different.
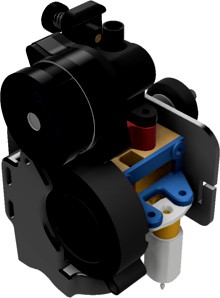
This fan Duct mount system is for Creality Ender3/3pro/5/5Plus. Design based on Ender 5 bracket with stock hotend. It is suitable for Ender 3/3pro as the mounting holes are the same. BL touch offset are X=35.5 Y=-5
This system uses a side mounted 4010 fan instead of the front to eliminate air flowing downwards onto the hotend. A 5015 or 4010 radial fan can be used for part cooling and mounted at the front. I am lousy at designing part cooling duct, hence using the designs by James Tongue. (Credit goes to him for such well designed part cooling ducts for 5015 and 4010)
The criteria of design were:
Print flat on bed as much as possible.
Minimal support
Modular parts to improve success in printing.
There are 2 versions. One uses M3 brass insert nuts (M3xD4.6xL3) for securing part together. The other have holes for the M3 to self-tap when u first screw them in. These are files with "M3_FDGen3_1 Orbiter_XXXXX". ie "M3_FDGen3_1 Orbiter_Body BottomV2.stl". This is because not everyone has M3 brass insert nuts.
This design requires silicon sock or something similar for the heat block. Without it the tip of the part cooling fan duct will melt due to proximity to heat block. There will also be abnormal dip in temperature when part fan starts running.
Screws needed:
4010 fan uses 4pcs of M3 stock screws from Creality.
BLT bracket uses 4pcs of M3x8 screws.
Orbiter bracket uses 2pcs of M3x18 or M3x20(with 1mm washer)
Part Cooling Fan Duct uses 2pcs of M3x18
Print Orientation and Support
It is advisable to print according to STL file orientation. Some supports are needed, but they are low at 6.2mm (31 layer at 0.2mm layer height) See images on orientation.
Part Cooling Fan Duct can also be printed according to orientation and no support is needed. I printed then without support as to what James said. Works fine for me. Do note that not all 5015 or 410 fans that comes from China factories meet dimension specifications. You may have to sand/file a little here and there to get them to fit.
Update on the design of the BLT bracket to V3. The original version was too thin for the M3x8 to secure properly.
reduce the diameter of self-tap M3 from 3mm - 2.8mm. If you are using the "M3_FDGen3_1 Orbiter_XXXXX" for M3 self tap, please wait for the part to fully cool down before tapping. This is because I have taken account that for shrinkage.
This is a work in progress design. It is currently installed on my Ender3 and 5 using stock hotend. If you see any improvement that can be made to the design, please provide your feedback. Do read the write up before printing. NOTE: Not suitable for Ender3 V2 as the mounting holes are different.
This fan Duct mount system is for Creality Ender3/3pro/5/5Plus. Design based on Ender 5 bracket with stock hotend. It is suitable for Ender 3/3pro as the mounting holes are the same. BL touch offset are X=35.5 Y=-5
This system uses a side mounted 4010 fan instead of the front to eliminate air flowing downwards onto the hotend. A 5015 or 4010 radial fan can be used for part cooling and mounted at the front. I am lousy at designing part cooling duct, hence using the designs by James Tongue. (Credit goes to him for such well designed part cooling ducts for 5015 and 4010)
The criteria of design were:
Print flat on bed as much as possible.
Minimal support
Modular parts to improve success in printing.
There are 2 versions. One uses M3 brass insert nuts (M3xD4.6xL3) for securing part together. The other have holes for the M3 to self-tap when u first screw them in. These are files with "M3_FDGen3_1 Orbiter_XXXXX". ie "M3_FDGen3_1 Orbiter_Body BottomV2.stl". This is because not everyone has M3 brass insert nuts.
This design requires silicon sock or something similar for the heat block. Without it the tip of the part cooling fan duct will melt due to proximity to heat block. There will also be abnormal dip in temperature when part fan starts running.
Screws needed:
4010 fan uses 4pcs of M3 stock screws from Creality.
BLT bracket uses 4pcs of M3x8 screws.
Orbiter bracket uses 2pcs of M3x18 or M3x20(with 1mm washer)
Part Cooling Fan Duct uses 2pcs of M3x18
Print Orientation and Support
It is advisable to print according to STL file orientation. Some supports are needed, but they are low at 6.2mm (31 layer at 0.2mm layer height) See images on orientation.
Part Cooling Fan Duct can also be printed according to orientation and no support is needed. I printed then without support as to what James said. Works fine for me. Do note that not all 5015 or 410 fans that comes from China factories meet dimension specifications. You may have to sand/file a little here and there to get them to fit.