Thingiverse
Orbiter + HeroMe Gen 5 +V6 for Tronxy X5SA-400 by markjhatch
by Thingiverse
Last crawled date: 3 years, 1 month ago
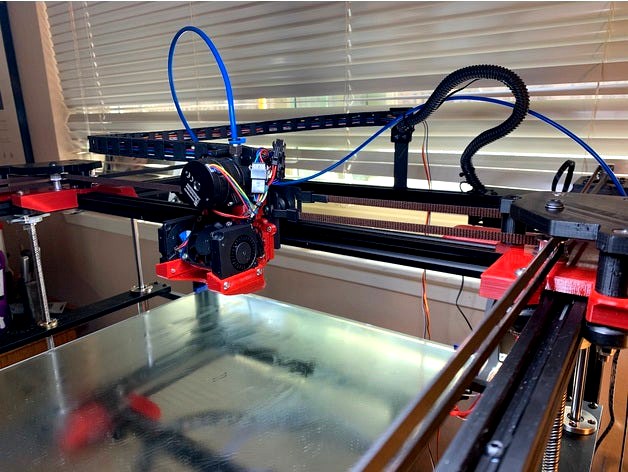
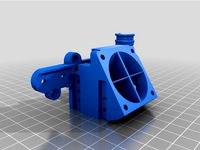
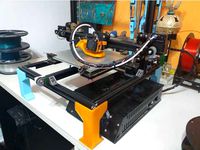
This is a V1 "Thing" or adding a Orbiter Extruder to a Tronxy X5SA-400 (late 2020 model) with a E3D V6 hot end.
For HERO ME GEN 5 piece:
I revised a prior X5SA/Hero Me Gen5 mounting bracket from: https://www.thingiverse.com/thing:4742927 When I tried the V6 bracket on my late model X5SA-400 (non-pro), the holes did not match up. This bracket matches the holes in my gantry plate. But it was close enough so it could have been just my printer was not fully tuned up. You should try both brackets and use the one that matches your gantry plate.
I also remixed the Base 3 (V6/V6 Clone direct drive. But it was only a very minor change: I added a pre-drilled hole in the top of the Base 3 to attache the Orbiter mounting plate. You can obviously use your own and drill your own hole.
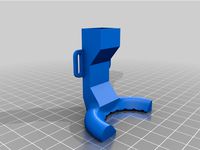
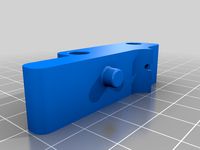
I needed to trim down and extend the travel for one of the bltouch mounting brackets.
From the original from HeroMe Gen 5 collection (https://www.thingiverse.com/thing:4460970) you will need to print:
a. V6 retaining collar
b. V6 air dam
c. 4010-Lightweight Duct FORWARD
d. Fan guard if you want...
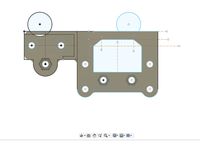
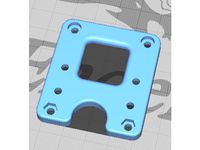
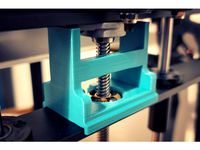
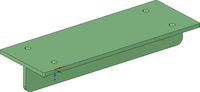
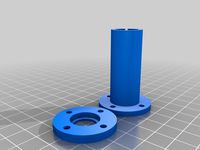
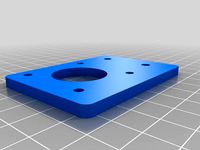
The mounting plate is used to attached the Orbiter to the Base 3 and the Gantry. There are two holes in the front that take 40mmx3m cap screws. These go through unthreaded holes in the gantry and are secured with nuts.
Order of assembly:
Prep Base 3 as usual (secure nuts for Ducts and mounting bracket). You might want to thread the "extra" whole on top of Base 3 for a 3M screw.
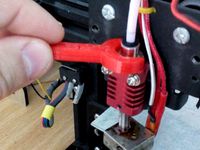
Install V6 and attach with collar.
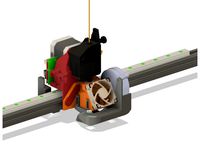
Attach to mounting bracket.
Attach to gantry plate.
Attach the bltouch offset mount to the Orbiter mounting plate.
Pre-install two cap screws in the Orbiter mounting plate facing UP (believe these are 15mmx3M)
Sit Orbiter mounting plate on Base 3. Put the two 40mm cap screws in, but don't secure.
Thread the top cap screw thru the mounting plate and start the thread into Base 3.
Secure the 3 screws of the Orbiter mounting plate.
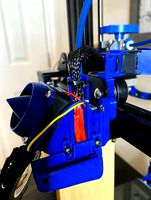
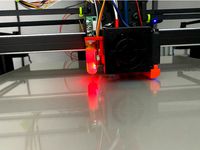
Run all your wires. Of particular concern is the V6 heater cartridge and thermistor wire.
Now mount the two fan ducts. At this point, before you install the fans themselves, you should adjust the level of the ducts as per the Hero me instrutions.
Mount the fans and run their wires too.
Mount the bltouch to the mounting bracket.
Attach the bltouch mounting bracket to the offset mount that you previously secured to the Orbiter mounting plate.
Adjust the bltouch level per their instructions.
My measurements for the bltouch offsets were -40, -7, but this was through direct measurement so could be off +/- 1mm.
For HERO ME GEN 5 piece:
I revised a prior X5SA/Hero Me Gen5 mounting bracket from: https://www.thingiverse.com/thing:4742927 When I tried the V6 bracket on my late model X5SA-400 (non-pro), the holes did not match up. This bracket matches the holes in my gantry plate. But it was close enough so it could have been just my printer was not fully tuned up. You should try both brackets and use the one that matches your gantry plate.
I also remixed the Base 3 (V6/V6 Clone direct drive. But it was only a very minor change: I added a pre-drilled hole in the top of the Base 3 to attache the Orbiter mounting plate. You can obviously use your own and drill your own hole.
I needed to trim down and extend the travel for one of the bltouch mounting brackets.
From the original from HeroMe Gen 5 collection (https://www.thingiverse.com/thing:4460970) you will need to print:
a. V6 retaining collar
b. V6 air dam
c. 4010-Lightweight Duct FORWARD
d. Fan guard if you want...
The mounting plate is used to attached the Orbiter to the Base 3 and the Gantry. There are two holes in the front that take 40mmx3m cap screws. These go through unthreaded holes in the gantry and are secured with nuts.
Order of assembly:
Prep Base 3 as usual (secure nuts for Ducts and mounting bracket). You might want to thread the "extra" whole on top of Base 3 for a 3M screw.
Install V6 and attach with collar.
Attach to mounting bracket.
Attach to gantry plate.
Attach the bltouch offset mount to the Orbiter mounting plate.
Pre-install two cap screws in the Orbiter mounting plate facing UP (believe these are 15mmx3M)
Sit Orbiter mounting plate on Base 3. Put the two 40mm cap screws in, but don't secure.
Thread the top cap screw thru the mounting plate and start the thread into Base 3.
Secure the 3 screws of the Orbiter mounting plate.
Run all your wires. Of particular concern is the V6 heater cartridge and thermistor wire.
Now mount the two fan ducts. At this point, before you install the fans themselves, you should adjust the level of the ducts as per the Hero me instrutions.
Mount the fans and run their wires too.
Mount the bltouch to the mounting bracket.
Attach the bltouch mounting bracket to the offset mount that you previously secured to the Orbiter mounting plate.
Adjust the bltouch level per their instructions.
My measurements for the bltouch offsets were -40, -7, but this was through direct measurement so could be off +/- 1mm.
Similar models
thingiverse
free

HeroME Gen 5 Gantry adaptor and baseplate for TronXY X5SA Pro(2020) by kingbain
...o model after.
confirmed that it fits, uses all original screws and the stock abl sensor(using the hallon_abl_medium_mount mount)
thingiverse
free
E3D-V6 Bowden Carriage Mount - Cooling duct by blattono
...from the "semi circular fan duct [...]"
there are two stl files, depending on which side you have your bltouch mounted.
thingiverse
free
Hero_Me_Gen5_Ender3v2_Base by dfinch6
...ing with m3 bolts when trying to adjust the fans. let's face it the forward m3 nuts were a pain to get mounted and adjusted.
thingiverse
free

BLtouch Standard mount to fit 5020 fans for Hero Me gen3/4 base by Champ4981
... want 5020 dual ducts this mount will allow you to fit it. you will also need to use hero me bltouch wide wing with this to fit.
thingiverse
free

CR-10/Ender 3 Hotend Fan Duct BLTouch Remix by raeuberhose
... my 4020 cooltek silent fan.
printed with fan duct side facing the bed, using supports.
thanks to pixarfanatic95 for making this.
thingiverse
free

Hero Me Fan Duct for Ender 3 (2019) Full OEM. No other parts needed
...an to secure part cooler duct on base.
insert original part cooler and secure with the two longer part cooler fan screws to duct.
thingiverse
free

Geeetech 2in1 mount Hero Me compatible by Spydyr
...annot use single fan dual duct part cooling. uses cyclops gantry plate. i do not own a cyclops+ so feedback is more than welcome.
thingiverse
free

HeroMe Gen5 Base Plate Tronxy X5SA Pro with original Probe by Der_Thingiverse
... a mount to fit on the top of osg rails on the front - another benefit is to close the gap between the rail and the pulley-plate.
thingiverse
free

Tronxy X5SA Fan Duct (CR10 Fang OEM) by ivanroberto
...ot; on time): https://www.thingiverse.com/thing:2763931
then print my files to make this duct fan compatible with tronxy x5sa 400
thingiverse
free

Biqu H2 Mount CR10-S Pro v2 by Mike_N
... in pla except for the duct which was done with petg.
i used the fan duct from fhogphil https://www.thingiverse.com/thing:4789656
Markjhatch
thingiverse
free

Bezel/Frame for 1.3" OLED for Benchduino by markjhatch
...frame for a 1.3" oled for my benchduino development board. the design mimic an existing frame that i printed for a 16x2 lcd.
thingiverse
free

Desk stand for QCX by markjhatch
...screws.
if you need a some more space on the nuts, you can print the design from here:
https://www.thingiverse.com/thing:4190589
thingiverse
free

Tek 2465b Front Cover by markjhatch
...th more expertise than me will create a re-mix address this?
in any case, it meets my needs and perhaps will work for others too.
thingiverse
free

Case for KX 2nd Look by markjhatch
...o be started after the kx2 starts. otherwise it cannot send the command to the kx2 to output the decoded text over the acc cable.
thingiverse
free

QCX PTT and CAT Phono plug Cover by markjhatch
... down and high resolution for best fit. so if the original plug that i designed does not fit, you might try his, it is very nice!
thingiverse
free
Hero Me Gen 5 CR-10S Pro Gantry/V6 Hot end by markjhatch
...hat provided the clearance needed to lower the z further:
https://www.thingiverse.com/thing:4088843. works great on my cr10s-pro!
Herome
thingiverse
free

HeroMe Ender3 Sherpa Mini Mount by theFPVgeek
...herome ender3 sherpa mini mount by thefpvgeek
thingiverse
herome ender3 sherpa mini mount - untested
thingiverse
free
A10v4 HeroMe Gen5 Gantry Adapter by nico85ar
...adapter by nico85ar
thingiverse
this is my design to adapt the gantry of a geeetech a10v4 to a herome gen5 e3d v6 customization.
thingiverse
free

Pen holder HeroMe Gen 5 by Pakoach
...remix to do 2d printing with your printer.
i adapted the pen holder to fit the herome gen 5.
it will need the abl mount to put it
thingiverse
free

HeroMe Gen5 SpeedDrive Lite by tomohulk
...e other versions out there, and works amazing. this is only tested with the stock extruder and stepper and with the herome gen5.
thingiverse
free
HeroMe Gen5 Base for MicroSwiss Direct Drive + Linear Rails by absorbthefuture
...ls by absorbthefuture
thingiverse
i remixed the herome base to work for my setup with micro swiss direct drive and linear rails.
thingiverse
free

V6 HeroMe Bowden Mashup by Hometinker12
... the carriage on the rail first
install the herome base and hotend
connect and tension belts
install the x-endstop/wiremanagement
thingiverse
free

HeroMe V5 tinkercad remix for BondTech DDX by sebbzor
...ersion of ddx (v3) that was released march 2021 by bondtech.
this piece was designed around bondtech ddx v2 for creality ender.
thingiverse
free

HeroMe Gen5 Ender3v2 Mount by mikeybme
...m y-offset made no sense to me, so i ditched it and merged the gantry adapter with the base (less screws and nuts to fight with).
thingiverse
free

Linear Rail Direct Drive BMG HeroMe Gen5 Ender 5 adapter by alucard321pl
... together so that the https://www.thingiverse.com/thing:3782865 modification would fit my herome gen 5 with bmg and direct drive.
thingiverse
free
V6 HeroMe Direct Drive Mashup by Hometinker12
... first
install the herome base and hotend
connect and tension belts
install extruder/stepper
install the x-endstop/wiremanagement
X5Sa
thingiverse
free

Chain riser X5SA by xanatorium
...chain riser x5sa by xanatorium
thingiverse
chain risers for x5sa
thingiverse
free
Tronxy X5S X5SA Organizer
...tronxy x5s x5sa organizer
thingiverse
organizer for tronxy x5s; x5sa
thingiverse
free
Tronxy X5SA Z-Blocker by n02m4n
...tronxy x5sa z-blocker by n02m4n
thingiverse
a z-blocker for my x5sa.
thingiverse
free

Tronxy X5SA Fan Duct by Noobik4ever
...tronxy x5sa fan duct by noobik4ever
thingiverse
fun duct for tronxy x5sa
thingiverse
free

Tronxy X5S, X5SA linear rail
...tronxy x5s, x5sa linear rail
thingiverse
linear rail tronxy x5sa
thingiverse
free

Tronxy X5SA Filament holder Screw
...tronxy x5sa filament holder screw
thingiverse
better holder for tronxy x5sa filament as screw
thingiverse
free
TronXY X5SA PRO BLTouch Mount
...tronxy x5sa pro bltouch mount
thingiverse
a simple bltouch mount for the tronxy x5sa pro.
thingiverse
free
Tronxy X5SA Extruder TPU Upgrade
...tronxy x5sa extruder tpu upgrade
thingiverse
redesigned anycubic kossel extruder tpu upgrade for tronxy x5sa
thingiverse
free

X5SA Tronxy Towline by Daelin89
... towline by daelin89
thingiverse
broke the towline on my tronxy x5sa-400. so i remade it in fusion 360. have yet to test print
thingiverse
free
Tronxy X5SA Display Offset by Darkwulf3D
...tronxy x5sa display offset by darkwulf3d
thingiverse
tronxy x5sa pro display offset for the large table adjustment wheels
Tronxy
thingiverse
free
LMF8LUU for tronxy x5s
...lmf8luu for tronxy x5s
thingiverse
lmf8luu for tronxy x5s
thingiverse
free

TRONXY XY2PRO by MaiMaiFACTORY
...tronxy xy2pro by maimaifactory
thingiverse
tronxy xy2-pro
sadebox
thingiverse
free

Power_supply_cover for TRONXY by Karollo
...power_supply_cover for tronxy by karollo
thingiverse
power supply cover for tronxy.
thingiverse
free
Tronxy support by d3m1sf
...tronxy support by d3m1sf
thingiverse
soporte para impresora tronxy x3.
thingiverse
free
Tronxy 13mm wrench
...tronxy 13mm wrench
thingiverse
13mm wrench for hotend fitting on tronxy x1...
thingiverse
free

Tronxy x5s by alex190074
...tronxy x5s by alex190074
thingiverse
tronxy x5s cart x fully adjustable only !!
thingiverse
free
Tronxy Logo
...tronxy logo
thingiverse
made this logo
thingiverse
free

Patas TronXY X3 - Vitofeli - TronXY Legs by Todopic
...todopic
thingiverse
patas separadoras para la tronxy x3, permite colocar la caja de control debajo y aprovechas mejor el espacio
thingiverse
free
TRONXY X5S EXTRUDER by ADAM98
...tronxy x5s extruder by adam98
thingiverse
tronxy x5s extruder
thingiverse
free

Belt tensioner Tronxy by jpalianak
...belt tensioner tronxy by jpalianak
thingiverse
belt tensioner tronxy
Orbiter
3ddd
free

Orbit
...ь - orbit 6225
габарит - 1450*400*310
сайт производитель -http://www.garsnas.se/en-gb/products/screens-lamps/orbit-6225
design_connected
$16

Orbital
...orbital
designconnected
modus furniture orbital lounge chairs computer generated 3d model. designed by christophe pillet.
3d_ocean
$5

Benzene Orbitals
...l arrangement. orbitals represent electronic cloud around atoms involved in benzene particle. red-green lobes of p-orbitals cr...
3ddd
$1

Dedon / Orbit
...dedon / orbit
3ddd
dedon
dedon / orbit
3ddd
$1

orbit lamps
...t lamps
3ddd
orbit
new modern orbit lamp.
it is a ceiling lamp, every element is parent father - child, and dummy. easy control.
3ddd
free

Dedon / Orbit
...d
dedon , германия , круглая
dedon orbit daybed
3ddd
$1

Люстра ORBITAL SP10
...люстра orbital sp10
3ddd
orbital
люстра orbital sp10
3ddd
$1
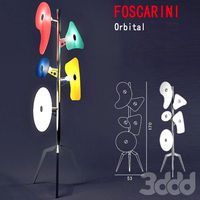
Foscarini Orbital
...foscarini orbital
3ddd
foscarini , orbital
дизайнер ferruccio laviani, 1992 г.
3ddd
$1

Dandelion Orbit Chandelier
...dandelion orbit chandelier
3ddd
dandelion , orbit
dandelion orbit chandelier
3ddd
$1

Orbit Chandelier
...orbit chandelier
3ddd
orbit
manufacturer:
townsend design, usa
www.townsenddesign.net
designer:
patrick townsend
Gen
turbosquid
$15

gen
... available on turbo squid, the world's leading provider of digital 3d models for visualization, films, television, and games.
turbosquid
$2

Gen. Rifle
...bosquid
royalty free 3d model gen. rifle for download as fbx on turbosquid: 3d models for games, architecture, videos. (1374075)
3d_export
$8

pokemon sprite voxel 1 gen
...pokemon sprite voxel 1 gen
3dexport
pokemon voxel 1 gen
turbosquid
$45

Chest Next-Gen
... available on turbo squid, the world's leading provider of digital 3d models for visualization, films, television, and games.
turbosquid
$39

Nano 6th Gen
... available on turbo squid, the world's leading provider of digital 3d models for visualization, films, television, and games.
3d_export
$8

pokemon sprite voxel 7 gen
...pokemon sprite voxel 7 gen
3dexport
pokemon sprite voxel 7 gen
3d_export
$8

pokemon sprite voxel 5 gen
...pokemon sprite voxel 5 gen
3dexport
pokemon sprite voxel 5 gen
3d_export
$8

pokemon sprite voxel 3 gen
...pokemon sprite voxel 3 gen
3dexport
pokemon sprite voxel 3 gen
3d_export
$8

pokemon sprite voxel 4 gen
...pokemon sprite voxel 4 gen
3dexport
4 gen pokemon voxel sprites
3d_export
$8

pokemon sprite voxel 2 gen
...pokemon sprite voxel 2 gen
3dexport
pokemon sprite voxel 2 gen
V6
3d_export
$100

v6 engine
...engine
3dexport
complete v6 engine modeled on solidworks 2017 along with .stl, .sldprt and .sldasm of all th parts and assembly.
3d_export
$10

V6 engine
... the first v6 engines were designed and produced independently by marmon motor car company, deutz gasmotoren fabrik and delahaye.
3d_export
$35

v6 engine
...s a complete model of a v6 engine containing over 400 components. you can contact me for a video of all the components assembling
3d_export
$10

v6 engine
...v6 engine
3dexport
turbosquid
$25

Bed1001-v6
... available on turbo squid, the world's leading provider of digital 3d models for visualization, films, television, and games.
turbosquid
$22

Chair2-v6
... available on turbo squid, the world's leading provider of digital 3d models for visualization, films, television, and games.
turbosquid
$20

V6.mb
... available on turbo squid, the world's leading provider of digital 3d models for visualization, films, television, and games.
3d_export
$20

V6 engine
...rovided in this package is all the parts in sldprt format and assembly in sldasm format. i can also convert the format on demand.
3ddd
$1

Стол V6
...6" в стиле дизельпанк изготовлен из блока двигателя, 4х поршней и 4х шатунов.
столешница изготовлена из стекла толщиной 8мм.
cg_studio
$199

V6 VVTi3d model
...v6 vvti3d model
cgstudio
.3ds - v6 vvti 3d model, royalty free license available, instant download after purchase.
400
design_connected
$11

400
...400
designconnected
artek 400 armchairs computer generated 3d model. designed by alvar aalto.
3d_export
$17

Boeing-747-400
...boeing-747-400
3dexport
boeing-747-400
turbosquid
$249

Boeing767 400
...quid
royalty free 3d model boeing767 400 for download as max on turbosquid: 3d models for games, architecture, videos. (1635314)
turbosquid
$25

B747-400
...uid
royalty free 3d model boeing 747-400 for download as skp on turbosquid: 3d models for games, architecture, videos. (1260135)
3ddd
$1

Armchair 400
... tank
the armchair 400, designed by alvar aalto in 1936 and better known as tank.
pelt coat idea by studioilse.
3ddd
$1
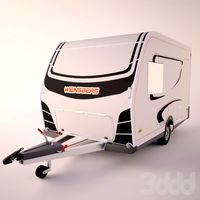
Weinsberg Caraone 400
...weinsberg caraone 400
3ddd
прицеп
weinsberg caraone 400
салона нет, все окна прикрыты шторами.
3ddd
free

Розетка d-400
...розетка d-400
3ddd
розетка
диаметр: 400 мм
производитель: мастер гипс
код товара: 50rz_009gp
3d_export
$59

B747 400 3D Model
...b747 400 3d model
3dexport
aircraft jumbo b747-400 star alliance b744 jetplane jet 747
b747 400 3d model puma83ffm 7898 3dexport
3ddd
$1
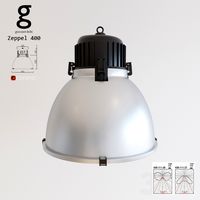
Goossen licht Zeppel 400
...goossen licht zeppel 400
3ddd
goossen licht , zeppel
goossen licht zeppel 400
3ddd
$1
Jotul I 400 FL
...jotul i 400 fl
3ddd
jotul , камин
jotul i 400 fl
jotul.com
5
turbosquid
$6

Rock 5-5
...urbosquid
royalty free 3d model rock 5-5 for download as obj on turbosquid: 3d models for games, architecture, videos. (1639063)
3d_export
$5

hinge 5
...hinge 5
3dexport
hinge 5
turbosquid
$10

A-5
... available on turbo squid, the world's leading provider of digital 3d models for visualization, films, television, and games.
turbosquid
$2

A-5
... available on turbo squid, the world's leading provider of digital 3d models for visualization, films, television, and games.
turbosquid
$12

Calligraphic Digit 5 Number 5
...hic digit 5 number 5 for download as max, obj, fbx, and blend on turbosquid: 3d models for games, architecture, videos. (1389333)
3ddd
$1

5 роз
...5 роз
3ddd
5 роз в стеклянной вазе
design_connected
$11

iPhone 5
...iphone 5
designconnected
apple iphone 5 computer generated 3d model.
3ddd
$1

Lola 5
...lola 5
3ddd
miniforms
lola 5 miniforms 300*65*134
3ddd
$1

Nexus 5
...dd
nexus , phone , телефон
google nexus 5 phone
3d_ocean
$15

iPhone 5
...iphone 5
3docean
3d 4d apple cinema iphone model modeling phone screen texture
iphone 5 3d model and texture realistic iphone 5.