Thingiverse
OO Gauge Box Wagons v2 (MWA, MWA-B and IOA) by MrBunsy
by Thingiverse
Last crawled date: 3 years, 1 month ago
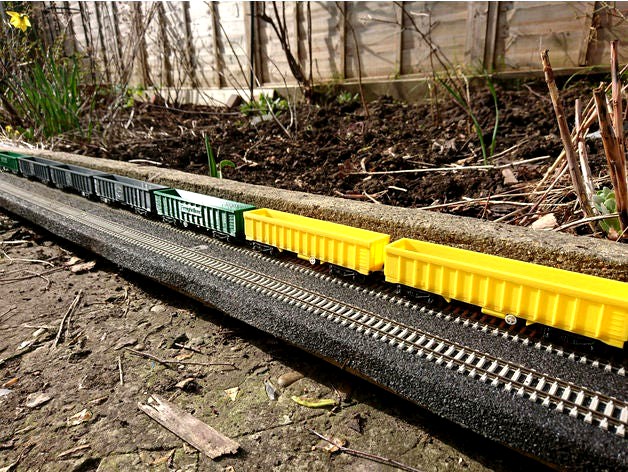
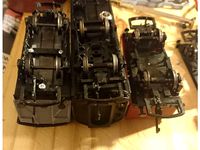
OO Gauge box wagons in three variants, based on three real British wagons.
Incremental improvements over my original box wagons with a new IOA variant in yellow.
These are part of a larger set of 3D printable trains I've been developing. The entire openscad source and scripts to generate all components are available on github. I've deliberately not included the SCAD files here as the entire design is spread across a large number of files.
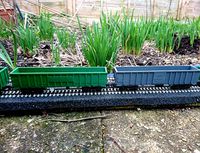
There are three variants: MWA (green), MWA-B (grey) and IOA (yellow). See below for more details.
Assembly requires up to eight 4mm M2 screws or hot glue. There are square pits in the bottom of the 'top' and top of the 'base' to allow space for hot glue without changing the shape of the finished wagon, alternatively you can use small (4/5mm) m2 screws - but the glue is more reliable. The bogies require a 10mm M3 screw and two M3 washers (one above and one below the bogie, to help with rotation). The bogies provide fixings for a dapol-style coupling, my 3D printed design works well. The brake wheels, cylinders and buffers should slot in with only a little encouragement - if needed you can clear out the hole by first screwing in an m2 screw, but don't clean the hole too much as they rely on friction to stay in. Since the small slot-in components are easy to snap I recommend printing them in something slightly more flexible than PLA, like PETG.
The main body of the wagon is split into two files ("wagon_top" and "wagon_base") to avoid too much warping when printing. Alternatively the entire wagon is avaible as "wagon_wagon". Good base adhesion is required for printing the top of the wagon. Even with good adhesion there is a slight line of warping, but this is mostly not too visible.
The bogie requires scafolding only on the underside of the coupling holder. If you want a more accurate, but harder to print, version of the bogie set BOGIE_EASY_PRINT to false.
MWA
Uses the MWA_wagon_*.stl files. The four-pronged brake wheel (white PETG) slots into the sides of the wagon base. The two brake cylinders (black PETG) slot into the bottom of the wagon base. Print the following:
MWA_wagon_base: Green PLA
MWA_wagon_top: Green PLA
MWA_wagon_bogie (x2): Black PLA
MWA_wagon_brake_cylinder (STL contains two objects): Black PETG
MWA_wagon_buffer (x4): Black PETG
MWA_wagon_brake_wheel (x2): White PETG
MWA-B
Uses the MWA-B_wagon_*.stl files and some MWA_wagon_*.stl files. The three-pronged brake wheels slot into the sides of one of the bogies. This bogie should be attached at the end furthest from the brake cylinder - there is only one brake cylinder on the MWA-B. Otherwise the same as the MWA wagon.
MWA-B_wagon_base: Grey PLA
MWA-B_wagon_top: Grey PLA
MWA-B_wagon_bogie (x1): Black PLA
MWA_wagon_bogie (x1): Black PLA
MWA-B_wagon_brake_cylinder : Black PETG
MWA_wagon_buffer (x4): Black PETG
MWA-B_wagon_brake_wheel (x2): White PETG
IOA
Uses the IOA_wagon_*.stl files and some MWA_wagon_*.stl files. The brake cylinders are part of the base as they're also yellow. Brake wheels slot into the sides of the wagon base, like MWA. The IOA wagon uses the MWA bogies.
IOA_wagon_base: Yellow PLA
IOA_wagon_top: Yellow PLA
MWA_wagon_bogie (x2): Black PLA
MWA_wagon_buffer (x4): Black PETG
MWA_wagon_brake_wheel (x2): White PETG
Couplings
coupling_wide_dapol_inline_hook (x2): Black PETG
coupling_hook_inline (x2): Black PLA
MWA-B and IOA photos by Foulger Railway Photography, MWA photo by Train Photos
Update 9th March: fixed height of couplings.
Update on 25th March: finally fixed coupling position for non-hornby variants properly, also now have a NEM variant.
Incremental improvements over my original box wagons with a new IOA variant in yellow.
These are part of a larger set of 3D printable trains I've been developing. The entire openscad source and scripts to generate all components are available on github. I've deliberately not included the SCAD files here as the entire design is spread across a large number of files.
There are three variants: MWA (green), MWA-B (grey) and IOA (yellow). See below for more details.
Assembly requires up to eight 4mm M2 screws or hot glue. There are square pits in the bottom of the 'top' and top of the 'base' to allow space for hot glue without changing the shape of the finished wagon, alternatively you can use small (4/5mm) m2 screws - but the glue is more reliable. The bogies require a 10mm M3 screw and two M3 washers (one above and one below the bogie, to help with rotation). The bogies provide fixings for a dapol-style coupling, my 3D printed design works well. The brake wheels, cylinders and buffers should slot in with only a little encouragement - if needed you can clear out the hole by first screwing in an m2 screw, but don't clean the hole too much as they rely on friction to stay in. Since the small slot-in components are easy to snap I recommend printing them in something slightly more flexible than PLA, like PETG.
The main body of the wagon is split into two files ("wagon_top" and "wagon_base") to avoid too much warping when printing. Alternatively the entire wagon is avaible as "wagon_wagon". Good base adhesion is required for printing the top of the wagon. Even with good adhesion there is a slight line of warping, but this is mostly not too visible.
The bogie requires scafolding only on the underside of the coupling holder. If you want a more accurate, but harder to print, version of the bogie set BOGIE_EASY_PRINT to false.
MWA
Uses the MWA_wagon_*.stl files. The four-pronged brake wheel (white PETG) slots into the sides of the wagon base. The two brake cylinders (black PETG) slot into the bottom of the wagon base. Print the following:
MWA_wagon_base: Green PLA
MWA_wagon_top: Green PLA
MWA_wagon_bogie (x2): Black PLA
MWA_wagon_brake_cylinder (STL contains two objects): Black PETG
MWA_wagon_buffer (x4): Black PETG
MWA_wagon_brake_wheel (x2): White PETG
MWA-B
Uses the MWA-B_wagon_*.stl files and some MWA_wagon_*.stl files. The three-pronged brake wheels slot into the sides of one of the bogies. This bogie should be attached at the end furthest from the brake cylinder - there is only one brake cylinder on the MWA-B. Otherwise the same as the MWA wagon.
MWA-B_wagon_base: Grey PLA
MWA-B_wagon_top: Grey PLA
MWA-B_wagon_bogie (x1): Black PLA
MWA_wagon_bogie (x1): Black PLA
MWA-B_wagon_brake_cylinder : Black PETG
MWA_wagon_buffer (x4): Black PETG
MWA-B_wagon_brake_wheel (x2): White PETG
IOA
Uses the IOA_wagon_*.stl files and some MWA_wagon_*.stl files. The brake cylinders are part of the base as they're also yellow. Brake wheels slot into the sides of the wagon base, like MWA. The IOA wagon uses the MWA bogies.
IOA_wagon_base: Yellow PLA
IOA_wagon_top: Yellow PLA
MWA_wagon_bogie (x2): Black PLA
MWA_wagon_buffer (x4): Black PETG
MWA_wagon_brake_wheel (x2): White PETG
Couplings
coupling_wide_dapol_inline_hook (x2): Black PETG
coupling_hook_inline (x2): Black PLA
MWA-B and IOA photos by Foulger Railway Photography, MWA photo by Train Photos
Update 9th March: fixed height of couplings.
Update on 25th March: finally fixed coupling position for non-hornby variants properly, also now have a NEM variant.
Similar models
thingiverse
free
OO Gauge Box Wagon (MWA and MWA-B) by MrBunsy
...es scafolding only on the underside of the coupling holder.
mwa-b photo by foulger railway photography, mwa photo by train photos
thingiverse
free

OO Gauge Intermodal FSA/FTA ISO Container Wagon by MrBunsy
...gmug.com/ukrailrollingstock/f/fsafta-intermodal-flats/https://github.com/phrxmd/containerhttps://dkprojects.net/openscad-threads/
thingiverse
free

Floppy Square-1 by Decoder_Pr0
...
dimensions: 5.5cm x 5.5cm x 3cm
print:
center x2
corner x4
edge x4
(only if needed) screw base x1
(only if needed) screw head x2
grabcad
free

Air Brake Cylinder
...air brake cylinder
grabcad
brake cylinder assembly for wag9 bogie frame
thingiverse
free

SuperGun MiniGun v2.5 Case for Black Jamma Connector by CrazyDart
...ts x2
case hardware
m3 screws 14mm 2x - for jamma connector
m3 screws 20mm 2x - for the edge with the controller ports
m3 nuts x4
thingiverse
free

X2 Elf camera mount by Kriton
...se
camera mount for x2 elf and foxeer arrow mini v2
requires 6 pcs of m2 screws for mounting
printed in pla on anycubic i3 mega
thingiverse
free

Floppy Square-0 by Decoder_Pr0
...2.5 screw
dimensions: 4cm x 4cm x 2.5cm
print:
center x2
equator x2
(only if needed) screw base x1
(only if needed) screw head x2
renderosity
$10
GWR -Macaw B- Bogie Wagon
...est morphing pack).<br />
<br />
please visit my renderosity freestuff area for more track and accessories.</p>
renderosity
$30

GWR -Macaw B- Bogie Wagon - Extended License
...est morphing pack).<br />
<br />
please visit my renderosity freestuff area for more track and accessories.</p>
thingiverse
free

Nederlandse Spoorwegen Type O wielstel voor DIV (1:32) by Robertino
... spoorwegen". (https://www.thingiverse.com/thing:4708075)
the sides are attached to the middle section by m2 tapered screws.
Ioa
3dwarehouse
free

IOA sofa
...ioa sofa
3dwarehouse
images of america healthcare furniture #furniture #healthcare #images_of_america #ioa #sleepers #sofa
3dwarehouse
free

IOA 6x6 Office Desk
...ioa 6x6 office desk
3dwarehouse
haworth office desk 6' x 6'
3dwarehouse
free

IOA 60 x 66 Workstation
...ioa 60 x 66 workstation
3dwarehouse
haworth 60' x 66' workstation
3dwarehouse
free

Curtain Wall Single Block
...curtain wall single block 3dwarehouse ioa ...
3dwarehouse
free

maison parfaite
...maison parfaite 3dwarehouse superbe 5 etoiles #ioa ...
3dwarehouse
free

jurasic park building
...jurasic park building 3dwarehouse the river adventure building #ioa #islands_of_adventure #jp #jurrasic_park...
Mrbunsy
thingiverse
free
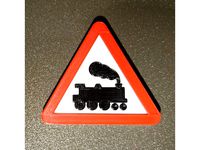
Train Warning Sign (UK Level Crossing) by MrBunsy
...tps://www.gov.uk/guidance/traffic-sign-images
contains public sector information licensed under the open government licence v3.0.
thingiverse
free

OO Gauge Couplings (Hornby X8031 style) by MrBunsy
...the hook should be free to fall under gravity to ensure a clean coupling.
updated 2nd september, improved hook geometry slightly.
thingiverse
free
OO Wide Couplings: X9660, X8031, Dovetail. Hornby, Dapol, Bachmann by MrBunsy
...e latest sources are all on github: https://github.com/mrbunsy/3dprintedtrains
the scad files are licenced under gpl-3.0-or-later
thingiverse
free
OO Gauge Intermodal FSA/FTA ISO Container Wagon by MrBunsy
...gmug.com/ukrailrollingstock/f/fsafta-intermodal-flats/https://github.com/phrxmd/containerhttps://dkprojects.net/openscad-threads/
thingiverse
free

OO/HO Gauge Wheels by MrBunsy
...fine after replacing just a wheel. provided you rectify any wonky wheelsets, these too have proven reliable on my garden railway.
thingiverse
free

Multi-Material Road Signs (UK) by MrBunsy
...n government licence and available in their original vector format from here
everything else licenced under gnu gpl-3.0-or-later.
thingiverse
free
OO Gauge Box Wagon (MWA and MWA-B) by MrBunsy
...es scafolding only on the underside of the coupling holder.
mwa-b photo by foulger railway photography, mwa photo by train photos
Mwa
turbosquid
$11

Fortuna von MWA aktuell - Tisch Sonoma Eiche
...ktuell - tisch sonoma eiche for download as max, obj, and fbx on turbosquid: 3d models for games, architecture, videos. (1279837)
thingiverse
free
OO Gauge Box Wagon (MWA and MWA-B) by MrBunsy
...es scafolding only on the underside of the coupling holder.
mwa-b photo by foulger railway photography, mwa photo by train photos
thingiverse
free

WeldingRod Bot: Exactly Constrained 3D Printer by Weldingrod1
...plates this morning; i think i have it now! mwaha-ha-ha! ok, ak got the belts almost right, and got...
cg_trader
$11

Fortuna von MWA aktuell - Tisch Sonoma Eiche
...fortuna von mwa aktuell - tisch sonoma eiche
cg trader
fortuna von mwa aktuell - tisch sonoma eiche
grabcad
free

MWA - Trike Model N°01
...mwa - trike model n°01
grabcad
ongoing trike project
3dwarehouse
free

mwa
...mwa
3dwarehouse
3dwarehouse
free

Rubberduck jet pack, mwa mwa
...rubberduck jet pack, mwa mwa
3dwarehouse
fooling with the kids when i should be working.
3dwarehouse
free

Large house made by mwa
...large house made by mwa
3dwarehouse
large house with lots and lots of windows
3dwarehouse
free

banig structure 2
...jesry kacey sherly the y trio hello happy birthday mwa ...
Oo
turbosquid
$75

Ladies Fashion oo.3dm
... available on turbo squid, the world's leading provider of digital 3d models for visualization, films, television, and games.
turbosquid
$15

Ladies Fashion Band oo.3dm
... available on turbo squid, the world's leading provider of digital 3d models for visualization, films, television, and games.
3d_export
$10

lobby sofa oo
...onze, for restaurant, for hotel, for bistro, bar, cafe packinfo: packed with model packer by https://3dground.net/ packver: 1.5.6
turbosquid
$20

JAPANESE CONVENIENCE STORE 23-417 N-HO-OO GAUGE SCENERY
... available on turbo squid, the world's leading provider of digital 3d models for visualization, films, television, and games.
3d_export
$20

Demolisher 3D Model
...3dexport demolisher transformer robot car devastator demolisher 3d model oo 27127...
3d_export
$20
Stargate 3D Model
...stargate star gate sg water space stargate 3d model oo 27089...
3d_export
$20

Deadpool 3D Model
...deadpool 3d model
3dexport
deadpool wolverine x-men marvel comics weapon
deadpool 3d model oo 27143 3dexport
3d_export
$20
Stargate Atlantis 3D Model
...gate sg water space atlantis stargate atlantis 3d model oo 28255...
3d_export
$20

Pontiac Firebird 1968 3D Model
...fire bird 1968 69 pontiac firebird 1968 3d model oo 27544...
3d_export
$17
Knight Bus 3D Model
...book car night knight film knight bus 3d model oo 27554...
Wagons
design_connected
$7

Wagon
...wagon
designconnected
magis wagon computer generated 3d model. designed by young, michael.
turbosquid
free

wagon
...wagon
turbosquid
free 3d model wagon for download as blend on turbosquid: 3d models for games, architecture, videos. (1447129)
turbosquid
$3

wagon
...turbosquid
royalty free 3d model wagon for download as blend on turbosquid: 3d models for games, architecture, videos. (1467550)
3d_export
free
wagon
...wagon
3dexport
turbosquid
$50

Wagon
... available on turbo squid, the world's leading provider of digital 3d models for visualization, films, television, and games.
turbosquid
$39

Wagon
... available on turbo squid, the world's leading provider of digital 3d models for visualization, films, television, and games.
turbosquid
$25

Wagon
... available on turbo squid, the world's leading provider of digital 3d models for visualization, films, television, and games.
turbosquid
$20

wagon
... available on turbo squid, the world's leading provider of digital 3d models for visualization, films, television, and games.
turbosquid
$20
Wagon
... available on turbo squid, the world's leading provider of digital 3d models for visualization, films, television, and games.
turbosquid
$14

Wagon
... available on turbo squid, the world's leading provider of digital 3d models for visualization, films, television, and games.
Gauge
3d_ocean
$10
Gauges
...rim to them. each gauge has an xpresso tag to give them an automatic animation without the need for keyframing and can be chan...
3d_export
$5

pressure gauge
...pressure gauge
3dexport
pressure gauge
3d_export
$5
gauge protector
...gauge protector
3dexport
gauge protector
3d_export
$5
Gauge 3D Model
...gauge 3d model
3dexport
gauge pressure gas air liquid
gauge 3d model fau 71180 3dexport
3d_export
$5

protected pressure gauge
...protected pressure gauge
3dexport
protected pressure gauge
3d_export
$5

hard gauge protector
...hard gauge protector
3dexport
hard gauge protector
turbosquid
$29
Screw Gauge
... available on turbo squid, the world's leading provider of digital 3d models for visualization, films, television, and games.
turbosquid
$29
Marking Gauge
... available on turbo squid, the world's leading provider of digital 3d models for visualization, films, television, and games.
turbosquid
$20

Blade Gauge
... available on turbo squid, the world's leading provider of digital 3d models for visualization, films, television, and games.
3d_export
$5

12 Gauge 3D Model
...12 gauge 3d model
3dexport
shotgun shell gauge 12
12 gauge 3d model pirog 54511 3dexport
V2
3d_export
free

Lamp v2
...lamp v2
3dexport
lamp v2 with solar panel
3d_export
$5

hammerhead v2
...hammerhead v2
3dexport
razer hammerhead v2 headphones, modeled in cinema 4d, render in corona
3d_export
$5

manometer v2
...manometer v2
3dexport
3d_export
$5

potato v2
...potato v2
3dexport
turbosquid
$52

Lifebuoys v2
...squid
royalty free 3d model lifebuoys v2 for download as fbx on turbosquid: 3d models for games, architecture, videos. (1560870)
turbosquid
$2

Mask v2
...turbosquid
royalty free 3d model mask v2 for download as stl on turbosquid: 3d models for games, architecture, videos. (1527741)
turbosquid
free

Flashlight V2
...d
free 3d model flashlight v2 for download as , obj, and fbx on turbosquid: 3d models for games, architecture, videos. (1663559)
turbosquid
$29

Thanos v2
...
royalty free 3d model thanos v2 for download as ztl and obj on turbosquid: 3d models for games, architecture, videos. (1651077)
turbosquid
$29

Titan v2
...d
royalty free 3d model titan v2 for download as ztl and obj on turbosquid: 3d models for games, architecture, videos. (1540228)
turbosquid
$29

Frieza v2
...
royalty free 3d model frieza v2 for download as ztl and obj on turbosquid: 3d models for games, architecture, videos. (1701238)
B
3ddd
$1
B&B
...b&b
3ddd
b&b italia
statue b&b italy
3ddd
$1
B&B Italia
...b&b italia
3ddd
b&b italia
b&b; italia
3ddd
$1

b&b italia
...b&b italia
3ddd
b&b italia
b&b; italia
3ddd
$1

B&B LAZY
...b&b lazy
3ddd
b&b italia
b&b; lazy
3ddd
$1
B&B Italy
...b&b italy
3ddd
b&b italia
диван b&b; italy
3ddd
$1

b&b RAY
...b&b ray
3ddd
b&b italia , угловой
диван b&b; ray
3ddd
$1
B&B Beverly
... b&b italia , beverly
cтул beverly от b&b.; текстуры в архиве
3ddd
$1

B&B ITALIA
...lia , журнальный , круглый
стол b&b; italia
3ddd
$1
шезлонг B&B
...шезлонг b&b
3ddd
b&b italia , шезлонг
шезлонг b&b; terminal 1
3ddd
$1

B&B J.J
...b&b j.j
3ddd
b&b italia , журнальный
b&b;
j.j
45x40x49 cm
Box
archibase_planet
free

Box
...box
archibase planet
box carton cardboard box
box 2 - 3d model (*.3ds) for interior 3d visualization.
archibase_planet
free

Box
...box
archibase planet
carton cardboard box box
box 1 - 3d model (*.3ds) for interior 3d visualization.
3d_export
$6

box
...box
3dexport
box
3d_export
$5

Box
...box
3dexport
box
3d_export
$5

box
...box
3dexport
box
3d_export
$5

box
...box
3dexport
box
archibase_planet
free

Box
...box
archibase planet
box box for paper notebook pencil
box - 3d model (*.gsm+*.3ds) for interior 3d visualization.
archibase_planet
free

Box
...box
archibase planet
box carton cardboard box
box n170111 - 3d model (*.gsm+*.3ds) for interior 3d visualization.
archibase_planet
free

Box
...box
archibase planet
box carton cardboard box
box n050411 - 3d model (*.gsm+*.3ds) for interior 3d visualization.
archibase_planet
free

Boxes
...boxes
archibase planet
boxes box case bin
boxes n281213 - 3d model (*.gsm+*.3ds+*.max) for interior 3d visualization.