Thingiverse
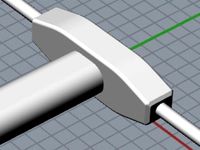
Nut & Washer Retainer for modified Cadillac crossbar kit for a Chevy Bolt Premier by elhalpern
by Thingiverse
Last crawled date: 3 years, 3 months ago
Thanks to all those that came before me on the Cadillac crossbars for the Bolt Premier roof rails.
This part is also described in the ChevyBolt.Org at this URL:
https://www.chevybolt.org/threads/crossbars-for-premier-trim-roof-rails.5441/page-4#post-396066
I paid $233 with shipping from a known GM parts distributor and was concerned about the accuracy of cutting the rails and the crossbar compatibility with Thule fork mount rails.
After opening the box from GM I verified that the crossbars do in fact need to be cut, and noticed that the four black mounts are each unique and labeled LF, RF, LR, & RR.
I was also concerned that the crossbars themselves might have a mitered cut and would effect how the rack mounted. Fortunately, the end cuts are not mitered in any significant way.
I chose just to take the excess off of one end. The bars are arc'd and curved upward (convex) and taking the extra off one end is not an issue. I used an 80 tooth blade on my $100 Ryobi chop saw and did not find it necessary to clamp them in place for cutting. I've cut aluminum with various chop saws in the past and although they're made for wood, aluminum is fairly safe if you're careful.
*** use either a face shield like that for wood lathe work, or a combination of safety glasses, a covid-style mask, and a baseball cap. Aluminum flakes get everywhere and you want to protect yourself from the chips that fly. Also, take your time and cut slowly, especially if you use a blade with less than 60 teeth. Slow ifs Good !
*** the front and rear crossbars are different lengths !!! - I took my time and did very precise measurements and took one large cut, placed the bars back on the car with the brackets sitting tight up against their final location on one side, and propped up side and its mounting bracket, then measured again for the final cut. When I was done I saved all the pieces, measured the thickness of the saw blade, and determined exactly what I removed from each crossbar. So here's what I took off of each:
removed 89.0mm from the front bar removed 82.7mm from the rear bar
*** It's better to remove too little and have to make another cut. My final cut on the rear bar was half a blade width and both crossbars fit perfect.
*** Once the bars were perfectly cut I placed the bars with their end brackets back on the roof at their exact mounting locations and sight them through their mounting holes on both sides of the car. With the bars sitting snugly in place I broke the last inch off a pencil and used sharp pencil to trace the mounting holes through the two brackets on the ends I trimmed. Then used a center punch to locate the drill bit precisely.
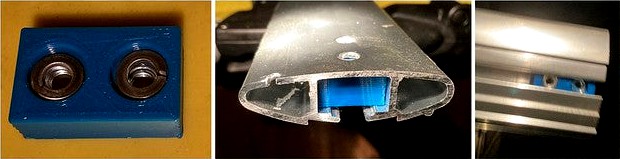
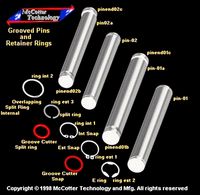
*** I bought four 6mm Nyloc nuts, and four "cut" (split lock washers)
*** I used a smaller pilot bit to more accurately locate the initial hole in the center and then use a bit that was ever-so-slight larger than the I.D. of the split lock washer. This gave me a little slop, but still made sure the lock washer would compress and do its job.
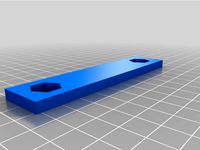
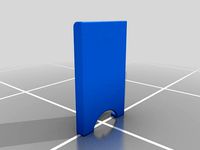
*** I solved the problem of the holding the Nyloc washers in place by creating a 3D printed block that hods the 6mm nuts and the 6mm lock washer in place. This worked great and I just slid them into the aero-shaped crossbar extrusion. Aside from holder the nuts and washers in place, this keeps the nuts from rotating during assemby.
*** The above nut/washer holder is a free download at: https://www.thingiverse.com/thing:4606945 This 3D printed block was perfect. It held the nuts and plit washers in place during assembly and allowed me to use the original screws that came with the Cadillac bar kit and gave me confidence that these screws will never come loose.
*** I also took the time to scribe the "weep" hole that is designed into the mounting bracket and while I was drilling the new 6mm holes, i use the small pilot bit to notch the end of the bars to keep the tiny hole open and free flowing in case there was dirt build up in the future.
*** The Thule Fork Mount rail I used was a "569 Sprint T" style. It was free from a friend. It had to be loaded in before the mounting brackets are attached. The Cadillac solution for the Bolt is the sleekest most aero design. If I used off-the-shelf (no-mod required) Thule kit then the 569 Sprint rail would be removable, but the crossbars would be stacked on the bracket and less aerodynamic. If I want to remove the fork mount rail I can simply un-screw the three cam levers completely and let the three remaining screw studs float in the crossbars, or possibly 3D print a simple bracket that holes them off to one side and provides a smooth cover to close the open channel and keeps them from rattling around while driving. The Thule circuit is another alternative, but the 569 Sprint T was free to me.
This part is also described in the ChevyBolt.Org at this URL:
https://www.chevybolt.org/threads/crossbars-for-premier-trim-roof-rails.5441/page-4#post-396066
I paid $233 with shipping from a known GM parts distributor and was concerned about the accuracy of cutting the rails and the crossbar compatibility with Thule fork mount rails.
After opening the box from GM I verified that the crossbars do in fact need to be cut, and noticed that the four black mounts are each unique and labeled LF, RF, LR, & RR.
I was also concerned that the crossbars themselves might have a mitered cut and would effect how the rack mounted. Fortunately, the end cuts are not mitered in any significant way.
I chose just to take the excess off of one end. The bars are arc'd and curved upward (convex) and taking the extra off one end is not an issue. I used an 80 tooth blade on my $100 Ryobi chop saw and did not find it necessary to clamp them in place for cutting. I've cut aluminum with various chop saws in the past and although they're made for wood, aluminum is fairly safe if you're careful.
*** use either a face shield like that for wood lathe work, or a combination of safety glasses, a covid-style mask, and a baseball cap. Aluminum flakes get everywhere and you want to protect yourself from the chips that fly. Also, take your time and cut slowly, especially if you use a blade with less than 60 teeth. Slow ifs Good !
*** the front and rear crossbars are different lengths !!! - I took my time and did very precise measurements and took one large cut, placed the bars back on the car with the brackets sitting tight up against their final location on one side, and propped up side and its mounting bracket, then measured again for the final cut. When I was done I saved all the pieces, measured the thickness of the saw blade, and determined exactly what I removed from each crossbar. So here's what I took off of each:
removed 89.0mm from the front bar removed 82.7mm from the rear bar
*** It's better to remove too little and have to make another cut. My final cut on the rear bar was half a blade width and both crossbars fit perfect.
*** Once the bars were perfectly cut I placed the bars with their end brackets back on the roof at their exact mounting locations and sight them through their mounting holes on both sides of the car. With the bars sitting snugly in place I broke the last inch off a pencil and used sharp pencil to trace the mounting holes through the two brackets on the ends I trimmed. Then used a center punch to locate the drill bit precisely.
*** I bought four 6mm Nyloc nuts, and four "cut" (split lock washers)
*** I used a smaller pilot bit to more accurately locate the initial hole in the center and then use a bit that was ever-so-slight larger than the I.D. of the split lock washer. This gave me a little slop, but still made sure the lock washer would compress and do its job.
*** I solved the problem of the holding the Nyloc washers in place by creating a 3D printed block that hods the 6mm nuts and the 6mm lock washer in place. This worked great and I just slid them into the aero-shaped crossbar extrusion. Aside from holder the nuts and washers in place, this keeps the nuts from rotating during assemby.
*** The above nut/washer holder is a free download at: https://www.thingiverse.com/thing:4606945 This 3D printed block was perfect. It held the nuts and plit washers in place during assembly and allowed me to use the original screws that came with the Cadillac bar kit and gave me confidence that these screws will never come loose.
*** I also took the time to scribe the "weep" hole that is designed into the mounting bracket and while I was drilling the new 6mm holes, i use the small pilot bit to notch the end of the bars to keep the tiny hole open and free flowing in case there was dirt build up in the future.
*** The Thule Fork Mount rail I used was a "569 Sprint T" style. It was free from a friend. It had to be loaded in before the mounting brackets are attached. The Cadillac solution for the Bolt is the sleekest most aero design. If I used off-the-shelf (no-mod required) Thule kit then the 569 Sprint rail would be removable, but the crossbars would be stacked on the bracket and less aerodynamic. If I want to remove the fork mount rail I can simply un-screw the three cam levers completely and let the three remaining screw studs float in the crossbars, or possibly 3D print a simple bracket that holes them off to one side and provides a smooth cover to close the open channel and keeps them from rattling around while driving. The Thule circuit is another alternative, but the 569 Sprint T was free to me.
Similar models
thingiverse
free

Duplicator i3 y-axis NEMA motor mount by GreyDay
...lt).
loosen the right guide rail.
bolt the motor to the mount (i used m3x35 and m3x10 and washer).
reattach the right guide rail.
thingiverse
free

Motorcycle Stand - Clean chain by andreribeiroeco
...ly and place the stand under the wheel ... end.
obs. i am brazilian and my native language is not english, sorry for any mistake.
thingiverse
free

Light bracket by xianic
...
the lighting bar is available from hobbytronics (uk), and sparkfun (us). the image of the lighting bar was provided by sparkfun.
thingiverse
free

2019+ Rav4 Roof Rack Pylons by Scubanero
... vendors on ebay. if you use different bars, double check the length as you don't want to bottom the bolts against the roof.
thingiverse
free

Projector tilting mount by mrgizmo9999
...ector can mount with either a ram mount style, or with a snap on square bar adapter, or with an end cap for a 1" square bar.
thingiverse
free

Drill Press Guard Bracket
... clips which lock it in place are a separate thing since they need to be printed at a higher quality - especially if pla is used.
thingiverse
free
Hullavator Mounting Fix by chuggs
...finelty going to be the last attachment in the design chain to fail... way more robust than the stock thule slot nuts and bolts.
thingiverse
free

Golf 7 wagon roof rack adapter by Adonay944
... attach a m6x60mm bolt to secure the bar to the mount . however due to the design with a cutout in the mount, it is self locking.
thingiverse
free
bike lock bracket under saddle
...of the bracket. the bracket is suitable for locks similar to the one shown in the pictures. to mount...
thingiverse
free

Bike mount for Thule Charriot Crossbar by crasu
...ot trailer. use at your own risk.
needs the following screws to assembe:
2 m5 screw
4 m4 screw
4 m4 nuts
2 m5 din 557 square nut
Elhalpern
thingiverse
free

Optiplex 160 Stand by elhalpern
...pture slots and grabs the pc more than an inch up its sides. it's a free alternative to dell's # cn-0j163g - j163g
enjoy!
thingiverse
free

Engine Key Briggs & Stratton # 794696 by elhalpern
...
a second version has been uploaded that does not have the support feature for those with resin or sintering printers. 1/27/2020
thingiverse
free

Hyundai Elantra Vent Slide by elhalpern
...vane.
use and install at your own risk. no warranty. user assumes all risk and may freely modify design to suit personal needs.
thingiverse
free

Holder for "Tube cutter hand tool trapezoid blade" by PredatorJr by elhalpern
...d a holder that protects fingers and the blade without changing the set of the filament. just a rubber band to hold it in place.
thingiverse
free

3TTT Stem Plug by elhalpern
...u may need to select metric conversion in slicing software so that it prints the correct size.
keep your stem bolt clean and dry.
thingiverse
free
Engine Key Tecumseh 430492 35062 for Yard Machines 24inch Snow Blower by elhalpern
...rn
thingiverse
replacement key for a yard machines 24" snow blower with a 7hp tecumseh engine key number 430492 or 35062
thingiverse
free
Vent Shield Acer Aspire AXC series by elhalpern
...this shield still allow the cpu to breath, but prevent dust and water mist or droplets from falling directly into the vent holes.
thingiverse
free

Campagnolo Ergo 8 End Cap by elhalpern
...right in and will replace original lost or broken parts. version 2 was uploaded to provide spring clearance for the thumb lever.
thingiverse
free

Honda CRV 02-05 Rear Window Wiper Bridge by elhalpern
...e" solves this issue and protects your rear wiper from getting burnt out or broken and provides reliable rear window wiping.
thingiverse
free
Gerber Baby Food Jar Holder by elhalpern
...s, and anything small. i'm sure some new parent will also appreciate the form and function of this at feeding time. enjoy !
Crossbar
3ddd
$1

Потолочный светильник Crossbar
...crossbar
потолочный светильник crossbar
высота (см): 100
длина (см): 88
cтек не свернут
в архиве имеется файл fbx и max_2012
3d_export
$10

Angelucci Crossbar table D970 3D Model
...e corona max
angelucci crossbar table d970 3d model download .c4d .max .obj .fbx .ma .lwo .3ds .3dm .stl sgirenko 102119 3dexport
archive3d
free
Barbell 3D Model
...barbell 3d model archive3d barbell bar weight crossbar barbell - 3d model (*.gsm+*.3ds) for interior 3d...
archibase_planet
free

Barbell
...barbell archibase planet barbell bar weight crossbar barbell rogue n230316 - 3d model (*.gsm+*.3ds) for interior...
archive3d
free

Barbell 3D Model
...barbell 3d model archive3d barbell bar weight crossbar barbell rogue n230316 - 3d model (*.gsm+*.3ds) for interior...
3d_export
$5
Swedish wall 3D Model
...swedish wall 3d model 3dexport swedish wall horizontal bar crossbar турник шведская стенка barra fija barras de pared reck...
3d_export
$5

wardrobe brimnes
...wardrobe with mirror. inside there are shelves and a crossbar for hangers. material: wood, aluminum, glass. dimensions: width: 117...
thingiverse
free
Crossbar-Midsection by Funderaren
...midsection by funderaren
thingiverse
basic crossbar midsection. use 8mm glasfiber rod and the endocarps to complete the crossbar
thingiverse
free

Hutten crossbar by meranos
...hutten crossbar by meranos
thingiverse
crossbar for ikea hutten wine rack. allows you to store smaller bottels.
thingiverse
free

Workshop crossbar
...workshop crossbar
thingiverse
workshop cross-bar for your tools
Cadillac
3ddd
$1
Cadillac
...cadillac
3ddd
капитоне
диван в стиле автомобиля cadillac eldorado
3ddd
$1
Cadillac Escalade wheel
... escalade , колесо
колесо cadillac escalade 2014
3d_export
free

Cadillac LMP-02
...cadillac lmp-02
3dexport
2002 cadillac lmp-02 team cadillac northstar
3d_ocean
$8

Cadillac Logo
...bile cadillac car highpoly logo meta poly realistic realistic vehicle vray material wheel
highpoly model of logo of cadillac auto
3d_export
$39

Cadillac XLR
...cadillac xlr
3dexport
cadillac xlr,year 2004. model with high quality finishing on the outside and inside.
3d_export
$20

cadillac fleetwoo 1941
...cadillac fleetwoo 1941
3dexport
cadillac fleetwoo 1941
3d_ocean
$3

Cadillac Car Logo
...please feel to use this model on your car models or motion graphics, or just be creative. the model comes in three pieces: the...
3d_export
$129

cadillac xt6
...cadillac xt6
3dexport
3d_export
free

Cadillac CTS-V
...cadillac cts-v
3dexport
2009 cadillac cts-v
3d_ocean
$50

Cadillac Cien
...ansport tuner vehicle
highly detailed exterior and interior of the cadillac cien. also includes rising and lowering rear spoiler.
Premier
design_connected
$29
Premiere Couch
...premiere couch
designconnected
alberta premiere couch computer generated 3d model.
design_connected
$9

Premiere Ottoman
...premiere ottoman
designconnected
alberta premiere ottoman computer generated 3d model.
3ddd
$1

CTS Premiere
...cts premiere
3ddd
cts salotti , угловой
итальянский диван cts salotti,марка premiere
3ddd
free

Premier Housewares Doodle
...premier housewares doodle
3ddd
банка , специи
premier housewares doodle
turbosquid
$10

Alberta Premiere
...ty free 3d model alberta premiere for download as max and obj on turbosquid: 3d models for games, architecture, videos. (1463320)
3d_export
$15

avant-premiere
...avant-premiere
3dexport
turbosquid
$10

Alberta Premiere
...model alberta premiere for download as jpg, png, max, and obj on turbosquid: 3d models for games, architecture, videos. (1460880)
3ddd
free

premier
...premier
3ddd
стулья и стол отечественной фабрики, бюджетный дизайн аля классик
текстура дерева в комплекте
turbosquid
$59

Chandelier Premiere
... available on turbo squid, the world's leading provider of digital 3d models for visualization, films, television, and games.
turbosquid
$1

Premier Ball
... available on turbo squid, the world's leading provider of digital 3d models for visualization, films, television, and games.
Chevy
3d_export
$20

chevy impala
...chevy impala
3dexport
chevy impala
design_connected
$16

Chevy 710
...chevy 710
designconnected
morganfurniture chevy 710 armchairs computer generated 3d model. designed by katerina zachariades.
3d_export
$20

Chevy camaro 3D Model
...chevy camaro 3d model
3dexport
chevy camaro
chevy camaro 3d model fatallist18 56067 3dexport
cg_studio
$390
Chevy 453d model
...chevy 453d model
cgstudio
.max - chevy 45 3d model, royalty free license available, instant download after purchase.
cg_studio
$99
Chevy Blazer3d model
...blazer3d model
cgstudio
.3ds .max .obj - chevy blazer 3d model, royalty free license available, instant download after purchase.
3d_export
$30

Chevy camaro 2010_0 3D Model
...chevy camaro 2010_0 3d model
3dexport
concept chevy chervolet 2010
chevy camaro 2010_0 3d model rashiga 9638 3dexport
3d_export
$85

Chevy Coupe 1948 3D Model
...chevy coupe 1948 3d model
3dexport
chevy coupe 1948 chevrolet car classic vintage
chevy coupe 1948 3d model seb3ds 36084 3dexport
cg_studio
$100
1977 Chevy Corvette3d model
... corvette3d model
cgstudio
.max - 1977 chevy corvette 3d model, royalty free license available, instant download after purchase.
cg_studio
$49

2010 Chevy Camaro3d model
...hevy camaro3d model
cgstudio
.lwo - 2010 chevy camaro 3d model, royalty free license available, instant download after purchase.
cg_studio
$99

Chevy Chevelle 19703d model
...gm 1970
.3ds .c4d .fbx .max .obj - chevy chevelle 1970 3d model, royalty free license available, instant download after purchase.
Retainer
turbosquid
$5
retaining wall
... available on turbo squid, the world's leading provider of digital 3d models for visualization, films, television, and games.
turbosquid
$6
![Retain [traffic signal]](/t/13301455.jpg)
Retain [traffic signal]
...yalty free 3d model retain [traffic sing] for download as max on turbosquid: 3d models for games, architecture, videos. (1196616)
turbosquid
$41
Pins, Clips & Retainers Library
... available on turbo squid, the world's leading provider of digital 3d models for visualization, films, television, and games.
turbosquid
$6

Alfa Romeo 166 sill spoiler retainer clip left side
... 166 sill spoiler retainer clip left side for download as ipt on turbosquid: 3d models for games, architecture, videos. (1301046)
3ddd
$1

Sanderson Pillows Oakwood
... that has been beautifully translated in five colourways to retain the characteristic textures and flecks of the original prints.
3ddd
$1
ocean rocker by jolyon Yates
...cker by jolyon yates
3dsmax , vray obj file included
the mesh retains all the original uvs, allowing for fast material creation.
3ddd
$1
Armchair Fensy by NUBE
...l metal frame covered by shape retaining polyurethane foam. black oven painted or black nichel painted feet.
not removable cover.
3d_ocean
$16

Sony Ericsson Xperia S
...y textures, bump maps, opacity maps. custom screen texture, low poly retained so smoothness can be adjusted according to demands.
3ddd
$1

GLASS BARN FILAMENT SCONCE AGED STEEL
...s retain the classic lines and exposed hardware of the originals. designed to showcase the warmth of edison-style filament bulbs.
3ddd
$1

ENGLISH WINDSOR
...ed silhouette and spindle back of the original, yet features more generous proportions and the comfort of a waterfall-edged seat.
Washer
archibase_planet
free
Washer
...washer
archibase planet
clothes washer washer laundry washer
washer - 3d model for interior 3d visualization.
archibase_planet
free

Washer
...sher
archibase planet
washer clothes washer laundry washer
washer n200111 - 3d model (*.gsm+*.3ds) for interior 3d visualization.
archibase_planet
free

Washer
...washer
archibase planet
washer washing machine
washer - 3d model for interior 3d visualization.
turbosquid
$4

Washer
...
turbosquid
royalty free 3d model washer for download as max on turbosquid: 3d models for games, architecture, videos. (1710693)
turbosquid
$5

Washer
...oyalty free 3d model washer for download as max, obj, and stl on turbosquid: 3d models for games, architecture, videos. (1347443)
3ddd
$1

basin washer
...basin washer
3ddd
modern basin washer
turbosquid
$2

washer
... available on turbo squid, the world's leading provider of digital 3d models for visualization, films, television, and games.
archive3d
free

Washer 3D Model
...archive3d
clothes washer washer laundry washer
washer - 3d model for interior 3d visualization.
3ddd
$1

MieleT7644C washer
...mielet7644c washer
3ddd
стиральная машинка , miele
mielet7644c washer
3ddd
$1

Washer
...washer
3ddd
modeling by i max render
Kit
turbosquid
$3

Bathroom Kit Baño kit
... available on turbo squid, the world's leading provider of digital 3d models for visualization, films, television, and games.
turbosquid
$19

Kit
... available on turbo squid, the world's leading provider of digital 3d models for visualization, films, television, and games.
3d_export
$20

Drift Kit
...drift kit
3dexport
turbosquid
$40

BitCoin Kit
...urbosquid
royalty free 3d model bitcoin kit for download as on turbosquid: 3d models for games, architecture, videos. (1519068)
turbosquid
$9

Industrial kit
...osquid
royalty free 3d model industrial kit for download as on turbosquid: 3d models for games, architecture, videos. (1144117)
turbosquid
$6

Kit Vases
...
turbosquid
royalty free 3d model kit vases for download as on turbosquid: 3d models for games, architecture, videos. (1285114)
turbosquid
free

Survival Kit
...rbosquid
royalty free 3d model survival kit for download as on turbosquid: 3d models for games, architecture, videos. (1637721)
turbosquid
$50

Ninja Kit
...rbosquid
royalty free 3d model ninja kit for download as fbx on turbosquid: 3d models for games, architecture, videos. (1672364)
turbosquid
$35

Brushes Kit
...osquid
royalty free 3d model brushes kit for download as max on turbosquid: 3d models for games, architecture, videos. (1216721)
turbosquid
$19

Kit Bedroom
...osquid
royalty free 3d model kit bedroom for download as max on turbosquid: 3d models for games, architecture, videos. (1290049)
Nut
3d_export
free
nut
...nut
3dexport
low poly
turbosquid
$12

nut
...
royalty free 3d model nut for download as max, obj, and fbx on turbosquid: 3d models for games, architecture, videos. (1175191)
3d_export
$5
nut handle
...nut handle
3dexport
nut handle
3d_export
$5
nut anchor
...nut anchor
3dexport
nut anchor
3d_export
$5
wing nut
...wing nut
3dexport
wing nut
3d_export
$5
butterfly nut
...butterfly nut
3dexport
butterfly nut
3d_export
$5
special nut
...special nut
3dexport
special nut
3d_export
$5

nut hook
...nut hook
3dexport
nut hook
3d_export
$5

nut ring
...nut ring
3dexport
nut ring
3ddd
$1
nut model
...nut model
3ddd
орех
nuts model
Bolt
3d_export
$2
bolt
...
bolt - a fastener in the form of a rod with an external thread, usually with a hex head wrench, forming a connection with a nut.
3d_export
$5
bolted ring
...bolted ring
3dexport
bolted ring
3d_export
$5
royal bolt
...royal bolt
3dexport
royal bolt
turbosquid
$13
bolt
... available on turbo squid, the world's leading provider of digital 3d models for visualization, films, television, and games.
turbosquid
$6

bolt
... available on turbo squid, the world's leading provider of digital 3d models for visualization, films, television, and games.
turbosquid
$5

bolt
... available on turbo squid, the world's leading provider of digital 3d models for visualization, films, television, and games.
turbosquid
$2

bolt
... available on turbo squid, the world's leading provider of digital 3d models for visualization, films, television, and games.
turbosquid
$1
Bolt
... available on turbo squid, the world's leading provider of digital 3d models for visualization, films, television, and games.
turbosquid
$1
Bolt
... available on turbo squid, the world's leading provider of digital 3d models for visualization, films, television, and games.
turbosquid
$1

Bolt
... available on turbo squid, the world's leading provider of digital 3d models for visualization, films, television, and games.
Modified
turbosquid
$5

modify car
...bosquid
royalty free 3d model modify car for download as max on turbosquid: 3d models for games, architecture, videos. (1390511)
turbosquid
$35

Soleste modified
...e 3d model soleste modified for download as 3dm, stl, and jpg on turbosquid: 3d models for games, architecture, videos. (1646606)
turbosquid
$20

APS modified
... available on turbo squid, the world's leading provider of digital 3d models for visualization, films, television, and games.
turbosquid
$5

Modified skull
... available on turbo squid, the world's leading provider of digital 3d models for visualization, films, television, and games.
3d_export
$8

Maruti 800 Modified
...obile engineers. this concept will also helpful to modified car enthusiast. this is made in solidworks & rendered in keyshot.
3d_ocean
$5
Spacecraft with Subdivision Modifier
...raft with subdivision modifier
3docean
fantasy spacecraft vehicle
the model was created in blender using the subdivision modifier
turbosquid
$10
Modified 9mm pistol
...royalty free 3d model modified 9mm pistol for download as fbx on turbosquid: 3d models for games, architecture, videos. (1560956)
3d_export
$10
ak-47 modified
...ak-47 modified
3dexport
turbosquid
$10

modified evo x
...ree 3d model modified evo x for download as obj, fbx, and stl on turbosquid: 3d models for games, architecture, videos. (1461606)
turbosquid
$5

Modified soldier
... free 3d model modified_soldier for download as png and blend on turbosquid: 3d models for games, architecture, videos. (1440882)