Thingiverse

NSTT Extruder by Paciente8159
by Thingiverse
Last crawled date: 3 years, 1 month ago
This is the NSTT Extruder. (Revision 3 now available)
I've designed this extruder in December 2016 and after some heavy testing and redesigning I decided to share it.
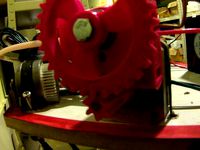
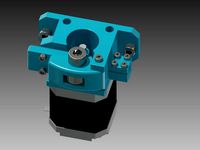
NSTT stands for "Not So Tiny Titan" and is an E3D Titan inspired printable extruder. Despite the name it is a pretty compact geared extruder when compared with other geared extruders.
It has the same 3:1 gear ratio as the E3D Titan.
It incorporates parts from my initial MK8 extruder like the spring, the hobbed gear and the 623z bearing.
To built this is necessary:
-4x M3x10 screws and nuts
-1x M5x40 screw (Hexagonal head) a M5 nut and an M5 nylon lock nut
-5x M3x25 M3 screw and nut
-1x M4x20 screw (internal hex head) and nut
-2x
option 1-625ZZ bearings (needs 1xM5 washer)
option 2-688ZZ or F688ZZ bearings (no need for washers)
-1x 623z bearing and a M3 washer
-1x MK8 hobbed gear
-1x MK8 tension spring
-1x extra 625z if using idler+body B
This extruder has hundreds of hours of work and it has been my extruder for the last 3 years. There are also a couple of variations of my design like the Drakon and the Pitan extruder that you can also check.
Update
06-08-2020
Following hellriser design, added 2 new parts for an optional assembly that includes a small gear with an higher side to fit a screw that locks the gear on the stepper shaft and the matching adapter base. This was not tested.
Update (revision 3)
14-05-2020
Revision 3 of the extruder is now available. Here are the changes
Added thickness around the idler screw on the body to avoid cracking due to the preassure of the string.
The lit also covers the screw to ensure it does not jump out of place.
Update (revision 2)
16-07-2017
Revision 2 of the extruder is now available. Here are the changes
New extruder lit that will offer support to stress caused by the idler spring tension that causes cracking on the top of the body near the outer bearing.
New assembly option for the idler main shaft. This allows for the using of the stepper shaft has the idler shaft has the initial version of the extruder.
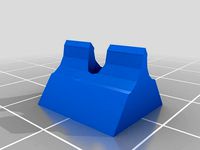
New filament coupler design to prevent miss-alignments.
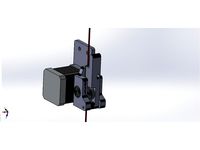
Included the stepper motor adapter sketchup file so you can modify/adapt the support to any given stepper or support on your printer.
Update (revision 1)
17-04-2017
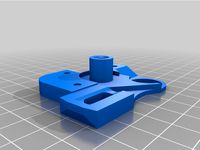
New body that features a side window to allow tightening/cleaning of the hobbed MK8 gear without the need to disassemble the extruder.
Added a teflon tube insert/holder on the input side of the feeding system.
Supressed the need for 625ZZ bearings on the filament idler (lighter)
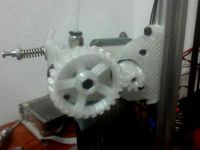
Redesigned gears. Easier to print and fit/match on assembly.
New option for bearing usage on the M5 long screw that allows better performance/less trouble. 688ZZ or F688ZZ can be used by using the available spacers. This also eliminates the need of using washers in the main axis (washers are hard to center/align).
New stepper mount plate to accommodate new gears
Update
09-02-2017
added filament guide on the extruder body (filament input side). Although the MK8 hobbed gear keeps the filament in the right track the filament can skip from the 623zz bearing and get stuck outside the gear causing the print to fail. The new filament guide prevents this.
Assembly
Instructional video here:
New Revision 2 - https://youtu.be/ww7HrSxefLU
Original version (outdated) - https://youtu.be/Cpo0SOepOIE (outdated)
Insert the small gear in the stepper shaft. It will self lock.
Put the M3 nuts in the motor mount base and screw the motor mount to the stepper (M3x10).
Pick up the M5x40 screw and insert in this order:
For the 625 bearings (option 1)
Big gear
M5 washer
625 bearing
625 spacer A
MK8 hobbed gear
For the 688 bearings (option 2)
Big gear
688 spacer A
688 bearing
MK8 hobbed gear
Mark were the side screw is hits the M5 screw remove it all and use a tool file to make a dent in the M5 screw. Reassemble all and tight the MK8 hobbed screw in place.
Connect the two printed gears and insert the extruder body, fitting the bearing in the main body slot. Some adjustments to the position of the small printed gear in the stepper shaft may be required to allow correct alignment. Screw the extruder body to the base (M3x25).
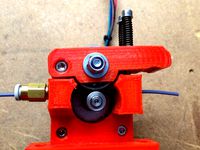
Assemble the filament idler. If using body+idler option B insert the 625 bearing in the idler. Insert the M3 nut on the back of the idler. Insert an M3 washer then the 623 bearing (washer is on the nut size and the bearing is on the side of the screw head) and screw the bearing ans washer in place (M3x10).
Screw the M4 nut on the M4 screw and place the MK8 tension spring in the M4 screw. Place it as the pictures shows (back side of idler)
Fit the idler in the stepper shaft.
Place the filament guide in place.
Screw the extruder lit in place. Insert the rest of the shaft parts by this order:
For the 625 bearings (option 1)
625 spacer B
625 bearing
M5 nut
For the 688 bearings (option 2)
688 bearing
688 spacer B
M5 nut
Tight all with the M5 nut (use your fingers). You want it to tight it very mildly so it wont load the bearings too much. Insert the M5 nylon lock nut on top of this.
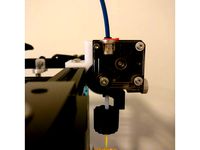
Note: The MK8 hobbed gear has very shallow teeth and not very sharp to avoid deforming the filament. In my case I have to apply a considerate amount of force to the tension sprint to avoid filament slip. I unscrew the M4 nut half way (see main picture).
The rest is up to you. Either use the E3D in direct feed mode or print the adapter (two halfs) to install the pneumatic coupler to use it has a bowden extruder.
In Marlin configure the E steps/mm to about 440. Test it and adjust.
Enjoy your new geared extruder. The printing quality on this is worth it!!!
I've designed this extruder in December 2016 and after some heavy testing and redesigning I decided to share it.
NSTT stands for "Not So Tiny Titan" and is an E3D Titan inspired printable extruder. Despite the name it is a pretty compact geared extruder when compared with other geared extruders.
It has the same 3:1 gear ratio as the E3D Titan.
It incorporates parts from my initial MK8 extruder like the spring, the hobbed gear and the 623z bearing.
To built this is necessary:
-4x M3x10 screws and nuts
-1x M5x40 screw (Hexagonal head) a M5 nut and an M5 nylon lock nut
-5x M3x25 M3 screw and nut
-1x M4x20 screw (internal hex head) and nut
-2x
option 1-625ZZ bearings (needs 1xM5 washer)
option 2-688ZZ or F688ZZ bearings (no need for washers)
-1x 623z bearing and a M3 washer
-1x MK8 hobbed gear
-1x MK8 tension spring
-1x extra 625z if using idler+body B
This extruder has hundreds of hours of work and it has been my extruder for the last 3 years. There are also a couple of variations of my design like the Drakon and the Pitan extruder that you can also check.
Update
06-08-2020
Following hellriser design, added 2 new parts for an optional assembly that includes a small gear with an higher side to fit a screw that locks the gear on the stepper shaft and the matching adapter base. This was not tested.
Update (revision 3)
14-05-2020
Revision 3 of the extruder is now available. Here are the changes
Added thickness around the idler screw on the body to avoid cracking due to the preassure of the string.
The lit also covers the screw to ensure it does not jump out of place.
Update (revision 2)
16-07-2017
Revision 2 of the extruder is now available. Here are the changes
New extruder lit that will offer support to stress caused by the idler spring tension that causes cracking on the top of the body near the outer bearing.
New assembly option for the idler main shaft. This allows for the using of the stepper shaft has the idler shaft has the initial version of the extruder.
New filament coupler design to prevent miss-alignments.
Included the stepper motor adapter sketchup file so you can modify/adapt the support to any given stepper or support on your printer.
Update (revision 1)
17-04-2017
New body that features a side window to allow tightening/cleaning of the hobbed MK8 gear without the need to disassemble the extruder.
Added a teflon tube insert/holder on the input side of the feeding system.
Supressed the need for 625ZZ bearings on the filament idler (lighter)
Redesigned gears. Easier to print and fit/match on assembly.
New option for bearing usage on the M5 long screw that allows better performance/less trouble. 688ZZ or F688ZZ can be used by using the available spacers. This also eliminates the need of using washers in the main axis (washers are hard to center/align).
New stepper mount plate to accommodate new gears
Update
09-02-2017
added filament guide on the extruder body (filament input side). Although the MK8 hobbed gear keeps the filament in the right track the filament can skip from the 623zz bearing and get stuck outside the gear causing the print to fail. The new filament guide prevents this.
Assembly
Instructional video here:
New Revision 2 - https://youtu.be/ww7HrSxefLU
Original version (outdated) - https://youtu.be/Cpo0SOepOIE (outdated)
Insert the small gear in the stepper shaft. It will self lock.
Put the M3 nuts in the motor mount base and screw the motor mount to the stepper (M3x10).
Pick up the M5x40 screw and insert in this order:
For the 625 bearings (option 1)
Big gear
M5 washer
625 bearing
625 spacer A
MK8 hobbed gear
For the 688 bearings (option 2)
Big gear
688 spacer A
688 bearing
MK8 hobbed gear
Mark were the side screw is hits the M5 screw remove it all and use a tool file to make a dent in the M5 screw. Reassemble all and tight the MK8 hobbed screw in place.
Connect the two printed gears and insert the extruder body, fitting the bearing in the main body slot. Some adjustments to the position of the small printed gear in the stepper shaft may be required to allow correct alignment. Screw the extruder body to the base (M3x25).
Assemble the filament idler. If using body+idler option B insert the 625 bearing in the idler. Insert the M3 nut on the back of the idler. Insert an M3 washer then the 623 bearing (washer is on the nut size and the bearing is on the side of the screw head) and screw the bearing ans washer in place (M3x10).
Screw the M4 nut on the M4 screw and place the MK8 tension spring in the M4 screw. Place it as the pictures shows (back side of idler)
Fit the idler in the stepper shaft.
Place the filament guide in place.
Screw the extruder lit in place. Insert the rest of the shaft parts by this order:
For the 625 bearings (option 1)
625 spacer B
625 bearing
M5 nut
For the 688 bearings (option 2)
688 bearing
688 spacer B
M5 nut
Tight all with the M5 nut (use your fingers). You want it to tight it very mildly so it wont load the bearings too much. Insert the M5 nylon lock nut on top of this.
Note: The MK8 hobbed gear has very shallow teeth and not very sharp to avoid deforming the filament. In my case I have to apply a considerate amount of force to the tension sprint to avoid filament slip. I unscrew the M4 nut half way (see main picture).
The rest is up to you. Either use the E3D in direct feed mode or print the adapter (two halfs) to install the pneumatic coupler to use it has a bowden extruder.
In Marlin configure the E steps/mm to about 440. Test it and adjust.
Enjoy your new geared extruder. The printing quality on this is worth it!!!
Similar models
thingiverse
free
7:32 Compact Geared Extruder Nema17 and 14 by ryannining
...haft bearing
1x 624 for idler.
1xm4 nut
to make tensior, i use steel from peg to clamphttps://www.youtube.com/watch?v=-7bpu9pbq18
thingiverse
free
MK8 Gear Extruder for Kossel by Velric
...5 bearings
1x m5x45mm screw (hexhead)
1x m5 presure nut
10x m5
1x m3x20mm screw
1x m3 x50mm screw
2x m3 nuts
1x spring (optional)
thingiverse
free

Dual stepper MK8 gear direct drive bowden extruder
...
2x m3 washer for holding the bearings in place
2x pneumatic push-in fittings with m5 threads for the bowden tube diameter in use
thingiverse
free
Mini Kossel 1.75mm extruder by wallie
...et head cap screw
2x spring
1x m5 pneumatic straight threaded-to-tube adapter, push in 4 mm 4mm male
tools
m5 manual screw tap
thingiverse
free
MK8-MK7 Bowden Extruder by ziyayildizz3
... performance!
necessary materials;
mk8 extruder gear
625 ball bearings x3
m3x31
m3x50
m3 washer x4
m3 nut
m5 nut x3
m5x 50
spring
thingiverse
free

Alpha Direct Drive Extruder by engineglue
...upply list; this is a minimal design. you can use m4 bolts and nuts to mount it. it mounts to a standard aluminum mounting plate.
thingiverse
free

compact bevel geared extruder for mk8 hobbed filament gear V4 UPDATED 13th July 2015 by iwant3d
...which makes the idler straighter i also made the idler smaller to increase the tension. you only need one spring for tension now.
cults
free

Extruder with MK8 drive gear and 688 bearing for dagoma discovery200
...with mk8 drive gear and 688 bearing for dagoma discovery200
extruder with mk8 drive gear and 688 bearing for dagoma discovery200
thingiverse
free
MK8 extruder filament guide by Seibah
... bearing and hobbed gear.
second file is a simpler one that doesn't nest, and just inserts, if the first one doesn't fit.
thingiverse
free
Rackprint Bowden Extruder by Alex_RP
...x m3 screw ~20mm and nuts
2x m3 screw 15mm
bearing 608zz
mk8 drive gear
2x spring ~20mm with ~3mm inner diameter
Nstt
thingiverse
free
NSTT extruder for Argento by ircnick
...nstt extruder for argento by ircnick
thingiverse
nstt for i3 bear edition by diego nuñez
thingiverse
free

NSTT extruder for Argento by ircnick
...by ircnick
thingiverse
nstt for bear argenta by diego nuñez
remix from https://www.thingiverse.com/thing:2090259 by paciente8159
thingiverse
free

D-bot NSTT extruder remix by Tick007
...ional, if you want to make it "pure" direct. this way you must use "nstt_motor_mount_170417_pure_direct.stl".
thingiverse
free
Titan/Drakon/NSTT or other geared extruder mount for 2020 (HyperCube) by superjamie
... stl prints with a 3mm thickness between the motor and the extruder body. if you want a thicker bracket, modify the mpt variable.
thingiverse
free

Anet A6 E3D v6 X-Carriage (ZEUS) by chekcian
...be downloaded from: https://www.thingiverse.com/thing:3322659 direct drive with 3d printed nstt extruder with 3 to 1 gear reduction ratio. extruder...
thingiverse
free

Lotar's Dual Gear Extruder by LotarInc
...of herringbone gears, i taken some from the beautiful nstt extruder by paciente8159. part list: 3x m3x30mm screw 2x...
Paciente8159
thingiverse
free

P3Steel redesigned by Paciente8159 by Paciente8159
...triangles (in the middle) to reduce the possibility of undesired hit's
these were the main changes.future changes may follow.
thingiverse
free

Paciente8159's CNC probe by Paciente8159
...thing touches the tip and one or more of the shelf pins stop making contact with the domed nuts the "switch" will open.
thingiverse
free

Yet another covid face shield by Paciente8159
...esigned over my own 3d head-scan since most masks seem to leave a lot of open spaces specialy over the external part of the eyes.
thingiverse
free

P3Steel bed auto-level and anti-shake by Paciente8159
...under support for the fixed height and the hotend collision protection.
can be used in either 4 point or 3 point assembly option.
thingiverse
free

YACS (Yet Another Calibration Square by Paciente8159
...on tool.
gsuite is an example. you can downloaded in this [link].
(http://pilotpage.monosock.org/fileadmin/files/gsuite_v1.4.rar)
thingiverse
free

P3Steel Anti Z-Wobble by Paciente8159
...r is so big the new system makes it a bit noisier, specially when performing z homing.
during print the noise is almost the same.
thingiverse
free
NSTT extruder for Argento by ircnick
...bear argenta by diego nuñez remix from https://www.thingiverse.com/thing:2090259 by paciente8159 ...
thingiverse
free
Lotar's Dual Gear Extruder by LotarInc
...i taken some from the beautiful nstt extruder by paciente8159 part list: 3x m3x30mm screw 2x m3x20mm screw 2x...
Extruder
3ddd
$1

Extruded Chair
...extruded chair
3ddd
extruded , tom dixon
inspired by tom dixon extruded chair
turbosquid
$15

Extruded Table
... extruded table for download as blend, dae, fbx, obj, and stl on turbosquid: 3d models for games, architecture, videos. (1634137)
turbosquid
$2

3D Printer Extruder
...d
royalty free 3d model 3d printer extruder for download as on turbosquid: 3d models for games, architecture, videos. (1537359)
turbosquid
$1

Zombie extruded text
...oyalty free 3d model zombie extruded text for download as obj on turbosquid: 3d models for games, architecture, videos. (1322198)
turbosquid
$4

Extruder conical screw
...el extruder conical screw for download as sldpr, ige, and stl on turbosquid: 3d models for games, architecture, videos. (1524433)
turbosquid
$50

3d PRINTER - Extruder
... available on turbo squid, the world's leading provider of digital 3d models for visualization, films, television, and games.
turbosquid
$15

Extruded Table 2
...xtruded table 2 for download as blend, dae, fbx, obj, and stl on turbosquid: 3d models for games, architecture, videos. (1621846)
turbosquid
$10

Maya Extrude Tool
... available on turbo squid, the world's leading provider of digital 3d models for visualization, films, television, and games.
3d_export
$5

world earth extrude map
...world earth extrude map
3dexport
3ddd
$1

Simply Elegant Extruded Tree Coffee Table Design
...ble by link studios. the silhouette of a tree is visible at one angle, extruded from the surface to create the support structure.