Thingiverse
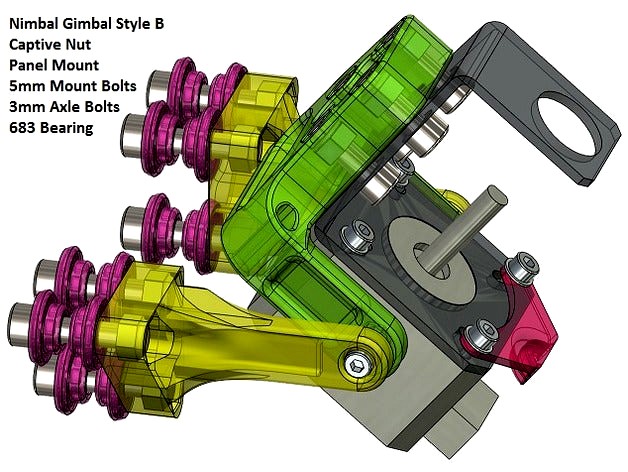
Nimble Gimbal - Gimbaling Extruder Motor Mount for Zesty Nimble by slonold
by Thingiverse
Last crawled date: 3 years ago
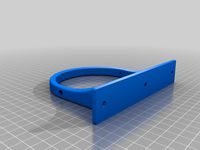
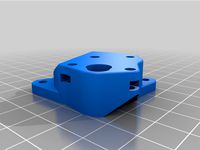
Single axis gimbaling mount for mounting the extruder motor for a Zesty Nimble
Lowers amount of force that drive cable can exert on Nimble body and printer motion system. https://youtu.be/qfjgy3MI5Gg
12 June 2018 - Design (123D), stl and stp files for Style B version all included in Nimble_Gimbal_Style_B.zip file. Design, stl and stp files for original version are in Nimble_Uni_Gimbal_Motor_Mount_42mm_Threaded.zip
6 April 2018 - Updated with Style B captive nut version, anti-vibration washers and strain relief. Style B is easier to assemble as axle is a free bolt installed from the external face of the arm which allows assembly/disassembly with the arms attached to panel. Also, no tapping required.
Very much work in progress - Style A (original) for 40mm length Nema 17 motor. Design and step files included in zip. Style B for any motor size.
Parts - Style A:
M3 x 12mm Button/Socket Head Cap Screw - for bearing axles (Qty 2)
M3 Lock Nut (Qty 2)
M3 Washer OD < 5.75mm, ideally 1mm thick - these Nylon "DIN125/ISO7089" ones work well - for bearing standoffs (Qty 4)683 Bearing - 3mm x 7mm x 3mm (Qty 2)
M5 x 12mm (+/-) Button/Socket Head Cap Screw - for mounting Zesty motor bracket (Qty 4)
M5 x length to suit your mounting surface - for fixing arms (Qty 6)
Parts - Style B:
M3 x 10mm Button/Socket Head Cap Screw - for bearing axles (Qty 2)
M3 x 2mm longer (typically 8mm) than your current (typically 6mm) motor mount bolts if using strain relief (Qty 2)
M3 Lock Nut (Qty 2)
M5 Lock Nut (Qty 10)
M3 Washer OD < 5.75mm, ideally 1mm thick - these Nylon "DIN125/ISO7089" ones work well - for bearing standoffs (Qty 2)683 Bearing - 3mm x 7mm x 3mm (Qty 2)
M5 x 12mm to 14mm (+/-) Button/Socket Head Cap Screw - for mounting Zesty motor bracket (Qty 4)
M5 x length (isolation washers take up 2mm for each face and need 8-9mm insertion into arm) to suit your mounting surface - for fixing arms (Qty 6)
Tools
M3 Tap (Style A only)
2.4mm drill (Style A only)
M5 Tap (Style A only)
4.2mm drill (Style A only)
3mm drill (Style B only)
5mm drill
10mm(13/32") drill (Isolation Washers only)
Small File
Bearing press of some sort, i.e. a socket with an outer diameter just under 7mm and an inner diameter > 4.5mm
Instructions - Style A
Size bearing housing to 6.9mm ("0.272") ~ remember the rueful expression that goes something like "... i bored it twice and it is still too big..."
Carefully press bearings into arms.
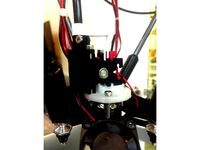
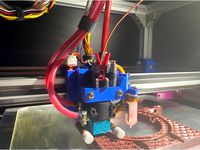
Assemble arms onto gimbal, ensure good alignment so that gimbal pivots freely.
Then locate holes for arms on mounting surface.
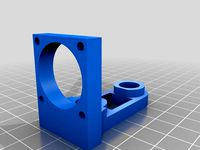
Then mount motor - fit is snug around Zesty motor mount bracket so may have to relieve radius where arms join body.
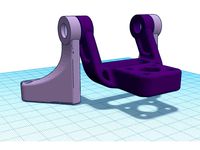
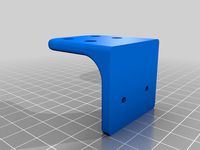
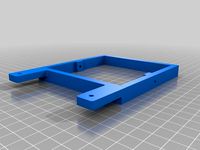
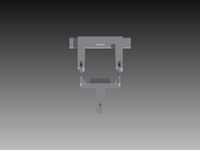
Instructions - Style B
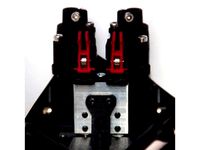
See exploded diagram.
Size bearing housing to 6.9mm ("0.272") ~ remember the rueful expression that goes something like "... i bored it twice and it is still too big..."
Carefully press bearings into arms.
Size 3mm and 5mm holes if required.
Insert nuts.
Assemble arms onto gimbal, ensure good alignment so that gimbal pivots freely. Note that a single washer goes between the bearing and the motor mount on each side.
Then locate holes for arms on mounting surface.
Inner arm bolt holes are 68mm apart on centre and bolt holes are 20mm on centre within the arms.
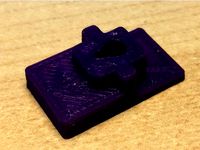
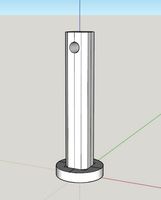
Vibration Washers
Panel holes need to be a 10mm+ (13/32"). A little bigger is probably better than smaller.Note that in order to minimize vibration transmission, mounting bolts on arms are best just tightened enough to prevent things from flopping around.
Printing
Mount and Arms: PETG recommended for toughness and ability to absorb vibration due to its lower flexural modulus but PLA or anything else with good layer adhesion should be fine. Overall vertical shell thickness of ~1mm and 20% infill should be good. Did not use support. Dimensional accuracy important for captive nuts.
Isolation Washers: X60 recommended (you have a Nimble, you CAN print it no problem!!) TPU (i.e. NinjaFlex) or soft TPE should work but keep perimeter wall thickness low (<0.5mm??). With the X60 i went with a 0.3mm nozzle and 0.2mm extrusion width, 3 perimeters, 0.125 layer height and 5 top/bottom layers.
Lowers amount of force that drive cable can exert on Nimble body and printer motion system. https://youtu.be/qfjgy3MI5Gg
12 June 2018 - Design (123D), stl and stp files for Style B version all included in Nimble_Gimbal_Style_B.zip file. Design, stl and stp files for original version are in Nimble_Uni_Gimbal_Motor_Mount_42mm_Threaded.zip
6 April 2018 - Updated with Style B captive nut version, anti-vibration washers and strain relief. Style B is easier to assemble as axle is a free bolt installed from the external face of the arm which allows assembly/disassembly with the arms attached to panel. Also, no tapping required.
Very much work in progress - Style A (original) for 40mm length Nema 17 motor. Design and step files included in zip. Style B for any motor size.
Parts - Style A:
M3 x 12mm Button/Socket Head Cap Screw - for bearing axles (Qty 2)
M3 Lock Nut (Qty 2)
M3 Washer OD < 5.75mm, ideally 1mm thick - these Nylon "DIN125/ISO7089" ones work well - for bearing standoffs (Qty 4)683 Bearing - 3mm x 7mm x 3mm (Qty 2)
M5 x 12mm (+/-) Button/Socket Head Cap Screw - for mounting Zesty motor bracket (Qty 4)
M5 x length to suit your mounting surface - for fixing arms (Qty 6)
Parts - Style B:
M3 x 10mm Button/Socket Head Cap Screw - for bearing axles (Qty 2)
M3 x 2mm longer (typically 8mm) than your current (typically 6mm) motor mount bolts if using strain relief (Qty 2)
M3 Lock Nut (Qty 2)
M5 Lock Nut (Qty 10)
M3 Washer OD < 5.75mm, ideally 1mm thick - these Nylon "DIN125/ISO7089" ones work well - for bearing standoffs (Qty 2)683 Bearing - 3mm x 7mm x 3mm (Qty 2)
M5 x 12mm to 14mm (+/-) Button/Socket Head Cap Screw - for mounting Zesty motor bracket (Qty 4)
M5 x length (isolation washers take up 2mm for each face and need 8-9mm insertion into arm) to suit your mounting surface - for fixing arms (Qty 6)
Tools
M3 Tap (Style A only)
2.4mm drill (Style A only)
M5 Tap (Style A only)
4.2mm drill (Style A only)
3mm drill (Style B only)
5mm drill
10mm(13/32") drill (Isolation Washers only)
Small File
Bearing press of some sort, i.e. a socket with an outer diameter just under 7mm and an inner diameter > 4.5mm
Instructions - Style A
Size bearing housing to 6.9mm ("0.272") ~ remember the rueful expression that goes something like "... i bored it twice and it is still too big..."
Carefully press bearings into arms.
Assemble arms onto gimbal, ensure good alignment so that gimbal pivots freely.
Then locate holes for arms on mounting surface.
Then mount motor - fit is snug around Zesty motor mount bracket so may have to relieve radius where arms join body.
Instructions - Style B
See exploded diagram.
Size bearing housing to 6.9mm ("0.272") ~ remember the rueful expression that goes something like "... i bored it twice and it is still too big..."
Carefully press bearings into arms.
Size 3mm and 5mm holes if required.
Insert nuts.
Assemble arms onto gimbal, ensure good alignment so that gimbal pivots freely. Note that a single washer goes between the bearing and the motor mount on each side.
Then locate holes for arms on mounting surface.
Inner arm bolt holes are 68mm apart on centre and bolt holes are 20mm on centre within the arms.
Vibration Washers
Panel holes need to be a 10mm+ (13/32"). A little bigger is probably better than smaller.Note that in order to minimize vibration transmission, mounting bolts on arms are best just tightened enough to prevent things from flopping around.
Printing
Mount and Arms: PETG recommended for toughness and ability to absorb vibration due to its lower flexural modulus but PLA or anything else with good layer adhesion should be fine. Overall vertical shell thickness of ~1mm and 20% infill should be good. Did not use support. Dimensional accuracy important for captive nuts.
Isolation Washers: X60 recommended (you have a Nimble, you CAN print it no problem!!) TPU (i.e. NinjaFlex) or soft TPE should work but keep perimeter wall thickness low (<0.5mm??). With the X60 i went with a 0.3mm nozzle and 0.2mm extrusion width, 3 perimeters, 0.125 layer height and 5 top/bottom layers.
Similar models
thingiverse
free

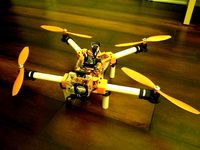
3030 Extrusion Gimbal mount for Zesty Nimble for a Hypercube Evolution by kuhnikuehnast
... to mount everything to the frame.
if you have any ideas to improve the nimble, just leave a comment and i'll try my best :-)
thingiverse
free
Nimble Gimbal For 2020 Delta Frame by quadcells
... on the motor bracket button head first. do the same for the other bearing assembly.
please see the provided photos for assembly.
thingiverse
free
Railcore Zesty Nimble Motor Mount
...lon locking nuts to hold it together. that is your choice. supports will help the holes to turn out better, but are not required.
thingiverse
free
Nema11 Motor Mounts by alaubhan
...n
thingiverse
hardware:
4 - m2.5 x 10mm hex socket cap bolts
2 - m5 x 8mm hex socket cap bolts
2 - m5 washers
2 - m5 t-slot nuts
thingiverse
free
TFG500 Quadcopter by joefarmer
...d stands 55mm (~2") tall. the short and long versions use (qty 16) 3x16mm metric bolts or (qty 16) 6-32x5/8" sae bolts.
thingiverse
free

Tarot T-2d V2 Gimbal Mount to DJI F450 by reesecrta
...-3mm flat washer
connect gimbal to mount
2 -2.5mm x 19mm bolts
2 -2.5mm flat washers
one male to male 6" extension cable
thingiverse
free

"Doubowden" Double Hobbed Bolt Bowden Extruder Assembly by MatGyver85
...pression springs for idlers. not sure what size exactly.
2 - 8mm x 15mm drill rod (5/16" may work)
1 - nema 17 stepper motor
thingiverse
free

Prusa i3 MK2 Remix (2020 profile) by brydon1593
...h)
main board
rumba or ramps or anything you like
frame
2020 all profiles
2 x 600mm profile
5 x 500mm profile
8 x corner brackets
thingiverse
free
Dual Extruder by Psycho1981
...ng:
4x allen screw m5
4x square nut m5
4x washer m5
electronic:
-ramps 1.4 board
-atx power supply
-firmware "marlin"
thingiverse
free

Wanhao Bed mount camera - Rugged version by Bleugh
.../ nuts will do the job
there are 3 arms, only need to print two, either a 4mm wide end, or a 3mm depending on your camera housing
Slonold
thingiverse
free
Garmin 910XT 22mm Aerobar Extension Mount by slonold
...nt watch - note that strap does not have to be tight - spare your spring pins
adjust angle and fix by gently snugging set screws.
thingiverse
free
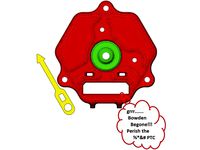
Crabby Cap Zesty Nimble SeeMeCNC HE280/Accelerometer Mount by slonold
... the ptfe tube should contact the bottom of the filament guide on centre without distortion. re-trim the ptfe tube if necessary.
thingiverse
free
Prometheus Mount for SeeMeCNC Rostock Ball Joint Platform +/- Accelerometer Option by slonold
...ive to the clamp plate like a clam shell.
be sure to seat bowden tube and insert ptc retainer before mounting accelerometer board
thingiverse
free

PanelDue 5" and Duet 2 Mounts for SeeMeCNC Rostock Max V2 by slonold
...phery of the onyx bed. some tape to hold the bed and template down will be your friend whilst you outline the bed plate cut out.
thingiverse
free

Belt Tension Adjust Truck for SeeMeCNC Ball Joint System and 1"x1" Extrusion by slonold
...ion truck at top, check tension at middle against fixed distance reference. tension at will!! gently snug screws when finished.
thingiverse
free
Nimble Gimbal For 2020 Delta Frame by quadcells
...i saw slonold's nimble gimbal and liked the idea. slonold did a great job on his design. i needed...
thingiverse
free
Nimble Gnu - System to Adapt the Zesty Nimble Extruder to a Prometheus V2 Hotend Mounted to a SeeMeCNC Balljoint Effector Platform with Accelerometer Probe PCB by slonold
...ter, strap down the whip.
remember to revisit your slicer retraction settings. it is a whole new world without the bowden tube.
thingiverse
free
Zesty Nimble V2 Breech Replica by kulfuerst
...p3 - bearing offset by 0.3 mm i like slonold#39;s naming system and adapted it here. i have not...
Zesty
3d_sky
free
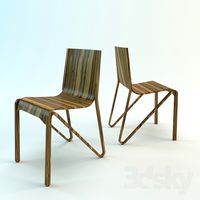
ZESTY CHAIR by PLY COLLECTION
...zesty chair by ply collection
3dsky
http://www.plycollection.com/eng/chairs/zesty/
thingiverse
free

Zesty Nimble Mount for Tevo Tarantula
...esty nimble mount for tevo tarantula
thingiverse
this is my zesty nimble mount for the tevo tarantula which i used in our video.
thingiverse
free
Zesty Nimble Gimbal 3030
...zesty nimble gimbal 3030
thingiverse
remix for extrusion 3030
thingiverse
free
Gimble for Zesty Nimble on RailCoreII by Atalon
...coreii by atalon
thingiverse
i remixed this zesty nimble extruder motor gimble mount to fit kraeger's railcoreii 3d printer.
thingiverse
free
Zesty Nimble Mini Base by profdryoman
... zesty nimble.
see pictures for more info.
matches 3 mm outer / 2 mm inner ptfe.
second stl matches 4 mm outer / 2 mm inner ptfe.
thingiverse
free

Zesty Sidewinder stepper bracket mount 90 degrees
...ees bracket for mounting the stepper bracket for the zesty sidewinder on the original stepper mount on printers like the ender 3.
thingiverse
free

Hypercube Mount for Zesty Nimble v2 and Orion Piezo
...ion for the zesty nimble v2 and the orion piezo.
all other needed parts are from here https://www.thingiverse.com/thing:2617424.
thingiverse
free
Railcore Zesty Nimble Motor Mount
...lon locking nuts to hold it together. that is your choice. supports will help the holes to turn out better, but are not required.
thingiverse
free

Zesty Nimble and E3D v6 hotend mount for RailCore II 3D printer
...imble and e3d v6 hotend mount for the railcore ii 3d printer. it has guides for the nimble drive cable and teflon filament tube.
thingiverse
free
Zesty Adapter for Blue Eagle Labs Metal Delta by thystonius
...s are valid. also i highly recommend double checking your steps_per_mm. please do let me know if you find some better settings.
Nimble
turbosquid
$25
Nimble Chair
... available on turbo squid, the world's leading provider of digital 3d models for visualization, films, television, and games.
3d_export
$10

toyota i-tril
...residents of small and medium-sized cities. a small and nimble three-seater electric car with a range of more than...
3d_export
$99

titanfall stryder
...survive a straight-up slugfest.<br>the stryder is an agile and nimble ***an, favouring speed and mobility over the other ***ans,...
3d_export
$25

Cartoon Zooba Nix Rigged Ready For Games
...'balanced'. on the character menu, she is described as “nimble and cunning”. nix is a very crafty fox that...
thingiverse
free
Nimble Inside by ZestyTech
...uder you can buy, it has ample torque and can be mounted in multiple orientations.
the nimble is available from zesty technology.
thingiverse
free
Nimble V1 and Nimble V2 on the E3D Toolchanger
...uder you can buy, it has ample torque and can be mounted in multiple orientations.
the nimble is available from zesty technology.
thingiverse
free
Mockup of the Dual Nimble aka Nimble C/C by ZestyTech
...uder you can buy, it has ample torque and can be mounted in multiple orientations.
the nimble is available from zesty technology.
thingiverse
free
Nimble V2 mount for Tevo TLM
...uder you can buy, it has ample torque and can be mounted in multiple orientations.
the nimble is available from zesty technology.
thingiverse
free
HevoRT Nimble V2 + Kryo mount
...hevort nimble v2 + kryo mount
thingiverse
this is a remix of miragec caridge to accommodate the nimble v2 and kryo
thingiverse
free

Nimble V2 mount for the BLV Cube
...uder you can buy, it has ample torque and can be mounted in multiple orientations.
the nimble is available from zesty technology.
Gimbaling
turbosquid
$1
Yuneec Save Stick for Gimbal
... available on turbo squid, the world's leading provider of digital 3d models for visualization, films, television, and games.
3d_export
$20
splashdrone gimbal camera
...nsions. all textures used have been included. thank you for purchasing this model!! click on my username to see more of my models
3d_export
$40
splashdrone 3 plus with gimbal camera
...nsions. all textures used have been included. thank you for purchasing this model!! click on my username to see more of my models
turbosquid
$88
DJI Phantom 2 Quadcopter with gimbal for GoPro HERO4 or 3
... available on turbo squid, the world's leading provider of digital 3d models for visualization, films, television, and games.
3d_export
$5

concentrate box
...concentrate box
3dexport
concealer box with handle and gimbal
cg_studio
$55
Drone Quadrocopter With Camera Rigged3d model
....fbx .max .3ds - drone quadrocopter with camera rigged 3d model, royalty free license available, instant download after purchase.
3d_ocean
$29
Drone Quadrocopter With Camera Rigged
...ry with turbosmooth in history. all object rigged or linked to easy manipulate. 3 special controller for camera rotation in 3 ...
3ddd
free
Foucault's Iron Orb
...al manufacturer dimensions and technical data.
geometry and materials are optimized, the result - a quick and beautiful rendering
thingiverse
free
Gimbal by tannermichael
...amera and gravity to self level. the gimbal uses .125" axles to pivot on. this gimbal was made using autodesk inventor 2015.
thingiverse
free

2020 Gimbal
...2020 gimbal
thingiverse
2020 gimbal
Gimbal
turbosquid
$1
Yuneec Save Stick for Gimbal
... available on turbo squid, the world's leading provider of digital 3d models for visualization, films, television, and games.
3d_export
$20
splashdrone gimbal camera
...nsions. all textures used have been included. thank you for purchasing this model!! click on my username to see more of my models
3d_export
$40
splashdrone 3 plus with gimbal camera
...nsions. all textures used have been included. thank you for purchasing this model!! click on my username to see more of my models
turbosquid
$88
DJI Phantom 2 Quadcopter with gimbal for GoPro HERO4 or 3
... available on turbo squid, the world's leading provider of digital 3d models for visualization, films, television, and games.
3d_export
$5
concentrate box
...concentrate box 3dexport concealer box with handle and gimbal ...
cg_studio
$55
Drone Quadrocopter With Camera Rigged3d model
...fly wing propeller rc video camera sky dron spy gimbal gopro riged aircraft toy .obj .fbx .max .3ds -...
3d_ocean
$29
Drone Quadrocopter With Camera Rigged
...quadrocopter with camera rigged 3docean aircraft camera dron fly gimbal gopro propeller quadrocopter rc riged sky sport spy toy...
3ddd
free
Foucault's Iron Orb
...physicist léon foucault's gyroscope inspired our openwork globe. its double-gimbal frame is built of iron around a nucleus of...
thingiverse
free
Gimbal by tannermichael
...amera and gravity to self level. the gimbal uses .125" axles to pivot on. this gimbal was made using autodesk inventor 2015.
thingiverse
free
2020 Gimbal
...2020 gimbal
thingiverse
2020 gimbal
Extruder
3ddd
$1

Extruded Chair
...extruded chair
3ddd
extruded , tom dixon
inspired by tom dixon extruded chair
turbosquid
$15

Extruded Table
... extruded table for download as blend, dae, fbx, obj, and stl on turbosquid: 3d models for games, architecture, videos. (1634137)
turbosquid
$2

3D Printer Extruder
...d
royalty free 3d model 3d printer extruder for download as on turbosquid: 3d models for games, architecture, videos. (1537359)
turbosquid
$1

Zombie extruded text
...oyalty free 3d model zombie extruded text for download as obj on turbosquid: 3d models for games, architecture, videos. (1322198)
turbosquid
$4

Extruder conical screw
...el extruder conical screw for download as sldpr, ige, and stl on turbosquid: 3d models for games, architecture, videos. (1524433)
turbosquid
$50

3d PRINTER - Extruder
... available on turbo squid, the world's leading provider of digital 3d models for visualization, films, television, and games.
turbosquid
$15

Extruded Table 2
...xtruded table 2 for download as blend, dae, fbx, obj, and stl on turbosquid: 3d models for games, architecture, videos. (1621846)
turbosquid
$10

Maya Extrude Tool
... available on turbo squid, the world's leading provider of digital 3d models for visualization, films, television, and games.
3d_export
$5

world earth extrude map
...world earth extrude map
3dexport
3ddd
$1

Simply Elegant Extruded Tree Coffee Table Design
...ble by link studios. the silhouette of a tree is visible at one angle, extruded from the surface to create the support structure.
Motor
archibase_planet
free

Motor
...base planet
motor motor engine engine electric motor
motor wagner n250213 - 3d model (*.gsm+*.3ds) for interior 3d visualization.
archibase_planet
free

Motor
...motor
archibase planet
motor motor engine engine
motor n151112 - 3d model (*.gsm+*.3ds) for interior 3d visualization.
archibase_planet
free

Motor
...motor
archibase planet
motor motor engine engine
motor n150615 - 3d model (*.gsm+*.3ds+*.max) for interior 3d visualization.
turbosquid
$15

Motor
...otor
turbosquid
royalty free 3d model motor for download as on turbosquid: 3d models for games, architecture, videos. (1639404)
3d_ocean
$5

Electric motor
...electric motor
3docean
car electric engine industry motor phase train vehicle
an electric motor enjoy!
3d_ocean
$18

Electric Motor
...electric motor
3docean
electric motor engine machine mover parts
3d model electric motor for hoist crane
turbosquid
$29

Motor
... available on turbo squid, the world's leading provider of digital 3d models for visualization, films, television, and games.
turbosquid
$5

Motor
... available on turbo squid, the world's leading provider of digital 3d models for visualization, films, television, and games.
3d_export
$5

electric motor
...electric motor
3dexport
electric motor use for industrial purposes
3d_export
$5

servo motor
...tor
3dexport
it's a simple part of servo motor 0.75kw for used in machines assembly to show specified motor in own project.
Mount
3d_export
free

mounting bracket
...mounting plate is the portion of a hinge that attaches to the wood. mounting plates can be used indoors, cabinetry and furniture.
turbosquid
$2

MOUNTING
... available on turbo squid, the world's leading provider of digital 3d models for visualization, films, television, and games.
turbosquid
free

Mounts
... available on turbo squid, the world's leading provider of digital 3d models for visualization, films, television, and games.
turbosquid
free

Mount Fuji
...fuji
turbosquid
free 3d model mount fuji for download as obj on turbosquid: 3d models for games, architecture, videos. (1579977)
3d_export
$5

Headphone mount LR
...headphone mount lr
3dexport
headphone mount l+r
turbosquid
$39

Mount rainier
...quid
royalty free 3d model mount rainier for download as fbx on turbosquid: 3d models for games, architecture, videos. (1492586)
turbosquid
$5

pipe mounting
...quid
royalty free 3d model pipe mounting for download as obj on turbosquid: 3d models for games, architecture, videos. (1293744)
turbosquid
$3

Mounting Tires
...uid
royalty free 3d model mounting tires for download as fbx on turbosquid: 3d models for games, architecture, videos. (1708511)
3d_export
$5

Magnetic GoPro Mount
...pro mount
3dexport
cool magnetic mount for gopro. allows you to mount the camera on flat metal surfaces and get exclusive shots.
turbosquid
$5

Stone Mount
...ty free 3d model stone mount for download as ma, obj, and fbx on turbosquid: 3d models for games, architecture, videos. (1370306)