Thingiverse
Nimble Gimbal For 2020 Delta Frame by quadcells
by Thingiverse
Last crawled date: 3 years ago
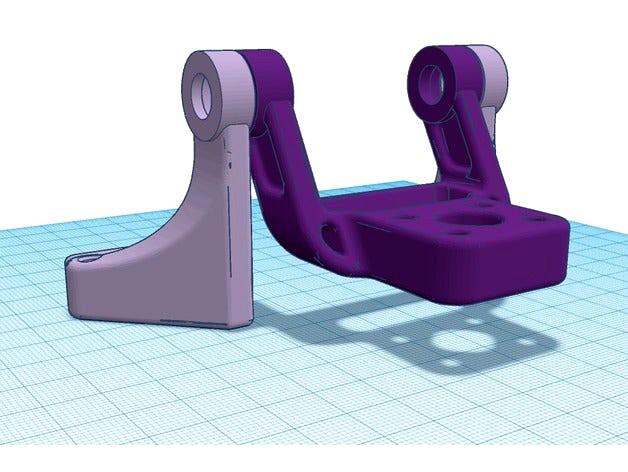
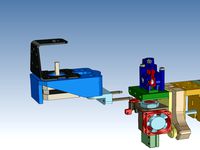
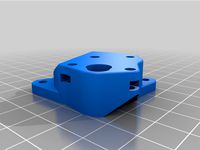
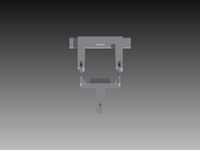
I saw slonold's Nimble Gimbal and liked the Idea. slonold did a great job on his design. I needed to modify it for my application.
I needed to make the arms wider at the bottom so it would mount on a 2020 aluminum
extrusion beam.
I want to use M4 bolts to attach the arms to the 2020 beam so I increased the M3 holes
to M4. (A little over kill)
I have a dozen 624 bearings and wanted to utilize them. I increased the size of the
bearing housing to accommodate the 13mm x 5mm bearing size of the 624's.
Also used four bearings instead of the two in the original design. (A little over kill)
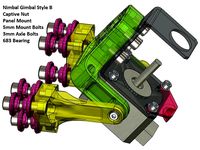
Needed supplies:
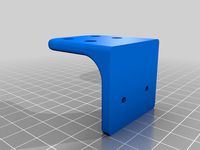
Print one set of arms and one extruder_mount_bracket.
6 M4 x 16mm bolts, 4 for the arms to bolt to the 2020 beam and 2 for the bearings.
4 M4 x 20mm bolts for mounting the Zesty Extruder Motor mount to the gimbal bracket.
18 M4 flat washers (8 for the 4 bolts to mount the Zesty Motor mount to the gimbal bracket
(optional), 4 for the M4 bolts that mount the arms to the 2020 beam (optional) and 6 for
the M4 bolts that make up the two bearing assemblies).
6 M4 nylon lock nuts, 4 for the Zesty motor mount to gimbal bracket and 2 for the arms to
gimbal bracket.
4 M4 'T' nuts for the M4 bolts the attach the arms to the 2020 beam.
4 624 size bearings.
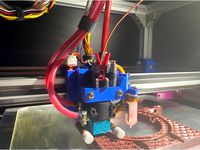
Assembly Instructions:
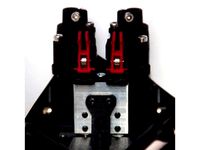
Assemble the bearings first by using 1 M4 x 16mm bolt, 3 M4 washers and 1 nylon lock nut. Slide 1 M4 washer onto the bolt followed by a 624 bearing, then another M4 washer followed by a 2nd 624 bearing. Then slide the third M4 washer and lastly the nylon lock nut. Now tighten the bearing assembly. Make one more assembly.
Take 1 bearing assembly and insert it into the bearing housing on the motor bracket button head first. Do the same for the other bearing assembly.
Please see the provided photos for assembly.
I needed to make the arms wider at the bottom so it would mount on a 2020 aluminum
extrusion beam.
I want to use M4 bolts to attach the arms to the 2020 beam so I increased the M3 holes
to M4. (A little over kill)
I have a dozen 624 bearings and wanted to utilize them. I increased the size of the
bearing housing to accommodate the 13mm x 5mm bearing size of the 624's.
Also used four bearings instead of the two in the original design. (A little over kill)
Needed supplies:
Print one set of arms and one extruder_mount_bracket.
6 M4 x 16mm bolts, 4 for the arms to bolt to the 2020 beam and 2 for the bearings.
4 M4 x 20mm bolts for mounting the Zesty Extruder Motor mount to the gimbal bracket.
18 M4 flat washers (8 for the 4 bolts to mount the Zesty Motor mount to the gimbal bracket
(optional), 4 for the M4 bolts that mount the arms to the 2020 beam (optional) and 6 for
the M4 bolts that make up the two bearing assemblies).
6 M4 nylon lock nuts, 4 for the Zesty motor mount to gimbal bracket and 2 for the arms to
gimbal bracket.
4 M4 'T' nuts for the M4 bolts the attach the arms to the 2020 beam.
4 624 size bearings.
Assembly Instructions:
Assemble the bearings first by using 1 M4 x 16mm bolt, 3 M4 washers and 1 nylon lock nut. Slide 1 M4 washer onto the bolt followed by a 624 bearing, then another M4 washer followed by a 2nd 624 bearing. Then slide the third M4 washer and lastly the nylon lock nut. Now tighten the bearing assembly. Make one more assembly.
Take 1 bearing assembly and insert it into the bearing housing on the motor bracket button head first. Do the same for the other bearing assembly.
Please see the provided photos for assembly.
Similar models
thingiverse
free
Railcore Zesty Nimble Motor Mount
...lon locking nuts to hold it together. that is your choice. supports will help the holes to turn out better, but are not required.
thingiverse
free
Nimble Gimbal - Gimbaling Extruder Motor Mount for Zesty Nimble by slonold
...?). with the x60 i went with a 0.3mm nozzle and 0.2mm extrusion width, 3 perimeters, 0.125 layer height and 5 top/bottom layers.
thingiverse
free

3030 Extrusion Gimbal mount for Zesty Nimble for a Hypercube Evolution by kuhnikuehnast
... to mount everything to the frame.
if you have any ideas to improve the nimble, just leave a comment and i'll try my best :-)
thingiverse
free

SQ12 Mount and Holder for 2020 Extrusion by IndoMakers
...rofile
nuts and bolts?
2x 2020 m5 hammer nut
2x m5 x 10mm bolts
1x m4 ordinary nuts or nylon lock nuts
1x m4 x 15mm or 20mm bolts
thingiverse
free
FolgerTech 2020 Y Axis Idler Bearing Holder by JWag
...er over the bolt and thread on the nylock
attach the holder to the 2020 frame with m5 bolts and t-nuts.
tension your y-axis belt.
thingiverse
free

Rusa bowden extruder gear by urusa
...tes the m5 bolts.
the shaft is fixed to the motor rotation.
secure the mk7 extrusion gear to the m5 bolts.
the gear ratio is 1/3.
thingiverse
free

Anet A8 Plus y motor anti swing by stefanobatt
...ide in the profile the 2 back t-nut.
mount on the rear of the motor and trim the screw to touch the motor. do not push the motor.
thingiverse
free

Foldable wall mount for 16mm pipe by sjostedt
...adjustments to get the pipe perfectly horizontal.
the pipe clamp in the image is this: https://www.thingiverse.com/thing:2481549
thingiverse
free

Sovol SV01 Titan Aero Adaptor plate by thedead1
... includes a valley for routing the stepper motor cable.
the bracket can be printed in any material with at least %30 plus infill.
thingiverse
free
Ultimaker 2 - Zesty Nimble V2 & E3D V6 upgrade by MacNite
...is an additional slide-on cover to "hide" the stepper motor assembly away and make everything look tidy.
not tested yet
Quadcells
thingiverse
free

Tekno Wing Spacers by quadcells
...ds 2x 55mm flat head bolts
36mm-needs 2x 55mm flat head bolts
34mm-needs 2x 50mm flat head bolts. this is the one i am using now.
thingiverse
free
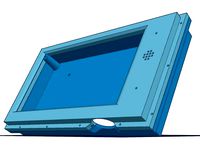
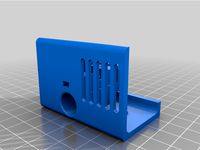
PanelDue 7i Enclosure by quadcells
...nnel mount case is for a 7 not a 7i.
i put a access hole for the micro sd card slot. not totally happy the way the hole came out.
thingiverse
free

Tekno MT410 Wire Management by quadcells
...anding wires-use two "parta"
secure wires use 1 "parta" and 1 "partb"
you will need small zip ties.
thingiverse
free

Tekno MT410 Rear Arm Guards by quadcells
...ssis of the rc vehicle.
hardware needed:
4 m3 x 8mm button head bolts.
update 12/11/2020
added 2 new sets that are 20mm taller
thingiverse
free

Taranis X9E Battery Holder by quadcells
....
i used a qidi tech x-one 3d printer.
simplify3d for a slicer software.
abs red 1.75mm filament, but you can use pla and pla/pha
thingiverse
free

Traxxas Slash 4x4 Body Mount (Extended) by quadcells
...fit correctly so i needed to change the height of the body mounts. after a couple designs i came up with these 3 different sizes.
thingiverse
free

FT Sea Duck Float strut by quadcells
...t) to the wing of the ft sea duck by flitetest.
i used abs so i could do a acetone vapor bath post print to smooth out the print.
thingiverse
free

Traxxas Slash 4x4 Body Mount Spacers by quadcells
... has more strength than the mounts that i 3d printed.
these spacers help raise the body over the chassis for a better custom fit.
thingiverse
free
Tekno MT410 Capacitor Holder (Glitch Buster) by quadcells
...at-set inserts for plastic, brass, m3 x 0.50 mm thread size, 3.800 mm
installed length mcmaster-carr
1 m3 x 6mm button head bolt.
thingiverse
free

Tekno MT410 Thumbwasher Body Mounts by quadcells
... threaded studs for the rear post and 2 m4 x 6mm button head bolts for the front post.
update 12/10/2020
added body_post_65mm.stl
Nimble
turbosquid
$25
Nimble Chair
... available on turbo squid, the world's leading provider of digital 3d models for visualization, films, television, and games.
3d_export
$10

toyota i-tril
...residents of small and medium-sized cities. a small and nimble three-seater electric car with a range of more than...
3d_export
$99
titanfall stryder
...survive a straight-up slugfest.<br>the stryder is an agile and nimble ***an, favouring speed and mobility over the other ***ans,...
3d_export
$25

Cartoon Zooba Nix Rigged Ready For Games
...'balanced'. on the character menu, she is described as “nimble and cunning”. nix is a very crafty fox that...
thingiverse
free
Nimble Inside by ZestyTech
...uder you can buy, it has ample torque and can be mounted in multiple orientations.
the nimble is available from zesty technology.
thingiverse
free
Nimble V1 and Nimble V2 on the E3D Toolchanger
...uder you can buy, it has ample torque and can be mounted in multiple orientations.
the nimble is available from zesty technology.
thingiverse
free
Mockup of the Dual Nimble aka Nimble C/C by ZestyTech
...uder you can buy, it has ample torque and can be mounted in multiple orientations.
the nimble is available from zesty technology.
thingiverse
free
Nimble V2 mount for Tevo TLM
...uder you can buy, it has ample torque and can be mounted in multiple orientations.
the nimble is available from zesty technology.
thingiverse
free
HevoRT Nimble V2 + Kryo mount
...hevort nimble v2 + kryo mount
thingiverse
this is a remix of miragec caridge to accommodate the nimble v2 and kryo
thingiverse
free

Nimble V2 mount for the BLV Cube
...uder you can buy, it has ample torque and can be mounted in multiple orientations.
the nimble is available from zesty technology.
Gimbal
turbosquid
$1
Yuneec Save Stick for Gimbal
... available on turbo squid, the world's leading provider of digital 3d models for visualization, films, television, and games.
3d_export
$20
splashdrone gimbal camera
...nsions. all textures used have been included. thank you for purchasing this model!! click on my username to see more of my models
3d_export
$40
splashdrone 3 plus with gimbal camera
...nsions. all textures used have been included. thank you for purchasing this model!! click on my username to see more of my models
turbosquid
$88
DJI Phantom 2 Quadcopter with gimbal for GoPro HERO4 or 3
... available on turbo squid, the world's leading provider of digital 3d models for visualization, films, television, and games.
3d_export
$5

concentrate box
...concentrate box 3dexport concealer box with handle and gimbal ...
cg_studio
$55
Drone Quadrocopter With Camera Rigged3d model
...fly wing propeller rc video camera sky dron spy gimbal gopro riged aircraft toy .obj .fbx .max .3ds -...
3d_ocean
$29
Drone Quadrocopter With Camera Rigged
...quadrocopter with camera rigged 3docean aircraft camera dron fly gimbal gopro propeller quadrocopter rc riged sky sport spy toy...
3ddd
free
Foucault's Iron Orb
...physicist léon foucault's gyroscope inspired our openwork globe. its double-gimbal frame is built of iron around a nucleus of...
thingiverse
free
Gimbal by tannermichael
...amera and gravity to self level. the gimbal uses .125" axles to pivot on. this gimbal was made using autodesk inventor 2015.
thingiverse
free

2020 Gimbal
...2020 gimbal
thingiverse
2020 gimbal
Delta
design_connected
$16

Delta
...delta
designconnected
arflex international spa delta computer generated 3d model. designed by koivisto, eero.
design_connected
$16

Delta
...delta
designconnected
lj lamps delta computer generated 3d model. designed by janowski-lenhart, sasha.
design_connected
$13

Delta
...delta
designconnected
emu group delta armchairs computer generated 3d model. designed by marin chiaramonte .
3ddd
$1

Delta Light
...delta light
3ddd
delta light , you-turn reo 3033
точечний светильник delta light
3ddd
$1
Blanco / delta
...blanco / delta
3ddd
blanco , мойка
мойка blanco delta со смесителем
3ddd
$1
Delta Light Spot
...delta light spot
3ddd
delta light
светильник фирмы delta light
3ddd
free
Bianchi Delta LVMDLT200100
...i delta lvmdlt200100
3ddd
bianchi delta , смеситель
смеситель bianchi delta lvmdlt200100
design_connected
free

Delta 190
...delta 190
designconnected
free 3d model of delta 190 by zanotta designed by progetti, emaf.
design_connected
$27
Delta 211
...delta 211
designconnected
zanotta delta 211 computer generated 3d model. designed by progetti, emaf.
design_connected
$27

Delta 234
...delta 234
designconnected
zanotta delta 234 computer generated 3d model. designed by progetti, emaf.
2020
3d_export
$5

cyberpunk 2020
...cyberpunk 2020
3dexport
cyberpunk 2020
3d_export
$5
monster01 2020
...monster01 2020
3dexport
monster01 2020 dxf file rigged in mixamo.
3d_export
$129

explorer 2020
...explorer 2020
3dexport
3d_export
$5

mug 2020
...mug 2020
3dexport
3d_export
$15
3 rims 2020
...3 rims 2020
3dexport
new rims 2020 from inventor
turbosquid
$7

Keepsake of 2020
...ty free 3d model keepsake of 2020 for download as obj and stl on turbosquid: 3d models for games, architecture, videos. (1657350)
3d_export
$35
landrover 2020
...landrover 2020
3dexport
turbosquid
$15
Timeless 2020
...free 3d model timeless 2020 for download as max, obj, and fbx on turbosquid: 3d models for games, architecture, videos. (1433362)
turbosquid
$85

Q8 2020
... free 3d model audi q8 2020 for download as max, obj, and fbx on turbosquid: 3d models for games, architecture, videos. (1559582)
turbosquid
$59

Supra 2020
...ee 3d model supra 2020 for download as max, lwo, obj, and c4d on turbosquid: 3d models for games, architecture, videos. (1404492)
Frame
archibase_planet
free

Frame
...frame
archibase planet
frame photo frame
frame n190813 - 3d model (*.gsm+*.3ds) for interior 3d visualization.
archibase_planet
free

Frame
...frame
archibase planet
frame photo frame
frame n071113 - 3d model (*.gsm+*.3ds) for interior 3d visualization.
3ddd
$1

Frame
...frame
3ddd
frame
3ddd
free

Frame
...frame
3ddd
frame
archibase_planet
free

Frame
...frame
archibase planet
frame mirror frame ornament
frame n260113 - 3d model (*.gsm+*.3ds) for interior 3d visualization.
archibase_planet
free

Frame
...frame
archibase planet
frame photo frame
frame photo n190813 - 3d model (*.gsm+*.3ds) for interior 3d visualization.
archibase_planet
free

Frame
...frame
archibase planet
frame window window frame
frame 1 - 3d model (*.gsm+*.3ds) for interior 3d visualization.
archibase_planet
free

Frame
...frame
archibase planet
frame window frame window
frame 3 - 3d model (*.gsm+*.3ds) for interior 3d visualization.
archibase_planet
free

Frame
...frame
archibase planet
frame wall frame decoration
frame 1 - 3d model (*.gsm+*.3ds) for interior 3d visualization.
archibase_planet
free

Frame
...frame
archibase planet
frame window window frame
frame 2 - 3d model (*.gsm+*.3ds) for interior 3d visualization.