Thingiverse
"Neurobot 2" - Arduino Educational Robotics Kit, Autonomous / RC controlled by NikolayGrigoryev
by Thingiverse
Last crawled date: 4 years, 2 months ago
Hello world! :)
My name is Nick Grigoryev, I am a professional engineer, and I love to make robots.
I created this constructor kit to let children to learn coding of Arduino, to prepare the engineers of tomorrow.
They can learn IR distance sensing, LED blinking (to blink the car lights is much more interesting, than one LED), servo control, GPS signal acquiring and processing, LCD screen etc.
This is a mini version of my "Neurobot 1" (http://www.thingiverse.com/thing:1378603) with minimum parts, for easier assembly.
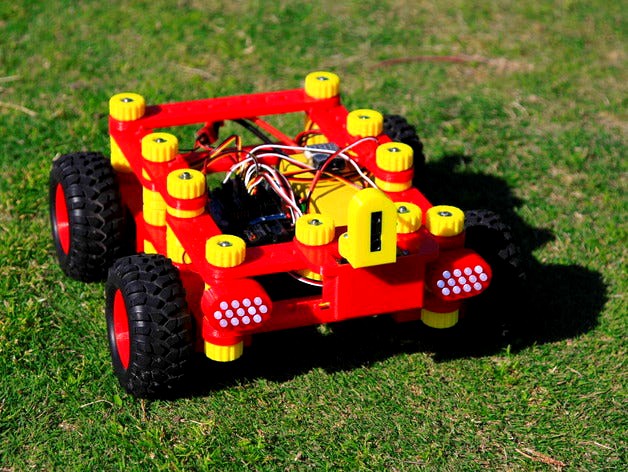
It is a robot, which can run in autonomous mode or to be RC controlled.
It runs Arduino Uno as a brain and Sharp IR sensor (10-90 cm) as his eyes.
If you will add one more plate 7x11 holes (included in files), you can locate on it the big breadboard, and run very interesting programs with "Adafruit Ultimate GPS breakout" sensor, RTC (real time clock) etc.
To assemble it, you will need to 3D-print:
Line_11 - 4 pieces
Line_7 - 3 pieces
SwitchHolder_Line_7 - 1 piece
Line_5 - 2 pieces
Plate_5x11 - 1 piece
Servo_holder - 4 pieces
Servo_holder_vertical - 1 piece
Proximity_sensor_front - 1 piece
Proximity_sensor_back - 1 piece
Knob - 28 pieces
Line_3_13_LEDs_front - 2 pieces
Line_1_13_LEDs_90_deg - 2 pieces
And you will need to buy:
Arduino Uno - 1 piece
Sainsmart Servo Shield - 1 piece
LiPo battery - 1 piece
LiPo checker - 1 piece
6 volts UBEC - 1 piece
Sharp IR sensor - 1 piece
1/4 inch threaded rod - 40 inches
1/4 inch nuts - 28 pieces
6/32 bolts 1-1/4 length - 40 pieces
6/32 nuts - 40 pieces
LEDs - 26 pieces
220 Ohm resistors - 8 pieces
Servo extension cable 30 cm - 3 pieces
Toggle on-off switch - 1 piece
All the links to buy them, please see here: http://www.thingiverse.com/thing:1378603
(I just want to keep one updated list of things to buy).
The power scheme is the simplest as it could be: Battery 12V -> Toggle Switch -> UBEC 6V -> V and G of Sainsmart shield (power for servos).
Make sure you connect Sharp sensor to A1 (or the like) port, because these A ports have 5V power supply directly from Arduino board, not 6V from UBEC.
Arduino is connected directly to 3S Li-Po battery through toggle switch. Toggle on-off switch is turning on and off both Arduino and UBEC at the same time.
If you want, you can add LCD screen and RC control (I installed Futaba receiver, but you can have it from here if you want: http://www.hobbyking.com/hobbyking/store/__190__190__Radios_Receivers.html?idCategory=190&pc=).
If you want to buy from me this kit printed (all parts except electronic components), please write to my email below.
Have fun, I hope, you will like it :)
Nick
nikgrigoryev@gmail.com
(C) Designed in California
My name is Nick Grigoryev, I am a professional engineer, and I love to make robots.
I created this constructor kit to let children to learn coding of Arduino, to prepare the engineers of tomorrow.
They can learn IR distance sensing, LED blinking (to blink the car lights is much more interesting, than one LED), servo control, GPS signal acquiring and processing, LCD screen etc.
This is a mini version of my "Neurobot 1" (http://www.thingiverse.com/thing:1378603) with minimum parts, for easier assembly.
It is a robot, which can run in autonomous mode or to be RC controlled.
It runs Arduino Uno as a brain and Sharp IR sensor (10-90 cm) as his eyes.
If you will add one more plate 7x11 holes (included in files), you can locate on it the big breadboard, and run very interesting programs with "Adafruit Ultimate GPS breakout" sensor, RTC (real time clock) etc.
To assemble it, you will need to 3D-print:
Line_11 - 4 pieces
Line_7 - 3 pieces
SwitchHolder_Line_7 - 1 piece
Line_5 - 2 pieces
Plate_5x11 - 1 piece
Servo_holder - 4 pieces
Servo_holder_vertical - 1 piece
Proximity_sensor_front - 1 piece
Proximity_sensor_back - 1 piece
Knob - 28 pieces
Line_3_13_LEDs_front - 2 pieces
Line_1_13_LEDs_90_deg - 2 pieces
And you will need to buy:
Arduino Uno - 1 piece
Sainsmart Servo Shield - 1 piece
LiPo battery - 1 piece
LiPo checker - 1 piece
6 volts UBEC - 1 piece
Sharp IR sensor - 1 piece
1/4 inch threaded rod - 40 inches
1/4 inch nuts - 28 pieces
6/32 bolts 1-1/4 length - 40 pieces
6/32 nuts - 40 pieces
LEDs - 26 pieces
220 Ohm resistors - 8 pieces
Servo extension cable 30 cm - 3 pieces
Toggle on-off switch - 1 piece
All the links to buy them, please see here: http://www.thingiverse.com/thing:1378603
(I just want to keep one updated list of things to buy).
The power scheme is the simplest as it could be: Battery 12V -> Toggle Switch -> UBEC 6V -> V and G of Sainsmart shield (power for servos).
Make sure you connect Sharp sensor to A1 (or the like) port, because these A ports have 5V power supply directly from Arduino board, not 6V from UBEC.
Arduino is connected directly to 3S Li-Po battery through toggle switch. Toggle on-off switch is turning on and off both Arduino and UBEC at the same time.
If you want, you can add LCD screen and RC control (I installed Futaba receiver, but you can have it from here if you want: http://www.hobbyking.com/hobbyking/store/__190__190__Radios_Receivers.html?idCategory=190&pc=).
If you want to buy from me this kit printed (all parts except electronic components), please write to my email below.
Have fun, I hope, you will like it :)
Nick
nikgrigoryev@gmail.com
(C) Designed in California