Thingiverse
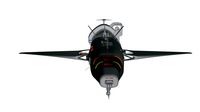
Navette d'aérophotographie - KAP shuttle by Tchoun
by Thingiverse
Last crawled date: 3 years ago
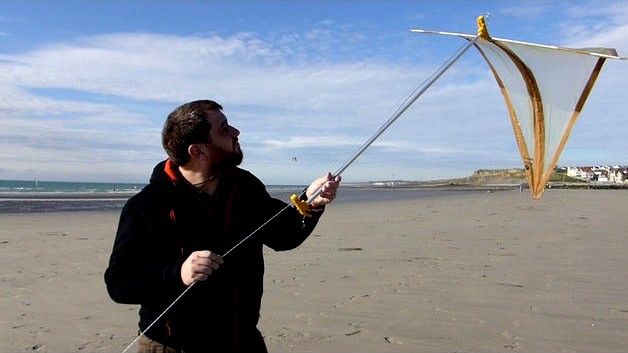
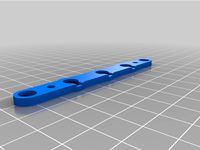
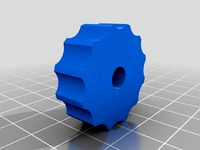
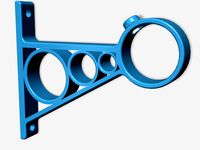
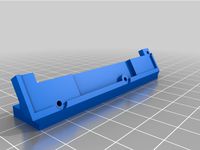
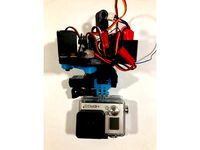
Pieces imprimées 3D pour la réalisation d'une navette (petit système qui monte le long de la ligne d'un cerf volant monofil) permettant d'embarquer un petit appareil photo.
Par rapport à la version "Kite messenger 1.2" d' erwinha :
Ajout d'un perçage de fixation pour un appareil photo
augmentation de la largeur pour intégrer les écrous et têtes de vis dans le corp de piece.
augmentation des diamètres de tiges (6mm) pour installation d'une voile plus importante (pour monter l'appareil photo)
mise en pente des parties nécessitant un support pour supprimer celui-ci
modification du diamètre des poulies
modification de l'axe des fentes "passe fil" pour empêcher la sortie de la ligne lorsque le fil est tendu.
Pieces supplémentaires nécessaires :
4 vis M3x20 à tete fraisée
4 écrous M3
2 vis M4x20 tete fraises
2 écrous M4
2 roulements a bille gorge en U (diamètre intérieur 4mm, diamètre extérieur 13mm, épaisseur 7mm) http://amzn.eu/d/2aM28zL
fil de fer
profilé aluminium 10x10mm, longueur 1m
deux tiges diamètre 6mm (hêtre ou fibre de carbone)
voile (toile de spy ou sac plastique et scotch)
une ficelle et un anneau métallique léger
un pied photo orientable (du type http://amzn.eu/d/4WTGS6D)
une tige de métal coudé servant de butée de déclenchement sur la ligne du cerf-volant
un peu de frein filet (lockit) pour éviter que les vis ne s'enlèvent avec les vibrations.
un appareil photo, gopro ou autre
A améliorer dans les versions futures :
ajouter un peu de jeu pour le profilé alu (ici j'ai dû y aller au marteau ;) )
ajouter un peu de jeu pour le pied photo
Vos commentaires sont bien sûr les bienvenus ;)
3D printing parts to make a shuttle (little system going up and down along the line of a one line kite) allowing to board a small camera.
Difference compared to the original "Kite messenger 1.2" by erwinha :
Adding of a fixing hole for a camera
Increased width to integrate the nuts and screw heads in the piece body.
increased diameter of rods (6mm) for installation of a larger sail (to mount the camera)
sloping the parts that need support to remove it
change of pulley diameter
modification of the axis of the slots "pass wire" to prevent the exit of the line when the wire is stretched.
Additional pieces needed:
4 screws M3x20 with countersunk head
4 M3 nuts
2 screws M4x20 with countersunk head
2 M4 nuts
2 U-groove ball bearings (inner diameter 4mm, outer diameter 13mm, thickness 7mm) http://amzn.eu/d/2aM28zL
metallic wire
aluminum profile 10x10mm, length 1m
two rods diameter 6mm (beech or carbon fiber)
sail (spy cloth or plastic bag and scotch tape)
a string and a light metal ring
an orientable photo foot (of the type http://amzn.eu/d/4WTGS6D)
an angled metal rod acting as a trigger stop on the kite line
lockit to prevent the screws from being removed with vibrations.
a camera, gopro or other
To improve in future versions:
add space for the aluminum profile (here I had to go hammer;))
add space for the photo foot
Your comments are of course welcome;)
Similar models
thingiverse
free
FTX KANYON DF4J connecteur rapide éclairage by PrintPat
...posés et maintenue avec une pointe de cyano.
pour la carrosserie le système est maintenue par de vis m3 tête fraiser avec écrous.
thingiverse
free
Support pour appareil photo sur une voiture thermique T2M by JulianDrouot
...e l'aileron de celle-ci.
diamètre de l'emplacement de l’aileron : 8mm
diamètre de la vis pour l'appareil photo : 6mm
thingiverse
free

Tapette à mouches by sylcaroline
...e colle pour fixer le manche et la tapette sur la tige.
réalisé en pla, c'est assez costaud... a tester avec du fil souple...
thingiverse
free
Dacia dokker - Ecrou support de cric | Jack support nut by Lacoste313
...er int 6.4 (printed in 6mm work fine for me.)
more thoot for less hurt.
i used solidwork for make this, the source is in package.
thingiverse
free

Support Circuit Imprimé. by MiniDef
...amètre m3.
une fois l'impression finie, mètre en force les 4 écrous dans leur logement au niveau des passage des tiges lisse.
thingiverse
free
Support tringle à rideaux by Cichlid
... en bois de 28 mm de diamètre.
possibilités de porte serviette ou papier toilettes en inversant les supports pour cacher la vis.
thingiverse
free
support telephone S7 pour vélo by kapy27
...ier de serrage plastique largeur 3.2mm
j'ai testé le support en condition réelle lors d'une sortie vtt et aucun souci :)
thingiverse
free

SURROUND STAND FEET FOCAL SIB by odbo
... 25mm + écrou, pour les pieds (ou vous pouvez couper à la disqueuse des vis de 30mm)
-(optionnel) x2 goulottes électrique 10x10mm
thingiverse
free

Support Bobine 5-10kg Francofill by Loop23
...mètre 4 longueur minimum de 55mm pour fixer les pieds du support
4 écrou de diamètre 4
8 rondelles de diamètre 4
bon print à tous
thingiverse
free
Dérouleur bobine suspendu by gtrouve
...ne plus lourde que les 750gr grâce à la bague d'extension.
la fixation s'effectue par une tige filtée de 6mm de diamètre.
Tchoun
thingiverse
free
GrovyBot by Tchoun
...et de module grove.
robot for initiation to robotics and programming with mblock, based on an arduino uno card and grove module.
thingiverse
free

Motor support by Tchoun
...ment under the support.
feel free to improve this model yourself, or let me know your ideas for improvement!
have a nice print ;)
thingiverse
free

Support loupes - magnifying glass case by Tchoun
...ratique pour ranger les loupes.
maintenant, tout est bien rangé ;)
pour des loupes de diamètre 60 mm, et de 8 mm d'épaisseur.
thingiverse
free
Support Ecran LCD Grove base Lego by Tchoun
...39;écran sur le support.
pas de support d'impression necessaire, remplissage 20% ok.
lego et grove sont des marques déposées.
thingiverse
free

Sphere-O-Bot Adjustable frame without support by Tchoun
... model : http://www.thingiverse.com/thing:1683764/#files
thanks to tobytetzi and nalanengine for the previous versions !
enjoy :)
thingiverse
free

Jonction axe moteur (6mm) / roues de roller (22mm) by Tchoun
...rt de vos remarques pour améliorer cette pièce !
(première réalisation sous tinkercad : https://tinkercad.com/things/1gtn3330gnu)
Navette
turbosquid
$20

Engagement Ring With Round Diamonds and Navette
... available on turbo squid, the world's leading provider of digital 3d models for visualization, films, television, and games.
thingiverse
free

Navette pour tricot (jacquard) by ChefChaudard
...navette pour tricot (jacquard) by chefchaudard
thingiverse
il parait que c'est très utile...
thingiverse
free
Navette de Vega , Goldorak by wogcolonel
...petite soucoupe de guerre de véga
attention l'image choisie est prise sur ebay pour vous donner l'idée de la soucoupe ...
thingiverse
free

E3Dv6 MK2S adaptator MGN12 by Sulfu
...: https://www.thingiverse.com/thing:2276997 12/10/2017 : agrandissement de l'empreinte pour la navette ...
thingiverse
free

Detailed Space Shuttle with printing supports by Tea_Innovation
...orbiter with windows and nose propellers orbiteur de la navette spaciale américaine avec hublots et propulseurs de...
thingiverse
free
Eclairage led - tête impression Prusa i3 by Cichlid
...prusa i3. matériels : 1 interrupteur 12v 1 led navette 12v fil d'alimentation multi-brins le support de led est...
thingiverse
free
Metier à corde - Rope Craft tool by Zigoto12345
..."tourillon manivelle 1" 1 x "manivelle 2" 1 x "navettequot; les supports sont à fabriquer en bois (dimensions trop...
grabcad
free

Navette spatiale
...navette spatiale
grabcad
navette spatiale
cg_trader
$6

Navette shaped signet ring | 3D
...navette shaped signet ring | 3d
cg trader
navette shaped signet ring
Kap
3d_export
$5

Kap door
...kap door
3dexport
3d_export
$10
Door glass kap
...door glass kap
3dexport
3d_export
$5
Queen Door 3D Model
...queen door 3d model 3dexport queen door krali?e kap? kaps? queen door 3d model sercancetin 81204...
3d_export
$5
Door 3D Model
...door 3d model 3dexport kap door door 3d model ua06 77212...
3d_export
$5
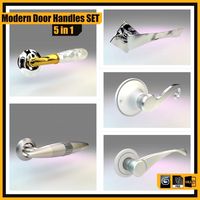
Modern Door Handles Set 5 in 1 3D Model
...in 1 3d model 3dexport modern door handle handles kap kolu kollar? modern door handles set 5 in 1...
3ddd
$1
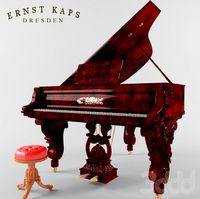
Рояль в стиле барокко
...рояль , пианино , барокко модель антикварного рояля ernst kap (1878) в стиле барокко для классического и современного интерьера....
3dfindit
free

KAP
...kap
3dfind.it
catalog: a.s.t. angewandte system technik
thingiverse
free
KAP by Clem_golgoth
...kap by clem_golgoth
thingiverse
light weight kite photography servo-controled cradle
thingiverse
free

Simple Picavet for KAP
...simple picavet for kap
thingiverse
simple picavet
thingiverse
free
KAP Camera Servo Holder by JBijnens
...kap camera servo holder by jbijnens
thingiverse
servo holder for kap rig.
Shuttle
turbosquid
$100

shuttle
... available on turbo squid, the world's leading provider of digital 3d models for visualization, films, television, and games.
turbosquid
$25

Shuttle
... available on turbo squid, the world's leading provider of digital 3d models for visualization, films, television, and games.
turbosquid
$5

shuttle
... available on turbo squid, the world's leading provider of digital 3d models for visualization, films, television, and games.
3d_export
$10

space shuttle
...space shuttle
3dexport
hey, guys this is my space shuttle i made in blender.<br>have fun!!!!
turbosquid
$50
space shuttle
...id
royalty free 3d model space shuttle for download as sldpr on turbosquid: 3d models for games, architecture, videos. (1299398)
turbosquid
$10
Space Shuttle
...quid
royalty free 3d model space shuttle for download as c4d on turbosquid: 3d models for games, architecture, videos. (1168896)
turbosquid
$10

Rocket Shuttle
...quid
royalty free 3d model rocket shuttle for download as ma on turbosquid: 3d models for games, architecture, videos. (1550181)
turbosquid
$36

shuttle.3ds
... available on turbo squid, the world's leading provider of digital 3d models for visualization, films, television, and games.
turbosquid
$30
Race Shuttle
... available on turbo squid, the world's leading provider of digital 3d models for visualization, films, television, and games.
turbosquid
$20

LONGDISTANCE SHUTTLE
... available on turbo squid, the world's leading provider of digital 3d models for visualization, films, television, and games.