Thingiverse
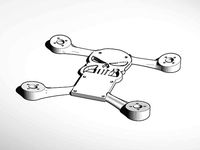
Nano Talon wing mounting parts - no dihedral, flat wing by keithluneau
by Thingiverse
Last crawled date: 3 years ago
Want to buy a updated/better Nano Talon with the wings already flat? lol Check this - http://bit.ly/2HU6FbP
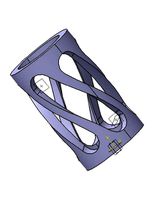
These are parts for the Nano Talon FPV plane, they replace the 'stock' plastic parts for mounting the wing. This will take out the dihedral from the stock setup and mount the wing halves so the wing is flat. It's intended for using with a flight controller, and should remove any self righting characteristics from the plane, or inherent stability on the roll axis. This is desirable with a flight controller, so it doesn't need to fight (or work against) the self righting in the stock design. At least that's the theory, I have yet to test fly this. Once I do, I'll post a video here with the results.
Included are the two plastic pieces which are glued into the sides of the fuselage, a center joiner for the spars that mounts to the plywood plate in the fuselage, and some wedges for leveling the stock aileron linkage pieces. Also included is a replacement control horn for the stock aileron linkage, I broke one of mine while working on these parts and needed a replacement. You shouldn't need it unless you're as clumsy as I was... lol You'll need four wedges, two fit under each of the aileron linkage parts. It will be obvious once you pull the plastic pieces from the foam fuselage.
I printed all these parts in PETG (black Novamaker) on an Anet A8. I had to carefully adjust the clearance a few times to get the spars to fit snug enough not to move, yet still slide in and out easy enough so the wings are still removable. You may need to tweak the square holes depending how close your printer's calibration is to mine. Mine is decent, but may not be perfect. You'll also need to trim a bit of foam from the bottom of the top hatch which covers these parts, since it's molded to match the stock parts that sit a little lower in the center than this configuration does. I suggest not trimming any foam from the wing roots until everything else is done and finished, then adjust the fit as necessary. I trimmed a bit of foam from mine early on in this 'project' and ended up removing more than I needed. My wings still fit fine, but it would have been a little cleaner had I removed less foam there.
The wings clip into the side pieces rather firmly, and may be a little tough to remove them at first. I ended up shaving a little plastic off the point inside the hole that the catches 'hook' onto so they were a little easier to remove. I considered adjusting the model, but decided to leave it as is. I'd rather have a more positive engagement that you can adjust to your liking, than end up with one that doesn't latch in place securely enough. ;)
I will leave this marked as a work in progress until I've test flown the plane, though all the parts do fit great. If you print the parts and do a flat wing conversion, please post your results, I'd love to hear about it! Enjoy!
I've had quite a few requests from people without access to a printer for these parts. I've added them to Shapeways as an option. The side plates and middle joiner piece are there. The little wedges were priced rather high for what they are, and would need the points cut off for Shapeways to be able to print them, so I left just the main parts. The wedges should be super easy to make from just about any scrap material you have around. ;) https://www.shapeways.com/shops/bonafidepirate
Update 7-13-2018: Test flight done, it works! Here's a video: https://www.youtube.com/watch?v=ld9OA-ziLEU
Update 7-14-2018: Added two more files for the side wing mounts that go into the fuselage, these have an extra wall around the outside to give some area to glue into the fuselage if you've damaged the foam when removing the stock parts. Put the pieces in place on side of the fuselage and trace around the, then cut the foam out to glue these in. Please note that I haven not printed or tested these, I just made them at the request of someone else. I see no reason the won't work, but consider them "experimental" anyway. ;) Make sure to get the aligned properly in the fuse, if possible use the slots that remain in the foam if it's not damaged too bad. It's important to have these positioned in the fuselage properly to keep the wing straight and aligned with the rest of the plane.
Update 7-17-2018: I changed up the center joiner piece a bit to add some "cups" on the end that will fit over the side plates. These serve two purposes. One, they will keep the joiner piece lined up with the side plates, making it easier to insert the wings/spars into the fuselage. They also give you the option of gluing the parts together once everything is in place, for a much more rigid center structure. If you chose to glue it in, make sure the wing fits and everything lines up first, then REMOVE the wings before gluing it with thin CA or similar. You definitely don't want the wing in place until the glue has ample time to cure fully, or you could end up with a permanently mounted wing!
Similar models
thingiverse
free

Wing spar support for Talon Pro mini talon by epquilloy
...ment from the wing spar by having more surface are in contact. apply glue to mount to the fuselage.
note: print 2 pieces of this.
thingiverse
free

Mini Talon Pro Rear Spar Brace by rx-midget
...issue. remove braces and glue them to the fuse sides making sure no glue obscures the inner opening for spar at the wing saddle.
thingiverse
free

Wing Joiner for X-UAV Talon by epquilloy
... and fuselage as well as on the side of the joiner plate to be bonded. make final alignment prior to pressing the parts together.
thingiverse
free

Radian upper wing joiner by whiteglint143
... make a channel though the foam so you can plug the wires in on the top. you will never have to flip the model upside down again.
thingiverse
free

AR Wing / Recruit GPS Perch by keithluneau
...ng, which i stuck on top of the "perch" with double sided foam tape. there is a wider/taller end, that's the front.
thingiverse
free

Mini Talon Spar Support brace by johanhoahm
... you'll have a bad time if glue wrong direction.
also, when gluing, make sure you can fit the spar through both of the brace.
thingiverse
free

Aeroscout Caddy by JPS99
... piece of foam to wedge between the tail and the ends of the wings in the caddy everything stays in place when you transport it.
thingiverse
free

Skyhunter Wing Mount plate by analogman
...the wing to. the holes are the right size that you can thread the stock screw into from the bottom and put a wing nut on the top.
thingiverse
free

Rear wing mount reenforcement - HK BAE Hawk Red Arrow 70mm EDF 990mm Jet
...lace. you get a sturdier mount that doesn't get sloppy with time. i upload the f3d file too, for customization in fusion 360.
thingiverse
free

Wing spar, tips and joiner set - high and moderate lift versions included by northshore
... less agressive lift profile, is matched to the version 5 centre spar for the centre join, wing tips and angled joiners included.
Keithluneau
thingiverse
free
Strix Strobe cover for AR Wing Pro by keithluneau
... led strobe light into the gps bay on the sonicmodell ar wing pro. https://www.readymaderc.com/products/details/strix-strobes-red
thingiverse
free

Top plate for keithluneau Split Mini Pan/Tilt by NoAgendaFPV
...fpv cameras, on the 2 screws for the sd card slot side to keep the top plate from pushing down on the sd card housing on the pcb.
thingiverse
free

Dragonlink V2/V3 (Large) Cradle by keithluneau
...ogether. it's quick and easy to swap transmitters or remove the whole thing form your radio while leaving the stand attached.
thingiverse
free
Low Profile Pan/Tilt (V2) for the Runcam Split 2 by keithluneau
...h?v=rh3p1brigxm
for the linkage, this was confirmed to fit: https://www.amainhobbies.com/blade-servo-pushrod-set-eflh1515/p164489
thingiverse
free

LED Channel Clip/Bracket by keithluneau
...you can print. i ended up moving it up to the top of the frame later when i needed to print a taller item. super fast/easy print.
thingiverse
free
AR Wing / Recruit GPS Perch by keithluneau
...ng, which i stuck on top of the "perch" with double sided foam tape. there is a wider/taller end, that's the front.
thingiverse
free

TL Smoother Holder for Anet A8 by keithluneau
...b done! :)
btw, i'm using 3 smoothers, one each on x and y, one for the extruder. i don't think they are necessary on z.
thingiverse
free

Pan Tilt for Runcam 3S with micro FPV camera by keithluneau
...calibrated well, as far as i know. it has only been tested on the ground, but i see no reason it won't work in the air... lol
thingiverse
free

E3D 40mm Fan Duct (.duct Remix) by keithluneau
...ve only printed pla. a regular 40mm fan should move a lot more air than this silent one, and still be quieter than the 30mm fans.
thingiverse
free
Flytron Strobon Strobe Light Mount for Skyhunter FPV Plane by keithluneau
...infill, you might print with thinner walls and less infill for a little less weight, although it's not really heavy as is. ;)
Dihedral
thingiverse
free

dihedral mount 4degrees by Ranger2
... carbonfiber mount with two 3mm holes it has a 4 degree angle on the mount for those of you who want to try a dihedral quadcopter
thingiverse
free

Folded Dihedral Torus 1 by wwebber
...nt and there are 6 at each vertex. the symmetry group of this is a dihedral group since the top looks different from the bottom.
thingiverse
free
Dihedral 180 mini skull quad by Ranger2
...ese angled arms - wondering if these would work as a miniquad with dihedral motor mount props. will require longer motor screws.
thingiverse
free

Airplane Dihedral Wing by theroar
... my good friends at target, i now have lovely wings. =) the balance is not good so it does not fly, but i think it has potential.
thingiverse
free

Kite Dihedral by mototrev
...in the slicer program (cura)
however your results might vary.
to make large fittings the % can be increased in the slicer program
thingiverse
free

Wedges to add dihedral to multirotors
...tor mount holes in the arms slightly larger to accommodate the fact that the screws will be going through them at a slight angle.
thingiverse
free
Hoverthings Flip dihedral motor mount and landing feet by BluefishNZ
...se the standard legs.
build log with these used is herehttp://www.bluefish.net.nz/2015/02/flip-sport-build-for-acro-flying.html
thingiverse
free

Dihedral tilt top for RCExplorer Tricopter V3 (5 degrees) by Motorpixiegimbals
...orer.se (http://rcexplorer.se/product/tricopter-tilt-mechanism-3d-printed/) or download the stls: http://rcexplorer.se/downloads/
thingiverse
free
Lijadora de ángulos de diedros de alas de aeromodelismo - sander wing dihedral angles by nodoingenieria
...en pla a 60 mm/sec pico de 0.8, 0.28 de capa a 10% de infill.
complemento para el pegado http://www.thingiverse.com/thing:1802190
thingiverse
free

Penta Tubes by DaveMakesStuff
...surfaces of the “dihedral tube” are derived from the dihedral angle of the dodecahedron, that is, the angle between...
Talon
turbosquid
$8

Talon Knife
...y free 3d model talon knife for download as obj, ipt, and iam on turbosquid: 3d models for games, architecture, videos. (1348946)
turbosquid
$4

Spire of Talons
... available on turbo squid, the world's leading provider of digital 3d models for visualization, films, television, and games.
3d_export
$17
Northrop T-38 Talon
...northrop t-38 talon
3dexport
northrop t-38 talon
3d_export
free
1998 Eagle Talon TSi Turbo
...1998 eagle talon tsi turbo
3dexport
1998 eagle talon tsi turbo
turbosquid
$15

HS-12 Talon
... available on turbo squid, the world's leading provider of digital 3d models for visualization, films, television, and games.
3d_export
$110
Stealth Talon 3D Model
...force lightning raptorrocket gun offensive counter us homeland security concept
stealth talon 3d model rendersteel 72513 3dexport
3d_export
$10
Talon Sword 3D Model
...del
3dexport
sword melee game model low poly video fantasy rpg warrior blade mmo
talon sword 3d model project_zero 32037 3dexport
turbosquid
free

ME3 talon t7 heavy pistol
...l me3 talon t7 heavy pistol for download as obj, fbx, and dae on turbosquid: 3d models for games, architecture, videos. (1402804)
3d_export
$20

eagle talon tsi turbo
...s.<br>car textures:png - 2k resolution other available formats: obj, 3ds, fbx, stl, max. polycount: 34484 poly / 30158 tris
3d_export
$10

Eagle 3D Emblem 3D Model
...3d emblem 3d model 3dexport 3d logo eagle emblem talon car eagle 3d emblem 3d model gdesigns 36617...
Nano
3d_export
$20

nano astronaut
...nano astronaut
3dexport
turbosquid
$29

robot nano
...bosquid
royalty free 3d model robot nano for download as 3ds on turbosquid: 3d models for games, architecture, videos. (1658714)
3ddd
free

iPod nano 4G
... nano 4g
3ddd
ipod , apple , плеер
ipod nano 4g
3d_export
$6

Nano Katana
...nano katana
3dexport
3ddd
free

iPod Nano
...ipod nano
3ddd
apple , плеер
d
turbosquid
$80

NANO CAR
... available on turbo squid, the world's leading provider of digital 3d models for visualization, films, television, and games.
turbosquid
$20
nano house
... available on turbo squid, the world's leading provider of digital 3d models for visualization, films, television, and games.
turbosquid
$18

nano house
... available on turbo squid, the world's leading provider of digital 3d models for visualization, films, television, and games.
turbosquid
$5

Ipod nano
... available on turbo squid, the world's leading provider of digital 3d models for visualization, films, television, and games.
3ddd
$1
iPod nano 6
...ipod nano 6
3ddd
apple , плеер
модель ipod nano 6, моделировался по чертежу.
Wing
3ddd
$1
The Wing
...the wing
3ddd
wing , appledesign
the wing seating by appledesignstudio
3d_export
$5

wings
...wings
3dexport
beautiful wings model.
archibase_planet
free

Wing
...wing
archibase planet
wing decoration ornament
wing angel n180215 - 3d model (*.gsm+*.3ds+*.max) for interior 3d visualization.
3ddd
$1

Wing Chair
...wing chair
3ddd
baker , wing
wing chair
3ddd
$1
Диван WING
...диван wing
3ddd
flexform , wing
модель дивана wing
производитель: flexform
3ddd
$1
Диван WING
...диван wing
3ddd
flexform , wing
модель дивана wing
производитель: flexform
3ddd
$1
Кушетка WING
...кушетка wing
3ddd
flexform , wing
модель дкушетки wing
производитель: flexform
turbosquid
free
A-Wing
...id
free 3d model a-wing for download as fbx and unitypackage on turbosquid: 3d models for games, architecture, videos. (1164828)
3ddd
$1

Кресло Wing
...кресло wing
3ddd
wing
кресло wing из каталога в двух сочетаниях конфигурации.
3d_export
$5
wing nut
...wing nut
3dexport
wing nut
Flat
3ddd
free

Nurus - Flat
...nurus - flat
3ddd
nurus
nurus - flat
turbosquid
$139

Flat
... available on turbo squid, the world's leading provider of digital 3d models for visualization, films, television, and games.
turbosquid
$20

flat
... available on turbo squid, the world's leading provider of digital 3d models for visualization, films, television, and games.
3d_ocean
$5

Flat TV
...ics hd tv lcd / plasma / flat screen tv
flat tv 3d models. flat tv, contemporary styling and low poly count. the tv has to render
3ddd
$1

Tresse Flat
... tresse
производитель tresse
модель flat
в архиве присутствует версия с материалами для corona
design_connected
$18
Chaise Flat
...chaise flat
designconnected
decameron chaise flat computer generated 3d model. designed by ferreira, marcus.
design_connected
$25

Flat sofa
...flat sofa
designconnected
gandia blasco flat sofa computer generated 3d model. designed by ruiz, mario .
design_connected
$18

Flat armchair
...flat armchair
designconnected
gandia blasco flat armchair computer generated 3d model. designed by ruiz, mario .
design_connected
$16
Flat chair
...flat chair
designconnected
gandia blasco flat chair computer generated 3d model. designed by ruiz, mario .
design_connected
$9

Flat pouf
...flat pouf
designconnected
gandia blasco flat pouf computer generated 3d model. designed by ruiz, mario .
Mounting
3d_export
free

mounting bracket
...mounting plate is the portion of a hinge that attaches to the wood. mounting plates can be used indoors, cabinetry and furniture.
turbosquid
$2

MOUNTING
... available on turbo squid, the world's leading provider of digital 3d models for visualization, films, television, and games.
turbosquid
free

Mounts
... available on turbo squid, the world's leading provider of digital 3d models for visualization, films, television, and games.
turbosquid
free

Mount Fuji
...fuji
turbosquid
free 3d model mount fuji for download as obj on turbosquid: 3d models for games, architecture, videos. (1579977)
3d_export
$5

Headphone mount LR
...headphone mount lr
3dexport
headphone mount l+r
turbosquid
$39

Mount rainier
...quid
royalty free 3d model mount rainier for download as fbx on turbosquid: 3d models for games, architecture, videos. (1492586)
turbosquid
$5

pipe mounting
...quid
royalty free 3d model pipe mounting for download as obj on turbosquid: 3d models for games, architecture, videos. (1293744)
turbosquid
$3

Mounting Tires
...uid
royalty free 3d model mounting tires for download as fbx on turbosquid: 3d models for games, architecture, videos. (1708511)
3d_export
$5

Magnetic GoPro Mount
...pro mount
3dexport
cool magnetic mount for gopro. allows you to mount the camera on flat metal surfaces and get exclusive shots.
turbosquid
$5

Stone Mount
...ty free 3d model stone mount for download as ma, obj, and fbx on turbosquid: 3d models for games, architecture, videos. (1370306)
Parts
3d_export
$5
Parts
...parts
3dexport
parts
3d_export
$5
Part
...part
3dexport
part
3d_export
$5

Part
...part
3dexport
machine part
3d_export
$65
Part
...part
3dexport
simple rendering of the scene file
3d_export
$65

Part
...part
3dexport
simple rendering of the scene file
3d_export
$30

fan part
...fan part
3dexport
this is a part of fan of pedastal
3d_export
$10
machine parts
...machine parts
3dexport
3d part modeling work ,contact for 3d work
turbosquid
$59

Mechanical Part
...id
royalty free 3d model mechanical part for download as c4d on turbosquid: 3d models for games, architecture, videos. (1410833)
turbosquid
$17
Road parts
...bosquid
royalty free 3d model road parts for download as 3ds on turbosquid: 3d models for games, architecture, videos. (1192967)
turbosquid
$9

Cutter Parts
...squid
royalty free 3d model cutter parts for download as stl on turbosquid: 3d models for games, architecture, videos. (1220010)