GrabCAD
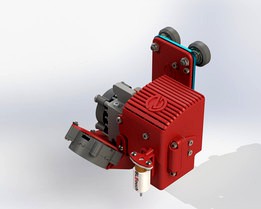
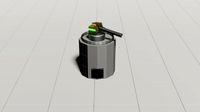
Nano 1. Adattatore universale MATRIX TRIANGLELAB / HEMERA per Artillery x1 - Genius . MATRIX TRIANGLELAB / HEMERA universal adapter for Artillery x1 - Genius
by GrabCAD
Last crawled date: 1 year, 11 months ago
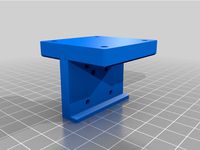
Il kit di ha lo scopo di rendere l’installazione del MATRIX o HEMERA (hanno gli stessi attacchi) più versatile e al tempo stesso adattabile a diversi componenti come fan 4020 – 4010 - 5015, blocco V6 e Volcano, in più comprende sistema di attacco per BL-touch. Ciò permettere di adottare diverse configurazioni con delle semplici regolazioni e cambio minimo di adattatore.
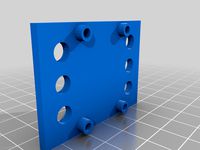
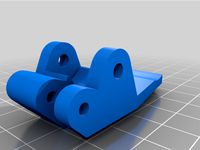
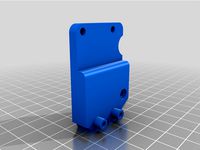
Perché NANO1? Apparte il nome e logo (concedetemelo) intendo sfruttare il componente “BASE DI SUPPORTO” come base fissa, e con lo sgancio rapido (solo 2 viti) adattare in futuro il componente “SUPPORTO PER ESTRUSORE” con kit per altri estrusori (tempo e denaro se disponibile), riducendo al minimo lo smontaggio e rimontaggio del gruppo.
Ho cercato di allineare la bocca del nozzle con le stesse misure del gruppo di stock lasciando come differenza di altezza fan-duct e bocca del nozzle 1,5mm, sia che si usi V6 che Volcano.
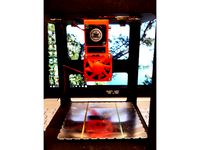
L’aria fuoriesce da 3 fori fino al nozzle e crea in fase di scontro una colonna di aria verso il basso (ho fatto alcune simulazione con solidworks).
Le tolleranze dei fori del kit sono minime per mia scelta, sono comprese tra 0,1 - 0,15mm compensando eventuali calibrazione sulla stampa dei pezzi, pertanto se occorre, in certi fori svasare i bordi, mentre in altri è comodo perché non si usano i dadi.
Ho creato sul lato basso dei ganci per far passare i fili degli attacchi, un aggancio per evitare sollecitazioni al cavo flat, ed infine giusto per estetica una cover.
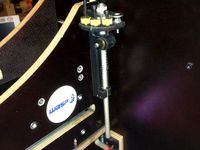
Alcune indicazioni per il montaggio. Nel kit del MATRIX quando arriva al destinatario sono compresi diversi componenti tra qui cartuccia riscaldante, termistore, e una busta con viti, dadi (fatti per matrix) e rondelle. Se usate cartuccia riscaldante e termistore comprese nel pacco, ricordatevi di apportare le modifiche al firmware, e rifare la calibrazione del PID, (in questa guida ho montato tutto con componenti di stock compresa la ventola così da facilitare chi segue). Le viti, i dadi (nuts) e le rondelle contenute nel pacco sono abbastanza abbondanti per effettuare la maggior parte del montaggio sul supporto, tutti le dimensioni sono “M3” compresi tra 6 e 12mm ), 4 dadi sono già montati nell’estrusore, e alcuni arrivano nella bustina. Per montare il MATRIX sul supporto NANO1 in base allla configurazione effettuare un controllo iniziale della bulloneria, tenere a disposizioni dadi M3, viti a testa bombata o testa svasata sempre M3, con misure comprese compresi tra 6 e 14mm, molto importante 2 viti di queste devono essere sempre M3 25mm che serviranno per l’attacco principale della slitta al supporto principale dell’artillery sull’asse X.
Fatto questa introduzione cercherò di riportare in dettaglio con delle foto la fase di montaggio del MATRIX con cartuccia riscaldante, termistore, e fan stock della Artillery X1 senza soffermarmi sulla misura delle viti da usare (si vedono molto chiaro quali servono) tenendo conto che fisicamente ho effettuato le prove di tolleranza e il tutto (apparte il supporto BL-Touch) è stato usato per quasi 1 mese come verifica in caso si sarebbero verificate deformazioni o altro. Prego chi riscontrasse problemi, di avvisarmi per apportare le modifiche. Grazie buona lettura.
Aggiornamento al 21/11/2021 inserito componente n.12, supporto per nuovo 3d-touch.
english
The kit has the purpose of making the installation of the MATRIX or HEMERA (they have the same connections) more versatile and at the same time adaptable to different components such as fan 4020 - 4010 - 5015, block V6 and Volcano, in addition it includes attachment system for BL-touch. This allows different configurations to be adopted with simple adjustments and minimal change of adapter.
Why NANO1? Apart from the name and logo (give it to me) I intend to use the "SUPPORT BASE" component as a fixed base, and with the quick release (only 2 screws) to adapt the "SUPPORT FOR EXTRUDER" component in the future with kits for other extruders (time and money if available), minimizing the disassembly and reassembly of the unit.
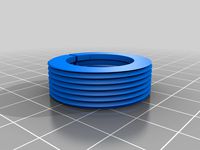
I tried to align the nozzle mouth with the same measurements as the stock group, leaving the fan-duct height difference and the nozzle mouth 1.5mm, whether using V6 or Volcano.
The air escapes from 3 holes to the nozzle and creates a downward column of air during the collision (I did some simulations with solidworks).
The tolerances of the holes in the kit are minimum for my choice, they are between 0.1 - 0.15mm, compensating for any calibration on the print of the pieces, so if necessary, countersink the edges in some holes, while in others it is convenient because they are not used the dice.
I created on the lower side of the hooks to pass the wires of the attacks, a hook to avoid stress on the flat cable, and finally, just for aesthetics, a cover.
Some indications for assembly. The MATRIX kit when it arrives at the recipient includes several components including heating cartridge, thermistor, and a bag with screws, nuts (made for matrix) and washers. If you use the heating cartridge and thermistor included in the package, remember to make the changes to the firmware, and redo the PID calibration, (in this guide I have assembled everything with stock components including the fan so as to facilitate those who follow). The screws, nuts and washers contained in the package are abundant enough to carry out most of the mounting on the support, all dimensions are "M3" between 6 and 12mm), 4 nuts are already mounted in the extruder, and some come in the sachet. To mount the MATRIX on the NANO1 support according to the configuration, carry out an initial check of the nuts and bolts, keep M3 nuts, button head screws or countersunk head always M3 available, with measurements between 6 and 14mm, very important 2 of these screws must be always be M3 25mm which will serve for the main attachment of the slide to the main support of the artillery on the X axis.
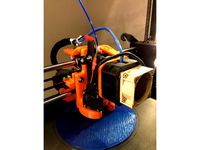
After this introduction I will try to report in detail with photos the assembly phase of the MATRIX with heating cartridge, thermistor, and fan stock of the Artillery X1 without dwelling on the size of the screws to use (you can see very clearly which ones are needed) taking into account that physically I have the tolerance tests were carried out and the whole (apart from the BL-Touch support) was used for almost 1 month as a check in case deformations or other would occur. If you encounter any problems, please let me know to make the changes. Thanks good reading.
Inserito il file .RAR con i componenti solidworks.
Added .RAR file with solidworks components
Update to 11/21/2021 added component 12, support for new 3d-touch.
• Materiale. PETG ROSSO;
• Marca. eSUN;
• Temperatura. 240°;
• Bed. 75°
• Slicer. CURA;
• Riempimento. 100%
• Flusso 91%
• Material. RED PETG;
• Brand. eSUN;
• Temperature. 240 °;
• Bed. 75 °
• Slicer. CARE;
• Infill. 100%
• Flow 91%
Perché NANO1? Apparte il nome e logo (concedetemelo) intendo sfruttare il componente “BASE DI SUPPORTO” come base fissa, e con lo sgancio rapido (solo 2 viti) adattare in futuro il componente “SUPPORTO PER ESTRUSORE” con kit per altri estrusori (tempo e denaro se disponibile), riducendo al minimo lo smontaggio e rimontaggio del gruppo.
Ho cercato di allineare la bocca del nozzle con le stesse misure del gruppo di stock lasciando come differenza di altezza fan-duct e bocca del nozzle 1,5mm, sia che si usi V6 che Volcano.
L’aria fuoriesce da 3 fori fino al nozzle e crea in fase di scontro una colonna di aria verso il basso (ho fatto alcune simulazione con solidworks).
Le tolleranze dei fori del kit sono minime per mia scelta, sono comprese tra 0,1 - 0,15mm compensando eventuali calibrazione sulla stampa dei pezzi, pertanto se occorre, in certi fori svasare i bordi, mentre in altri è comodo perché non si usano i dadi.
Ho creato sul lato basso dei ganci per far passare i fili degli attacchi, un aggancio per evitare sollecitazioni al cavo flat, ed infine giusto per estetica una cover.
Alcune indicazioni per il montaggio. Nel kit del MATRIX quando arriva al destinatario sono compresi diversi componenti tra qui cartuccia riscaldante, termistore, e una busta con viti, dadi (fatti per matrix) e rondelle. Se usate cartuccia riscaldante e termistore comprese nel pacco, ricordatevi di apportare le modifiche al firmware, e rifare la calibrazione del PID, (in questa guida ho montato tutto con componenti di stock compresa la ventola così da facilitare chi segue). Le viti, i dadi (nuts) e le rondelle contenute nel pacco sono abbastanza abbondanti per effettuare la maggior parte del montaggio sul supporto, tutti le dimensioni sono “M3” compresi tra 6 e 12mm ), 4 dadi sono già montati nell’estrusore, e alcuni arrivano nella bustina. Per montare il MATRIX sul supporto NANO1 in base allla configurazione effettuare un controllo iniziale della bulloneria, tenere a disposizioni dadi M3, viti a testa bombata o testa svasata sempre M3, con misure comprese compresi tra 6 e 14mm, molto importante 2 viti di queste devono essere sempre M3 25mm che serviranno per l’attacco principale della slitta al supporto principale dell’artillery sull’asse X.
Fatto questa introduzione cercherò di riportare in dettaglio con delle foto la fase di montaggio del MATRIX con cartuccia riscaldante, termistore, e fan stock della Artillery X1 senza soffermarmi sulla misura delle viti da usare (si vedono molto chiaro quali servono) tenendo conto che fisicamente ho effettuato le prove di tolleranza e il tutto (apparte il supporto BL-Touch) è stato usato per quasi 1 mese come verifica in caso si sarebbero verificate deformazioni o altro. Prego chi riscontrasse problemi, di avvisarmi per apportare le modifiche. Grazie buona lettura.
Aggiornamento al 21/11/2021 inserito componente n.12, supporto per nuovo 3d-touch.
english
The kit has the purpose of making the installation of the MATRIX or HEMERA (they have the same connections) more versatile and at the same time adaptable to different components such as fan 4020 - 4010 - 5015, block V6 and Volcano, in addition it includes attachment system for BL-touch. This allows different configurations to be adopted with simple adjustments and minimal change of adapter.
Why NANO1? Apart from the name and logo (give it to me) I intend to use the "SUPPORT BASE" component as a fixed base, and with the quick release (only 2 screws) to adapt the "SUPPORT FOR EXTRUDER" component in the future with kits for other extruders (time and money if available), minimizing the disassembly and reassembly of the unit.
I tried to align the nozzle mouth with the same measurements as the stock group, leaving the fan-duct height difference and the nozzle mouth 1.5mm, whether using V6 or Volcano.
The air escapes from 3 holes to the nozzle and creates a downward column of air during the collision (I did some simulations with solidworks).
The tolerances of the holes in the kit are minimum for my choice, they are between 0.1 - 0.15mm, compensating for any calibration on the print of the pieces, so if necessary, countersink the edges in some holes, while in others it is convenient because they are not used the dice.
I created on the lower side of the hooks to pass the wires of the attacks, a hook to avoid stress on the flat cable, and finally, just for aesthetics, a cover.
Some indications for assembly. The MATRIX kit when it arrives at the recipient includes several components including heating cartridge, thermistor, and a bag with screws, nuts (made for matrix) and washers. If you use the heating cartridge and thermistor included in the package, remember to make the changes to the firmware, and redo the PID calibration, (in this guide I have assembled everything with stock components including the fan so as to facilitate those who follow). The screws, nuts and washers contained in the package are abundant enough to carry out most of the mounting on the support, all dimensions are "M3" between 6 and 12mm), 4 nuts are already mounted in the extruder, and some come in the sachet. To mount the MATRIX on the NANO1 support according to the configuration, carry out an initial check of the nuts and bolts, keep M3 nuts, button head screws or countersunk head always M3 available, with measurements between 6 and 14mm, very important 2 of these screws must be always be M3 25mm which will serve for the main attachment of the slide to the main support of the artillery on the X axis.
After this introduction I will try to report in detail with photos the assembly phase of the MATRIX with heating cartridge, thermistor, and fan stock of the Artillery X1 without dwelling on the size of the screws to use (you can see very clearly which ones are needed) taking into account that physically I have the tolerance tests were carried out and the whole (apart from the BL-Touch support) was used for almost 1 month as a check in case deformations or other would occur. If you encounter any problems, please let me know to make the changes. Thanks good reading.
Inserito il file .RAR con i componenti solidworks.
Added .RAR file with solidworks components
Update to 11/21/2021 added component 12, support for new 3d-touch.
• Materiale. PETG ROSSO;
• Marca. eSUN;
• Temperatura. 240°;
• Bed. 75°
• Slicer. CURA;
• Riempimento. 100%
• Flusso 91%
• Material. RED PETG;
• Brand. eSUN;
• Temperature. 240 °;
• Bed. 75 °
• Slicer. CARE;
• Infill. 100%
• Flow 91%
Similar models
thingiverse
free

Adattatore universale MATRIX TRIANGLELAB / HEMERA per Artillery x1 - Genius . MATRIX TRIANGLELAB / HEMERA universal adapter for Artillery x1 - Genius by Nanodesigner
...u encounter any problems, please let me know to make the changes. thanks good reading.
added .rar file with solidworks components
grabcad
free

Adattatore universale MATRIX TRIANGLELAB / HEMERA per Artillery x1 - Genius . MATRIX TRIANGLELAB / HEMERA universal adapter for Artillery x1 - Genius
...0%
• flusso 91%
• material. red petg;
• brand. esun;
• temperature. 240 °;
• bed. 75 °
• slicer. care;
• infill. 100%
• flow 91%
grabcad
free

NANO2 “BMG TRIANGLELAB/BONDTECH” PER SIDEWINDER ARTILLERY X1 V4 – GENIUS SISTEMA AGGANCIO UNIVERSALE
...the installation of the bmg trianglelab / bondtech or similar (they have the same connections) more versatile and at...
thingiverse
free

Fan duct for 3drag by cellino92
...
la stampa non richiede materiale di supporto
nb: sono necessarie 3 viti e dadi m3 in più per fissare correttamente la ventola
thingiverse
free

Supporto per monitor per poggiatesta Opel by legno75
... fiera di elettronica (costo circa 30 euro cad.) sul retro hanno una sede scorrevole in cui ho fissato una vite a testa quadrata.
thingiverse
free

Supporto micrometro digitale R2 EVO by claustro
...vuole fermare con 3 viti occorre forare la scocca della ventola.
occorrono
3 dadi m3
2 viti m3 35mm
1 vite m3 25mm
1 vite m3 10mm
thingiverse
free
Finecorsa asse Z con memoria di 4 livelli by tecnicotibetano
...o 6mm. la molla e il seeger non sono indispensabili. le viti dei fine corsa sono di m3, la vite di bloccaggio dell'asta è m4.
thingiverse
free

SUPPORTO LUCE ANTERIORE BROMPTON by Jamensolo
...), n.4 rondelle larghe per m5, n.2 dadi m5.
il tempo di stampa del g-code è più lungo in quanto le velocità sono state diminuite.
thingiverse
free

Magazzino Filamento (Ikea Samla) by Tavo
... m4x20 + dadi
n°14 viti m3x12 + dadi e rondelle
tubo 20mm pvc o alluminio
non necessita di nessun accorgimento durante la stampa!
thingiverse
free
Mini laser engraver supercarver mod by pulcepulce
...con il diametro delle pale di circa 23mm.
laltra versione ha il foro della ventola da 20mm, valutate voi quale fa al caso vostro.
Universale
turbosquid
$120

the last judgement jezus giudizio universale michelangelo
... giudizio universale michelangelo for download as obj and stl on turbosquid: 3d models for games, architecture, videos. (1548788)
thingiverse
free

porta bobina universale
...porta bobina universale
thingiverse
ok
thingiverse
free
SUPPORTO UNIVERSALE TL SMOOTHER
...rsale per tl smoother adatto a tutte le stampanti anche con profilo 2020 e 2040 .
iscriviti al mio canale youtube per nuovi stl .
thingiverse
free

GOPRO SESSION CASE UNIVERSALE 26 GRADI by Lorism1988
...gopro session case universale 26 gradi by lorism1988
thingiverse
gopro session case universale 26 gradi for tpu printing
thingiverse
free

supporto universale per smartphone caricabatterie by mc2_3d_carmelo
...elo
thingiverse
porta cellulare con attacco universale con possibilità di carica di tutti i cellulari anche con custodia a libro
thingiverse
free

Adattatore universale per tv oculus by fdf3dprint
...adattatore universale per tv oculus by fdf3dprint
thingiverse
fdf3d.altervista.org
thingiverse
free

universall speaker mount by der_graue
...ersall speaker mount by der_graue
thingiverse
i use this speaker mounts to put em at the ceiling.
check my other designs too ;-)
thingiverse
free

Clip porta cavo per profilo X universale - Universal wire clip
...rta cavo per profilo x universale - universal wire clip
thingiverse
clip porta cavo per profilo x universale
universal wire clip
thingiverse
free

Convogliatore aria raffreddamento filamento universale 40mm/ Filament cooling air conveyor universal 40mm
...0mm universal radial fan
video di esempio della versone per a10
example video of the version for a10
https://youtu.be/wj_jpwtkwmy
thingiverse
free

Universall stick for wall holder transformer by axill
...ll_mount_transform
use glue or screw to stick this with your tool holder and wall stick https://www.thingiverse.com/thing:2424749
Adattatore
turbosquid
free

valvola maschera subacquea adattatore per ossigeno covid-19 coronavirus gratis free
...ossigeno covid-19 coronavirus gratis free for download as stl on turbosquid: 3d models for games, architecture, videos. (1535712)
thingiverse
free

Adattatore rulli by mluigi82
...adattatore rulli by mluigi82
thingiverse
adattatore per rulli
thingiverse
free

adattatore batteria by Ganzissimo
...adattatore batteria by ganzissimo
thingiverse
adattatore batterie cr2032-br1225
thingiverse
free
Adattatore bobina by andrea00
...adattatore bobina by andrea00
thingiverse
adattatore per bobina stampante 3d
thingiverse
free
Adattatore bobine by samuele79j
...adattatore bobine by samuele79j
thingiverse
adattatore bobine plastica e cartone
thingiverse
free
Adattatore rotorbitale Bosh by gran
...adattatore rotorbitale bosh by gran
thingiverse
adattatore per aspiratore
thingiverse
free

Adattatore Raccordo 11-10mm by creativesolutions-lab
...adattatore raccordo 11-10mm by creativesolutions-lab
thingiverse
adattatore raccordo 11-10mm
thingiverse
free
Adattatore SD CR10-S by creativesolutions-lab
...adattatore sd cr10-s by creativesolutions-lab
thingiverse
adattatore sd cr10-s
thingiverse
free

adattatore parkside x20V a powerbank by SamueleLg
...sfruttare le batterie parkside x20v team come un powerbank utilizzando un comunissimo adattatore da accendi sigari per auto a usb
thingiverse
free
Adattatore Testina termostati NETATMO
...issimo per chi non riesce a trovare l'adattatore per valvola caleffi da utilizzare con le testine termostatiche della netatmo
Trianglelab
thingiverse
free

Trianglelab Bowden Clip by cobraroja
...trianglelab bowden clip by cobraroja
thingiverse
trianglelab bowden tube clip, 1.5mm thickness.
thingiverse
free

TriangleLab matrix DUCT V1 by kaluzaburza
...trianglelab matrix duct v1 by kaluzaburza
thingiverse
cooling duct for trianglelab matrix extruder/hotend
for fan blower 4020.
thingiverse
free

Trianglelab Matrix Extruder Liquid Cooled by pipersw
...elab matrix extruder liquid cooled by pipersw
thingiverse
a quick modelisation for the trianglelab matrix extruder liquid cooled
thingiverse
free

Trianglelab MiniMosfet holder
...ionality of the mosfet.
tl-minimosfet --> https://es.aliexpress.com/item/32864926764.html?spm=a2g0s.9042311.0.0.274263c0uq1wks
thingiverse
free

BLTouch Spacer for TriangleLabs Direct Drive
...t on the trianglelabs direct drive extruder kit. no need for springs. 4mm spacer. z probe offset of real bltouch is about 2mm.
thingiverse
free
trianglelab BMG Extruder motor fan mount by KraliCzech
...r motor fan mount by kraliczech
thingiverse
just my design of a simple fan mount for the trianglelab bmg extruder stepper motor.
thingiverse
free

Trianglelab Matrix Upgrade to Creality Ender 5 by Zuck
...of
https://www.thingiverse.com/thing:4031637
this is a kit for upgrading the ender 5 with a trianglelab matrix extruder.
enjoy!
thingiverse
free
Trianglelab QR Extruder Clamp
... stl files for it, i created one. it is not exactly the same shape, but it fits my extruder just fine.
print it with 100% infill.
thingiverse
free
Trianglelab dde-orbiter e3d V6 for Ender 6 by Druss0
...glelab dde-orbiter e3d v6 for ender 6 by druss0
thingiverse
adapter for creality ender 6 trianglelab dde-orbiter kit and e3d v6
thingiverse
free

Trianglelab Matrix - Anycubic i3 Mega by RomanKryvolapov
...trianglelab matrix - anycubic i3 mega by romankryvolapov
thingiverse
use 1% scale
Hemera
3ddd
$1

Hemera
...d
круглое , напольные
зеркало hemera;
designer:grace feyock
dimensions:46 w x 46 h x 1 d
3ddd
$1

Cофа (MOS)
...cофа (mos) 3ddd угловой hemera l-shape sofa. смоделена по реальным...
3d_sky
free

PROFI Hemera
...profi hemera
3dsky
hemera mirror;
designer: grace feyock
dimensions: 46 w x 46 h x 1 d
thingiverse
free

E3D Hemera Model
...e3d hemera model
thingiverse
official mounting cad for designing your own custom mounts for the e3d hemera.
thingiverse
free

Hemera Troodon mount by vonsy
...hemera troodon mount by vonsy
thingiverse
hemera support for troodon
thingiverse
free

BLTouch Mount for Hemera
...bltouch mount for hemera
thingiverse
attach to hemera heat sink body with 3m vhb tape flush to the top edge.
thingiverse
free

X5S MGN12 Hemera by Festivejelly
... mounting solution for the e3d hemera on a mgn12 rail.
assemble and screw the hemera into the mount before putting onto the rail.
thingiverse
free

Hemera Mount for 2020 (2040)
...hemera mount for 2020 (2040)
thingiverse
2020 mount for the e3d hemera (hermes)
thingiverse
free
MGN12 Toprail mount for Hemera
...mgn12 toprail mount for hemera
thingiverse
hemera mount for mgn12 rails on top like the am8
thingiverse
free

E3D Hemera Blower Duct
...e3d hemera blower duct
thingiverse
blower duct & mount. fits e3d hemera extruder
Genius
3ddd
$1

фоторамка Genius
...s
3ddd
genius , фоторамка
модель "genius dpf t-805". вхшхг = 218 x 165 х 30 mm
3ddd
free

IL GRANDE / Genius
... комод
качественная модель классического комода genius от il grande с текстурами и материалами v-ray
turbosquid
$24

Genius Speaker
...d model genius speaker for download as 3ds, max, obj, and fbx on turbosquid: 3d models for games, architecture, videos. (1207079)
turbosquid
free

speakers genius
... available on turbo squid, the world's leading provider of digital 3d models for visualization, films, television, and games.
3d_export
$10

Columns genius 3D Model
...columns genius 3d model
3dexport
columns music genius
columns genius 3d model vizzar 11854 3dexport
3ddd
free

Giorgetti-Spa Genius
...giorgetti-spa genius.
размеры: 77х70х126 см
модель выполнена по чертежамhttp://www.giorgetti-spa.it/prodotto.php?id=11
3d_export
$10

Genius Keyboard 3D Model
...eyboard 3d model
3dexport
keyboard genius vray electronics computer input buttons
genius keyboard 3d model neuroslk 3775 3dexport
turbosquid
$7

Docol Genius Flex
...
royalty free 3d model docol genius flex for download as max on turbosquid: 3d models for games, architecture, videos. (1423371)
3ddd
$1

Кровать Move collezione Genius
...collezione genius
3ddd
move , genius
кровать фабрики move. размеры (дхгхв):
237x172x75см
3d_export
$32

Keyboard Genius 3D Model
...uter hardware low poly key windows lcd desktop laptop notebook office mouse
keyboard genius 3d model dzejsi.models 72618 3dexport
Artillery
turbosquid
$10
Artillery
...rbosquid
royalty free 3d model artillery for download as max on turbosquid: 3d models for games, architecture, videos. (1324795)
turbosquid
$10
Artillery
...rbosquid
royalty free 3d model artillery for download as fbx on turbosquid: 3d models for games, architecture, videos. (1580617)
turbosquid
$1

Artillery
...rbosquid
royalty free 3d model artillery for download as fbx on turbosquid: 3d models for games, architecture, videos. (1708575)
turbosquid
$1

artillery
...d
royalty free 3d model artillery for download as ma and fbx on turbosquid: 3d models for games, architecture, videos. (1628190)
3d_export
$65

artillery
...artillery
3dexport
simple rendering of the scene file
turbosquid
$15

Artillery Cannon
...
royalty free 3d model artillery cannon for download as blend on turbosquid: 3d models for games, architecture, videos. (1361953)
turbosquid
$5
Artillery Tank
...uid
royalty free 3d model artillery tank for download as fbx on turbosquid: 3d models for games, architecture, videos. (1169122)
3d_export
$7

middle artillery
...eavy, and high maneuverability, that have wide range of shells, and high accuracy. suitable for support as well as quick punches.
turbosquid
free

WW1 Artillery
...del ww1 artillery for download as blend, obj, x, fbx, and stl on turbosquid: 3d models for games, architecture, videos. (1609805)
3d_export
$10
artillery turret
...artillery turret
3dexport
3d model created by blender 2.90 render eevee.
X1
design_connected
$11

X1
...x1
designconnected
dränert x1 chairs computer generated 3d model. designed by oswald mathias ungers.
3ddd
$1

Leica X1
...leica x1
3ddd
leica , фотоаппарат
leica x1 profi
turbosquid
$15

sofa x1
...turbosquid
royalty free 3d model sofa x1 for download as max on turbosquid: 3d models for games, architecture, videos. (1283096)
3ddd
$1

Francis Francis X1
...francis francis x1
3ddd
кофемашина
кофемашина francis francis x1
3d_export
$5

X1 3D Model
...x1 3d model
3dexport
x1
x1 3d model download .c4d .max .obj .fbx .ma .lwo .3ds .3dm .stl gorgsalvatore 106035 3dexport
turbosquid
$55

Nokia X1
... available on turbo squid, the world's leading provider of digital 3d models for visualization, films, television, and games.
turbosquid
$13

Nokia X1
... available on turbo squid, the world's leading provider of digital 3d models for visualization, films, television, and games.
turbosquid
$1
X1 Airplane
... available on turbo squid, the world's leading provider of digital 3d models for visualization, films, television, and games.
3d_export
$55

Nokia X1 3D Model
...nokia x1 3d model
3dexport
nokia x1 phone smartphone mobile
nokia x1 3d model fedia 45159 3dexport
3ddd
$1

Wood x1
...wood x1
3ddd
размер 1024-1024 бесшовная 8-)
Nano
3d_export
$20

nano astronaut
...nano astronaut
3dexport
turbosquid
$29

robot nano
...bosquid
royalty free 3d model robot nano for download as 3ds on turbosquid: 3d models for games, architecture, videos. (1658714)
3ddd
free

iPod nano 4G
... nano 4g
3ddd
ipod , apple , плеер
ipod nano 4g
3d_export
$6

Nano Katana
...nano katana
3dexport
3ddd
free

iPod Nano
...ipod nano
3ddd
apple , плеер
d
turbosquid
$80

NANO CAR
... available on turbo squid, the world's leading provider of digital 3d models for visualization, films, television, and games.
turbosquid
$20

nano house
... available on turbo squid, the world's leading provider of digital 3d models for visualization, films, television, and games.
turbosquid
$18

nano house
... available on turbo squid, the world's leading provider of digital 3d models for visualization, films, television, and games.
turbosquid
$5

Ipod nano
... available on turbo squid, the world's leading provider of digital 3d models for visualization, films, television, and games.
3ddd
$1
iPod nano 6
...ipod nano 6
3ddd
apple , плеер
модель ipod nano 6, моделировался по чертежу.
Matrix
3ddd
$1

Matrix
...matrix
3ddd
lumina , matrix
модель светильника matrix
3ddd
$1

Lumina Matrix
... lumina , matrix
светильник matrix doppia от фабрики lumina
3ddd
$1

MATRIX SLIM
...reesse , ванна , джакузи
treesse - matrix sleem
3ddd
$1

Люстра Lumina - Matrix
...люстра lumina - matrix
3ddd
lumina , matrix
люстра lumina - matrix
3ddd
$1

mebel MATRIX
...mebel matrix
3ddd
коллекция мебели matrix, линейка мебельной фабрики bfm. производство польша.
3ddd
$1
Светильник Lumina Matrix
...к lumina matrix
3ddd
lumina , matrix
светильник lumina matrix - максимальная детализация
design_connected
free

Matrix Terra
...matrix terra
designconnected
free 3d model of matrix terra by lumina italia designed by kaufman, yaacov.
design_connected
$11

Matrix 8
...matrix 8
designconnected
lumina italia matrix 8 computer generated 3d model. designed by kaufman, yaacov.
3ddd
$1
MATRIX by MAURO FADEL
...iproducts.com/it/prodotti/96755/matrix-poltroncina-a-slitta-con-braccioli-matrix-poltroncina-a-slitta-la-cividina.html#
3ddd
$1

APU Matrix Robot
...apu matrix robot
3ddd
робот
apu matrix robot
Per
turbosquid
$70
Pers
...pers
turbosquid
royalty free 3d model pers for download as on turbosquid: 3d models for games, architecture, videos. (1288905)
3d_export
$5

mmorpg pers
...mmorpg pers
3dexport
pers for mmorpg ,rpg
3d_export
$40

Pers 3D Model
...pers 3d model
3dexport
pers 3d model 666cepesh666 73023 3dexport
turbosquid
$10

scala per piscina
... available on turbo squid, the world's leading provider of digital 3d models for visualization, films, television, and games.
turbosquid
$13
Delaktig 2 pers sofa
... model delaktig 2 pers sofa for download as max, obj, and fbx on turbosquid: 3d models for games, architecture, videos. (1482218)
turbosquid
$9

Chandra rugs PER-15403
... available on turbo squid, the world's leading provider of digital 3d models for visualization, films, television, and games.
turbosquid
$9

Chandra rugs PER-15400
... available on turbo squid, the world's leading provider of digital 3d models for visualization, films, television, and games.
turbosquid
$5

Per oberg table (Soffbord)
... available on turbo squid, the world's leading provider of digital 3d models for visualization, films, television, and games.
turbosquid
$10

globo-Mobile sospeso per lavabo
... available on turbo squid, the world's leading provider of digital 3d models for visualization, films, television, and games.
3d_export
$10

Compressor Dalgakiran flow rate 45m3 per minute
...compressor dalgakiran flow rate 45m3 per minute
3dexport
compressor dalgakiran, with a constant air capacity of 45m3 per minute
Universal
3d_export
$20
university
...university
3dexport
university model with textures.
3d_export
free

steven universe
...steven universe
3dexport
steven universe
3ddd
free

Quasar Universe
...quasar universe
3ddd
quasar
люстра quasar universe
turbosquid
$65

Universal
... available on turbo squid, the world's leading provider of digital 3d models for visualization, films, television, and games.
turbosquid
$65

University
... available on turbo squid, the world's leading provider of digital 3d models for visualization, films, television, and games.
turbosquid
$5

Universal
... available on turbo squid, the world's leading provider of digital 3d models for visualization, films, television, and games.
3d_export
$40
Graphics Universe Universe Flares 3D Model
...graphics universe universe flares 3d model
3dexport
textures
graphics universe universe flares 3d model crashangel 97554 3dexport
3d_export
$65

universe
...universe
3dexport
simple rendering of the scene file
3d_export
$65

university
...university
3dexport
simple rendering of the scene file
3ddd
$1

Gala Universal раковина
...universal раковина
3ddd
gala , universal
раковина
производитель gala
коллекция universal
Adapter
3d_export
$10
Adapter 3D Model
...adapter 3d model
3dexport
adapter
adapter 3d model mur 20260 3dexport
archive3d
free

Adapter socket 3D Model
...dapter socket adapter
adapter socket n090211 - 3d model (*.3ds) for interior 3d visualization.
turbosquid
$400

cell adaptation
...
royalty free 3d model cell adaptation for download as blend on turbosquid: 3d models for games, architecture, videos. (1701655)
archive3d
free
Adapter 3D Model
...ups pc equipment
adapter extron n180813 - 3d model (*.gsm+*.3ds) for interior 3d visualization.
turbosquid
$5

usb adapter
...royalty free 3d model usb adapter for download as ige and stl on turbosquid: 3d models for games, architecture, videos. (1582234)
turbosquid
$15
Power adapter
...free 3d model power adapter for download as max, obj, and fbx on turbosquid: 3d models for games, architecture, videos. (1510024)
turbosquid
$8

USB adapter
...e 3d model usb adapter for download as max, fbx, obj, and dwg on turbosquid: 3d models for games, architecture, videos. (1713542)
turbosquid
$30

adapter.3ds
... available on turbo squid, the world's leading provider of digital 3d models for visualization, films, television, and games.
turbosquid
$15

Nokia Adapter
... available on turbo squid, the world's leading provider of digital 3d models for visualization, films, television, and games.
turbosquid
$15
Universal adapter
... available on turbo squid, the world's leading provider of digital 3d models for visualization, films, television, and games.
1
turbosquid
$69

armchairs(1)(1)
... available on turbo squid, the world's leading provider of digital 3d models for visualization, films, television, and games.
turbosquid
$15

ring 1+1
... available on turbo squid, the world's leading provider of digital 3d models for visualization, films, television, and games.
turbosquid
$10

chair(1)(1)
... available on turbo squid, the world's leading provider of digital 3d models for visualization, films, television, and games.
turbosquid
$8

Chair(1)(1)
... available on turbo squid, the world's leading provider of digital 3d models for visualization, films, television, and games.
turbosquid
$2

RING 1(1)
... available on turbo squid, the world's leading provider of digital 3d models for visualization, films, television, and games.
turbosquid
$1

house 1(1)
... available on turbo squid, the world's leading provider of digital 3d models for visualization, films, television, and games.
turbosquid
$1

Table 1(1)
... available on turbo squid, the world's leading provider of digital 3d models for visualization, films, television, and games.
turbosquid
$59

Formula 1(1)
...lty free 3d model formula 1 for download as max, fbx, and obj on turbosquid: 3d models for games, architecture, videos. (1567088)
design_connected
$11

No 1
...no 1
designconnected
sibast no 1 computer generated 3d model. designed by sibast, helge.
turbosquid
$2

desert house(1)(1)
...3d model desert house(1)(1) for download as 3ds, max, and obj on turbosquid: 3d models for games, architecture, videos. (1055095)