Thingiverse
Multi Purpose Raspberry Pi Box by harmo_hammer
by Thingiverse
Last crawled date: 3 years, 1 month ago
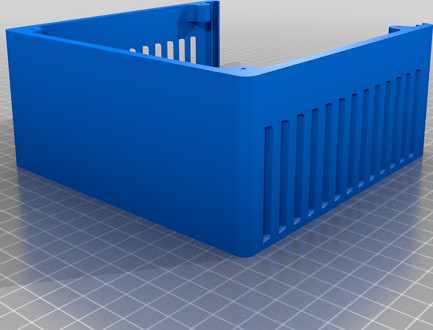
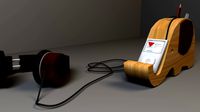
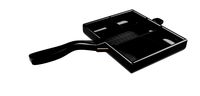
Multi-Purpose Raspberry Pi Box.
You'll find that this box comes in three parts (each has an STL file):
i) Pi Box Chassis.
ii) Pi Box Socket Panel.
iii) Pi Box Lid.
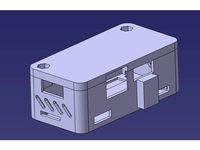
I wanted a case for my Raspberry Pi that had the following characteristics:
It absolutely HAD to have the room to attach prototype boards on top of the Pi in the usual Pi Hat way.
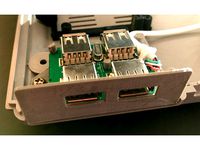
I wanted to integrate the ability to easily attach/detach Krone styled RJ12 and RJ45 Sockets to the case.
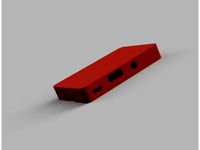
I shouldn’t have to open the box to connect things once it’s set up. As many ports had to be accessible from the outside. This includes power, HDMI, (Through panel mounted extension sockets) and of course, the Ethernet/USB ports on the Pi itself (through holes in the case itself).
The option to mount it to the wall.
Passively cooled… now I know many of you will want to include a fan, but this is a prototype and I want to see how this goes without it. To this end, I’ve added quite a lot of venting on the sides of the chassis. I left the top alone as I’d probably want an extraction fan there.. but at this point. I’ve left the top sealed to add rigidity, and to discourage dust.
This was designed with a Pi based weather station in mind, to house the main circuitry and to mount it somewhere on a wall indoors (I must stress the indoor part). However, there are many potential uses for it beyond a weather station.
Why Krone-Style Sockets?
A lot of commercial weather station kits include two RJ12 cables that connect the rain gauge, vane, and anemometer. I designed this case with three Krone port mounts so people can use the two “kit” cables as they arrive, and simply adding the third for the Temp/Humidity/Pressure sensor.
… Of course, you could condense the 6 wires of the kit into one RJ45 connection, leaving you with 18 wires of spare connectivity in the 3 available Krone socket mounts… assuming you use RJ45 sockets.
Krone styled network/telephone sockets add a lot of connectivity in a convenient, quick to setup/change manner. Perhaps more importantly, network and telephone cables can be found in many homes, or are easily obtainable. This is great for DIY electronics, educational kits, and just reducing ugly wiring.
However, Krone "clone" sockets aren't all exactly the same, so I can't guarantee every port will work perfectly with the mounts in this panel. It was provided as a prototype, one that worked for me, but again, there's a few brands out there. However, please let me know which brands did (or did not) work for the mounts, and I'll outline them here.
OVERALL DIMENSIONS:
This box will protrude 75mm from the wall when mounted, and is 150mm x 150mm high/wide.
PLEASE NOTE: INSTALL SOCKET PANEL THEN RASPBERRY PI!
The socket panel is designed for the usb/ethernet sockets to be partially inserted into it. As such, you need to install the panel into the chassis first, then slide the Raspberry Pi into position, and screw it into the mounts.
BEWARE LONG PI PROTOTYPE HATS:
I've used a few different hats. Many will work with this box without issue. However, if the Pi Hat board extends beyond the Pi's circuit board (at the end with the USB/Ethernet ports, then this will no allow the Pi to move into place.
You'll find that this box comes in three parts (each has an STL file):
i) Pi Box Chassis.
ii) Pi Box Socket Panel.
iii) Pi Box Lid.
I wanted a case for my Raspberry Pi that had the following characteristics:
It absolutely HAD to have the room to attach prototype boards on top of the Pi in the usual Pi Hat way.
I wanted to integrate the ability to easily attach/detach Krone styled RJ12 and RJ45 Sockets to the case.
I shouldn’t have to open the box to connect things once it’s set up. As many ports had to be accessible from the outside. This includes power, HDMI, (Through panel mounted extension sockets) and of course, the Ethernet/USB ports on the Pi itself (through holes in the case itself).
The option to mount it to the wall.
Passively cooled… now I know many of you will want to include a fan, but this is a prototype and I want to see how this goes without it. To this end, I’ve added quite a lot of venting on the sides of the chassis. I left the top alone as I’d probably want an extraction fan there.. but at this point. I’ve left the top sealed to add rigidity, and to discourage dust.
This was designed with a Pi based weather station in mind, to house the main circuitry and to mount it somewhere on a wall indoors (I must stress the indoor part). However, there are many potential uses for it beyond a weather station.
Why Krone-Style Sockets?
A lot of commercial weather station kits include two RJ12 cables that connect the rain gauge, vane, and anemometer. I designed this case with three Krone port mounts so people can use the two “kit” cables as they arrive, and simply adding the third for the Temp/Humidity/Pressure sensor.
… Of course, you could condense the 6 wires of the kit into one RJ45 connection, leaving you with 18 wires of spare connectivity in the 3 available Krone socket mounts… assuming you use RJ45 sockets.
Krone styled network/telephone sockets add a lot of connectivity in a convenient, quick to setup/change manner. Perhaps more importantly, network and telephone cables can be found in many homes, or are easily obtainable. This is great for DIY electronics, educational kits, and just reducing ugly wiring.
However, Krone "clone" sockets aren't all exactly the same, so I can't guarantee every port will work perfectly with the mounts in this panel. It was provided as a prototype, one that worked for me, but again, there's a few brands out there. However, please let me know which brands did (or did not) work for the mounts, and I'll outline them here.
OVERALL DIMENSIONS:
This box will protrude 75mm from the wall when mounted, and is 150mm x 150mm high/wide.
PLEASE NOTE: INSTALL SOCKET PANEL THEN RASPBERRY PI!
The socket panel is designed for the usb/ethernet sockets to be partially inserted into it. As such, you need to install the panel into the chassis first, then slide the Raspberry Pi into position, and screw it into the mounts.
BEWARE LONG PI PROTOTYPE HATS:
I've used a few different hats. Many will work with this box without issue. However, if the Pi Hat board extends beyond the Pi's circuit board (at the end with the USB/Ethernet ports, then this will no allow the Pi to move into place.
Similar models
thingiverse
free

case for Pi 3 by enhvacsy
...
prototype of a raspberry pi 3 case with ports for power, usb, ethernet, and pins. the model also contains a lid and belt loops.
thingiverse
free

Krone RJ12 and RJ45 Socket Mount by harmo_hammer
... it and glue this mount to the inside so you have a socket-detachable option. printing the included stl file will help with that.
thingiverse
free

Raspberry Pi NAS Box by khanhj
...raspberry pi nas box by khanhj
thingiverse
support raspberry pi 3, 4
usb hub
ethernet rj45
hdmi
power plug
power switch
thingiverse
free

Raspberry Pi Zero - Ethernet - Usb casing by koens
...d wire --> solder pad pp1
black wire --> solder pad pp6
green wire --> solder pad pp22
white wire --> solder pad pp23
thingiverse
free

Raspberry Pi Desktop Tower Case by joeyC
....
variable speed cooling fan, speed based on cpu temp.
raspberry pi logo on case side.
clear removable window on other case side.
thingiverse
free
Low Profile / Slim Raspberry Pi 2/3 Case by kapakahi
...spberry pi 2 and 3 with desoldered usb ports, ethernet port, and gpio pins.
alternate case includes cutout for a single usb port
thingiverse
free
Retro Playstation Pi Usb Hub Holder by jakobwesthoff
... raspberry only has 4 ports total.
additional parts
i used the following usb-hub as inlay for this part:
usb 2.0 hub smile 4-port
thingiverse
free
Raspberry Pi Zero + Ethernet / USB hat case (Pihole) by Woyta
...on between pi and hat was tight fit for me. if it is loose you will need piece of double sided tape or change scale of that part.
thingiverse
free

OSMC Raspberry Pi Case by smartroad
...i wanted all the cables to be at the rear for neatness ;). both have a 5mm hole for an led that i have connected to the +5v line.
thingiverse
free
Raspberry Zero Case with Ethernet/Lan Adapter
...ount
https://www.aliexpress.com/item/4000289078353.html
micro usb lan adapter
https://www.aliexpress.com/item/4000299266700.html
Harmo
3d_export
$10
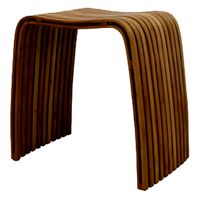
Harmo stool SH2879
...~ 100,000 model parts: 1 texture format: .png .jpg resolution: 1024*1024 pbr in substance painter formats: .obj .gltf .fbx .blend
3dbaza
$4
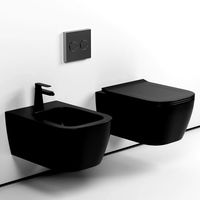
Harmo matt black wall-hung Toilet and bidet (181751)
...atform: 3ds max 2014 + obj.<br>polygon: 4793.<br>vertex: 4894.<br>item number: 2820-cm.<br>series: harmo.
thingiverse
free

Harmo Pool Eco Heatpump replacement nut by xavierh
...see, it matches perfectly.
this design is free, but if it saved your heatpump, you can send me a tip on https://paypal.me/xavierh
artstation
$2

Harmo stool SH2879
...#games_real-time_3d_environment<br>#graphic_design<br>#weapon<br>#vehicles<br>#stylized<br>contact:
cg_trader
$10

Harmo stool SH2879
...ool sh2879
cg trader
harmo stool sh2879 3d model pbr interior chair talbe, available in obj, gltf, ready for 3d animation and ot
cg_trader
$10

Harmo stool SH2879
...ol sh2879
cg trader
harmo stool sh2879 3d model interior chair talbe, formats obj, fbx, stl, gltf, ready for 3d animation and ot
cg_trader
$5

Hange Bidet Harmo Schwarz Matt
...itzeigenschaften.
render: vray.
platforma: 3ds max 2014 + obj.
polygon: 4793.
vertex: 4894.
artikelnummer: 2820-sm.
serie: harmo.
3dwarehouse
free

HARMOS HOTEL -EGYPT
...harmos hotel -egypt
3dwarehouse
tanta city 2010 #egypt_hotel
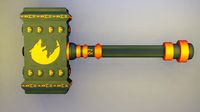
Hammer
3d_ocean
$3

Hammer
...hammer
3docean
hammer
a high quality hammer .
3d_export
$20
hammer
...hammer
3dexport
hammer
3d_export
$10
hammer
...hammer
3dexport
hammer
3d_export
$5

hammer
...hammer
3dexport
hammer
3d_export
free
hammer
...hammer
3dexport
hammer
3d_export
free

hammer
...hammer
3dexport
this is a hammer☺♥
archibase_planet
free

Hammer
...hammer
archibase planet
hammer claw hammer toolware
hammer n060114 - 3d model (*.gsm+*.3ds+*.max) for interior 3d visualization.
3d_export
$5
Hammer
...hammer
3dexport
a 3d model of a hammer.
3ddd
free

Hammer
...hammer
3ddd
молоток
model of a hammer.
3d_export
$5
hammer
...hammer
3dexport
ready made hammer to use.
Raspberry
3d_export
free

raspberry
...raspberry
3dexport
3d model of a raspberry. i tried to make it realistic.
turbosquid
$27

Raspberries
...y free 3d model raspberries for download as max, obj, and stl on turbosquid: 3d models for games, architecture, videos. (1354176)
turbosquid
$14

Raspberries
...y free 3d model raspberries for download as max, obj, and fbx on turbosquid: 3d models for games, architecture, videos. (1364663)
3d_export
$5

raspberry pi
...raspberry pi
3dexport
carcasa para la raspberry pi
turbosquid
$99

Raspberry
... available on turbo squid, the world's leading provider of digital 3d models for visualization, films, television, and games.
turbosquid
$10

raspberries
... available on turbo squid, the world's leading provider of digital 3d models for visualization, films, television, and games.
archive3d
free

Raspberries 3D Model
...raspberries 3d model archive3d raspberries raspberry raspberries n300911 - 3d model (*.3ds) for interior 3d...
3d_export
$5

raspberry fruit
...raspberry fruit
3dexport
3d_export
$5

raspberry
...y different sizes. their color ranges from light burgundy to pink. there are formats: obj, 3ds, blend, dae, fbx, mtl.<br>:)
evermotion
$12

raspberries 23 am130
...evermotion raspberries 23 am130 evermotion key 23 food fruit raspberry fruits am130 raspberries highly detailed 3d model of raspberries...
Pi
design_connected
$11

Pi
...pi
designconnected
ligne roset pi chairs computer generated 3d model. designed by thibault desombre.
3d_export
$5
raspberry pi
...raspberry pi
3dexport
carcasa para la raspberry pi
turbosquid
$18

pied
... available on turbo squid, the world's leading provider of digital 3d models for visualization, films, television, and games.
3ddd
$1

Emme pi light
...emme pi light
3ddd
emme pi light
люста emme pi light
3ddd
$1

Emme pi light
...emme pi light
3ddd
emme pi light
бра классическое emme pi light
3ddd
$1

Emme Pi Light
...emme pi light
3ddd
emme pi light
3ddd
$1

Emme Pi Light
...emme pi light
3ddd
emme pi light
design_connected
$16

Pi-Air
...pi-air
designconnected
living divani pi-air lounge chairs computer generated 3d model. designed by harry & camila.
3d_ocean
$15

Manneken Pis
...picting a naked little boy urinating into a fountain’s basin. (wikipedia) the model was sculpted in blender 2.70a rendered wit...
3ddd
$1

Emme pi light
...emme pi light
3ddd
emme pi light
люстра классическая фирма: emme pi light
артикул: 3595/5/cot/12/wh
Purpose
turbosquid
$10

General purpose Chair
... available on turbo squid, the world's leading provider of digital 3d models for visualization, films, television, and games.
3d_export
$129

Multi Purpose Delivery Vehicle
...multi purpose delivery vehicle
3dexport
turbosquid
$30

Multi Purpose 3D Carving
...ty free 3d model multi purpose 3d carving for download as stl on turbosquid: 3d models for games, architecture, videos. (1617161)
turbosquid
free

Antique Multi-purpose Cabinet
...ee 3d model antique multi-purpose cabinet for download as max on turbosquid: 3d models for games, architecture, videos. (1182937)
turbosquid
free
Multi-Purpose Pen-Holder
...lty free 3d model multi-purpose pen-holder for download as ma on turbosquid: 3d models for games, architecture, videos. (1234055)
turbosquid
free

Multi Purpose Display Sign
...purpose display sign for download as obj, blend, dae, and stl on turbosquid: 3d models for games, architecture, videos. (1509080)
turbosquid
$10

Hand Grenade Special Purpose
... available on turbo squid, the world's leading provider of digital 3d models for visualization, films, television, and games.
turbosquid
$10

Modern Sofa multi purpose
... available on turbo squid, the world's leading provider of digital 3d models for visualization, films, television, and games.
turbosquid
free
AR19A2 Multi-Purpose Rifle
... available on turbo squid, the world's leading provider of digital 3d models for visualization, films, television, and games.
3d_export
$5

war vehicle with purpose machine
...lity . c4d file and fbx . dxf .3ds .dae.obj and stl . easy use and good. als rib file full project and mesh poly . good for use .
Multi
3d_export
$5
multi handle
...multi handle
3dexport
multi handle
3d_export
free
Multi socket
...multi socket
3dexport
multi socket
design_connected
$22

Multy Loveseat
...multy loveseat
designconnected
ligne roset multy loveseat 2-seater computer generated 3d model. designed by claude brisson.
turbosquid
$10
multi pan
...
royalty free 3d model multi pan for download as max and ige on turbosquid: 3d models for games, architecture, videos. (1161690)
turbosquid
$9

Multi Plug
...
royalty free 3d model multi plug for download as max and fbx on turbosquid: 3d models for games, architecture, videos. (1355953)
turbosquid
$39
Multi Gym
...y free 3d model multi gym for download as obj, fbx, and blend on turbosquid: 3d models for games, architecture, videos. (1275571)
3ddd
free
Ligne Roset Multy
... sofa , мебель
двухместный диван multy от французского производителя ligne roset
3d_export
$5

multi-colored pencils
...multi-colored pencils
3dexport
multi-colored pencils on a mirror surface
3d_export
$5
multi function box
...multi function box
3dexport
it is multi function box in iges format
3ddd
free
ligne roset / MULTY
...ligne roset / multy
3ddd
ligne roset , multy
минималистический диван
Box
archibase_planet
free

Box
...box
archibase planet
box carton cardboard box
box 2 - 3d model (*.3ds) for interior 3d visualization.
archibase_planet
free

Box
...box
archibase planet
carton cardboard box box
box 1 - 3d model (*.3ds) for interior 3d visualization.
3d_export
$6

box
...box
3dexport
box
3d_export
$5

Box
...box
3dexport
box
3d_export
$5

box
...box
3dexport
box
3d_export
$5

box
...box
3dexport
box
archibase_planet
free

Box
...box
archibase planet
box box for paper notebook pencil
box - 3d model (*.gsm+*.3ds) for interior 3d visualization.
archibase_planet
free

Box
...box
archibase planet
box carton cardboard box
box n170111 - 3d model (*.gsm+*.3ds) for interior 3d visualization.
archibase_planet
free

Box
...box
archibase planet
box carton cardboard box
box n050411 - 3d model (*.gsm+*.3ds) for interior 3d visualization.
archibase_planet
free

Boxes
...boxes
archibase planet
boxes box case bin
boxes n281213 - 3d model (*.gsm+*.3ds+*.max) for interior 3d visualization.