Thingiverse
MPMD Effector replacement with secondary fan
by Thingiverse
Last crawled date: 4 years, 1 month ago
Just wanted to see if this was possible. Note: I have a new, different version that uses a side fan as the secondary instead of the straight through fan.https://www.thingiverse.com/thing:3945643
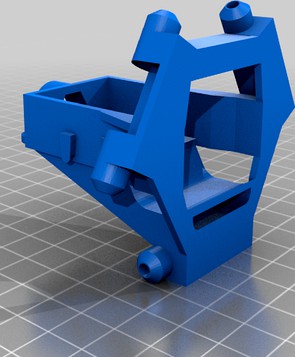
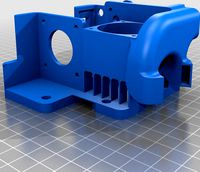
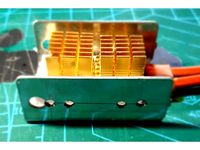
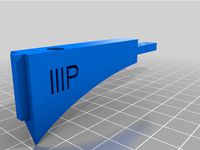
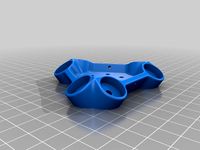
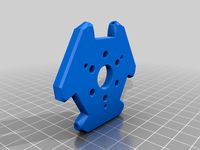
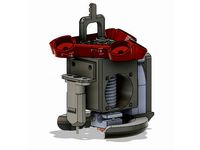
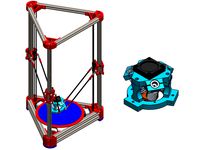
I designed a complete replacement for the metal effector and heatsink casing that includes a space for an additional 10mm cooling fan (same size as is already on the hotend.) The fan can be wired with a Y connector to the heatsink fan connector. The rods connect to the plastic effector using 6 M3 20mm screw. In order to ensure clearance for the fans the connectors on the effector are slightly larger than those on the carriages making the rods NOT parallel. So far I have not noticed any problem with prints.
I have a silicone sock on my heater block and so far I have not noticed any heat issues with the PLA I used to print the design. It would probably be better printed in a higher temp plastic though.
This part requires the printer to be calibrated to ensure proper sizing.
I actually printed the current version using an older version of the design.
To assemble the part you need to disassemble the existing effector but you do not need to remove the throat or nozzle from the block.
The heater has to be removed from the block by loosening the small grub screw in the block and sliding the heater out (unless you have disconnected the wiring at the printer and have the wires loose.)
In order to do this you will probably need to loosen the throat from the heat sink so you can get enough clearance or you may be able to just slide the heat sink down through the effector to get the required clearance.
Be very careful when handling the heatsink, heater and thermistor as these wires are very delicate.
Pre-fit all parts before putting the part in place. Fit all screws to ensure that they will fit before assembling and adjust if necessary.
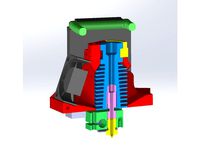
The heater has to be fed in from the side (through the side opening) and the heatsink is fed up through the bottom. This is why the heater has to be removed from the block in order to fit it. At this point you will have the heater wire feeding through the hole in the side of the effector.
If you have unwrapped the heater, fan and thermistor from the bowden connector and have them unplugged from the printer you can just feed the heater wire out through this side effector hole without removing the heater from the block.
Once the heater has been put in place and tightened, position the silicone sock and slide the heat sink back into place, positioning it so that it can be tightened onto the casing using the original screws. Be very careful with this step as you are pushing the heat sink up and at the same time you need to be watching the heater wires so they do not get snagged on the side of the effector.
Set the throat position so the nozzle will protrude slightly below the effector and tighten it into place. Ensure the spacing at the top where the bowden connector sits is filled with the PTFE tubing. If it is too short cut a small piece of smaller PTFE that will fit inside the larger tubing and fill in any gap. Tighten the bowden connector in place using the grub screw.
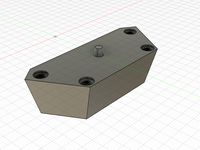
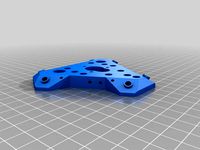
The rods are held in place on the effector using M3 20mm screws. Use one of the small lock washers on the outside but not on the inside of the rod end. Tighten the bolt using an appropriately sized nut on the inside.
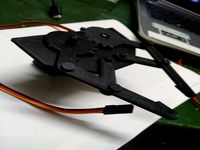
Install the 2nd fan and wire the heater, thermistor and fans back up.
Once everything is reinstalled re-calibrate your bed levelling before printing.
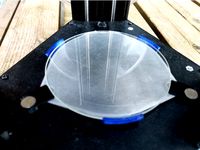
I have included some pictures showing the new effector printing a Benchy (thing:2795629.) The Benchy was sliced using the stock Cura 4.2.1 'Draft 0.2 mm' profile adjusted to print .21 mm layer height and 0.7 wall thickness. Also adjusted the brim width to 4mm. everything else was left the same.
White PLA @200 and bed @60 with print speed at 60
The print completed successfully without any major defects. It completed the stack without an issue ( previously the stack always caused a failed print or a shifted print) but the arches above the doors did continue to warp up although they did not cause any issue as they have for me previously.
I have also included a small print (dragon thing:2830051) sliced in Cura 4.3 @50% using the default settings adjusted to 0.21 layer height. I had no printing issues with this one either.
These are my calibration numbers. You need to set ones for your own machine but I thought these might be helpful in case you are not sure.
Note: M4MPMD, Silicone sock, magnetic bed clips, glass bed, Litho-frame column shields.
M666 X0.00 Y-0.22 Z-0.26
M665 L133.69 H125.94 R71.19 S120.00 A0.60 B0.50 C-0.25
M851 Z-0.26
Things still to do:
redesign the rod holders to provide enough clearance and to ensure rods remain parallel.
Design a base part to direct air directly on parts where the nozzle is rather than just through the effector base.
I designed a complete replacement for the metal effector and heatsink casing that includes a space for an additional 10mm cooling fan (same size as is already on the hotend.) The fan can be wired with a Y connector to the heatsink fan connector. The rods connect to the plastic effector using 6 M3 20mm screw. In order to ensure clearance for the fans the connectors on the effector are slightly larger than those on the carriages making the rods NOT parallel. So far I have not noticed any problem with prints.
I have a silicone sock on my heater block and so far I have not noticed any heat issues with the PLA I used to print the design. It would probably be better printed in a higher temp plastic though.
This part requires the printer to be calibrated to ensure proper sizing.
I actually printed the current version using an older version of the design.
To assemble the part you need to disassemble the existing effector but you do not need to remove the throat or nozzle from the block.
The heater has to be removed from the block by loosening the small grub screw in the block and sliding the heater out (unless you have disconnected the wiring at the printer and have the wires loose.)
In order to do this you will probably need to loosen the throat from the heat sink so you can get enough clearance or you may be able to just slide the heat sink down through the effector to get the required clearance.
Be very careful when handling the heatsink, heater and thermistor as these wires are very delicate.
Pre-fit all parts before putting the part in place. Fit all screws to ensure that they will fit before assembling and adjust if necessary.
The heater has to be fed in from the side (through the side opening) and the heatsink is fed up through the bottom. This is why the heater has to be removed from the block in order to fit it. At this point you will have the heater wire feeding through the hole in the side of the effector.
If you have unwrapped the heater, fan and thermistor from the bowden connector and have them unplugged from the printer you can just feed the heater wire out through this side effector hole without removing the heater from the block.
Once the heater has been put in place and tightened, position the silicone sock and slide the heat sink back into place, positioning it so that it can be tightened onto the casing using the original screws. Be very careful with this step as you are pushing the heat sink up and at the same time you need to be watching the heater wires so they do not get snagged on the side of the effector.
Set the throat position so the nozzle will protrude slightly below the effector and tighten it into place. Ensure the spacing at the top where the bowden connector sits is filled with the PTFE tubing. If it is too short cut a small piece of smaller PTFE that will fit inside the larger tubing and fill in any gap. Tighten the bowden connector in place using the grub screw.
The rods are held in place on the effector using M3 20mm screws. Use one of the small lock washers on the outside but not on the inside of the rod end. Tighten the bolt using an appropriately sized nut on the inside.
Install the 2nd fan and wire the heater, thermistor and fans back up.
Once everything is reinstalled re-calibrate your bed levelling before printing.
I have included some pictures showing the new effector printing a Benchy (thing:2795629.) The Benchy was sliced using the stock Cura 4.2.1 'Draft 0.2 mm' profile adjusted to print .21 mm layer height and 0.7 wall thickness. Also adjusted the brim width to 4mm. everything else was left the same.
White PLA @200 and bed @60 with print speed at 60
The print completed successfully without any major defects. It completed the stack without an issue ( previously the stack always caused a failed print or a shifted print) but the arches above the doors did continue to warp up although they did not cause any issue as they have for me previously.
I have also included a small print (dragon thing:2830051) sliced in Cura 4.3 @50% using the default settings adjusted to 0.21 layer height. I had no printing issues with this one either.
These are my calibration numbers. You need to set ones for your own machine but I thought these might be helpful in case you are not sure.
Note: M4MPMD, Silicone sock, magnetic bed clips, glass bed, Litho-frame column shields.
M666 X0.00 Y-0.22 Z-0.26
M665 L133.69 H125.94 R71.19 S120.00 A0.60 B0.50 C-0.25
M851 Z-0.26
Things still to do:
redesign the rod holders to provide enough clearance and to ensure rods remain parallel.
Design a base part to direct air directly on parts where the nozzle is rather than just through the effector base.
Similar models
thingiverse
free

Effector Fan Shroud by SummersideGuy
... out the tips for the filament fans and spaced them further apart, this gives room for the wiring from the heater and thermistor.
thingiverse
free

Chimera mount fan duct 5mm extended
...5mm to make silicon sock fit better, so i needed more clearance for the fan to blow below the nozzle and not on the heater block.
thingiverse
free

MPMD Dual Fan Custom Effector
...ace. i included some photos to demonstrate this as well as how to insert a small ptfe at the top of the heatsink to fill any gap.
thingiverse
free
Anycubic Chiron direct drive modification (almost all factory parts: extruder, v5 hotend, 4010 fan, 5015 radial fan)) by ggrzyk
...ble heat block in heatsink
mount pcb board
mount 4010 fan
connect all wires to pcb board
mount 5015 radial fan with two m4 screws
thingiverse
free

Rostock Max effector cable hook(3) by Duplicat
...rostock max effector cable hook(3) by duplicat
thingiverse
heater cable 2. thermistor wire 3. fan wire
thingiverse
free
Anycubic Kossel Linear Plus upgrade hotend E3D V6 effector by rosch8
...screws or better din7981 2,2x 4,5 mm screws or similar on the top of exxector there are 2 holes....
thingiverse
free
KP3 Custom fan hood with single 4010 blower by mentalgrinds
... the hood as a loop on the heatsink side. this intended to be a zip tie down point for the heater wires to isolate wire movement.
thingiverse
free

MPMD Double Fan Part Cooler by ksihota
...r fan can be used for this purpose.
to control the fans using your slicer and gcode, you need to upgrade your firmware to marlin.
thingiverse
free

MPMD E3D V6 Effector by ksihota
...base
rod connectors:
3 60mm m3 threaded rods (nuts and washers)
or
6 30mm m3 nuts bolts and washers
assorted wires and connectors
thingiverse
free
Heater for dry box by denyok
... fan cover was used to protect ventilator and ptc heater.
this heater block allow to increase temperature inside dry box to 51 c.
Mpmd
thingiverse
free
MPMD Spool Forks - single piece
...mpmd spool forks - single piece
thingiverse
mpmd filament spool
thingiverse
free
MPMD Replacement Spool Holder by dscpt
...mpmd replacement spool holder by dscpt
thingiverse
basic replacement mpmd rear mounted spool holder.
thingiverse
free
MPMD feet
...e vibration absorption.
i used some double sided tape to assemble them to the printer in case i ever need to unscrew the endcaps.
thingiverse
free

MPMD Leg
...iverse
this is yet another leg model for monoprice mini delta, because i did not like other models of it. stock screws are okay.
thingiverse
free

MPMD fan mount for radiator
...mpmd fan mount for radiator
thingiverse
for standard cooler 30mm
thingiverse
free

mpmd 40mm fan shroud by lsirhc
...
thingiverse
mpmd 40mm fan shroud remix of ericrobodox stock shroud.
i haven't tried it yet, it may interfere with the arms.
thingiverse
free
MPMD (Mini Delta) bowden slider - endstop shield
....
this slider solved it.
printable on mpmd. the one piece is not possible to print on mpmd and it is not easy to get it in place.
thingiverse
free
MPMD top spool holder
...mpmd top spool holder
thingiverse
slip this on top of the monoprice mini delta printer and put a spool on top.
thingiverse
free
MPMD Frame Column Shield Remix
...m tall, 1.6mm thick in most places, 0.8mm on the ends.
mpmd shield. check out my enclosure as well, they work together perfectly.
thingiverse
free
Glass Bed Retainer - Monoprice Mini Delta (MPMD) by bLITzJoN
...op. this requires a larger printer, so if the mpmd is all you have then look at the glass bed clip - monoprice mini delta (mpmd).
Effector
3d_ocean
$5

Radial Sound Effector
...e spheres will expand with your song. fully customisable, change the color, the size of the spheres or even put in different s...
3d_ocean
$12

3D Customizable Puzzle Set (16x10)
...mograph compatible (you can effect the pieces with mograph effector) - included also a non-mograph version with...
thingiverse
free
Effector by olo2000pm
...effector by olo2000pm
thingiverse
effector
thingiverse
free
CERAMBOT-Effector
...cerambot-effector
thingiverse
cerambot-effector
thingiverse
free

modulize effector by candyasdf
...ulize effector by candyasdf
thingiverse
mount things on effector with m3 screws
effector radius : 25.4mm
rod arm distance : 40mm
thingiverse
free
Delta Effector by zavier
...delta effector by zavier
thingiverse
delta effector with radial fan 50 and bltouch
thingiverse
free
D810 Effector by WhiteTiger13
...d810 effector by whitetiger13
thingiverse
this is d810 effector for d810 without autocalibration, and also cap for it.
thingiverse
free
Effector for Delta Printer
...effector for delta printer
thingiverse
effector for delta printer (3 color)
using diamond hotend
thingiverse
free
Delta effector magnetic by fpassos
...delta effector magnetic by fpassos
thingiverse
effector for e3dv6 hotend. i needed put the spheres (10mm) on the effector.
thingiverse
free
End Effector Gripper
...end effector gripper
thingiverse
end effector gripper
for a robotic arm
uses mg995 servo motor
Secondary
turbosquid
$149

Track Secondary Pulverizer
... available on turbo squid, the world's leading provider of digital 3d models for visualization, films, television, and games.
turbosquid
$25

Chilled Water Secondary Pumps
...ee 3d model chilled water secondary pumps for download as max on turbosquid: 3d models for games, architecture, videos. (1270113)
turbosquid
$60

Secondary Atitude Indicator (AI, Artifical Horizon)
... available on turbo squid, the world's leading provider of digital 3d models for visualization, films, television, and games.
3d_export
$8

Modern style primary and secondary school architectural design SU model
... secondary school architectural design su model
3dexport
modern style primary and secondary school architectural design su model
3d_export
$8

transat bamboo
...3dexport diffuse and normal on primary uvmap ao on secondary :...
3d_export
$6

transat deauville
...3dexport diffuse and normal on primary uvmap ao on secondary :...
3d_export
$15

Maverick REV-6
...range, it is recommended to use it as a secondary additional...
3d_export
$10

maison du monde pinup stool
...diffuse texture on primary map : uvmap ao on secondary map : uvmap...
3d_export
$5

Scrap metal 3D Model
...spare object subject scrap metal iron breakage stuff waste secondary raw materials scrap metal 3d model talgat 39978...
3d_export
$15

insectoid monster
...insectoid mutant low poly<br>can be used in games as secondary character or enemy<br>created in blender 2.91<br>archive includes next...
Fan
3d_export
$5

fan
...fan
3dexport
fan 3d model, table fan, fan, electric fan, ventilator
archibase_planet
free

Fan
...fan
archibase planet
fan large fan
fan out n260707 - 3d model for interior 3d visualization.
archibase_planet
free

Fan
...fan
archibase planet
fan ceiling fan ventilator
fan stealth n300615 - 3d model (*.gsm+*.3ds) for interior 3d visualization.
3d_export
$15

fan
...fan
3dexport
is an ancient fan
3ddd
$1

Fan-C-Fan by marco gallegos
...n-c-fan by marco gallegos
3ddd
вентилятор , marco gallegos
fan-c-fan by marco gallegos
3d_export
$10

fan
...fan
3dexport
a detailed fan designed for home or space blowing is now available for only 19.99!
turbosquid
$1

Fan
...fan
turbosquid
free 3d model fan for download as on turbosquid: 3d models for games, architecture, videos. (1427865)
turbosquid
$14

Fan
...fan
turbosquid
royalty free 3d model fan for download as on turbosquid: 3d models for games, architecture, videos. (1415642)
3ddd
$1

Светильник Fan
...светильник fan
3ddd
fan , italamp
светильник fan, производитель italamp
turbosquid
$25

Fan
...fan
turbosquid
royalty free 3d model fan for download as c4d on turbosquid: 3d models for games, architecture, videos. (1483246)
Replacement
3d_export
$12

replaceable bristle
...replaceable bristle
3dexport
this is 3d printable replaceable bristle toothbrush.
3d_export
$34
Knee Replacement
...h meets the lower leg. ... during a total knee replacement, the end of the femur bone is removed and replaced with a metal shell.
3d_export
$44
Hip Replacement
...omponents. the damaged femoral head is removed and replaced with a metal stem that is placed into the hollow center of the femur.
turbosquid
$59

Hip replacement
...el hip replacement for download as ma, c4d, lwo, lxo, and obj on turbosquid: 3d models for games, architecture, videos. (1520195)
turbosquid
$10

Module replacment station
...alty free 3d model module replacment station for download as on turbosquid: 3d models for games, architecture, videos. (1271271)
3d_export
$8
tool replacement gearbox
...tool replacement gearbox
3dexport
eccentric lifting mechanism, you can process according to available drawings.
turbosquid
$7

Globe Oil Atomizer Replacement Housing
... oil atomizer replacement housing for download as ige and stl on turbosquid: 3d models for games, architecture, videos. (1253839)
turbosquid
free

SLICE Ceramic Scapel (Replaceable Blade)
... (replaceable blade) for download as obj, fbx, blend, and dae on turbosquid: 3d models for games, architecture, videos. (1363525)
3d_export
$19
Knee Replacement Implant
...ntimeter<br>__________________________<br>poly count :<br>polygon count - 217440<br>vertex count - 108776
turbosquid
$19

(Project) Bad odor filtering sytem with support rail and pulley that assure a comfortable gel filter element replacement.
... available on turbo squid, the world's leading provider of digital 3d models for visualization, films, television, and games.