Thingiverse
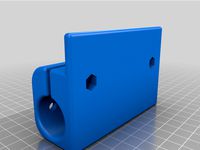
MPCNC Tangential Knife by jamesd256
by Thingiverse
Last crawled date: 3 years ago
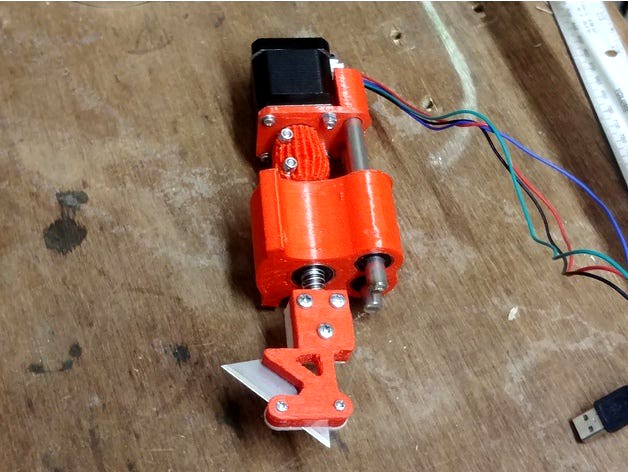
4th Axis Tangential cutter for MPCNC
IN DEVELOPMENT
Designs and software likely to undergo updates. Please check back.
Recent updates
25/11:
Published update to gcodetools: manual path selection. Gcode cut order will match path selection order. See github link and manual_path_selection branch. Will merge once I've implemented optionality.
Printed out geodave's blade holder, and very happy with it. See below.
Older:
Moved gcodetools to Github.
Shifted to degrees for the turn magnitude, firmware changes required
Added support for full command by command speed control in the generated gcode
Switched away from the pineapple, and adopted a metal 5mm to 8mm coupler
No more thread moving inside the skate bearings - fashioned a smooth rod threaded at one end and clamped straight into the thread coupler - no top bolt, spring tension controlled by adding or removing washers. Not a critical update, more to follow.
See below for details
Further planned changes
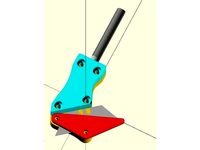
Redesign blade holder - this one is too far from the tool mount. I will probably do something like the TOCK, where Olfa blade snap offs are used. Hopefully the rigidity of the cutting head can be improved.
^ Scratch this. Geodave did it better than I could have https://www.thingiverse.com/thing:2661474
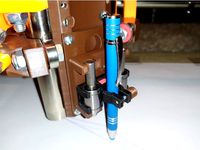
Inter-changeable pen mount - some cut out jobs benefit from markings, like using Fusion 360 Slicer.
Instructable detailing workflow for going from Fusion 360 Slicer output to useable gcode.
Intro
Like a drag knife, only able to cut more intricate designs and sharp corners. Also more suitable for thicker material. May be adapted for other tools which require 4th axis (A axis) rotation, and also for other CNC machines.
https://www.youtube.com/watch?v=UMdeTK2p5F0https://www.youtube.com/watch?v=cap5BHarNFA
Latest vid, working quite well now for thick (7mm) cardboard:
https://www.youtube.com/watch?time_continue=2&v=Y-hkMQuFu2w
Hardware
Design changes incorporated:
Stepper motor to rotate the blade
Rotating assembly free to slide on two steel rods mounted to the MPCNC via linear bearings - allows rotation without losing the spring loaded z
Offset of blade tip to centre axis reduced to 0mm
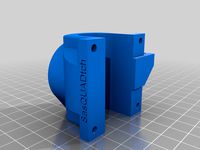
In addition to the printed parts, you will need:
2 x 608ZZ skate bearings
2 x LMK10UU linear bearing
2 x 10mm x 120mm steel or aluminium rods
1 x Nema 17 stepper motor
4 x M3 x 8 screws
3 x M4 x 20 screws with nut
2 x M3 x 15 screws with nut
1 x M8 x 70 screw with lock nut, or M8 threaded rod cut to length
15mm x 20mm spring (took mine from a £1 caulk gun)
1 x standard utility knife blade
Optional:
5mm to 8mm metal shaft coupler (to replace pineapple, £1.50 each in UK)
Gcode Generation
A modified version of Gcodetools is supplied. Please note, this is no longer included in the Thingiverse page, but instead should be obtained from Github:
https://github.com/jamesd256/gcodetools
Three new parameters are introduced:
knife lift threshold angle (only lift the knife if the material thickness/angle requires it)
4th axis command (allows generation of gcode with A commands substituted with E, see firmware below)
turn feed: Adds an FXXX gcode command to the turns, so turn speed is controllable.
Firmware
A small modification is required for best results with the standard MPCNC supplied Marlin firmware. In the first release, the code was outputting the turn command magnitude in radians. This works better with degrees, so the instructions now reflect that.
Marlin discards anything beyond 2 decimal places for E commands, which is why the change is needed. This means that with the magitudes associated with degrees, the firmware's over extrusion detection kicks in. Hence you will need to upload a new firmware to your Arduino, with the following two lines commened from configuration.h:
#define PREVENT_LENGTHY_EXTRUDE
#define EXTRUDE_MAXLENGTH 200
The stepper motor attaches to the E0 controller on the RAMPS board. You may need an additional stepper driver if you don't have one.
The generated gcode will have the 4th axis turns expressed in positive or negative degrees. The E0 steps per mm value needs to be set so that a value of 360 in the gcode corresponds to one full turn. In my case this was 103.xx steps per mm.
You can calculate the correct value by issuing a g1 e3600 command (10 full turns) and checking that 10 turns happen and the final angle matches the initial angle. If it's a bit slow add an F3000 or so to that command.
The latest gcodetools is modified to support feedrate gcode for individual turn commands which speeds things up.
See thread here:
https://www.vicious1.com/forum/topic/tangential-cutter-in-development/
And a precursor to the thread (motivation):
https://www.vicious1.com/forum/topic/drag-knife-not-making-sharp-corners/
Additional parameters and operation for attached Gcodetools
Follow instructions in README.md to install
Set the tool to be tangential knife:
Extensions -> Gcodetools dev -> Tools library-dev -> tangient knife -> Apply
A green box will pop up. Use the Inkscape text tool to adjust the values:
lift knife at corner: set to how much lift you want in addition to current cut depth
4th axis command: override to E ( from A) for MPCNC Marlin
Knife lift threshold angle: set the turn angle in degrees above which turns will have a lift. Eg: 45
Depth step: this is the maximum depth per cut
Create orientation points (this is where you'll control cutting depth or material thickness):
Extensions -> Gcodetools dev -> Orientation points-dev -> Z-depth -> Apply
Generate the gcode
Extensions -> Gcodetools dev -> Path to Gcode-dev
Preferences: set the directory to something other than the default /home/, then Apply
Options: set minimum arc radius to 10 (radians), meaning no arc commands will be generated (g2,g3) only straight moves (g0,g1). Apply (firmware struggles with arcs apparently - will test this soon)
Path to Gcode tab: Apply (make sure the vector you want to cut is selected first)
This will generate a new set of vectors in the drawing overlayed onto your cut vectors indicating the gcode commands generated
According to what you set for your output in preferences, this is where the gcode will be generated.
If your MPCNC Marlin is set right for E0 steps per mm, you can run the gcode directly.
Thanks to all over at the Vicious1 forums, especially Alted
Alted I borrowed your pineapple. Hope that's ok
IN DEVELOPMENT
Designs and software likely to undergo updates. Please check back.
Recent updates
25/11:
Published update to gcodetools: manual path selection. Gcode cut order will match path selection order. See github link and manual_path_selection branch. Will merge once I've implemented optionality.
Printed out geodave's blade holder, and very happy with it. See below.
Older:
Moved gcodetools to Github.
Shifted to degrees for the turn magnitude, firmware changes required
Added support for full command by command speed control in the generated gcode
Switched away from the pineapple, and adopted a metal 5mm to 8mm coupler
No more thread moving inside the skate bearings - fashioned a smooth rod threaded at one end and clamped straight into the thread coupler - no top bolt, spring tension controlled by adding or removing washers. Not a critical update, more to follow.
See below for details
Further planned changes
Redesign blade holder - this one is too far from the tool mount. I will probably do something like the TOCK, where Olfa blade snap offs are used. Hopefully the rigidity of the cutting head can be improved.
^ Scratch this. Geodave did it better than I could have https://www.thingiverse.com/thing:2661474
Inter-changeable pen mount - some cut out jobs benefit from markings, like using Fusion 360 Slicer.
Instructable detailing workflow for going from Fusion 360 Slicer output to useable gcode.
Intro
Like a drag knife, only able to cut more intricate designs and sharp corners. Also more suitable for thicker material. May be adapted for other tools which require 4th axis (A axis) rotation, and also for other CNC machines.
https://www.youtube.com/watch?v=UMdeTK2p5F0https://www.youtube.com/watch?v=cap5BHarNFA
Latest vid, working quite well now for thick (7mm) cardboard:
https://www.youtube.com/watch?time_continue=2&v=Y-hkMQuFu2w
Hardware
Design changes incorporated:
Stepper motor to rotate the blade
Rotating assembly free to slide on two steel rods mounted to the MPCNC via linear bearings - allows rotation without losing the spring loaded z
Offset of blade tip to centre axis reduced to 0mm
In addition to the printed parts, you will need:
2 x 608ZZ skate bearings
2 x LMK10UU linear bearing
2 x 10mm x 120mm steel or aluminium rods
1 x Nema 17 stepper motor
4 x M3 x 8 screws
3 x M4 x 20 screws with nut
2 x M3 x 15 screws with nut
1 x M8 x 70 screw with lock nut, or M8 threaded rod cut to length
15mm x 20mm spring (took mine from a £1 caulk gun)
1 x standard utility knife blade
Optional:
5mm to 8mm metal shaft coupler (to replace pineapple, £1.50 each in UK)
Gcode Generation
A modified version of Gcodetools is supplied. Please note, this is no longer included in the Thingiverse page, but instead should be obtained from Github:
https://github.com/jamesd256/gcodetools
Three new parameters are introduced:
knife lift threshold angle (only lift the knife if the material thickness/angle requires it)
4th axis command (allows generation of gcode with A commands substituted with E, see firmware below)
turn feed: Adds an FXXX gcode command to the turns, so turn speed is controllable.
Firmware
A small modification is required for best results with the standard MPCNC supplied Marlin firmware. In the first release, the code was outputting the turn command magnitude in radians. This works better with degrees, so the instructions now reflect that.
Marlin discards anything beyond 2 decimal places for E commands, which is why the change is needed. This means that with the magitudes associated with degrees, the firmware's over extrusion detection kicks in. Hence you will need to upload a new firmware to your Arduino, with the following two lines commened from configuration.h:
#define PREVENT_LENGTHY_EXTRUDE
#define EXTRUDE_MAXLENGTH 200
The stepper motor attaches to the E0 controller on the RAMPS board. You may need an additional stepper driver if you don't have one.
The generated gcode will have the 4th axis turns expressed in positive or negative degrees. The E0 steps per mm value needs to be set so that a value of 360 in the gcode corresponds to one full turn. In my case this was 103.xx steps per mm.
You can calculate the correct value by issuing a g1 e3600 command (10 full turns) and checking that 10 turns happen and the final angle matches the initial angle. If it's a bit slow add an F3000 or so to that command.
The latest gcodetools is modified to support feedrate gcode for individual turn commands which speeds things up.
See thread here:
https://www.vicious1.com/forum/topic/tangential-cutter-in-development/
And a precursor to the thread (motivation):
https://www.vicious1.com/forum/topic/drag-knife-not-making-sharp-corners/
Additional parameters and operation for attached Gcodetools
Follow instructions in README.md to install
Set the tool to be tangential knife:
Extensions -> Gcodetools dev -> Tools library-dev -> tangient knife -> Apply
A green box will pop up. Use the Inkscape text tool to adjust the values:
lift knife at corner: set to how much lift you want in addition to current cut depth
4th axis command: override to E ( from A) for MPCNC Marlin
Knife lift threshold angle: set the turn angle in degrees above which turns will have a lift. Eg: 45
Depth step: this is the maximum depth per cut
Create orientation points (this is where you'll control cutting depth or material thickness):
Extensions -> Gcodetools dev -> Orientation points-dev -> Z-depth -> Apply
Generate the gcode
Extensions -> Gcodetools dev -> Path to Gcode-dev
Preferences: set the directory to something other than the default /home/, then Apply
Options: set minimum arc radius to 10 (radians), meaning no arc commands will be generated (g2,g3) only straight moves (g0,g1). Apply (firmware struggles with arcs apparently - will test this soon)
Path to Gcode tab: Apply (make sure the vector you want to cut is selected first)
This will generate a new set of vectors in the drawing overlayed onto your cut vectors indicating the gcode commands generated
According to what you set for your output in preferences, this is where the gcode will be generated.
If your MPCNC Marlin is set right for E0 steps per mm, you can run the gcode directly.
Thanks to all over at the Vicious1 forums, especially Alted
Alted I borrowed your pineapple. Hope that's ok
Similar models
thingiverse
free

MPCNC Universal mount for Tangential Knife by yvesvlb
...ial knife by yvesvlb
thingiverse
i quickly adapted the mount of the tangential knife so that i can use it in my universal mount.
thingiverse
free

Tangential Oscillating Cutting Knife by luben111
... iges model of the design in case you can't open the solidworks files.
04/10/2016 - increased limits of feed rate in software
thingiverse
free

Spirograph Sharpie Art By CNC by andyseubert
...quot;gcodetools" from herehttps://launchpad.net/gcodetools
thank you nick! http://www.cnc-club.ru/forum/viewtopic.php?t=35
thingiverse
free

Belt Sander Angle Guide Set by Spacelion
...e the angle of double the guide angel because you need to sharpen the blade from both sides. razor blades would need a 10° guide.
thingiverse
free

NEMA-17 Brackets by alterob
...m.
note: you must re-compile the firmware. for marlin you need to edit configuration.h changing #define invert_z_dir to false.
thingiverse
free

Chinese Cutting Pliers Angle 45 Degree Blade Stop by mishkin2
...gle 45 degree blade stop by mishkin2
thingiverse
this is a replacement blade stop for the chinese cutting pliers angle 45 degree
thingiverse
free

Knife sharpening angle guide blocks by imfurplay
...etc.
groove cut into the blocks to use rubber bands to hold to the sharpening stone.
break off the angle you need from the strip.
thingiverse
free

MPCNC Wire Support by rullmann
...antry.
print one of each bracket out and mount them to the stepper brackets by swapping out the screws for a ~5mm longer version.
thingiverse
free

Propellers with different blade angles by Lordgert
...changed from 0 to 90 in 15 degree steps.
used for a physics project in order to see how the angle of the blade affected the lift.
thingiverse
free

3D part scraping tool/ putty knife by Richardas
...rd image.
for my tool i used big 0,5 mm thickness stainless putty knife by cutting it with an angle grinder to the wanted shape.
Tangential
3dfindit
free

Tangential Air Separators
...tangential air separators
3dfind.it
catalog: wheatley hvac
thingiverse
free
MPCNC Universal mount for Tangential Knife by yvesvlb
...ial knife by yvesvlb
thingiverse
i quickly adapted the mount of the tangential knife so that i can use it in my universal mount.
thingiverse
free

Geeetech Prusa I3B 18mm Inductor and tangential fan support by mava70
...nd tangential fan support by mava70
thingiverse
support for a 18mm sensor on a geeetech i3 pro b and a tangential fan deployable
thingiverse
free

Tangential fan support for hot-end IEC 4.0 by Graziano
...ngiverse
tangential fan support for hot-end iec 4.0
link iec 4.0 manufacturer :
http://www.immaginaecreashop.it/hot-end-iec.html
thingiverse
free

E3DV6 tangential fan + hot-end fan 40 MM by Graziano
...
thingiverse
e3dv6 support for extruded material cooled, using the 50 mm tangential fan and body cooling hot-end with fan 40 mm.
thingiverse
free

12° angle block for making a tangential toolholder by stmorgan
...compound angle for the tool bit slot.
plans can be found on www.gadgetbuilder.com on the "tangential toolholder" page.
thingiverse
free

N-Tangential Rotated Rods by ProcerSapientiae
... questions, i'll be posting more now that i finally made an account. i've got a back log of beautiful geometry to upload.
thingiverse
free
Tangential Oscillating Cutting Knife by luben111
... iges model of the design in case you can't open the solidworks files.
04/10/2016 - increased limits of feed rate in software
thingiverse
free
Remix of MPCNC Tangential Knife by GeoDave
...d to a value from 0 to 20.
see the original design: https://www.thingiverse.com/thing:2624654 for further details on this design.
Mpcnc
thingiverse
free

MPCNC Laser Mount
...mpcnc laser mount
thingiverse
custom laser mount for mpcnc.
thingiverse
free

MPCNC Remix
...mpcnc remix
thingiverse
test
thingiverse
free
MPCNC Belt Mod
...mpcnc belt mod
thingiverse
belt mod for mpcnc. alternative to zip tie.
thingiverse
free

MPCNC Y PLATE
...mpcnc y plate
thingiverse
ender 3 printable y plate for mpcnc lowrider 2
thingiverse
free
MPCNC adapter for pen holder
...mpcnc adapter for pen holder
thingiverse
adapter to mpcnc
thingiverse
free

MPCNC Higher Feet
...mpcnc higher feet
thingiverse
extra height and width feet to minimize wobbling on higher mpcnc 2.5mm configurations.
thingiverse
free

MPCNC 30x30 Laser by DariusO
...mpcnc 30x30 laser by dariuso
thingiverse
mpcnc lasermodul in 30x30
thingiverse
free

mpcnc penholder
...mpcnc penholder
thingiverse
a quick remix of two different ideas
thingiverse
free
MPCNC Drillign Guide by isiks_tech
...mpcnc drillign guide by isiks_tech
thingiverse
mpcnc drilling guide for gantry rails.
thingiverse
free

MPCNC Proxxon Mount by CNC_Fan
...mpcnc proxxon mount by cnc_fan
thingiverse
this is my proxxon mount for use mpcnc
Knife
archibase_planet
free
Knifes
...knifes
archibase planet
knifes kitchen knife case-knifes
knifes - 3d model (*.gsm+*.3ds) for interior 3d visualization.
archibase_planet
free
Knife
...knife
archibase planet
knife kitchen-knife carving-knife
knife - 3d model (*.gsm+*.3ds) for interior 3d visualization.
archibase_planet
free
Knife
...knife
archibase planet
knife kitchen knife carving knife
knife - 3d model (*.gsm+*.3ds) for interior 3d visualization.
archibase_planet
free

Knifes
...knifes
archibase planet
kitchen-knifes knife carving-knifes
knifes - 3d model (*.gsm+*.3ds) for interior 3d visualization.
archibase_planet
free

Knife
...knife
archibase planet
knife kitchen-knife carving-knife
knife n211207 - 3d model (*.gsm+*.3ds) for interior 3d visualization.
archibase_planet
free

Knife
...knife
archibase planet
kitchen-knife knife carving-knife
knife n010808 - 3d model (*.gsm+*.3ds) for interior 3d visualization.
archibase_planet
free
Knife
...knife
archibase planet
knife bread knife kitchen knife
knife n040212 - 3d model (*.gsm+*.3ds) for interior 3d visualization.
archibase_planet
free
Knife
...fe
archibase planet
knife penknife pocket knife clasp-knife
knife n300715 - 3d model (*.gsm+*.3ds) for interior 3d visualization.
archibase_planet
free
Knife
...e
archibase planet
knife kitchen knife kitchen ware kitchen-knife
knife n090212 - 3d model (*.3ds) for interior 3d visualization.
archibase_planet
free

Knife
...knife
archibase planet
knife kitchen knife
knife n220807 - 3d model for interior 3d visualization.