Thingiverse

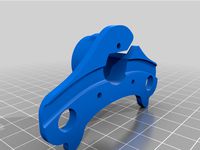
MPCNC dewalt/laser dual tool mount by b3457xm0d3
by Thingiverse
Last crawled date: 3 years, 4 months ago
Updates
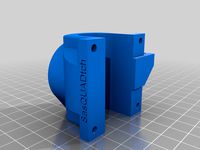
12/10/2020: the file I added today is a total overhaul of the air assist with a few new features. NOTE: this is not backwards compatable with the other pieces. it no longer has the need for any gaskets, the air is piped in and focused downward into a series of spiraling fins directing it into a swirling vortex! also i left room to adjust the focus manually. more to come soon! stay tuned!
11/30/2020: Apologies if you tried to print either of the last 2 revisions of the main body, this version fixes a number of issues aesthetic and otherwise. The side clamp now allows for a full length barb (don't cut it!), and with the 3 m3 nuts and bolts clamps down tightly on the hose (it actually does i promise, i printed and tested it). I am working on a redesign for the air assist which incorporates a different method of covering/uncovering the lens that should adapt easily to automation down the road.
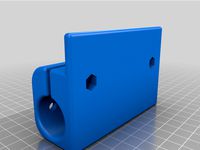
11/29/2020: Updated the main body with counter-bore styled holes for mounting the laser inside, and widened the clamp on the side as well as updating the way the clamp works. this is to allow some mobility while providing sufficient pressure as to not need a hose clamp.
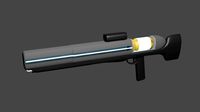
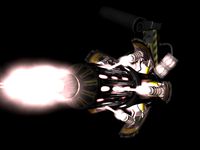
i needed something like this ..but i have an eleksmaker laser (la03-3500), and i wanted an air-assist and a magnetic lens cover for when the laser isn't in use (sawdust + laser optics = no bueno)...
so i designed this!
You Will Need
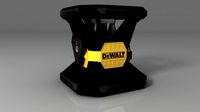
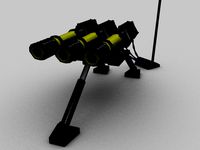
the orignal burly mount for the dewalt 660 and all of it's related hardware
screws for mounting the laser and attaching the air assist
i believe M3's will work if they are the proper length, I just dug through my screw bin until I had what I needed
a 1/4" barbed swivel nut: search amazon
I added this after several failed attempts to print a barb that wouldn't snap off, I found one kicking around in a junk drawer, i'm sure you could even find a one piece solution
2 8x3 neodymium a.k.a. 'rare earth magnets', i got these,
Note:be aware that the naming convention for these magnets apparently has no bearing on the actual dimensions, as the diameter of these is actually 12mm
2 M3x10 or M3x12, with nuts
An air compressor and 1/4" hose.
And Sugru or any kind of gasket maker really
JB Weld makes a few, I just used what I hand on hand, but go nuts
Printing
All the parts can be printed without supports, as long as they are oriented properly.
The main piece needs to be upside-down, the other 2 need to be right-side up.
Assembly
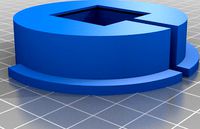
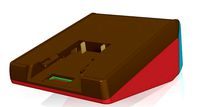
Super glue the magnets in place
Make sure to mind the poles! I usually glue the first magnet in while it's still attached to it's mate, then l put glue in the second cavity and press it over the second magnet, once it's dry pull 'em apart et voila!
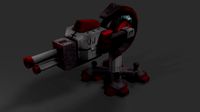
Cut, or grind down the barb, we need it to be <14mm, make it smooth.
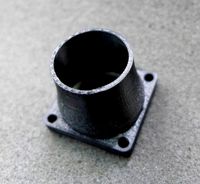
The tube on the side of the Air-assist part is meant to have the swivel nut threaded onto it.
Screw threads bite nicely into 3d-printed holes, so I asked myself: "Why not the other way as well?" After a few prints I had worked out the sizing and bada-bing, the swivel nut threaded over the cylinder.
Slightly overfill the channels on the air-assist and lens cover with the Sugru (or gasket maker) and allow time to set.
UPDATE: the gasket should cover everything except the screw holes on the air assist part, as shown in the picture, and for the lens cover, you need to apply the gasket around the magnet as well, or else the magnetic pull will use the gasket like a fulcrum, and your lens cover will not sit flat like it needs to.
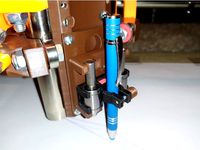
Slide the laser into the main body, and secure with screws.
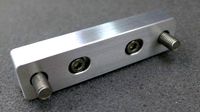
Cut one end off of the air compressor hose and pass it through the clamps on the side of the main body.
Press the cut end of the hose over the barb and maneuver the air-assist into place.
Attach the air-assist to the laser using 4 mounting screws
Use the M3x10's (or 12's) to tighten the clamps down on the hose
Always be sure to remove the lens cover before powering on the laser!
12/10/2020: the file I added today is a total overhaul of the air assist with a few new features. NOTE: this is not backwards compatable with the other pieces. it no longer has the need for any gaskets, the air is piped in and focused downward into a series of spiraling fins directing it into a swirling vortex! also i left room to adjust the focus manually. more to come soon! stay tuned!
11/30/2020: Apologies if you tried to print either of the last 2 revisions of the main body, this version fixes a number of issues aesthetic and otherwise. The side clamp now allows for a full length barb (don't cut it!), and with the 3 m3 nuts and bolts clamps down tightly on the hose (it actually does i promise, i printed and tested it). I am working on a redesign for the air assist which incorporates a different method of covering/uncovering the lens that should adapt easily to automation down the road.
11/29/2020: Updated the main body with counter-bore styled holes for mounting the laser inside, and widened the clamp on the side as well as updating the way the clamp works. this is to allow some mobility while providing sufficient pressure as to not need a hose clamp.
i needed something like this ..but i have an eleksmaker laser (la03-3500), and i wanted an air-assist and a magnetic lens cover for when the laser isn't in use (sawdust + laser optics = no bueno)...
so i designed this!
You Will Need
the orignal burly mount for the dewalt 660 and all of it's related hardware
screws for mounting the laser and attaching the air assist
i believe M3's will work if they are the proper length, I just dug through my screw bin until I had what I needed
a 1/4" barbed swivel nut: search amazon
I added this after several failed attempts to print a barb that wouldn't snap off, I found one kicking around in a junk drawer, i'm sure you could even find a one piece solution
2 8x3 neodymium a.k.a. 'rare earth magnets', i got these,
Note:be aware that the naming convention for these magnets apparently has no bearing on the actual dimensions, as the diameter of these is actually 12mm
2 M3x10 or M3x12, with nuts
An air compressor and 1/4" hose.
And Sugru or any kind of gasket maker really
JB Weld makes a few, I just used what I hand on hand, but go nuts
Printing
All the parts can be printed without supports, as long as they are oriented properly.
The main piece needs to be upside-down, the other 2 need to be right-side up.
Assembly
Super glue the magnets in place
Make sure to mind the poles! I usually glue the first magnet in while it's still attached to it's mate, then l put glue in the second cavity and press it over the second magnet, once it's dry pull 'em apart et voila!
Cut, or grind down the barb, we need it to be <14mm, make it smooth.
The tube on the side of the Air-assist part is meant to have the swivel nut threaded onto it.
Screw threads bite nicely into 3d-printed holes, so I asked myself: "Why not the other way as well?" After a few prints I had worked out the sizing and bada-bing, the swivel nut threaded over the cylinder.
Slightly overfill the channels on the air-assist and lens cover with the Sugru (or gasket maker) and allow time to set.
UPDATE: the gasket should cover everything except the screw holes on the air assist part, as shown in the picture, and for the lens cover, you need to apply the gasket around the magnet as well, or else the magnetic pull will use the gasket like a fulcrum, and your lens cover will not sit flat like it needs to.
Slide the laser into the main body, and secure with screws.
Cut one end off of the air compressor hose and pass it through the clamps on the side of the main body.
Press the cut end of the hose over the barb and maneuver the air-assist into place.
Attach the air-assist to the laser using 4 mounting screws
Use the M3x10's (or 12's) to tighten the clamps down on the hose
Always be sure to remove the lens cover before powering on the laser!
Similar models
thingiverse
free

Mount for K40 Air Assist by erpel09
...ations, the laser head may become loose.
therefore i now use 2 zip ties without tightening the m3 screws to mount the air assist.
thingiverse
free

Air Assist Nozzle for 40w Laser by pjbutler
...freight airbrush kit (http://goo.gl/rz6dru).
it fits pretty snugly over the lens cover, but i added a zip-tie for added security.
thingiverse
free

Z Axis and Air Assist for Ortur Laser Master 2 by wd5gnr
...er height that won't leave the tube open. although i guess, since we aren't using the tube, it doesn't really matter.
thingiverse
free

Air Assist Laser by HenneVA
...air assist laser by henneva
thingiverse
the part is for a china laser with a lens diameter of 16 mm and for a 6 mm air hose.
grabcad
free

K40 air assist and targeting
... 3mm caphead screws in two positions for secure mounting. i've included f3d, step, and iges files for modifications if needed
thingiverse
free

Ortur Laser Master 2 Air Assist Transition by Teps71
...rs required, barbs, push-to-connect, quick disconnect, etc.
included are stl's for both 1/8" npt and 1/4" npt sizes
thingiverse
free

Air nozzle with line lasers ( K40 / 40W-Laser ) by ViperGtr
...0-lasers.
it's the updated version with a normal 12v blower. so there is no hose in the air.
break away supports included ;-)
thingiverse
free

Garden Hose to 1/4 barb by Sp0ngeb0b
...iverse.com/thing:2356899
i needed a 1/4 hose barb side so i edited this one . still not tested tough. will update after i print.
thingiverse
free

32mm scope to picatinny rail adapter
...t's side, and the clamp part with the v groove facing down. put the nuts in the hexgonal slots, and screw it together.
enjoy!
thingiverse
free

K40 laser cutter air assist nozzle for 6mm hose
...t and easy to install.
i used abs with 0.2mm layer height, with 2 or 3 deep wall perimeters and it'll print solid and strong.
B3457Xm0D3
thingiverse
free

eleksmaker la03-3500 by b3457xm0d3
...iverse
i needed a model to design a custom mount around, figured it may help some else out.
i also published the step on grabcad
thingiverse
free

Custom Dewalt 660 End Cap by b3457xm0d3
...custom dewalt 660 end cap by b3457xm0d3
thingiverse
you'll need some m3 screws, 2 should be longer than the others
thingiverse
free
MPCNC cable covers by b3457xm0d3
...machine, so i split all the pieces (you're gonna need quite a few m3 bolts of varying lengths) and expanded the inner cavity.
thingiverse
free

plain top - no limit switch by b3457xm0d3
...lopped it off with meshmixer, thought somebody else might someday find this useful so i decided to give back to the community.. .
thingiverse
free

dewalt 660 customization by b3457xm0d3
... parts for yours. i'm uploading the step file too so you won't have to reverse-engineer the stl in order to utilize this.
thingiverse
free

remixed belt holder by b3457xm0d3
...e best results if you rotate it with the fin sticking up, this will ensure you are not trying to clear supports out of the teeth.
Mpcnc
thingiverse
free

MPCNC Laser Mount
...mpcnc laser mount
thingiverse
custom laser mount for mpcnc.
thingiverse
free

MPCNC Remix
...mpcnc remix
thingiverse
test
thingiverse
free
MPCNC Belt Mod
...mpcnc belt mod
thingiverse
belt mod for mpcnc. alternative to zip tie.
thingiverse
free

MPCNC Y PLATE
...mpcnc y plate
thingiverse
ender 3 printable y plate for mpcnc lowrider 2
thingiverse
free
MPCNC adapter for pen holder
...mpcnc adapter for pen holder
thingiverse
adapter to mpcnc
thingiverse
free

MPCNC Higher Feet
...mpcnc higher feet
thingiverse
extra height and width feet to minimize wobbling on higher mpcnc 2.5mm configurations.
thingiverse
free
MPCNC 30x30 Laser by DariusO
...mpcnc 30x30 laser by dariuso
thingiverse
mpcnc lasermodul in 30x30
thingiverse
free

mpcnc penholder
...mpcnc penholder
thingiverse
a quick remix of two different ideas
thingiverse
free
MPCNC Drillign Guide by isiks_tech
...mpcnc drillign guide by isiks_tech
thingiverse
mpcnc drilling guide for gantry rails.
thingiverse
free

MPCNC Proxxon Mount by CNC_Fan
...mpcnc proxxon mount by cnc_fan
thingiverse
this is my proxxon mount for use mpcnc
Dewalt
3ddd
$1
DeWalt DW735
...dewalt dw735
3ddd
рейсмус dewalt dw735
3d_export
$5

logo dewalt
...logo dewalt
3dexport
dewalt logo/lowpoly/obj
turbosquid
$15

dewalt
... available on turbo squid, the world's leading provider of digital 3d models for visualization, films, television, and games.
3ddd
$1
Перфоратор DeWALT
...перфоратор dewalt
3ddd
инстурмент , перфоратор
хай поли модель перфоратора dewalt
turbosquid
$140

Dewalt 9 tools
...ewalt 9 tools for download as ma, max, 3ds, fbx, obj, and stl on turbosquid: 3d models for games, architecture, videos. (1552245)
3d_export
$15
plastic housing with dewalt battery holder
...t will be powered by a dewalt battery. the case measures 155x106x60. inside the case there are two pcb of 130x98 and 98x42 sizes.
3d_export
$159

Nascar Toyota Camry DeWalt Matt Kenseth 2015 3D Model
...e chassis nascar camry hipoly hi-detail circuit dewalt
nascar toyota camry dewalt matt kenseth 2015 3d model squir 98098 3dexport
turbosquid
$15

DEWALT Manual Flooring Cleat Nailer DWMFN-201
...ler dwmfn-201 for download as ma, max, 3ds, fbx, obj, and stl on turbosquid: 3d models for games, architecture, videos. (1549318)
cg_studio
$159

Nascar Toyota Camry DeWalt Matt Kenseth 20153d model
...4d .3ds - nascar toyota camry dewalt matt kenseth 2015 3d model, royalty free license available, instant download after purchase.
turbosquid
$20
DEWALT 20V Max Green Rotary Tough Laser DW079LG
...laser dw079lg for download as ma, max, 3ds, fbx, obj, and stl on turbosquid: 3d models for games, architecture, videos. (1548702)
Dual
turbosquid
free

Dual Pistols
...ls
turbosquid
free 3d model dual pistols for download as fbx on turbosquid: 3d models for games, architecture, videos. (1320360)
turbosquid
$2

Dual Axe
...urbosquid
royalty free 3d model dual axe for download as fbx on turbosquid: 3d models for games, architecture, videos. (1332372)
turbosquid
$10

Dual Lesaths
... available on turbo squid, the world's leading provider of digital 3d models for visualization, films, television, and games.
3ddd
$1

плитка Dual Bianco (Испания)
...й плитки venis dual (испания). технические качества: устойчивость к стирания, отличная геометрия, отсутствие проблем при укладке.
turbosquid
$35

Dual Mesh Fonts
...ree 3d model dual mesh fonts for download as ma, obj, and fbx on turbosquid: 3d models for games, architecture, videos. (1352989)
turbosquid
$29

Dual Flask with Bungs
...del dual flask with bungs for download as obj, fbx, and blend on turbosquid: 3d models for games, architecture, videos. (1210512)
turbosquid
$19

Dual Socket Plug
...3d model dual socket plug for download as obj, fbx, and blend on turbosquid: 3d models for games, architecture, videos. (1303912)
turbosquid
$13

Dual Adjustable Pulley
... available on turbo squid, the world's leading provider of digital 3d models for visualization, films, television, and games.
turbosquid
$10

Amoi N809 Dual
... available on turbo squid, the world's leading provider of digital 3d models for visualization, films, television, and games.
turbosquid
$5

Dual Turret Tank
... available on turbo squid, the world's leading provider of digital 3d models for visualization, films, television, and games.
Laser
3d_export
$5
laser
...laser
3dexport
a 3d laser
3d_export
free
cnc 3dp laser nozzle for 2w laser opt lasers
...logy that gave birth to cutting and engraving laser heads this laser nozzle was designed for, read the article in the link below:
3d_export
free
cnc laser mount opt lasers
...eive the engraving and cutting laser heads this cnc machine laser mount was designed for, read the article on the following page:
turbosquid
$20
Laser
... available on turbo squid, the world's leading provider of digital 3d models for visualization, films, television, and games.
turbosquid
$15
Laser
... available on turbo squid, the world's leading provider of digital 3d models for visualization, films, television, and games.
turbosquid
$3
Laser
... available on turbo squid, the world's leading provider of digital 3d models for visualization, films, television, and games.
3d_export
$5

laser sword
...laser sword
3dexport
it is a blue laser sword with a metal frame
3d_ocean
$19
Laser Turret
...be used in any sf type of game, especially in tower defense games. - laser turret: 3025 polygons - props: 270 polygons - textu...
3d_export
free
workbee cnc laser mount for opt lasers
...the specifications of engraving and cutting laser heads this mount was designed for, please take a look at the following website:
3d_export
free

shapeoko cnc laser mount for opt lasers
...ind out the opportunities that adding a cutting and engraving laser head to your cnc can bring, take a look at the website below:
Tool
turbosquid
$21
Tool box with tools
... available on turbo squid, the world's leading provider of digital 3d models for visualization, films, television, and games.
archibase_planet
free
Tools
...tools
archibase planet
tools instruments implements
tools n070114 - 3d model (*.gsm+*.3ds+*.max) for interior 3d visualization.
3d_ocean
$12
Tools
...tools
3docean
hammer metal old screw tools wrench
maya
turbosquid
$6

Tool Cart / Tool Box
...
royalty free 3d model tool cart / tool box for download as on turbosquid: 3d models for games, architecture, videos. (1241859)
3d_ocean
$15
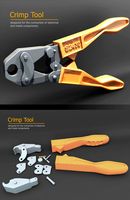
crimp tool
... tool copper cutter crimp crimp tool electrical electrical tools press tools pressing tool tools wire cutter
created in maya 2013
3d_ocean
$5

Tools
...tools
3docean
3d models paint tools work
3d,models,works,paint,art,create,working,
3d_export
free
tools
...tools
3dexport
coldsteel
turbosquid
$15

Tools
...turbosquid
royalty free 3d model tools for download as blend on turbosquid: 3d models for games, architecture, videos. (1331352)
3ddd
$1
bar tool
...bar tool
3ddd
барный
bar tool
turbosquid
$35

tools
... available on turbo squid, the world's leading provider of digital 3d models for visualization, films, television, and games.
Mount
3d_export
free

mounting bracket
...mounting plate is the portion of a hinge that attaches to the wood. mounting plates can be used indoors, cabinetry and furniture.
turbosquid
$2

MOUNTING
... available on turbo squid, the world's leading provider of digital 3d models for visualization, films, television, and games.
turbosquid
free

Mounts
... available on turbo squid, the world's leading provider of digital 3d models for visualization, films, television, and games.
turbosquid
free

Mount Fuji
...fuji
turbosquid
free 3d model mount fuji for download as obj on turbosquid: 3d models for games, architecture, videos. (1579977)
3d_export
$5

Headphone mount LR
...headphone mount lr
3dexport
headphone mount l+r
turbosquid
$39

Mount rainier
...quid
royalty free 3d model mount rainier for download as fbx on turbosquid: 3d models for games, architecture, videos. (1492586)
turbosquid
$5

pipe mounting
...quid
royalty free 3d model pipe mounting for download as obj on turbosquid: 3d models for games, architecture, videos. (1293744)
turbosquid
$3

Mounting Tires
...uid
royalty free 3d model mounting tires for download as fbx on turbosquid: 3d models for games, architecture, videos. (1708511)
3d_export
$5

Magnetic GoPro Mount
...pro mount
3dexport
cool magnetic mount for gopro. allows you to mount the camera on flat metal surfaces and get exclusive shots.
turbosquid
$5

Stone Mount
...ty free 3d model stone mount for download as ma, obj, and fbx on turbosquid: 3d models for games, architecture, videos. (1370306)