Thingiverse
Mounting Plate for 2 to 1 Mixing Extruder for Geeetech Prusa I3 by DougInAZ
by Thingiverse
Last crawled date: 3 years ago
Update 12/8/17 It looks like this mix/dual extruder could be adapted to a radial fan in the same way I am modifying the 2 in 1 out switch extruder Thing I made. If you have an interest in helping to develop this, let me know and I'll make a duct and transition piece that you can print and evaluate with a 30 (or 40) mm axial fan. If it looks promising, then I'll make the mounting parts for the fan and the transition piece for a radial fan.
Update 1/24/2007
I added some info about my experience with the Cyclops Clone 2to1/Mix extruder near the bottom of this section.
UPDATE 4/23/16
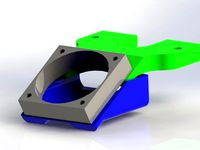
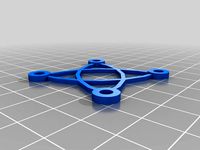
I added a plate that allows you to attach a 40 mm fan to the 30 mm fan mounting holes on the Geeetech single extruder bracket that I use with the mix extruder plate. Use 3 mm cap screws to mount the plate to the bracket and 3mm screws or sheet metal screws that cut threads into the bottom holes of the plate. Use a little heat on the screws to prevent cracking the plate as you cut the threads into the hole.
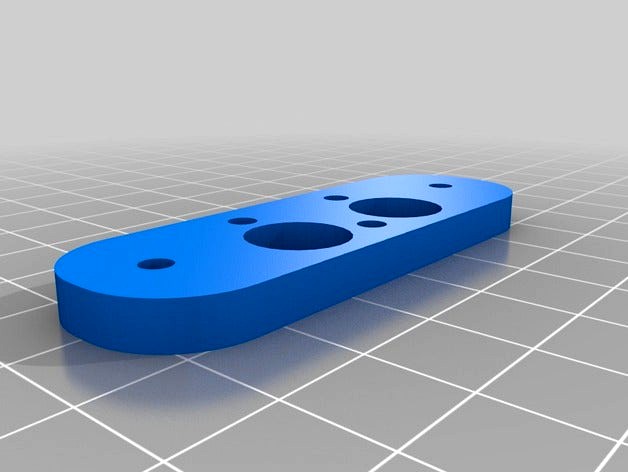
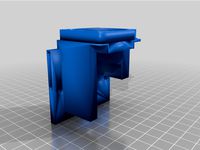
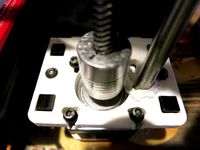
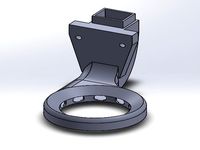
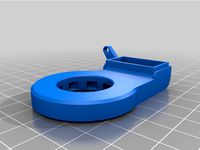
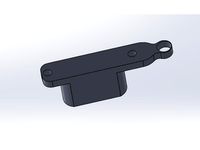
This mounting plate allows you to attach a 2 to 1 mixing/switching extruder to a single extruder mounting bracket attached to the X carriage of a Geeetech I3 printer. In addition there is a spacer, two of which may be needed, depending on how you mount the extruder, to ensure the hot end is lower than the X axis carriage plate.
I mounted all the hardware with M3 screws. The thickness of the mounting plate was sized to make use of some 8mm M3 button head screws I had on hand. You can adjust it to meet your needs. I mounted the bracket upside down and used longer M3 screws in the lower band of the upper linear bearing to attach the bracket, rather than M4 screws as intended. I'm not sure that's the best solution to get the hot end below the carriage without loosing any more Z axis capacity than necessary.
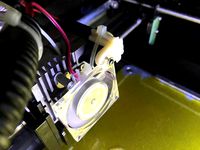
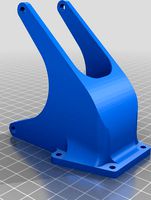
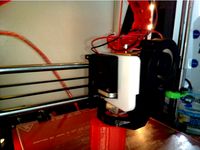
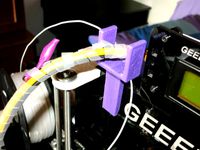
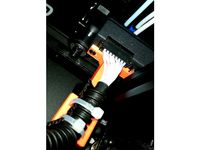
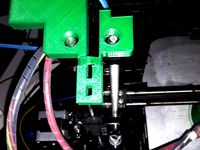
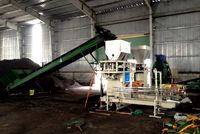
The photos show one shot of the mix extruder and two of the extruder with one of the original hot ends that were furnished with the MK8 extruder. There was a defect in the mixing block (see PLA oozing out of the heater cavity) so I reverted to a single extruder using the parts furnished with the mixing extruder. You can buy extra throats for the block so you can quickly switch from a mix/switch situation to a dual extruder with two hot ends. Dealing with the switch with the firmware may not be so easy. Look for the parts on Aliexpress and eBay. The single extruder bracket is available from Geeetech also.
The mounting bracket has hole spacing for a 30 mm fan. I hung a 40 mm fan on it temporarily.
In order to use this effectively, it looks like different firmware will be required. It appears that Repetier firmware has capability to handle mixing extruders . Maybe you can define extra virtual extruders to use when switching to a dual hot end configuration.
update 1/24/17 notes about mix extruder
I switched to Repetier FW on the printer and defined a dozen mix ratios in virtual extruders within Repetier Host.
It does work to combine two filaments in the ratio you select, but it does not truly mix the two filaments. The extruded filament shows the two filament colors prominent on the edge of the extruded thread, and a fair amount of mixing in the center of the thread. This results in an object that has a different color depending upon which side of the filament thread you are viewing, i.e. if you print a cube, one side will favor filament A and the other will favor filament B. It's an interesting effect, but not a true mixer.
There can be a significant problem with filament melting too far back in the throats of the extruder block. This can cause a flow stoppage, especially if you use a low flow on one extruder. Geeetech limits the flow ratio to something like 96/4 on the M201 printer, and I can see why. I wouldn't recommend even trying a 100/0 ratio until you have it well proven. I believe the problem I saw is due to the poor design of the clone throats; the heat break area is not thin enough, and the upper block has to handle more heat than the original Cyclops part probably does.
I attached a 30 mm fan to the block. Get a good quality fan, you need a lot of cooling (if you are using a clone with poor heat breaks). I also added small aluminum heat sinks to every bit of the upper block that I could. That helped a lot, but was not as reliable as I hoped for at high flow difference between the two sides.
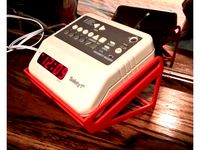
I finally insulated the extruder block with thin cardboard on all 6 sides. I used cereal box type paper. That made a significant difference in the ability of the heater controller to hold the temperature of extruder. The main effect though, I believe, is that since the heater can run at a lower duty cycle with insulation on the extruder block, there is less heat flowing into the upper block, and the filament is staying below the melt point farther down the throats of the extruder block, and it probably now works as well as it can. Again, probably not a consideration on the original E3D part.
The same problem is evident if you switch to two extruder blocks and try to use it as a dual extruder machine. There is a new 2 to 1 switching extruder from a Chinese supplier that looks like it will work as a true switcher and will avoid the problems with two streams of fluid filament by retracting the unused filament back into the cool zone when the tool is switched to the other extruder.
Update 1/24/2007
I added some info about my experience with the Cyclops Clone 2to1/Mix extruder near the bottom of this section.
UPDATE 4/23/16
I added a plate that allows you to attach a 40 mm fan to the 30 mm fan mounting holes on the Geeetech single extruder bracket that I use with the mix extruder plate. Use 3 mm cap screws to mount the plate to the bracket and 3mm screws or sheet metal screws that cut threads into the bottom holes of the plate. Use a little heat on the screws to prevent cracking the plate as you cut the threads into the hole.
This mounting plate allows you to attach a 2 to 1 mixing/switching extruder to a single extruder mounting bracket attached to the X carriage of a Geeetech I3 printer. In addition there is a spacer, two of which may be needed, depending on how you mount the extruder, to ensure the hot end is lower than the X axis carriage plate.
I mounted all the hardware with M3 screws. The thickness of the mounting plate was sized to make use of some 8mm M3 button head screws I had on hand. You can adjust it to meet your needs. I mounted the bracket upside down and used longer M3 screws in the lower band of the upper linear bearing to attach the bracket, rather than M4 screws as intended. I'm not sure that's the best solution to get the hot end below the carriage without loosing any more Z axis capacity than necessary.
The photos show one shot of the mix extruder and two of the extruder with one of the original hot ends that were furnished with the MK8 extruder. There was a defect in the mixing block (see PLA oozing out of the heater cavity) so I reverted to a single extruder using the parts furnished with the mixing extruder. You can buy extra throats for the block so you can quickly switch from a mix/switch situation to a dual extruder with two hot ends. Dealing with the switch with the firmware may not be so easy. Look for the parts on Aliexpress and eBay. The single extruder bracket is available from Geeetech also.
The mounting bracket has hole spacing for a 30 mm fan. I hung a 40 mm fan on it temporarily.
In order to use this effectively, it looks like different firmware will be required. It appears that Repetier firmware has capability to handle mixing extruders . Maybe you can define extra virtual extruders to use when switching to a dual hot end configuration.
update 1/24/17 notes about mix extruder
I switched to Repetier FW on the printer and defined a dozen mix ratios in virtual extruders within Repetier Host.
It does work to combine two filaments in the ratio you select, but it does not truly mix the two filaments. The extruded filament shows the two filament colors prominent on the edge of the extruded thread, and a fair amount of mixing in the center of the thread. This results in an object that has a different color depending upon which side of the filament thread you are viewing, i.e. if you print a cube, one side will favor filament A and the other will favor filament B. It's an interesting effect, but not a true mixer.
There can be a significant problem with filament melting too far back in the throats of the extruder block. This can cause a flow stoppage, especially if you use a low flow on one extruder. Geeetech limits the flow ratio to something like 96/4 on the M201 printer, and I can see why. I wouldn't recommend even trying a 100/0 ratio until you have it well proven. I believe the problem I saw is due to the poor design of the clone throats; the heat break area is not thin enough, and the upper block has to handle more heat than the original Cyclops part probably does.
I attached a 30 mm fan to the block. Get a good quality fan, you need a lot of cooling (if you are using a clone with poor heat breaks). I also added small aluminum heat sinks to every bit of the upper block that I could. That helped a lot, but was not as reliable as I hoped for at high flow difference between the two sides.
I finally insulated the extruder block with thin cardboard on all 6 sides. I used cereal box type paper. That made a significant difference in the ability of the heater controller to hold the temperature of extruder. The main effect though, I believe, is that since the heater can run at a lower duty cycle with insulation on the extruder block, there is less heat flowing into the upper block, and the filament is staying below the melt point farther down the throats of the extruder block, and it probably now works as well as it can. Again, probably not a consideration on the original E3D part.
The same problem is evident if you switch to two extruder blocks and try to use it as a dual extruder machine. There is a new 2 to 1 switching extruder from a Chinese supplier that looks like it will work as a true switcher and will avoid the problems with two streams of fluid filament by retracting the unused filament back into the cool zone when the tool is switched to the other extruder.
Similar models
thingiverse
free

Flexion Adapter Plate for Trinus by Rethys
...ill need to drill corresponding holes into the other side of the the aluminum angle, and thread those holes with an m3 .5 mm tap.
thingiverse
free
Solidoodle Press extruder fan bracket and horizontal plate by kel
...ing perpendicular to the built-in fan. a horizontal plate blocks the wind flow to the bed and directs it to the extruder housing.
thingiverse
free

Mounting Plate for 2 in 1 out Switch Hotend for Geeetech Prusa I3 by DougInAZ
...for mounting a new 2-to-1 hot end that is similar to a cyclops, but permits two filaments to be...
thingiverse
free

Cooling Fan Box for TAZ3 by msufilip
...screws for mounting it on the right side of the hot end assembly, also it uses four heat-set inserts (m2.5) for mounting the fan.
thingiverse
free
Ender 3 Max 7530 fan adapter by burto17rn
...e combination of using this cooling setup with a all metal hot-end and dual gear extruder completely fixed my heat creep problem.
thingiverse
free

Anet A8 18mm Sensor Bracket and Extruder Fan Holder by ashleydawson
... inside a holster so it can be easily removed without screws for quick access to the filament nozzle throat for loading filament.
thingiverse
free
Wade extruder J-head fan mount by Dainis
...n.
added air duct that cools the upper part of hot end (cold end). it makes it really cool, if you use additional radiators...
thingiverse
free
Geeetech 2 in 1 out dual extruder mix color hotend Mount Plate by Tux2020
...a4x10 flx.
on the left side are some holes to screw on a bl touch holder.
translated with www.deepl.com/translator (free version)
thingiverse
free
Throat cooler for Geeetech Prusa i3 ProB by RugbyGoth
...goth
thingiverse
this part will redirect the flow of the upper fan to the throat reducing its temperature and reducing clapping.
thingiverse
free

Hot end fan mount for dual extruder zonestar p802cr2 by arrimcx
...lament cooling. it works well, it need two screws for stick on the other fan and another two screws for stick the fan in position
Douginaz
thingiverse
free
Simple Fan Guard by DougInAZ
...original, but other than that should do about the same job as the original. if you want it thicker, scale it in the z direction.
thingiverse
free

Super Glue Holder by DougInAZ
...se for super glue before i had a 3d printer. now, i find it an essential item to assmeble and patch pla and some other plastics.
thingiverse
free

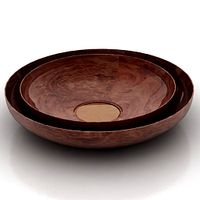
Soap Tray for Kitchen or bathroom by DougInAZ
...version without drain holes, let me know and i'll add one.
note: the models are sized @ 10x. scale to 0.1 for original size.
thingiverse
free

Nose Clip for anti COVID mask by DougInAZ
...nother version(s) right away.
update 4/17/21 i added a version that fits tighter on my face and is twice as thick in the arms.
thingiverse
free
Holder for X10 Clock by DougInAZ
...the rear feet of the stand. it was really not needed for my use, and probably doesn't need to be used for most applications.
thingiverse
free
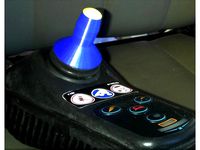
Joy Stick Handle for Power Chair by DougInAZ
...meter, with a 11.5 mm circular stop below.
the part has a thin internal brim built into it that has to be removed prior to use.
thingiverse
free
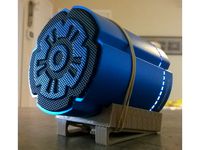
Base for Enermax EAS02S Bluetooth Speaker by DougInAZ
...ne perimeter for the base, and the infill moved the printed thread where they were adjacent. however, it was surprisingly rigid.
thingiverse
free

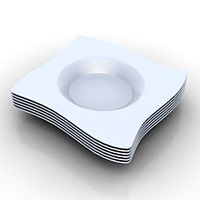
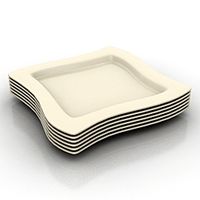
Tray for Pills, etc. by DougInAZ
...two colors using a y-switching extruder and patched g-code. there is also a small foot. print four and glue them on the bottom.
thingiverse
free

Tether for Drill Chuck Key by DougInAZ
...asy to heat them with a hair dryer and slip them around the 90 deg bend when they were hot. upon cooling, they are a shrink fit.
thingiverse
free

Steering Wheel Spinner Knob for 29x36 mm Wheel by DougInAZ
...ings like this, the question of legality and the risk imposed by having this attached to the steering wheel is borne by the user.
Geeetech
3d_export
free
part right for geeetech acrylic i 3
...part right for geeetech acrylic i 3
3dexport
the engine can be shifted
3d_export
free
cable holder
...cable holder 3dexport for geeetech acrylic i...
thingiverse
free

geeetech a10 by Igor_garbuz
...geeetech a10 by igor_garbuz
thingiverse
model geeetech a10 ( solidworks).
thingiverse
free
geeetech calibration by muffler1979
...geeetech calibration by muffler1979
thingiverse
just a calibration test for the bed on a geeetech
thingiverse
free
Fan for Geeetech proB
...fan for geeetech prob
thingiverse
this is my fan for the geeetech pro b i3.
thingiverse
free

Chain for Geeetech A30
...chain for geeetech a30
thingiverse
this is my personal review of chain for geeetech a30.
thingiverse
free
Zugentlastung Hotend Geeetech A30T / Strain relief Geeetech A30T by 3DDennis1983
...zugentlastung hotend geeetech a30t / strain relief geeetech a30t by 3ddennis1983
thingiverse
zugentlastung hotend geeetech a30t
thingiverse
free
Kettenhalter i3x geeetech by Autark
...kettenhalter i3x geeetech by autark
thingiverse
geeetech i3x
thingiverse
free
Geeetech A10 Fanduct by stefan177gr
...geeetech a10 fanduct by stefan177gr
thingiverse
fanduct for geeetech a10
thingiverse
free
Geeetech filament guide by RicardoZ2018
...geeetech filament guide by ricardoz2018
thingiverse
desing for geeetech i3x
I3
3d_export
$10

suv i3
...suv i3
3dexport
suv i3 2013 series
3d_ocean
$89

BMW i3 2012
...y, in real units of measurement, qualitatively and maximally close to the original. model formats: - *.max (3ds max 2008 scanl...
cg_studio
$99

BMW i3 20143d model
...
cgstudio
.3ds .c4d .fbx .lwo .max .obj - bmw i3 2014 3d model, royalty free license available, instant download after purchase.
cg_studio
$99

BMW i3 20123d model
...tudio
.3ds .c4d .fbx .lwo .max .mb .obj - bmw i3 2012 3d model, royalty free license available, instant download after purchase.
cg_studio
$99

BMW i3 20143d model
...tudio
.3ds .c4d .fbx .lwo .max .mb .obj - bmw i3 2014 3d model, royalty free license available, instant download after purchase.
humster3d
$75

3D model of BMW i3 2014
...
buy a detailed 3d model of bmw i3 2014 in various file formats. all our 3d models were created maximally close to the original.
humster3d
$40

3D model of Kitchen Set I3
...uy a detailed 3d model of kitchen set i3 in various file formats. all our 3d models were created maximally close to the original.
3d_ocean
$30

Kitchen set i3
...ensils oven plates shelves sink table ware
kitchen set i3 include 3d models: cooker, oven, sink, cupboards, table, chair, plates.
3d_ocean
$89

BMW i3 2014
...y, in real units of measurement, qualitatively and maximally close to the original. model formats: - *.max (3ds max 2008 scanl...
cg_studio
$99

BMW i3 Concept 20113d model
...i3
.3ds .c4d .fbx .lwo .max .obj - bmw i3 concept 2011 3d model, royalty free license available, instant download after purchase.
Mixing
3d_export
free
mixing machine
...mixing machine
3dexport
a civil mixing machine
3d_export
$5
artiste azul mix artiste verde mix
...artiste azul mix artiste verde mix
3dexport
artiste azul mix<br>artiste verde mix
archibase_planet
free

Biscuit Mix
...iscuit mix
archibase planet
biscuits biscuit biscuit mix
baking mix box 1 - 3d model (*.gsm+*.3ds) for interior 3d visualization.
3d_export
$10
concrete mixing conveyor
...concrete mixing conveyor
3dexport
concrete mixing conveyor
3d_export
$6

color mixing palette
...color mixing palette
3dexport
color mixing palette
3d_export
$50

MIXING DRYING MACHINE
...ying machine
3dexport
mixing drying machine - salted roasted cashews -roasted peanut - mix the flour... - p:0.75kw bonfigioli. -
turbosquid
$2

Mixing Bowls
...ee 3d model mixing bowls for download as fbx and unitypackage on turbosquid: 3d models for games, architecture, videos. (1289683)
turbosquid
$14

Seed Mix
...alty free 3d model seed mix for download as max, obj, and fbx on turbosquid: 3d models for games, architecture, videos. (1364661)
turbosquid
$10

MIxed Squash
...d model mixed squash for download as obj, fbx, blend, and dae on turbosquid: 3d models for games, architecture, videos. (1515521)
turbosquid
$39

Round Mix
... available on turbo squid, the world's leading provider of digital 3d models for visualization, films, television, and games.
Prusa
turbosquid
$2

Frame Filament Guide Clip-On for Prusa Mk3
...rame filament guide clip-on for prusa mk3 for download as stl on turbosquid: 3d models for games, architecture, videos. (1634730)
3d_export
free

prusa i3 mk3s laser mount for opt lasers
...to learn more about the blue laser technology that conceived the cutting and engraving laser heads from opt lasers, please visit:
turbosquid
free

Prusa small printer adapter holder
...er for download as ipt, skp, dwg, dxf, fbx, ige, obj, and stl on turbosquid: 3d models for games, architecture, videos. (1642936)
3d_export
$30

geisha by jonathan adler
...** i did a 3d printing test in the prusa software, you can find it among the attached images.<br>exchange:<br>.blend...
thingiverse
free

Prusa without Prusa (rc2) by madless
...prusa without prusa (rc2) by madless
thingiverse
just the main part of prusa rc2 faceshield, without writing.
enjoy :)
thingiverse
free

Prusa by acejbc
...prusa by acejbc
thingiverse
prusa knob info
m3 8mm screw
thingiverse
free

Prusa house
...prusa house
thingiverse
how prusa house could look like...
thingiverse
free

Prusa Mk2 "Fake Prusa" LCD cover by anraf1001
...r by anraf1001
thingiverse
version of prusa's lcd cover with "fake prusa" instead of "original prusa"
thingiverse
free

Prusa stabilizator by gutiueugen
...prusa stabilizator by gutiueugen
thingiverse
prusa stabilizator
thingiverse
free

Keychain Prusa by rbarbalho
...keychain prusa by rbarbalho
thingiverse
keychain with text prusa.
Extruder
3ddd
$1

Extruded Chair
...extruded chair
3ddd
extruded , tom dixon
inspired by tom dixon extruded chair
turbosquid
$15

Extruded Table
... extruded table for download as blend, dae, fbx, obj, and stl on turbosquid: 3d models for games, architecture, videos. (1634137)
turbosquid
$2

3D Printer Extruder
...d
royalty free 3d model 3d printer extruder for download as on turbosquid: 3d models for games, architecture, videos. (1537359)
turbosquid
$1

Zombie extruded text
...oyalty free 3d model zombie extruded text for download as obj on turbosquid: 3d models for games, architecture, videos. (1322198)
turbosquid
$4

Extruder conical screw
...el extruder conical screw for download as sldpr, ige, and stl on turbosquid: 3d models for games, architecture, videos. (1524433)
turbosquid
$50

3d PRINTER - Extruder
... available on turbo squid, the world's leading provider of digital 3d models for visualization, films, television, and games.
turbosquid
$15

Extruded Table 2
...xtruded table 2 for download as blend, dae, fbx, obj, and stl on turbosquid: 3d models for games, architecture, videos. (1621846)
turbosquid
$10

Maya Extrude Tool
... available on turbo squid, the world's leading provider of digital 3d models for visualization, films, television, and games.
3d_export
$5

world earth extrude map
...world earth extrude map
3dexport
3ddd
$1

Simply Elegant Extruded Tree Coffee Table Design
...ble by link studios. the silhouette of a tree is visible at one angle, extruded from the surface to create the support structure.
Plate
archibase_planet
free
Plates
...plates
archibase planet
plates and dishes plate
plates - 3d model (*.gsm+*.3ds) for interior 3d visualization.
3d_export
$5

plate
...plate
3dexport
plate
archibase_planet
free
Plates
...plates
archibase planet
plates and dishes plate kitchen ware
plates - 3d model (*.gsm+*.3ds) for interior 3d visualization.
archibase_planet
free
Plates
...plates
archibase planet
plate plates and dishes crockery
plates 2 - 3d model (*.gsm+*.3ds) for interior 3d visualization.
archibase_planet
free
Plate
...plate
archibase planet
dinner-plate plate kitchen ware
plate n070808 - 3d model (*.gsm+*.3ds) for interior 3d visualization.
3d_export
$6

plate
...plate
3dexport
design of plate
3d_export
$5

plate
...plate
3dexport
plate lowpoly
archibase_planet
free
Plates
...plates
archibase planet
plate dish kitchen-ware
plate - 3d model for interior 3d visualization.
3ddd
$1
Plates
...plates
3ddd
полка , тарелка
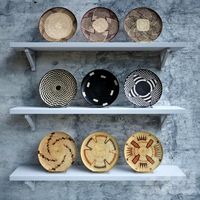
african plates
archibase_planet
free
Plate
...plate
archibase planet
plate kitchen ware
plate - 3d model (*.gsm+*.3ds) for interior 3d visualization.
Mounting
3d_export
free

mounting bracket
...mounting plate is the portion of a hinge that attaches to the wood. mounting plates can be used indoors, cabinetry and furniture.
turbosquid
$2

MOUNTING
... available on turbo squid, the world's leading provider of digital 3d models for visualization, films, television, and games.
turbosquid
free

Mounts
... available on turbo squid, the world's leading provider of digital 3d models for visualization, films, television, and games.
turbosquid
free

Mount Fuji
...fuji
turbosquid
free 3d model mount fuji for download as obj on turbosquid: 3d models for games, architecture, videos. (1579977)
3d_export
$5

Headphone mount LR
...headphone mount lr
3dexport
headphone mount l+r
turbosquid
$39

Mount rainier
...quid
royalty free 3d model mount rainier for download as fbx on turbosquid: 3d models for games, architecture, videos. (1492586)
turbosquid
$5

pipe mounting
...quid
royalty free 3d model pipe mounting for download as obj on turbosquid: 3d models for games, architecture, videos. (1293744)
turbosquid
$3

Mounting Tires
...uid
royalty free 3d model mounting tires for download as fbx on turbosquid: 3d models for games, architecture, videos. (1708511)
3d_export
$5

Magnetic GoPro Mount
...pro mount
3dexport
cool magnetic mount for gopro. allows you to mount the camera on flat metal surfaces and get exclusive shots.
turbosquid
$5

Stone Mount
...ty free 3d model stone mount for download as ma, obj, and fbx on turbosquid: 3d models for games, architecture, videos. (1370306)
1
turbosquid
$69

armchairs(1)(1)
... available on turbo squid, the world's leading provider of digital 3d models for visualization, films, television, and games.
turbosquid
$15

ring 1+1
... available on turbo squid, the world's leading provider of digital 3d models for visualization, films, television, and games.
turbosquid
$10

chair(1)(1)
... available on turbo squid, the world's leading provider of digital 3d models for visualization, films, television, and games.
turbosquid
$8

Chair(1)(1)
... available on turbo squid, the world's leading provider of digital 3d models for visualization, films, television, and games.
turbosquid
$2

RING 1(1)
... available on turbo squid, the world's leading provider of digital 3d models for visualization, films, television, and games.
turbosquid
$1

house 1(1)
... available on turbo squid, the world's leading provider of digital 3d models for visualization, films, television, and games.
turbosquid
$1

Table 1(1)
... available on turbo squid, the world's leading provider of digital 3d models for visualization, films, television, and games.
turbosquid
$59

Formula 1(1)
...lty free 3d model formula 1 for download as max, fbx, and obj on turbosquid: 3d models for games, architecture, videos. (1567088)
design_connected
$11

No 1
...no 1
designconnected
sibast no 1 computer generated 3d model. designed by sibast, helge.
turbosquid
$2

desert house(1)(1)
...3d model desert house(1)(1) for download as 3ds, max, and obj on turbosquid: 3d models for games, architecture, videos. (1055095)
2
design_connected
$11

No 2
...no 2
designconnected
sibast no 2 computer generated 3d model. designed by sibast, helge.
turbosquid
$6

Cliff Rock 2-2
...uid
royalty free 3d model cliff rock 2-2 for download as obj on turbosquid: 3d models for games, architecture, videos. (1619161)
turbosquid
$29

Book variation 2 2
...3d model book variation 2 2 for download as max, obj, and fbx on turbosquid: 3d models for games, architecture, videos. (1366868)
turbosquid
$22

Classic baluster (2) (2)
...assic baluster (2) (2) for download as max, obj, fbx, and stl on turbosquid: 3d models for games, architecture, videos. (1483789)
turbosquid
$99

Smilodon 2 Pose 2
... available on turbo squid, the world's leading provider of digital 3d models for visualization, films, television, and games.
turbosquid
$20

Barrel Barricade 2-2
... available on turbo squid, the world's leading provider of digital 3d models for visualization, films, television, and games.
turbosquid
$6

Wall Trophy (2) (2)
... available on turbo squid, the world's leading provider of digital 3d models for visualization, films, television, and games.
turbosquid
free

Tire label 2 of 2
... available on turbo squid, the world's leading provider of digital 3d models for visualization, films, television, and games.
3ddd
$1

Кровать, 2 тумбочки, 2 светильника
...кровать, 2 тумбочки, 2 светильника
3ddd
кровать, 2 тумбочки, 2 светильника
нормальное качество
формат 3ds max
без текстур
3ddd
free

Кровать, 2 тумбочки, 2 светильника
...кровать, 2 тумбочки, 2 светильника
3ddd
кровать, 2 тумбочки, 2 светильника
нормальное качество
формат 3ds max
без текстур