Thingiverse

Mould and guides for wet forming a glasses case from Leather by Amazinblaze
by Thingiverse
Last crawled date: 3 years, 3 months ago
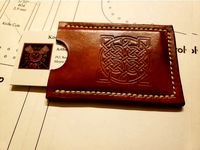
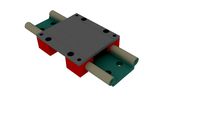
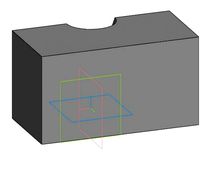
These are the parts I used to create the glasses case as seen in the images.NOTE: Please note that while these are the parts I used for this project, there is quite some room for improvement. I dont know If I will make enough of these in the future to justify Iterating on the mould design, so this is it for now.
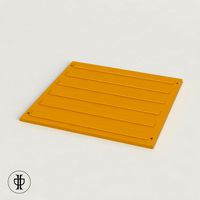
To create the case, Four 12x12 cm pieces of 7oz leather are needed to get the outer shell (green in my example), and two smaller pieces, about 4 cm x 10 cm each, are needed to make the connector (brown).
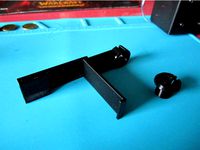
The big mould is used for the shell pieces, where one of the big pieces is soaked in water first, then carefully formed around the bottom mould by hand, until it shows the rough shape. Then, the top part can be pressed on. make sure the backsides of the mould line up, this assures that the round part sits snug. You can apply force to the mould using clamps, but make sure you dont harm the leather.
Let the leather sit in the clamped mould over night, then take it out so that it can dry properly while you mould the next piece.
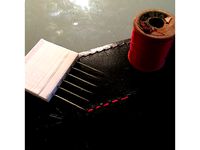
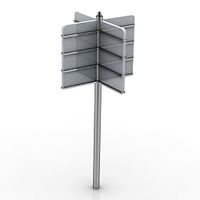
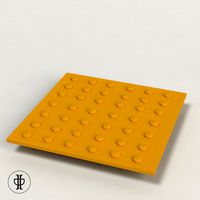
The stitching guides can be helpful to get equidistant stitching around the curved parts. The holes are designed to fit my awl when printed with my printer. This was a bit of trial and error, so your mileage may vary.
It is advised to stitch the shorter seams first, because once the shell is sewn together, you may have trouble getting the needles through (especially on the side with the connector piece).
The stitching guide for the long seam around the case can also be used as a cutting guide to cut excess leather from the shell parts.
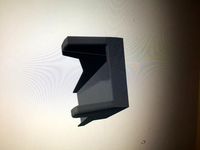
to connect the two shell pieces, you'll need the two smaller pieces. I moulded those as well, but this might be overkill because the leather can be easily bent around the required radius without soaking it.
To create the case, Four 12x12 cm pieces of 7oz leather are needed to get the outer shell (green in my example), and two smaller pieces, about 4 cm x 10 cm each, are needed to make the connector (brown).
The big mould is used for the shell pieces, where one of the big pieces is soaked in water first, then carefully formed around the bottom mould by hand, until it shows the rough shape. Then, the top part can be pressed on. make sure the backsides of the mould line up, this assures that the round part sits snug. You can apply force to the mould using clamps, but make sure you dont harm the leather.
Let the leather sit in the clamped mould over night, then take it out so that it can dry properly while you mould the next piece.
The stitching guides can be helpful to get equidistant stitching around the curved parts. The holes are designed to fit my awl when printed with my printer. This was a bit of trial and error, so your mileage may vary.
It is advised to stitch the shorter seams first, because once the shell is sewn together, you may have trouble getting the needles through (especially on the side with the connector piece).
The stitching guide for the long seam around the case can also be used as a cutting guide to cut excess leather from the shell parts.
to connect the two shell pieces, you'll need the two smaller pieces. I moulded those as well, but this might be overkill because the leather can be easily bent around the required radius without soaking it.
Similar models
thingiverse
free
Business Card Case Template by Art-Tech
...or the cards approx 6 cards. enjoy and look forward to your make photos please and shares. please credit my work on the template.
thingiverse
free
Malyan M150/Wanhao I3 Filament Guide remix by Schiksie
...amp on
m150 filament guide 13.8 cm short clamp on
also the locker will still fit fine :
https://www.thingiverse.com/thing:1280498
thingiverse
free

ender 5 gopro hero 3 stand clamp version by niklassaaksjarvi
...n be used with abs and petg and this uses original gopro screw.
(warning: when not in use dont press the three circles together!)
blendswap
free

Crown and Cove Moulding Set
...lame but i didn't know how best to present these.p.s. this was downright tedious, so i hope someone can make use of these! ;)
thingiverse
free

Toilet Paper Tube Connectors by Swamdoge
...o different things, it is a really useful connector. hope you guys enjoy this project and share what you built with this project.
thingiverse
free

Case for Raspberry Pi 2 Model B by _primoz_
... on ribbon cable.
disclaimer: i do not guarantee that this case can withhold 20 kg of load or that deformation is less that 1mm.
thingiverse
free

Profile connector by kazem_samadi
...stable profile!
i used https://www.thingiverse.com/thing:884966 to print profile.
freecad file is attached, you can customize it!
thingiverse
free

Electrical Wire Spool
... pieces, the hole in the cylinders are lined up. if they're not, you can't attach the beginning of the wire to the spool.
thingiverse
free
Stitch Guide by JmsHFox
...guide by jmshfox
thingiverse
this is a quickly made needle guide. the point was to make quick holes in leather for a 5mm stitch.
thingiverse
free

Two color Escher lizard by Watsonian000
...ts of this.
the dxf made a large lizard so i print the pieces at 50%. i left it large in case someone wants to print big lizards.
Wet
turbosquid
free

wet floor
...lty free 3d model wet floor for download as max, obj, and fbx on turbosquid: 3d models for games, architecture, videos. (1392063)
turbosquid
$5

wet bar
... available on turbo squid, the world's leading provider of digital 3d models for visualization, films, television, and games.
3d_ocean
$6
Pirelli wet tyre
... year italy michelin pirelli racing rain reifen rim tyre wet zero
detailed 3d model of a pirelli wet tyre used in f1 2011 season.
3d_ocean
$3
Wet Beach Sand
... a beach for game development and 3d modelling art. 1 color and 1 bump file in png format, made from 100% original photo content.
3d_export
$5
Wet floor 3D Model
...3dexport
caution wet floor
wet floor 3d model download .c4d .max .obj .fbx .ma .lwo .3ds .3dm .stl ruslannovosela 108875 3dexport
turbosquid
$49

Kitchen (Wet Kitchen)
... available on turbo squid, the world's leading provider of digital 3d models for visualization, films, television, and games.
turbosquid
$49
Wet Rear tyre
... available on turbo squid, the world's leading provider of digital 3d models for visualization, films, television, and games.
turbosquid
$49

Wet front tyre
... available on turbo squid, the world's leading provider of digital 3d models for visualization, films, television, and games.
turbosquid
$15

Wet Caution Banana
...et caution banana for download as 3ds, max, obj, fbx, and stl on turbosquid: 3d models for games, architecture, videos. (1435225)
turbosquid
$10

Pirelli wet tyre
... available on turbo squid, the world's leading provider of digital 3d models for visualization, films, television, and games.
Mould
3ddd
$1

moulding
...moulding
3ddd
moulding classic plaster ornament
moulding
turbosquid
$35

mould
...ty free 3d model mould for download as max, obj, fbx, and stl on turbosquid: 3d models for games, architecture, videos. (1438489)
turbosquid
$29

moulding
...free 3d model moulding for download as max, obj, fbx, and stl on turbosquid: 3d models for games, architecture, videos. (1467257)
turbosquid
$27

Moulding
...free 3d model moulding for download as max, obj, fbx, and stl on turbosquid: 3d models for games, architecture, videos. (1239199)
turbosquid
$21

Moulding
...free 3d model moulding for download as max, obj, fbx, and stl on turbosquid: 3d models for games, architecture, videos. (1367303)
turbosquid
$17

moulding
...free 3d model moulding for download as max, obj, fbx, and stl on turbosquid: 3d models for games, architecture, videos. (1438701)
turbosquid
$7

Moulding
...free 3d model moulding for download as max, obj, fbx, and stl on turbosquid: 3d models for games, architecture, videos. (1466555)
turbosquid
$40

Moulding
... available on turbo squid, the world's leading provider of digital 3d models for visualization, films, television, and games.
turbosquid
$29

Moulding
... available on turbo squid, the world's leading provider of digital 3d models for visualization, films, television, and games.
turbosquid
$29

Moulding
... available on turbo squid, the world's leading provider of digital 3d models for visualization, films, television, and games.
Guides
turbosquid
$15
Guide drawer
...squid
royalty free 3d model guide drawer for download as dwg on turbosquid: 3d models for games, architecture, videos. (1261387)
turbosquid
$1
Road Guide
... available on turbo squid, the world's leading provider of digital 3d models for visualization, films, television, and games.
archive3d
free
Guide-board 3D Model
...ion sign guide sign
guide-board n170112 - 3d model (*.gsm+*.3ds) for exterior 3d visualization.
turbosquid
$2
soap cutter guide
...
royalty free 3d model soap cutter guide for download as stl on turbosquid: 3d models for games, architecture, videos. (1694030)
turbosquid
$15
Blind Guiding tiles
...free 3d model blind guiding tiles for download as 3dm and dae on turbosquid: 3d models for games, architecture, videos. (1156598)
turbosquid
$69

Japanese Tour Guide
...d model japanese tour guide for download as max, fbx, and obj on turbosquid: 3d models for games, architecture, videos. (1614288)
turbosquid
$10
CNC Linear Guide
... available on turbo squid, the world's leading provider of digital 3d models for visualization, films, television, and games.
turbosquid
$1

Tank Model Guide
... available on turbo squid, the world's leading provider of digital 3d models for visualization, films, television, and games.
turbosquid
$1
Road Guide 2
... available on turbo squid, the world's leading provider of digital 3d models for visualization, films, television, and games.
3d_ocean
$9

Guide Books 3
...sformed separately and each have unique texture map on front and back cover. to make your work easier this model comes in thre...
Leather
3d_ocean
$2
Leather
...leather
3docean
fabri high resolution interior leather
fabric for interior
3d_ocean
$7

Leather Seat
...leather seat
3docean
amrchair build chair home house leather leather seat lounge seat sofa
leather seat
3d_ocean
$4
Banquette leather
...banquette leather
3docean
banquette chear leather stool wood
leather banquette on wooden legs.
3d_ocean
$18
Leather Sofa
...or leather old leather sofa
leather sofa presidential custom ballentine collection 3d model polys: 39932 / meshsmoth 2 it. 251792
3d_export
$5

sofa leather
...sofa leather
3dexport
sofa leather
3d_export
$5
leather armchair
...leather armchair
3dexport
leather armchair
3ddd
$1
leather couch
...leather couch
3ddd
кожаный
3d model of leather couch with a satin cover. leather texture is 2500x2500pix
3ddd
$1
Leather Poof
...leather poof
3ddd
пуф
leather poof
3ddd
$1

Leather Poof
...leather poof
3ddd
пуф
leather poof
3ddd
$1

Dyed leather
...dyed leather
3ddd
dyed leather chair
Forming
3d_export
$5
Forms
...forms
3dexport
very gooooooooood forms)
design_connected
$13

Form
...form
designconnected
kartell form computer generated 3d model. designed by lissoni, piero.
3d_ocean
$3
Form
...reen screenshot texture ui wallppaper
form poly count:168 texture :1024×768 tga + alpha hope someone will find it useful .enjoy !
design_connected
$16

Form Pendants
...form pendants
designconnected
design house stockholm form pendants computer generated 3d model. designed by form us with love.
3ddd
$1

Eurolegno | Forme
...rolegno , forme , om
источник: www.eurolegno.it
3ddd
$1
Eurolegno | Forme
...rolegno , forme , om
источник: www.eurolegno.it
3ddd
$1
Eurolegno | Forme
...rolegno , forme , om
источник: www.eurolegno.it
3ddd
$1

Eurolegno | Forme
...rolegno , forme , om
источник: www.eurolegno.it
3ddd
$1
Eurolegno | Forme
...rolegno , forme , om
источник: www.eurolegno.it
3ddd
$1
Eurolegno | Forme
...rolegno , forme , om
источник: www.eurolegno.it
Case
3d_export
$1

case
...case
3dexport
case
archibase_planet
free

Case
...case
archibase planet
showcase show-case glass case
glass-case + cakes - 3d model for interior 3d visualization.
archibase_planet
free

Case
...case
archibase planet
showcase show-case glass case
glass-case for chips - 3d model for interior 3d visualization.
archibase_planet
free

Case
...case
archibase planet
case shelving drawer
case - 3d model for interior 3d visualization.
archibase_planet
free

Case
...case
archibase planet
case rack locker
case - 3d model for interior 3d visualization.
archibase_planet
free

Case
...case
archibase planet
case drawer kitchen furniture
case - 3d model for interior 3d visualization.
archibase_planet
free

Case
...case
archibase planet
case cupboard shelving
glass case - 3d model for interior 3d visualization.
archibase_planet
free

Case
...case
archibase planet
case handbag suitcase
case - 3d model (*.gsm+*.3ds) for interior 3d visualization.
archibase_planet
free

Case
...case
archibase planet
case suitcase
case 5 - 3d model (*.gsm+*.3ds) for interior 3d visualization.
archibase_planet
free

Case
...case
archibase planet
locker case dresser
case - 3d model (*.gsm+*.3ds) for interior 3d visualization.
Glasses
archibase_planet
free
Glasses
...glasses
archibase planet
glass wine-glass liqueur-glass
glasses- 3d model for interior 3d visualization.
archibase_planet
free
Glass
...archibase planet
glass cocktail glass tall wine glass martini glass
glass - 3d model (*.gsm+*.3ds) for interior 3d visualization.
archibase_planet
free
Glass
...glass
archibase planet
glass wine-glass glass-ware
glass n030209 - 3d model (*.gsm+*.3ds) for interior 3d visualization.
archibase_planet
free
Glass
...glass
archibase planet
glass-ware glass glass ware
glass n141109 - 3d model (*.gsm+*.3ds) for interior 3d visualization.
3d_ocean
$2
Glass
...c4d cinema 4d cup drink drinking glass fbx glass glasses kitchen accessories liquid container low-poly glass nice glass obj...
archibase_planet
free
Glass
...glass
archibase planet
glass tall wine glass wine-glass
glass n300514 - 3d model (*.gsm+*.3ds) for interior 3d visualization.
archibase_planet
free

Glass
...glass
archibase planet
glass wine-glass tall wine glass
glass n091210 - 3d model (*.gsm+*.3ds) for interior 3d visualization.
archibase_planet
free
Glass
...glass
archibase planet
glass tall wine glass glass-ware
glass n081011 - 3d model (*.gsm+*.3ds) for interior 3d visualization.
3d_ocean
$9
glasses
...glasses
3docean
glasses
max glasses v-ray
archibase_planet
free
Glass
...glass
archibase planet
glass-ware glass
glass - 3d model (*.gsm+*.3ds) for interior 3d visualization.