Thingiverse

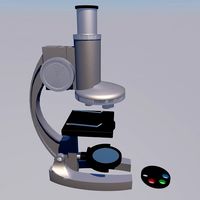
Motorized microscope with Raspberry Pi HQ camera and HTML interface by projetsdiy
by Thingiverse
Last crawled date: 3 years, 3 months ago
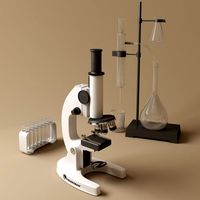
Motorized microscope project made from recycled elements from a CNC and the new HQ camera for Raspberry Pi.
The HTML command interface was developed in Python. It is accessible from the local network and allows you to zoom and control the NeoPixels LED lighting.
Parts to 3D print
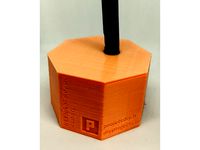
Support for 12.3MP HQ camera to be fixed on the linear guide of a T8 screw
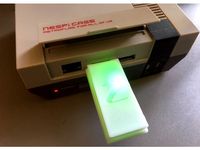
Support for Neopixel 16 LED lighting (diam. 30mm) compatible with 4K C-mount lens
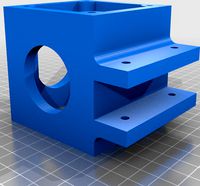
Raspberry Pi support (3 or 4) to be fixed on a 2020 aluminum profile using a T-nut
Extension tube (optional)
HQ camera and other components used
12MP HQ Camera module
4K 50mm C-mount lens or equivalent
x1 Motor Nema 17HS4401 or equivalent
x1 stepper motor driver A4988 or DRV8825
x1 4 pin cable for Nema motor
x1 mini power supply module multi-voltages delivering at least 5V and 12V
x1 LED ring ø32mm (x16 LED RGB NeoPixel)
Raspberry Pi(model of your choice). The bracket is compatible with models 3 and 4
Recycled components from a CNC 3018 used for the stand:
x2 aluminum profiles 2020 (square section 20x20mm) of length 220mm approximately
x2 2020 aluminum profiles (square section 20x20mm) approximately 350mm long
x4 30mm brackets
T-nuts for aluminum profile 2020
x2 rods ø10mm length 400mm mini
x2 linear guides ø10mm
x4 supports for rod ø10mm
x1 Nema motor board
x1 T8 screw of minimum length 350mm
x1 direct screw transmission element
x1 flexible connection ø8mm
Useful links
Step by step tutorial
Github Repo
Python code to drive Nema 17 stepper motor
Cameras for Raspberry Pi and accessories (C-mount lenses, extension ring, CSI tape, tripod, microscope holder
Selection of components for 3D printers and CNCs that can be used in DIY.
Projet de microscope motorisé réalisé à partir d'éléments recyclés d'une CNC et de la nouvelle caméra HQ pour Raspberry Pi.
L'interface de commande HTML a été développée en Python. Elle est accessible depuis le réseau local et permet de zoomer et de piloter l'éclairage à LED NeoPixels.
Pièces à imprimer en 3D
Support pour caméra HQ 12,3MP à fixer sur le guidage linéaire d'un vis T8
Support pour éclairage Neopixel 16 LED (diam. 30mm) compatible objectif 4K à monture C
Support Raspberry Pi (3 ou 4) à fixer sur un profilé aluminium 2020 à l'aide d'un écrou en T
Tube allonge (optionnel)
Caméra HQ et autre composants utilisés
Caméra HQ 12MP
Objectif 50mm à monture C par caméra 4K ou équivalent
x1 Moteur Nema 17HS4401 ou équivalent
x1 pilote pour moteur pas à pas A4988 ou DRV8825
x1 câble 4 broches pour moteur Nema
x1 mini module d'alimentation multi-tensions délivrant au moins 5V et 12V
x1 anneau de LED ø32mm (x16 LED RGB NeoPixel)
Raspberry Pi (modèle au choix). Le support est compatible avec les modèles 3 et 4
Composants recyclés d'une CNC 3018 utilisés pour le statif :
x2 profilés aluminium 2020 (section carrée 20x20mm) de longueur 220mm environ
x2 profilés aluminium 2020 (section carrée 20x20mm) de longueur 350mm environ
x4 équerres 30mm
Ecrous en T pour profilé aluminium 2020
x2 tiges ø10mm de longueur 400mm mini
x2 guidages linéaires ø10mm
x4 supports pour tige ø10mm
x1 platine moteur Nema
x1 vis T8 de longueur 350mm minimum
x1 élément de transmission direct à vis
x1 raccord flexible ø8mm
Liens utiles
Tutoriel avec le code source Python
Dépôt Github
Piloter un moteur Nema 17 en Python
Caméras pour Raspberry Pi et accessoires (objectifs à monture C, bague allonge, ruban CSI, trépied, support microscope
Sélection de composants pour imprimantes 3D et CNC que l'on peut utiliser dans les bricolages.
The HTML command interface was developed in Python. It is accessible from the local network and allows you to zoom and control the NeoPixels LED lighting.
Parts to 3D print
Support for 12.3MP HQ camera to be fixed on the linear guide of a T8 screw
Support for Neopixel 16 LED lighting (diam. 30mm) compatible with 4K C-mount lens
Raspberry Pi support (3 or 4) to be fixed on a 2020 aluminum profile using a T-nut
Extension tube (optional)
HQ camera and other components used
12MP HQ Camera module
4K 50mm C-mount lens or equivalent
x1 Motor Nema 17HS4401 or equivalent
x1 stepper motor driver A4988 or DRV8825
x1 4 pin cable for Nema motor
x1 mini power supply module multi-voltages delivering at least 5V and 12V
x1 LED ring ø32mm (x16 LED RGB NeoPixel)
Raspberry Pi(model of your choice). The bracket is compatible with models 3 and 4
Recycled components from a CNC 3018 used for the stand:
x2 aluminum profiles 2020 (square section 20x20mm) of length 220mm approximately
x2 2020 aluminum profiles (square section 20x20mm) approximately 350mm long
x4 30mm brackets
T-nuts for aluminum profile 2020
x2 rods ø10mm length 400mm mini
x2 linear guides ø10mm
x4 supports for rod ø10mm
x1 Nema motor board
x1 T8 screw of minimum length 350mm
x1 direct screw transmission element
x1 flexible connection ø8mm
Useful links
Step by step tutorial
Github Repo
Python code to drive Nema 17 stepper motor
Cameras for Raspberry Pi and accessories (C-mount lenses, extension ring, CSI tape, tripod, microscope holder
Selection of components for 3D printers and CNCs that can be used in DIY.
Projet de microscope motorisé réalisé à partir d'éléments recyclés d'une CNC et de la nouvelle caméra HQ pour Raspberry Pi.
L'interface de commande HTML a été développée en Python. Elle est accessible depuis le réseau local et permet de zoomer et de piloter l'éclairage à LED NeoPixels.
Pièces à imprimer en 3D
Support pour caméra HQ 12,3MP à fixer sur le guidage linéaire d'un vis T8
Support pour éclairage Neopixel 16 LED (diam. 30mm) compatible objectif 4K à monture C
Support Raspberry Pi (3 ou 4) à fixer sur un profilé aluminium 2020 à l'aide d'un écrou en T
Tube allonge (optionnel)
Caméra HQ et autre composants utilisés
Caméra HQ 12MP
Objectif 50mm à monture C par caméra 4K ou équivalent
x1 Moteur Nema 17HS4401 ou équivalent
x1 pilote pour moteur pas à pas A4988 ou DRV8825
x1 câble 4 broches pour moteur Nema
x1 mini module d'alimentation multi-tensions délivrant au moins 5V et 12V
x1 anneau de LED ø32mm (x16 LED RGB NeoPixel)
Raspberry Pi (modèle au choix). Le support est compatible avec les modèles 3 et 4
Composants recyclés d'une CNC 3018 utilisés pour le statif :
x2 profilés aluminium 2020 (section carrée 20x20mm) de longueur 220mm environ
x2 profilés aluminium 2020 (section carrée 20x20mm) de longueur 350mm environ
x4 équerres 30mm
Ecrous en T pour profilé aluminium 2020
x2 tiges ø10mm de longueur 400mm mini
x2 guidages linéaires ø10mm
x4 supports pour tige ø10mm
x1 platine moteur Nema
x1 vis T8 de longueur 350mm minimum
x1 élément de transmission direct à vis
x1 raccord flexible ø8mm
Liens utiles
Tutoriel avec le code source Python
Dépôt Github
Piloter un moteur Nema 17 en Python
Caméras pour Raspberry Pi et accessoires (objectifs à monture C, bague allonge, ruban CSI, trépied, support microscope
Sélection de composants pour imprimantes 3D et CNC que l'on peut utiliser dans les bricolages.
Similar models
thingiverse
free

support nema 23 profilé 40 x 40 motedis by vince59
...° pour profilé 40x40 de chez motedis.
il peut servir à réaliser un guidage linéaire ou autre pour cnc ou imprimante.
cordialement
thingiverse
free

Support Nema 17 sur EQ5 by ben37hak
... rj11 intégré.
prévoir courroie gt2 de 130mm pour un montage avec une poulie de 40 dents et de 16 dents.
remplissage à 26% à 33%.
3dwarehouse
free

Pied caméra physique ppe
...améra physique ppe
3dwarehouse
pied caméra physique ppe pied pour caméra permettant une étude cinétique, assemblage de profilés.
thingiverse
free

Support pour la camera raspberry pi pour Artillery Genius by korbier
...ante.
les trous ont un diamètre de 3mm. la distance entre les centres est de 21mm à l'horizontal et de 12.5mm à la verticale.
thingiverse
free

Anet A8 Montage sur bed pour Raspberry Pi Camera (mount cam) V2 by Aklain52
...gnée du bed et deux supports hexagonaux pour pouvoir choisir le hauteur.
lien vers v1 : https://www.thingiverse.com/thing:2896456
thingiverse
free

HexoCopt - Drone Hexacopter multicopter pliable by hderko12
...ces à imprimer:
6x support moteur
6x support bras
2x pied fixe
2x maintien vis
1x pcb supp
1x pcb inf
1x pcb batt
1x pied pliable
thingiverse
free

Support Raspberry Pi Camera OV5647 by Atikin44
...angle pour raspberry pi.
pas besoin de vis, les éléments se clipsent.
disponible ici: https://www.amazon.fr/gp/product/b07g9vlpzh
thingiverse
free

Multirotor support moteur et pied by JeanDesBiolles
... mécanisme du yaw avec le support moteur
pieds.stl est bien sur les pieds du multi.
le tous se fixe avec des colliers plastiques.
thingiverse
free

Anneau de mise au point de Caméra de Raspberry Pi by antonydbzh
...r les picam v1 et v2 http://www.thingiverse.com/thing:1570865
le même pour la picam v2 : http://www.thingiverse.com/thing:1941802
thingiverse
free
Support moteur odrive robotics 270Kv by L42Project
...minium 20x20
(https://odriverobotics.com/shop/odrive-custom-motor-d5065)
les autres pièces (poulies et autre) sont sur mon profil
Projetsdiy
thingiverse
free

Calibration setup for HC-SR04- Sharp GP2Y0A02YK0F - VL53L0X by projetsdiy
...pteurs. exemple de projet pour mesurer le niveau de remplissage d'un réservoir d'eau
code source et feuille de calcul odt
thingiverse
free
CC2531 Zigbee Gateway based on Zigbee2mqtt project by projetsdiy
...er zigbee cc2531 usb
uniquement pour l'installation du firmwarekit de démarrageti cc debuggercâble gban
page github du projet
thingiverse
free

Raspberry Pi Zero W case for compatible asian NoIR camera by projetsdiy
...ançais
le fichier fusion 360 est inclus dans le projet si vous avez besoin d'apporter des modifications pour votre kit caméra
thingiverse
free
Mini RFLink Gateway Housing by projetsdiy
...-boitier-imprime-3d/
vous trouverez les fichiers stl, fusion 360 (originaux), step et iges pour modifier le boitier ci nécessaire
thingiverse
free

Mini Traceur Arduino - Mini CNC Plotter by projetsdiy
...otter-arduino/
a tutorial with all steps you need to followhttp://www.projetsdiy.fr/mini-cnc-plotter-arduino-l293d-stepper-motor/
Microscope
3d_export
$5
Microscope 3D Model
...microscope 3d model
3dexport
microscope
microscope 3d model tu.rok 77960 3dexport
3d_ocean
$16
Microscop Toy
...microscop toy
3docean
game games microscop microscop toy play science toy
microscop model toy with materials
archive3d
free

Microscope 3D Model
...e optical microscope
microscope n180314 - 3d model (*.gsm+*.3ds) for interior 3d visualization.
3d_ocean
$2
DNA Strands Of 5 Types
... strands that can be multiplied and can be made long chains by duplicating them and can be easily applied materials and textures.
3d_ocean
$5
Nervce Cell
...cells cellular human infect infection internal medical micro microbe microscope microscopic microscopy organism organs red red blood red blood...
3d_ocean
$6
Red Blood Cells
...blood cell cells erythrocyte erythrocytes human medic medical micro microscope microscopic organism organs red red blood science vein red...
3d_ocean
$6

Customisable DNA Strand with Style Options
...s, hand drawn and text splines. model can be as detailed or low poly as needed. separate obj model is included. help file is i...
3d_ocean
$2
Red Blood Cell
...cell cells erythrocyte erythrocytes human internal medic medical micro microscope microscopic organism organs red science vein 3d model of...
3d_ocean
$5
virus
...flu germs graphic human infection life macro medical medicine microscope milk molecular molecules muesli organic render sweet vegetarian virus...
3d_ocean
$14

Red Blood Cells Animated
...cells cellular human infect infection internal medical micro microbe microscope microscopic microscopy organism organs red red blood red blood...
Interface
3ddd
$1

Kare tables Janus, Romantico Silver
...table in an irresistible mix of styles – the interface between the baroque and the modern has produced this...
3d_ocean
$4
USB Flash Drive 04
...compatible component computer convenient disk drive electronic flash high interface mac memory modern pc pen pocket reliable removable sleek...
3d_ocean
$4
USB Flash Drive 07
...compatible component computer convenient disk drive electronic flash high interface mac memory modern pc pen pocket reliable removable sleek...
3d_ocean
$4

USB Flash Drive 05
...compatible component computer convenient disk drive electronic flash high interface mac memory modern pc pen pocket reliable removable sleek...
3d_ocean
$4

USB Flash Drive 06
...compatible component computer convenient disk drive electronic flash high interface mac memory modern pc pen pocket reliable removable sleek...
3d_ocean
$15

Puzzle
...tutorial showing how to change the image within the interface of 3d max, that explains right to the point...
3d_ocean
$19

Anas Boy Character
...stretchy rig and ik fk limbs and facial blend-shapes interface perfect for animation...
3d_ocean
$9

SmartWatch
...lcd smartphone smartwatch watch weareble weareble smartwatch with ios interface ...
3d_ocean
$12

Philips 236v hd monitor
...236v hd monitor 3docean computer monitor computers electronics hd interface monitor ngon 3d model periferal device philips monitor wide...
cg_studio
$50

USB Keyer/Audio Interface3d model
...tudio
.3ds .max .obj .wrl - usb keyer/audio interface 3d model, royalty free license available, instant download after purchase.
Hq
3d_export
$13
Mercedes Hood Badge 3D Model
...w123 w201 w210 w211 w212 w221 w222 high quality hq poly mercedes hood badge 3d model rulerz 85088...
3d_export
$95

Pontiac Bonneville 1966 3D Model
...old car muscle american germany new 1965 1966 1967 hq hd model 3d antique sport coupe pontiac bonneville 1966...
3d_ocean
$15
3d human head v1
...anatomy bald boy character face guy hd head hi hq human male man max men model obj people photorealistic...
3d_ocean
$99

25 Creative HDRI Lightmap Collection
...sky stars sunset included in this bundle is 25 hq hdri lightmaps at a bundle discount. each hdri is...
3d_export
$10

Knife No Textures 3D Model
...3d model 3dexport knife hunting hd uv unwrap materials hq high quality obj blend fighting melee cutting sharp metal...
3d_export
$12

White brick house HQ 3D Model
...s architecture
white brick house hq 3d model download .c4d .max .obj .fbx .ma .lwo .3ds .3dm .stl makleierik19098 103639 3dexport
3d_export
$199
Citroen GT with HQ interior 2008 3D Model
...y france
citroen gt with hq interior 2008 3d model download .c4d .max .obj .fbx .ma .lwo .3ds .3dm .stl humster3d 104085 3dexport
3d_export
$99

HQ LowPoly Generic Coupe 2015 3D Model
...ied noname name
hq lowpoly generic coupe 2015 3d model download .c4d .max .obj .fbx .ma .lwo .3ds .3dm .stl squir 113552 3dexport
3ddd
$1
IKEA - Galant Drawer (HPoly and LPoly)
...corona, vray textured: yes uv layout: yes poly count hq 57800 poly count opt: 3500 max 2013, fbx more...
3ddd
$1
Vitra Repos
...vitra repos 3ddd vitra hq realistic model of vitra repos, archive included fbx file...
Raspberry
3ddd
$1

the body shop
..., shampoo , box , lotion the body shop raspberry ...
archive3d
free

Bush 3D Model
...bush 3d model archive3d bush raspberry plant raspberry cane bush raspberry cane n250416 - 3d...
3ddd
$1

Raspberry cake
...pberry cake
3ddd
торт
на бисквите и креме - vraydisplacementmod.
на малине - turbosmooth. всё можно отключить для дальних планов.
3d_ocean
$19

Raspberry Bed
...(inspired in the bedding products of the “the land of nod”). modeled in 3d studio max 2015, but saved as 3ds max 2012-2013-201...
3d_ocean
$9
4 Cocktail Bottles
...drink fresh fruit glow juice mouthwatering multicolor orange pub raspberry rose shine sweet tasty tropical 4 cocktail bottles 3d...
3d_ocean
$6

11 Ice Cream Flavours
...ice-cream mint nut peach peanut butter pod pudding rainbow raspberry restaurant strawberry swirl toffee vanilla 11 ice cream flavours....
3ddd
$1

Raspberry and chocolate
...сный летний десерт, сочные ягоды с шоколадом. всем приятного аппетита....
форматы в архиве:
3d max 2011, 3d max 2014, fbx, obj.
3ddd
free
Disegno ceramica - Splash 152-DX
...square soap dish 3. подставка для украшений jewellery tree raspberry 4. ёршик напольный confetti toilet brush аксессуары могут быть...
archive3d
free

Raspberries 3D Model
...raspberries 3d model archive3d raspberries raspberry raspberries n300911 - 3d model (*.3ds) for interior 3d...
cg_studio
$159

Coca Cola Freestyle Jet Fountain of the Future3d model
...canned tinned fastfood retro vintage pininfarina ferrari lime vanilla raspberry orange diet light zero sprite grape peach vault red...
Pi
3ddd
$1
Sea Container письменный стол
...для крупных планов так и для средних. подробней о модели:http://loft-art.ru/sea-container-pi-mennyj-stol.html ...
3ddd
$1

SILVA Vario UT11315-PI
...silva vario ut11315-pi
3ddd
silva , vario
silva vario ut11315-pi
3ddd
$1

SILVA Vario UT11124-PI
...silva vario ut11124-pi
3ddd
silva , vario
silva vario ut11124-pi
3ddd
$1

Sea Container письменный стол (4 цвета)
...для крупных планов так и для средних. подробней о модели:http://loft-art.ru/sea-container-pi-mennyj-stol.html ...
3ddd
$1

Blu Dot / Pi Coffee Table
... круглый , журнальный
• powder-coated steel top
• solid walnut legs
3ddd
$1
Blu Dot / Pi Coffee Table
... кофейный , круглый
модель стола blu dot. 3dsmax2012
3ddd
$1
PRESIDENT P101 ПИСCУАР + ПЕРЕГОРОДКА
...+ перегородка 3ddd president , писcуар писcуар president артикул p-pia101 подвод воды сверху ширина [мм] 320 глубина [мм] 280...
3ddd
free
набор светильников
...набор светильников 3ddd emme pi light ,...
3ddd
free
Emme pi light | Masiero
... light | masiero
3ddd
emme pi light , masiero
masiero lampa,emme pi light – masiero,art.
3ddd
free

Emme pi light Masiero 3050
...emme pi light masiero 3050
3ddd
emme pi light , masiero
masiero, emme pi light 3050
Html
3ddd
$1

Picnic Table
..., журнальный , машина manufacturer: meritalia model: fiat500_ picnic tablehttp://www.meritalia.it/fiat500/fiat500eng/fiat500.htmlamp;nbsp; ...
3ddd
$1

Olives Art. mp 18885
...olives art. mp 18885 3ddd olives http://www.vipmir.ru/prod53901.htmlamp;nbsp; ...
3ddd
$1
Тумба и комод Worlds Away + аксессуары
...шкатулка в одном варианте. комодhttp://www.worlds-away.com/cary-wh.html тумбаhttp://www.worlds-away.com/claudette-wh.html зеркалоhttp://www.worlds-away.com/collection/accessories/carmen-glg.html шкатулкаhttp://www.worlds-away.com/collection/accessories/boxoctcl.html черепахаhttp://www.worlds-away.com/collection/accessories/tortuga-stand-lg.html ежhttp://www.worlds-away.com/collection/accessories/urchin-g12.htmlamp;nbsp; ...
3ddd
$1

Horus Eloise Monobloc bidet mixer
...mixer horus eloise monobloc bidet mixer reference : 02.311 ссылка:http://www.horus-design-faucets.com/ranges/eloise/monobloc-bidet-mixer__02.311.htmlamp;nbsp; ...
3ddd
$1

Подушки, Китайский стиль
...подушки, китайский стиль 3ddd подушка заказать можно на сайтеhttp://ru.aliexpress.com/item/free-shipping-fashionable-chinese-style-restoring-ancient-ways-is-blue-and-white-porcelain-cotton-pillowcases-45/1985125212.htmltracelog=back_to_detail_b ...
3ddd
$1

Maxim Lighting Richmond
...в комплекте версия в 2011 максе. по ссылке доп. инфо.http://www.wayfair.com/maxim-lighting-richmond-15-light-chandelier-mxl9052.htmlamp;nbsp; ...
3ddd
$1

Bright Moon Lighting
...bright moon lighting 3ddd современная стеклянная люстраhttp://www.brightmoonlighting.net/sdp/532675/4/pd-2797202/5729639-2082083/glass_pendant_light_bm-3028p-5.htmlamp;nbsp; ...
3ddd
$1

Lustra EGLO 42491 TEADORO 48sm
...lustra eglo 42491 teadoro 48sm 3ddd eglo , teadoro оригинал:http://www.lampa.kiev.ua/katalog/42491.htmlamp;nbsp; ...
3ddd
$1
Aviation PRO
...aviation pro 3ddd oligo , aviation http://www.oligo.de/en/products/system-luminaires/prod/st-aviation-pro-1.htmlamp;nbsp; ...
3ddd
$1

Аквариум угловой овальный Juwel TRIGON
...заданию диза, есть ли такие в натуре - не знаю.)http://shop.aquafun.com.ua/product_info.php/info/p145_akvarium-uglovoi-ovalnyi-juwel-trigon-350--oreh-.htmlamp;nbsp; ...
Motorized
3d_export
$99

Buick Skylark convertible 1964 3D Model
...lassic 2-door coupe sport convertible general motors us american
buick skylark convertible 1964 3d model humster3d 90963 3dexport
3d_export
$89
GMC Yukon Hybrid 2013 3D Model
...13 general motors avto car vehicle auto automobile cars 3d model higt poly
gmc yukon hybrid 2013 3d model creatord 71204 3dexport
3d_export
$89

GMC Yukon SLT 3D Model
... yukon slt general motors avto car vehicle auto automobile cars 3d model higt poly
gmc yukon slt 3d model creatord 70452 3dexport
3ddd
$1

Currey & Company Orion
...or model for easy change or setup.
object at 0.0.0, clean and light scene.
the archive contains the obj file and more previews.
3d_ocean
$85
Ferrari 488 Spider 2016
...scheduled to make its official premiere during the frankfurt motor show this september. the italian company explains this is t...
3d_export
$16

W Motors Lykan Hypersport logo 3D Model
...adge marque
w motors lykan hypersport logo 3d model download .c4d .max .obj .fbx .ma .lwo .3ds .3dm .stl rmodeler 104172 3dexport
3d_export
$129
Yamaha XJ6 2009 3D Model
...ke bike motor cycle japan
yamaha xj6 2009 3d model download .c4d .max .obj .fbx .ma .lwo .3ds .3dm .stl humster3d 111168 3dexport
cg_studio
$50

Rat Rod3d model
...n car antique vehicle motor
.dae .obj .blend - rat rod 3d model, royalty free license available, instant download after purchase.
cg_studio
$50

Hot Rod3d model
...hool american blak metal
.x .dae .obj .blend - hot rod 3d model, royalty free license available, instant download after purchase.
cg_studio
$99
Engine 023d model
...ftimage fbx vray 3dmax
.max .obj .fbx .3ds - engine 02 3d model, royalty free license available, instant download after purchase.
Camera
3d_export
$30

Tripod 3D Model
...tripod 3d model 3dexport tripod camera photography studio lighting 3d virtualz tripod 3d model virtualz...
3d_ocean
$29
Low Poly Sports Bike
...2013. lighting with vray light and also has vray camera ...
3d_ocean
$29
Scania Truck
...trailer vehicle high poly truck with vray lighting and camera ...
3d_ocean
$29

Parrot Bebop Drone
...parrot bebop drone 3docean aircraft aviation camera chopper dji dron game helicopter parrot-bebop-quadcopter-drone phantom propeller quad...
3d_ocean
$49
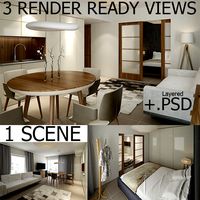
Interior Vray Scene with 3 RenderReady Views + PSD
...team7 textures vray interior vray scene with 3 renderready camera realistic v-ray & 3ds max 2014 interior scene, fully...
3d_ocean
$19
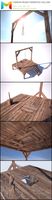
Western Gallow Camera Ready
...nd animated wild west wooden gallow. ready gibbet model for both wild west movie and game use. included files : .max (vray), ....
3d_ocean
$15

Highpoly 3d Model of Electrostatic Machine
...rigged:no animated: no uv mapped: no unwrapped uvs: yes camera: 0 lights: 0...
3d_ocean
$5
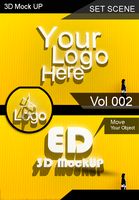
3d Text and Object Mockup - Wall
...visualisation vray white what’s included: vray rendering setup vray camera, vray lights and shadow studio scene render scene 5852×3901...
3d_ocean
$12

Google Cardboard
...(with .psd files included) + multiple positions + real camera effects (vray 3.0) +...
3d_ocean
$6
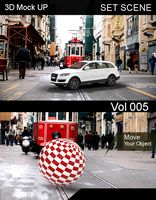
3d Text and Object Mockup - Wall
...visualisation vray white what’s included: vray rendering setup vray camera, vray lights and shadow studio scene render scene 5852×3901...