Thingiverse
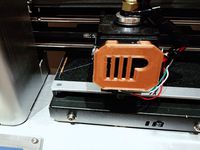
Monoprice X Extension 228mm Maker Select by chinaman4u
by Thingiverse
Last crawled date: 3 years ago
This is a low or zero cost modification. Need that extra few mm of space to print?
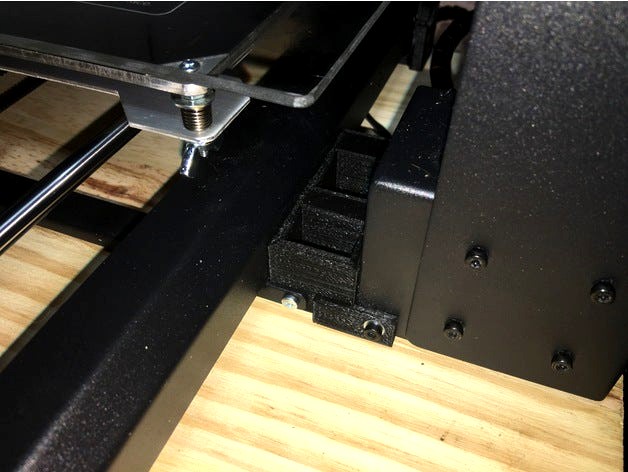
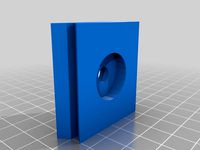
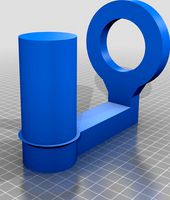
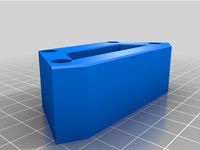
I made this spacer in Sketchup allowing me to increase my X axis from 200mm to 228. It does require a lot of work/disassembly to make this modification. I just needed a slightly larger print area and found this to be a great solution. I now run my Monoprice Maker Select V2.1 at 228mm(x) by 214mm(y), using a 250mmx400mm glass bed clipped to stock bed.
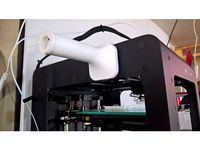
THE TOP FRAME WILL NEED TO BE BENT or CUT in order to make this modification work. It works with the Z-brace! (SEE PHOTOS)
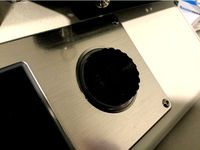
THE PRINT BED NEEDS TO BE DRILLED to allow for flush mounted bolts. Do not run the drill fast, run it really slow, to prevent the drill from grabbing and cutting through. Or use a cone shaped sanding stone on a Dremel. Aluminum bed is very soft. The screws on the heated bed needs to be convert to flush bolts so it doesn't get in the way of the larger glass bed.
The x axis shafts are too short, so the x axis shaft mounts will be needed to be flipped to the outside to make this modification work. And it is the most difficult job since there is very little clearance to get an allen wrench to tighten the block from the backside, but it is doable, with a lot of patience.
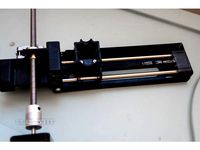
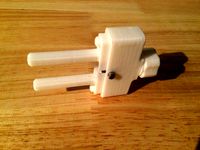
The belt will also be too short, so a different belt tensioner is used to make up the length. I used the WanHao Duplicator I3 2.1 and Plus Belt Tensioner by AlexWYYC and reused the stock belt.
You will need two M5 0.80 x 40 screws, and one M3 0.50 x 20 and an appropriate nut.
You will also need a larger glass print bed.
You need 4x flush bolts and nuts and adjusting thumbwheel for hot bed.
Glass bed is the major cost. No longer rods/belts needed. Just print the X extension spacer and the belt tensioner and a quick trip to Lowe's.
Note: This is my first attempt at making something on my own. I am unhappy with the finish of the part, but it is usable as is. I used 50% infill but I would recommend 100%. I will not be doing any more work and have included the Sketchup file for your use. You can also use anything for a spacer, a 30mm metal sleeve, for example.
I made this spacer in Sketchup allowing me to increase my X axis from 200mm to 228. It does require a lot of work/disassembly to make this modification. I just needed a slightly larger print area and found this to be a great solution. I now run my Monoprice Maker Select V2.1 at 228mm(x) by 214mm(y), using a 250mmx400mm glass bed clipped to stock bed.
THE TOP FRAME WILL NEED TO BE BENT or CUT in order to make this modification work. It works with the Z-brace! (SEE PHOTOS)
THE PRINT BED NEEDS TO BE DRILLED to allow for flush mounted bolts. Do not run the drill fast, run it really slow, to prevent the drill from grabbing and cutting through. Or use a cone shaped sanding stone on a Dremel. Aluminum bed is very soft. The screws on the heated bed needs to be convert to flush bolts so it doesn't get in the way of the larger glass bed.
The x axis shafts are too short, so the x axis shaft mounts will be needed to be flipped to the outside to make this modification work. And it is the most difficult job since there is very little clearance to get an allen wrench to tighten the block from the backside, but it is doable, with a lot of patience.
The belt will also be too short, so a different belt tensioner is used to make up the length. I used the WanHao Duplicator I3 2.1 and Plus Belt Tensioner by AlexWYYC and reused the stock belt.
You will need two M5 0.80 x 40 screws, and one M3 0.50 x 20 and an appropriate nut.
You will also need a larger glass print bed.
You need 4x flush bolts and nuts and adjusting thumbwheel for hot bed.
Glass bed is the major cost. No longer rods/belts needed. Just print the X extension spacer and the belt tensioner and a quick trip to Lowe's.
Note: This is my first attempt at making something on my own. I am unhappy with the finish of the part, but it is usable as is. I used 50% infill but I would recommend 100%. I will not be doing any more work and have included the Sketchup file for your use. You can also use anything for a spacer, a 30mm metal sleeve, for example.
Similar models
thingiverse
free

MP Select Mini GT2 Y & X Belt Clips / Tensioner Monoprice by A_Makers_Life
...more travel.
you will need to drill and tap 2 m3 screws to mount this to the bed. i used a 2.5mm / 2s drill bit & a 3mm tap.
thingiverse
free

CR-10S S5 Y-Axis Belt Tensioner Mount
...tps://www.amazon.com/3d-synchronous-straighten-tensioner-creality/dp/b07rfrrx7p
gear:https://www.amazon.com/gp/product/b072c9831q
thingiverse
free
Monoprice Select Mini. X Axis Belt Tensioner Mod. by lowfat
...sm w/o an x-axis shroud is normal. so i've added versions that you can use that don't require the shroud to be installed.
thingiverse
free

Improved Anet A8 RepRap X-Axis Belt Tensioner by WedgeSD
...want to wrap the belt around the bearing and insert into the housing then bolt the bearing in place, as shown in the photo's.
thingiverse
free

X-axis belt tensioner - Prusa I3 by scampagna
...ation needed. this part makes it possible to add the functionality of tensioning the belt of the axis x on the side of the motor.
thingiverse
free

CR-10S Y-Axis Belt Tensioner by eliaolgiati
...eed:
m4 hex head bolt
m4 hex head nut
the other standard parts are provided by the stock belt tensioner installed on the printer.
thingiverse
free

CR-10 X-axis tensioner shim spacer by Goblins
...im for the x-axis right mount bearing.
it will center the belt at the center of the rail and not on the side as in stock machine.
thingiverse
free

i3 Duplicator Y belt pulley tensioner by Xierion
... locknuts
(optional) 1 x m5 washer (for adjustment bolt)
see also the x belt tensioner: https://www.thingiverse.com/thing:2655574
thingiverse
free
X-Axis belt tensioner for geared GT2 pulley by ibschreiber
...want to wrap the belt around the bearing and insert into the housing then bolt the bearing in place, as shown in the photo's.
thingiverse
free

Elk's X-Axis T5 Belt Tensioner for Mendel by elk
...k
thingiverse
my version of a belt tensioning system for mendel x axis and t5 belt.
i use it since some time and it works great.
Chinaman4U
thingiverse
free

2" telescope dust cap by chinaman4u
...2" holes for telescope dust cap. fits perfectly, printed in pla. feel free to make any modifications for your own remakes.
thingiverse
free
quick release FX12 Davis Sanford Magnum XG by chinaman4u
...reccommended, i think is better to prevent separation of layers when attached to tripod. includes sketchup file, stl, and gcode.
228Mm
3d_export
$5
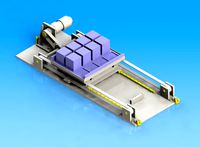
traverse mechanism of heavy workpiece
...(dp) × π× (ia) × (ib) × 1 / 60<br>=600×80×π×(1/9)×(40/49)×1/60=228mmsec<br>(according to the operating speed (ns): 600rpm)<br>key points of structure...
3d_sky
free

Kludi ZENTA - 3897391757-8884
...according to the manufacturer's scheme: diameter - 45mm, height -228mm ...
thingiverse
free

Kenner Tie Fighter Wing by apcoyne
...your printer has a build plate of at least 228mm in one horizontal axis print the complete wing files,...
thingiverse
free

Simple Deadpool Bust - work in progress by JBarrera30
...of champions game. approx. dimensions: ****108mm by 104mm by 228mm haven't printed it yet, but i'm working on getting...
thingiverse
free

GWR Steam Locomotive Builders Plate by atgordon
...too small to print this full size (556mm x 228mm, so i jigsawed the plate into two pieces and...
thingiverse
free
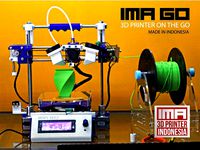
IMA-GO mini 3D Printer by gunawansy
...firmware: https://github.com/gunawansy/ima-go rods: 6mm smooth rods: 1 6mm x 228mm x 2 y axis 2 6mm x 220mm x...
thingiverse
free
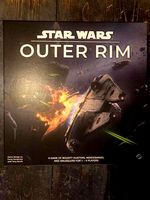
Star Wars Outer Rim Game Insert by irmcdermott
...and one. unfortunately since the player boards are around 228mm the main trays are slightly longer than that, so...
thingiverse
free

CTC Adjustable Glass Bed Corner Clamp by m4t42
...sliders are the right shape for my 151mm x 228mm glass plate from wanhao.co.uk i'm also about to design...
thingiverse
free

Pen Holder for office (Customizable) (Small Version) by STEV-o
...extra pockets at the left side. new dimensions: length: 228mm width: 120mm height:...
Monoprice
thingiverse
free

Display frame for Monoprice MP10
...display frame for monoprice mp10
thingiverse
display frame for monoprice mp10
thingiverse
free

Bridge covers Monoprice MP10
...bridge covers monoprice mp10
thingiverse
bridge covers monoprice mp10
thingiverse
free
Monoprice Coin by Peyton_Guyot
...monoprice coin by peyton_guyot
thingiverse
print this!
thingiverse
free
Voxel Monoprice spool holder by avalero
...voxel monoprice spool holder by avalero
thingiverse
voxel monoprice spool holder
thingiverse
free
Monoprice select mini knob by BramRausch
...monoprice select mini knob by bramrausch
thingiverse
this is a replacement knob for the monoprice select mini.
thingiverse
free

Monoprice 3d printer hook by dmitriyf
...monoprice 3d printer hook by dmitriyf
thingiverse
this is an attachment to monoprice select 3d printer v2
thingiverse
free
monoprice ultimate spool mount by death4u
...older by danmannert to monoprice ultimate 3d printer. it clips into the slot on the top of the printer for the optional enclosue.
thingiverse
free
Monoprice Mini Delta Foot
...a foot for a monoprice mini delta. it helps to increase airflow under the printer. it also helps to reduce the volume of the fan.
thingiverse
free
Monoprice Select Mini Fan Guard
...y fan protection. this is an essential upgrade.
used it on the monoprice select mini pro (from www.3dprinthings.be).
perfect fit!
thingiverse
free

Monoprice Cable Tie Mount
... but had to cut down the straps a bit to make them work. designed a quick mount that fits the full strap, item 6457 on monoprice.
Extension
3d_export
$5
extension plug - extension socket
...model. low poly and game ready. with blender files and texture (.png).<br>verts: 424<br>faces: 364<br>tris: 808
3ddd
$1

Moooi, Extension Chair
... стул , вешалка
стулья фирмы moooi, коллекция extension
turbosquid
$300

Bedroom Extension
...
royalty free 3d model bedroom extension for download as skp on turbosquid: 3d models for games, architecture, videos. (1682078)
3d_export
$5
palo extensible
...palo extensible
3dexport
turbosquid
$39
Leg Extension
...ee 3d model leg extension for download as obj, fbx, and blend on turbosquid: 3d models for games, architecture, videos. (1276776)
3d_export
$5

lampe extensible architecte
...lampe extensible architecte
3dexport
lampe extensible architecte maisons du monde
turbosquid
$20

Leg Extension
... available on turbo squid, the world's leading provider of digital 3d models for visualization, films, television, and games.
turbosquid
$2

Garage Extension
... available on turbo squid, the world's leading provider of digital 3d models for visualization, films, television, and games.
turbosquid
free

Extension cable
... available on turbo squid, the world's leading provider of digital 3d models for visualization, films, television, and games.
3ddd
$1

Moooi Extension Chair
...moooi extension chair
3ddd
moooi
http://www.moooi.com/products/extension-chair
Select
3ddd
$1

TUBADZIN SELECT
...max 2014, 2011.
fbx 2014, 2013, 2011,
obj
_____________________________________http://www.tubadzin.pl/en/collection/324
3ddd
$1
Плитка Selection
... supergres , плитка
плитка selection - supergres ceramiche
turbosquid
$15
Christmas Selection
...royalty free 3d model christmas selection for download as fbx on turbosquid: 3d models for games, architecture, videos. (1696333)
turbosquid
$39

Vases selection
... available on turbo squid, the world's leading provider of digital 3d models for visualization, films, television, and games.
turbosquid
free

SELECTIVE RACKING SYSTEM
...yalty free 3d model selective racking system for download as on turbosquid: 3d models for games, architecture, videos. (1282512)
turbosquid
$10
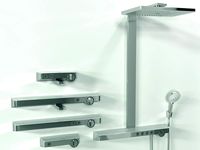
Hansgrohe ShowerTablet Select
...ee 3d model hansgrohe showertablet select for download as max on turbosquid: 3d models for games, architecture, videos. (1336955)
turbosquid
$29
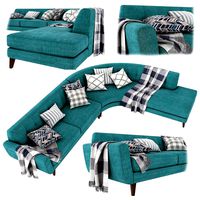
Chill selectional sofa
...odel chill selectional sofa for download as max, obj, and fbx on turbosquid: 3d models for games, architecture, videos. (1465691)
3ddd
free

Lunaria - Nova, ASA Selection
... asa selection , dried flowers
ветка лунарии в вазе nova, asa selection
3ddd
$1
inno SELECT SLIM chair
...inno select slim chair
3ddd
inno
high detailed inno select slim chair
turbosquid
$29

Select Chaise Lounge
... available on turbo squid, the world's leading provider of digital 3d models for visualization, films, television, and games.
Maker
3d_ocean
$17
Coffee Maker
...coffee maker
3docean
breakfast coffee drip electric maker morning
detailed coffee maker and a plug.
3ddd
$1
coffee maker
...coffee maker
3ddd
кофемашина
coffee maker
3d_export
$10

chapati maker
...chapati maker
3dexport
it is a indian traditional chapati maker
archibase_planet
free
Coffee maker
...aker
archibase planet
percolator coffee-machine coffee maker
coffee maker - 3d model (*.gsm+*.3ds) for interior 3d visualization.
archibase_planet
free
Coffee maker
...aker
archibase planet
percolator coffee-machine coffee maker
coffee maker - 3d model (*.gsm+*.3ds) for interior 3d visualization.
archibase_planet
free
Coffee maker
...aker
archibase planet
percolator coffee-machine coffee maker
coffee maker - 3d model (*.gsm+*.3ds) for interior 3d visualization.
archibase_planet
free

Сoffee maker
...er
archibase planet
coffee maker percolator coffee-machine
сoffee maker n020112 - 3d model (*.3ds) for interior 3d visualization.
archibase_planet
free

Coffee maker
...aker
archibase planet
coffee maker percolator coffee-machine
coffee maker - 3d model (*.gsm+*.3ds) for interior 3d visualization.
3ddd
$1

Juice Maker
...juice maker
3ddd
соковыжималка
fully detailed kenwood juice maker
archibase_planet
free
Coffee maker
...hibase planet
coffee maker percolator coffee-machine
coffee maker n140611 - 3d model (*.gsm+*.3ds) for interior 3d visualization.