Thingiverse
Monoprice v2.1 Y Bar Alignment Jig i3 Maker Select Wanhao by ModifiedDesigns3D
by Thingiverse
Last crawled date: 4 years, 7 months ago
Bed level is such a big issue! But bed level is much affected by the alignment of things. Lets just be real. They were just slapped together before they left the factory. So getting everything nice and straight is what we need to do.
But who wanta to sit there with calipers to get everything perfect?
Holding calipers, holding the fame, holding the rods, tightening the bolts. You need an extra set of hands. But im lazy, i like simple. This is a version2. First print 2 jigs. Then get your printer on a nice flat surface. Remove the gantey (like how you got it when it was shipped to you).
Remove the heated bed, and check the springs are even height. Crazy off height puts excess tension on the lower plate (not good).
Remove the lower plate - if you see its warped, simply flatten it back out. Most likely warped from the factory.
Losen the rod bolts and the grub screws (if you dont have grub screws, get them, otherwise the rods are not completely stationary). Place the frame on your surface, and all 4 corners should be contacting. If not, loosen the bolts and get your main frame straight and flat.
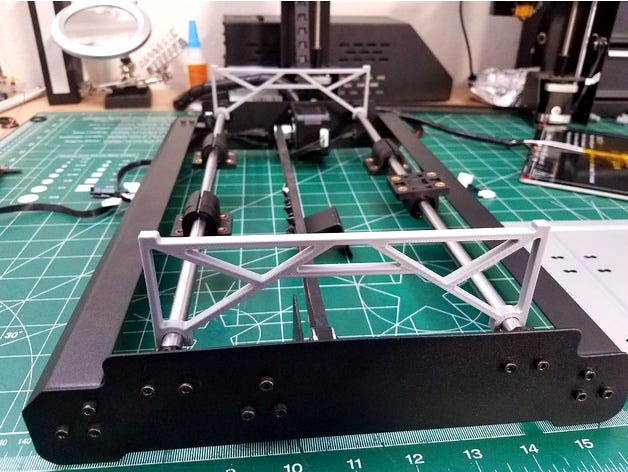
Originally these jigs were designed to be flipped from the picture and go under the belts so all 4 corners would be at equal heights. But there is only .5-1mm of play in the bolt holes, and there is a thick coating applied to the printers frame that threw off distances. So my coating/your coating blah blah mines worn, yours isnt. Ideally you want the Y rods level with your base because your Z motors are also sitting on that same surface. So equally shim each corner with paper, or you can just flip the jigs as shown - i had miminal height variances by sitting the jigs on top due to the coating.
Tighten the grub screws first, then SLOWLY and evenly tighten the rest of the rod bolts..
Placing your lower plate on the bars should be flat, pressing each corner you will notice if any other corner pops up, if it does, either your rods are not perfect, or your lower plate is warped, adjust as needed.
Attach the lower plate loosly, and feel it move.. feel it move front/back.. Grab each block and again, evenly and slowly tighten the screws for the bearing blocks.. If you just tighten one and then the next, the block will twist and cause drag.. Then reassemble the rest of the printer. You should now notice the 4 springs have an almost equal compression to them. Which in turn will resuly in far less bed relevels. Even with the stock thumb wheels (which i still use).
But who wanta to sit there with calipers to get everything perfect?
Holding calipers, holding the fame, holding the rods, tightening the bolts. You need an extra set of hands. But im lazy, i like simple. This is a version2. First print 2 jigs. Then get your printer on a nice flat surface. Remove the gantey (like how you got it when it was shipped to you).
Remove the heated bed, and check the springs are even height. Crazy off height puts excess tension on the lower plate (not good).
Remove the lower plate - if you see its warped, simply flatten it back out. Most likely warped from the factory.
Losen the rod bolts and the grub screws (if you dont have grub screws, get them, otherwise the rods are not completely stationary). Place the frame on your surface, and all 4 corners should be contacting. If not, loosen the bolts and get your main frame straight and flat.
Originally these jigs were designed to be flipped from the picture and go under the belts so all 4 corners would be at equal heights. But there is only .5-1mm of play in the bolt holes, and there is a thick coating applied to the printers frame that threw off distances. So my coating/your coating blah blah mines worn, yours isnt. Ideally you want the Y rods level with your base because your Z motors are also sitting on that same surface. So equally shim each corner with paper, or you can just flip the jigs as shown - i had miminal height variances by sitting the jigs on top due to the coating.
Tighten the grub screws first, then SLOWLY and evenly tighten the rest of the rod bolts..
Placing your lower plate on the bars should be flat, pressing each corner you will notice if any other corner pops up, if it does, either your rods are not perfect, or your lower plate is warped, adjust as needed.
Attach the lower plate loosly, and feel it move.. feel it move front/back.. Grab each block and again, evenly and slowly tighten the screws for the bearing blocks.. If you just tighten one and then the next, the block will twist and cause drag.. Then reassemble the rest of the printer. You should now notice the 4 springs have an almost equal compression to them. Which in turn will resuly in far less bed relevels. Even with the stock thumb wheels (which i still use).