Thingiverse
Monoprice Select Mini Thumbwheel Leveling System by ahutton1972
by Thingiverse
Last crawled date: 3 years ago
Update December 22, 2018
A new Version 2 Thumbwheel Leveling System is available here:
https://www.thingiverse.com/thing:3280396
It's much better than this one!
Please consider trying the newer version above as it works much better and is more reliable.
Update February 14, 2018
I've changed this from a work in progress to final. I do not plan on making any other changes to this system unless someone indicates a problem. Several have been successful with this system so I am making the move. Thanks to those that gave it a try in the beta stage!
Update: February 11, 2018
It was brought to my attention that the regular back bracket was missing the countersunk holes for the springs. I've updated the files and recommend everyone update that bracket with the newer file. The bracket without the countersunk is still usable if you use one of the the spring cup washers on the bottom.
Update: February 11, 2018
I've added a version of the front bracket with the magic number layer heights embossed in it. You can choose the original version or the magic number version as you please. No need to print both.
Update: February 10, 2018
I've added a back bracket with an integrated wire harness for those that choose to do the heat bed wire modification. You can use the same wheels with this bracket. It has a slot to hold a zip tie if you wish to secure your wires for strain relief. You choose which bracket you want to use. No need to print both.
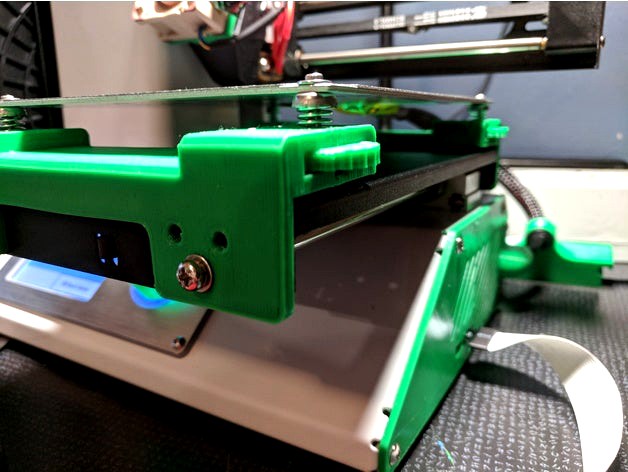
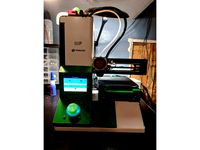
Monoprice Select Mini Thumbwheel Leveling System
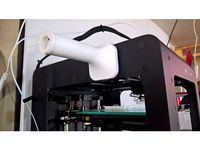
This is a thumb wheel leveling system I designed for the Monoprice Select Mini 3D Printer. This system is designed to be completely printable on the MP Select Mini and installed without any drilling or modification to the existing hardware. In doing this, the mod takes up some Z-height that you will lose for taller prints. The advantage of this system is that it is easily installed and removed if a larger Z-height is required.
Note: This is a prototype (Beta) leveling system that I may still tinker with based on recommendations and required improvements
Please follow the installation instructions below in order to be successful with this mod. DO NOT attempt to print until you have installed the correctly sized provided spacer
Also, I HAVE NOT tested the z-spacers with a glass bed. Do so at your own risk
Parts List:
4 M2 X 25mm screws to secure to the heat bed. I am currently using M2 X20mm screws and it does work, but you have more flexibility with the longer screws. DO NOT use M3 screws and DO NOT use the current screws used to hold the heat bed. They will not work. Must be M2. I used hex head M2 screws because that's what I had on hand, but you can use whichever head style you like. Countersunk style heads would probably be the best.
4 M2 nylon lock nuts or lock washers. I prefer the lock nuts as they are more secure
4 M2 nuts. 8 if you choose to go the lock washer route.
8 M2 washers to prevent the M2 screws from falling through the heat bed screw holes.
Existing printer springs, cup washers and screws that secure the bed to the y-axis rods
InstallationPlease reference the photos provided when putting together your system.
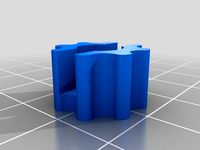
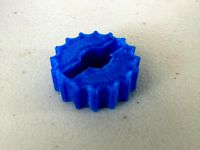
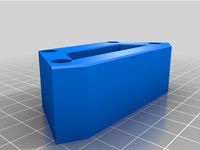
1.) Print all parts before assembly. DO NOT INSTALL ANY PARTS until you have printed out both the front and back brackets, the thumb wheels, and the necessary spacer.
2.) In order to print the brackets on the MP Select Mini, you will have to adjust your printer settings in Cura (or your particular slicer) to have an X and Y length of 125mm. This is not ideal as the official lengths are 120mm. But in order to print, we have to cheat a little and squeeze out a little more space. Reference the Cura photos. You most likley will not be able to fit a skirt or brim, so if you can print without. Please remember to put your settings back (X:120mm Y:120mm) when you are done. Alternately you can print the brackets on a larger printer.
3.) None of the parts require supports if oriented correctly in your slicer. The bracket should be printed as shown in the photo and the wheels face down.
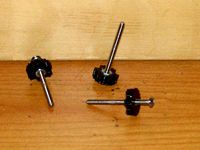
4.) Thumb wheel assembly: The nuts will tightly fit within the hub of the wheels. You might have to tap them in a little to get them to seat properly. It is HIGHLY recommended that you super glue these in place. Please allot enough time for the glue to dry or the wheel will not be usable. You've been warned. Once the glue has dried, run an M2 screw through the nut a few times to make sure the inner threads of the nut are clear of dried glue. It might take some doing to clean it out but it's not too hard. I don't recommend heating the nuts and melting them in place since this tends to leave them not flush. If the nuts aren't flush with the face of the bed, it will make the wheels very difficult to turn.
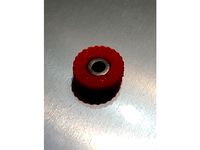
5.) Place the wheels into the slots of the brackets. The nut should be facing down.
6.) Attach screws to heat bed: The 4 M2 screws must be securely fastened to the heat bed so that they DO NOT TURN. This is accomplished with the nylon lock nuts or lock washers. Also secure existing cup washers as shown in the pictures. Use M2 washers on the top of the bed to prevent the screw head from falling through the screw hole.
7.) Screw brackets to the gantry. Remove the screws that hold the bed gantry to the y-axis rods. You can do this without harming anything. Just don't move the bed a bunch after you have unscrewed. Place the bracket on the bed and using the same screws, screw the bracket to the bed. Repeat for the other bracket. Please be careful that you install the correct brackets on the front and back.
8.) Assemble the heat bed: Place the heat bed on top of the brackets. The screws should line up with the center of the wheels. If they do not loosen them and re-align until they do. Place the existing 4 springs around the screws and make sure they seat into the depression of the brackets. Press down with the face of your hand on the heat bed until the screws seat with the top of the nuts in the thumb wheels. Turn each thumb wheel counter clockwise until the screw catches in the nut and it holds. At this point your heat bed should be securely fastened.
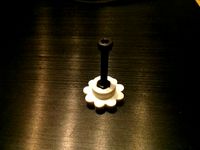
9.) Install the z-axis spacer: Lower the bed with the thumb wheels as low as they will go. Because the brackets add 12mm to the z-axis height, we have to adjust for this. 3 spacers are available for printing: 0mm offset, 3mm offset, and 4mm offset. The 0mm offset should be used by those that have not added a surface such as glass to the heat bed. BuildTak users, tape users, etc should use the 0 mm offset spacer. If you are using glass or another substrate choose the appropriate width (3mm or 4mm) for your application. Place the spacer as shown in the picture. The spacer clearly labels the correct orientation. It should snap into place.
10.) Level the bed: It is important to note that with this mod there is no play in the bed if the nozzle dives into it. PLEASE USE CARE WHEN HOMING THE NOZZLE AS TO NOT RUIN BOTH YOUR NOZZLE AND HEAT BED. With the bed lowered as low as it can go, home the printer. Be prepared to shut the printer off if you feel the nozzle is pressing to hard on the bed. From this point you should be able to adjust the thumb wheels to level the bed. Again, there is no play in the bed as there used to be. If the nozzle goes too low, it will dig into the bed causing damage. Be sure your leveling is spot on.
11.) THAT'S IT!
I hope you enjoy this mod. It makes leveling a snap and goes a lot quicker than using the Allen wrench. If anyone out there needs a different sized spacer, let me know. I can crank a new design out pretty fast.
As always, if you have any questions or concerns, post in the comments section and I'll get back to you.
DISCLAIMER: I am not responsible for any damage you cause to your printer if you choose to install this mod, whether you follow my directions or not. Install at your own risk. Pay close attention to the height of the bed prior to homing the printer so you don't do damage.
One last thing: If you are successful with this mod, please share a picture here. I would greatly appreciate it.
Happy Leveling!
A new Version 2 Thumbwheel Leveling System is available here:
https://www.thingiverse.com/thing:3280396
It's much better than this one!
Please consider trying the newer version above as it works much better and is more reliable.
Update February 14, 2018
I've changed this from a work in progress to final. I do not plan on making any other changes to this system unless someone indicates a problem. Several have been successful with this system so I am making the move. Thanks to those that gave it a try in the beta stage!
Update: February 11, 2018
It was brought to my attention that the regular back bracket was missing the countersunk holes for the springs. I've updated the files and recommend everyone update that bracket with the newer file. The bracket without the countersunk is still usable if you use one of the the spring cup washers on the bottom.
Update: February 11, 2018
I've added a version of the front bracket with the magic number layer heights embossed in it. You can choose the original version or the magic number version as you please. No need to print both.
Update: February 10, 2018
I've added a back bracket with an integrated wire harness for those that choose to do the heat bed wire modification. You can use the same wheels with this bracket. It has a slot to hold a zip tie if you wish to secure your wires for strain relief. You choose which bracket you want to use. No need to print both.
Monoprice Select Mini Thumbwheel Leveling System
This is a thumb wheel leveling system I designed for the Monoprice Select Mini 3D Printer. This system is designed to be completely printable on the MP Select Mini and installed without any drilling or modification to the existing hardware. In doing this, the mod takes up some Z-height that you will lose for taller prints. The advantage of this system is that it is easily installed and removed if a larger Z-height is required.
Note: This is a prototype (Beta) leveling system that I may still tinker with based on recommendations and required improvements
Please follow the installation instructions below in order to be successful with this mod. DO NOT attempt to print until you have installed the correctly sized provided spacer
Also, I HAVE NOT tested the z-spacers with a glass bed. Do so at your own risk
Parts List:
4 M2 X 25mm screws to secure to the heat bed. I am currently using M2 X20mm screws and it does work, but you have more flexibility with the longer screws. DO NOT use M3 screws and DO NOT use the current screws used to hold the heat bed. They will not work. Must be M2. I used hex head M2 screws because that's what I had on hand, but you can use whichever head style you like. Countersunk style heads would probably be the best.
4 M2 nylon lock nuts or lock washers. I prefer the lock nuts as they are more secure
4 M2 nuts. 8 if you choose to go the lock washer route.
8 M2 washers to prevent the M2 screws from falling through the heat bed screw holes.
Existing printer springs, cup washers and screws that secure the bed to the y-axis rods
InstallationPlease reference the photos provided when putting together your system.
1.) Print all parts before assembly. DO NOT INSTALL ANY PARTS until you have printed out both the front and back brackets, the thumb wheels, and the necessary spacer.
2.) In order to print the brackets on the MP Select Mini, you will have to adjust your printer settings in Cura (or your particular slicer) to have an X and Y length of 125mm. This is not ideal as the official lengths are 120mm. But in order to print, we have to cheat a little and squeeze out a little more space. Reference the Cura photos. You most likley will not be able to fit a skirt or brim, so if you can print without. Please remember to put your settings back (X:120mm Y:120mm) when you are done. Alternately you can print the brackets on a larger printer.
3.) None of the parts require supports if oriented correctly in your slicer. The bracket should be printed as shown in the photo and the wheels face down.
4.) Thumb wheel assembly: The nuts will tightly fit within the hub of the wheels. You might have to tap them in a little to get them to seat properly. It is HIGHLY recommended that you super glue these in place. Please allot enough time for the glue to dry or the wheel will not be usable. You've been warned. Once the glue has dried, run an M2 screw through the nut a few times to make sure the inner threads of the nut are clear of dried glue. It might take some doing to clean it out but it's not too hard. I don't recommend heating the nuts and melting them in place since this tends to leave them not flush. If the nuts aren't flush with the face of the bed, it will make the wheels very difficult to turn.
5.) Place the wheels into the slots of the brackets. The nut should be facing down.
6.) Attach screws to heat bed: The 4 M2 screws must be securely fastened to the heat bed so that they DO NOT TURN. This is accomplished with the nylon lock nuts or lock washers. Also secure existing cup washers as shown in the pictures. Use M2 washers on the top of the bed to prevent the screw head from falling through the screw hole.
7.) Screw brackets to the gantry. Remove the screws that hold the bed gantry to the y-axis rods. You can do this without harming anything. Just don't move the bed a bunch after you have unscrewed. Place the bracket on the bed and using the same screws, screw the bracket to the bed. Repeat for the other bracket. Please be careful that you install the correct brackets on the front and back.
8.) Assemble the heat bed: Place the heat bed on top of the brackets. The screws should line up with the center of the wheels. If they do not loosen them and re-align until they do. Place the existing 4 springs around the screws and make sure they seat into the depression of the brackets. Press down with the face of your hand on the heat bed until the screws seat with the top of the nuts in the thumb wheels. Turn each thumb wheel counter clockwise until the screw catches in the nut and it holds. At this point your heat bed should be securely fastened.
9.) Install the z-axis spacer: Lower the bed with the thumb wheels as low as they will go. Because the brackets add 12mm to the z-axis height, we have to adjust for this. 3 spacers are available for printing: 0mm offset, 3mm offset, and 4mm offset. The 0mm offset should be used by those that have not added a surface such as glass to the heat bed. BuildTak users, tape users, etc should use the 0 mm offset spacer. If you are using glass or another substrate choose the appropriate width (3mm or 4mm) for your application. Place the spacer as shown in the picture. The spacer clearly labels the correct orientation. It should snap into place.
10.) Level the bed: It is important to note that with this mod there is no play in the bed if the nozzle dives into it. PLEASE USE CARE WHEN HOMING THE NOZZLE AS TO NOT RUIN BOTH YOUR NOZZLE AND HEAT BED. With the bed lowered as low as it can go, home the printer. Be prepared to shut the printer off if you feel the nozzle is pressing to hard on the bed. From this point you should be able to adjust the thumb wheels to level the bed. Again, there is no play in the bed as there used to be. If the nozzle goes too low, it will dig into the bed causing damage. Be sure your leveling is spot on.
11.) THAT'S IT!
I hope you enjoy this mod. It makes leveling a snap and goes a lot quicker than using the Allen wrench. If anyone out there needs a different sized spacer, let me know. I can crank a new design out pretty fast.
As always, if you have any questions or concerns, post in the comments section and I'll get back to you.
DISCLAIMER: I am not responsible for any damage you cause to your printer if you choose to install this mod, whether you follow my directions or not. Install at your own risk. Pay close attention to the height of the bed prior to homing the printer so you don't do damage.
One last thing: If you are successful with this mod, please share a picture here. I would greatly appreciate it.
Happy Leveling!
Similar models
thingiverse
free

3mm Thumb Bed Level Adjusters
...ps://github.com/prusaowners/prusaowners/wiki/bed_leveling_without_wave_springs
video: https://www.youtube.com/watch?v=hdv73adibqm
thingiverse
free

print bed thumb wheel by tanasibob
...lt with a washer to seat it properly... make this one of your first mods, you will not be sorry (if you dont have auto leveling.)
thingiverse
free

Anycubic Photon S - Sovol Flexi Plate X Sensor Spacer - Sovol3D by warezchewy
...ore you install the magnetic plate. then go ahead and install your magnetic plate, then zero z out and level the plate if needed.
thingiverse
free

Tevo Tornado / CR-10 Bed Spacer Spring Replacement by ratmandu
... the ability to level your bed with the screws.
this should help improve y-axis slop by removing any lateral movement of the bed.
thingiverse
free

Ender 3 and Ender 5 bed leveling spring spacer with capture nut
... the spacers and then put the bed back on your carriage and put on the bed leveling wheels. you will now have a much stiffer bed.
thingiverse
free

Prusa i3 heat bed nut holder by J_Seppala
...int out nicely and the nut should have a snug fit to hold the nut in place. i printed these with pla and for me they work nicely.
thingiverse
free

FT-5 Mechanical Bed Leveling : Dial Gauge Bracket by Ishampadron
...etailpage_o07_s00?ie=utf8&psc=1
if there are any issues with the design or adjustments that need to be made please notify me.
thingiverse
free
Anet A8 / A6 Bed Level Thumbwheel use with wing nut by reba256
...hat can be used with the wing nut, but they were too tight. the wing nut did not fit in to the thumb wheel. so i made my own one.
thingiverse
free

Bed Level Thumb-wheel by Jb3designer
...cise.
in adittion, to complete the kit, you need these elements too:
4x screw m3x30
4x springs
8x nut m3 (optional)
4x washer m3
thingiverse
free
Wingnut Thumb Screw for Maker Select V2 by Deliciousfewd
...design takes into account clearance for the y carriage to travel and should just make it easier on your fingers to level the bed.
Ahutton1972
thingiverse
free

F-15 Logo by ahutton1972
...f-15 logo by ahutton1972
thingiverse
this is a f-15 logo.
thingiverse
free
Storm Door Bracket by ahutton1972
...i printed at 100% infill and on its side to orient the layers outward.
if you print one, post a picture. i'd love to see it!
thingiverse
free

Headphone Holder for 34mm Width IKEA Table by ahutton1972
... in two parts. you can glue them together if you wish or not. if you make one, please post a picture as i would love to see it!
thingiverse
free
Monoprice Select Mini Control Panel Relocation by ahutton1972
...ile.
if you have any comments or suggestions, please feel free to comment here or on the mp select mini users group on facebook.
thingiverse
free

Monoprice Select Mini Filament Spool Spinner by ahutton1972
...-code command in the g-code file at the appropriate layers. use your slicer to figure out which layers are right for your print.
thingiverse
free

MP Select Mini Beefy Bed Wire Harness by ahutton1972
...t interfere with the gantry. if it does, use a smaller zip tie.
i used m3 screws and nuts to secure the wire harness to the bed.
Thumbwheel
thingiverse
free

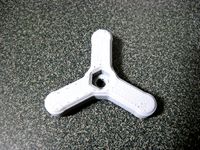
Thumbwheel by Workshopshed
...thumbwheel by workshopshed
thingiverse
a three cornered thumbwheel i made to put on some m6 bolts
thingiverse
free

Thumbwheel by schneik80
...umbwheel by schneik80
thingiverse
6 mm thumbwheel as a replacement part for a broken wheel on a floor standing projector screen.
thingiverse
free
Small Thumbwheel by johnpanter
...small thumbwheel by johnpanter
thingiverse
14mm thumbwheel for a m3 screw or bolt.
thingiverse
free
Thumbwheel M3 by neeoo
...thumbwheel m3 by neeoo
thingiverse
thumbwheel for standard m3 nut.
external dimension only 11,8mm.
thingiverse
free

Tarantula Thumbwheel by Fabio22italy
...tarantula thumbwheel by fabio22italy
thingiverse
tiny thumbwheel for bed leveling, perfect for original tevo tarantula.
thingiverse
free
M3 thumbwheel by tnw513
...m3 thumbwheel by tnw513
thingiverse
based on "just another m3 thumbwheel!".
height: 8mm
thingiverse
free
Thumbwheel direction guide by SirexwasP
...thumbwheel direction guide by sirexwasp
thingiverse
a thumbwheel direction guide to assist newcomers with bed levelling.
thingiverse
free
M3 Knob Thumbwheel by LittleDangerous
...m3 knob thumbwheel by littledangerous
thingiverse
this knob/thumbwheel is designed for m3 hex head bolts.
thingiverse
free

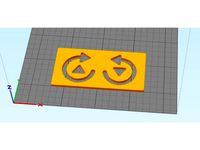
Thumbwheel Reminder by Thundrfuk
...always forget which way to turn those bed thumbwheels! this just goes in the corner of the 2020 extrusion as a simple reminder.
thingiverse
free

Directional Thumbwheel by demoneye999
...ed - larger text!
added some text to the thumbwheel just so it's easier to remember which direction lowers/highers the bed :)
Monoprice
thingiverse
free

Display frame for Monoprice MP10
...display frame for monoprice mp10
thingiverse
display frame for monoprice mp10
thingiverse
free

Bridge covers Monoprice MP10
...bridge covers monoprice mp10
thingiverse
bridge covers monoprice mp10
thingiverse
free
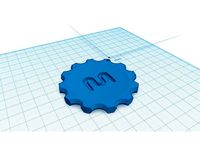
Monoprice Coin by Peyton_Guyot
...monoprice coin by peyton_guyot
thingiverse
print this!
thingiverse
free
Voxel Monoprice spool holder by avalero
...voxel monoprice spool holder by avalero
thingiverse
voxel monoprice spool holder
thingiverse
free
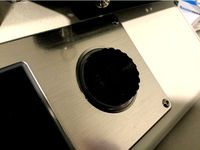
Monoprice select mini knob by BramRausch
...monoprice select mini knob by bramrausch
thingiverse
this is a replacement knob for the monoprice select mini.
thingiverse
free

Monoprice 3d printer hook by dmitriyf
...monoprice 3d printer hook by dmitriyf
thingiverse
this is an attachment to monoprice select 3d printer v2
thingiverse
free
monoprice ultimate spool mount by death4u
...older by danmannert to monoprice ultimate 3d printer. it clips into the slot on the top of the printer for the optional enclosue.
thingiverse
free
Monoprice Mini Delta Foot
...a foot for a monoprice mini delta. it helps to increase airflow under the printer. it also helps to reduce the volume of the fan.
thingiverse
free
Monoprice Select Mini Fan Guard
...y fan protection. this is an essential upgrade.
used it on the monoprice select mini pro (from www.3dprinthings.be).
perfect fit!
thingiverse
free

Monoprice Cable Tie Mount
... but had to cut down the straps a bit to make them work. designed a quick mount that fits the full strap, item 6457 on monoprice.
Select
3ddd
$1

TUBADZIN SELECT
...max 2014, 2011.
fbx 2014, 2013, 2011,
obj
_____________________________________http://www.tubadzin.pl/en/collection/324
3ddd
$1
Плитка Selection
... supergres , плитка
плитка selection - supergres ceramiche
turbosquid
$15
Christmas Selection
...royalty free 3d model christmas selection for download as fbx on turbosquid: 3d models for games, architecture, videos. (1696333)
turbosquid
$39

Vases selection
... available on turbo squid, the world's leading provider of digital 3d models for visualization, films, television, and games.
turbosquid
free

SELECTIVE RACKING SYSTEM
...yalty free 3d model selective racking system for download as on turbosquid: 3d models for games, architecture, videos. (1282512)
turbosquid
$10
Hansgrohe ShowerTablet Select
...ee 3d model hansgrohe showertablet select for download as max on turbosquid: 3d models for games, architecture, videos. (1336955)
turbosquid
$29

Chill selectional sofa
...odel chill selectional sofa for download as max, obj, and fbx on turbosquid: 3d models for games, architecture, videos. (1465691)
3ddd
free

Lunaria - Nova, ASA Selection
... asa selection , dried flowers
ветка лунарии в вазе nova, asa selection
3ddd
$1
inno SELECT SLIM chair
...inno select slim chair
3ddd
inno
high detailed inno select slim chair
turbosquid
$29

Select Chaise Lounge
... available on turbo squid, the world's leading provider of digital 3d models for visualization, films, television, and games.
Mini
turbosquid
$10

Mini Mini Luceplan
...
royalty free 3d model mini mini luceplan for download as max on turbosquid: 3d models for games, architecture, videos. (1227359)
3d_ocean
$39

Mini Cooper
...mini cooper
3docean
cabrioler cooper mini
mini cooper cabrioler
3d_export
$30

Mini lathe
...mini lathe
3dexport
mini lathe
3d_export
$5

mini mouse
...mini mouse
3dexport
mini mouse
3d_export
$5

mini house
...mini house
3dexport
mini house
3d_export
free

Mini Mecha
...mini mecha
3dexport
concept of mini mecha
3d_ocean
$20

Mini Gun
...mini gun
3docean
gatling gun gun machine gun mini gun weapon
model of a mini gatling gun.
3ddd
free

Herve mini
... кофейный , herve
http://www.mobiliavenanti.it/ru/products/hervè-mini
3d_export
$5

mini wall
...mini wall
3dexport
mini wall for living room
3d_export
$5

mini bank
...mini bank
3dexport
mini bank 3d model
Leveling
design_connected
$11

Levels
...levels
designconnected
one nordic levels computer generated 3d model. designed by form us with love.
design_connected
$7
Level
...level
designconnected
zanotta level shelves and storage computer generated 3d model. designed by arik levy.
turbosquid
$1
level
... available on turbo squid, the world's leading provider of digital 3d models for visualization, films, television, and games.
3d_export
$5

Mario level
...mario level
3dexport
mario level low quality for fun videos
3ddd
$1

LEVELS OF DISCOVERY
...етская мебель "levels of discovery". rab10003 princess mini rocker
кресло-качалка (мини) "принцесса навсегда"
3d_export
$19

level design
...level design
3dexport
you can use this design (level design) in your own game.
turbosquid
$60
Desert level
...squid
royalty free 3d model desert level for download as fbx on turbosquid: 3d models for games, architecture, videos. (1208131)
turbosquid
$15
Transit Level
...quid
royalty free 3d model transit level for download as max on turbosquid: 3d models for games, architecture, videos. (1158112)
turbosquid
$14

Districts Level
...id
royalty free 3d model districts level for download as max on turbosquid: 3d models for games, architecture, videos. (1408410)
turbosquid
$3

Level Ball
...
royalty free 3d model level ball for download as ma and obj on turbosquid: 3d models for games, architecture, videos. (1515558)
System
archibase_planet
free

System
...m
archibase planet
fire alarm system fire alarm box
security light system - 3d model (*.gsm+*.3ds) for interior 3d visualization.
archibase_planet
free

Spider system
...stem spider glass system
spider system to fix glass stefano galli n050912 - 3d model (*.gsm+*.3ds) for interior 3d visualization.
3ddd
$1

Euforia System
...euforia system
3ddd
euforia
euforia system
3d_export
$50

Roof system Truss system 3D Model
...oof system truss system 3d model
3dexport
roof system truss truss stage
roof system truss system 3d model aleksbel 38970 3dexport
3ddd
$1

DVD System
...dvd system
3ddd
dvd , schneider
dvd system
design_connected
free

Seating system
...seating system
designconnected
free 3d model of seating system
3d_export
$5

solar system
...solar system
3dexport
solar system in c4d, with 8k nasa textures
3ddd
$1

Quanta System
...quanta system
3ddd
медицина
quanta system.
лазерное оборудование для медицинских центров
3d_export
$15

solar system
...nd the other the sun, the earth and the moon, the latter has an animation with camera movement included, the files are in spanish
3d_export
$14

missile system
...missile system
3dexport