Thingiverse

MonoPrice Select Mini Bed Expansion V2 (150mmx230mm) by iBigNTastyi
by Thingiverse
Last crawled date: 3 years ago
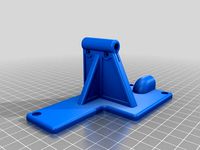
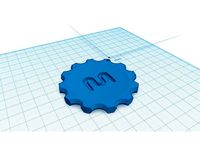
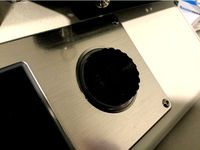
This is a revision of YourDrunkle's design. I've updated the bed holders to work with thumb-wheels. I've also included two versions of the thumb-wheel. Print 4x of whichever you choose. Photos above and the summary below are pulled directly from Yourdrunkle's design.
This is a modification to expand the MonoPrice Select Mini's print bed depth to 230mm on the cheap. I am able to utilize a printable area of 130mm x 220mm with just these modifications. The price once built was approximately $60 for me. This is nearly the same price as the unheated version of the "4th dimension modifications" "Maximus" kit but my build includes a heated bed. Note that you will need to upgrade the Select Mini's power supply to utilize the heater but I hope to be making a basic guide for that as well soon.
Some notes about this project:
No special tools (except a 3D printer) are needed for this project. I used a hacksaw to cut the aluminum, scissors, a drill with 1/8" and 5/32" drill bits, and a measuring device.
Most of the non-3D printer specific parts (8mm rod, belt, and the bed itself) were purchased from my local Ace Hardware.
I used a lot of Imperial sized (6-32) bolts instead of Metric (M3 or M4) bolts. Im in the US, so they are WAY cheaper locally. Seriously, like 1/3 to 1/2 the price. Sorry, I'd rather use metric too... M4 will PROBABLY work fine and allow use of the nut inserts.
Links to what I used:
Print Bed:https://www.amazon.com/gp/product/B01AAYY70Y/ref=oh_aui_detailpage_o01_s00?ie=UTF8&psc=1
Belt (note: this is WAY too much belt. You only need ~30cm and could save money by buying a smaller quantity):https://www.amazon.com/gp/product/B00F2IQNX8/ref=oh_aui_detailpage_o00_s00?ie=UTF8&psc=1
Rods:https://www.ebay.com/itm/300-350-400mm-8mm-Chromed-Rod-Parts-DIY-CNC-Linear-Rail-Shaft-for-3D-Printer/122850462999?hash=item1c9a754d17:m:m3bE2vd9IhcoeTMEq0XmC7Q
Everything else was locally purchased at Ace Hardware.
A REALLY REALLY BRIEF BUILD GUIDE:
Looking at your printer as it comes apart is crucial. This "guide" is very broad and skips a lot of stuff that you should be able to figure out on your own.
Printing
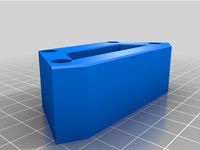
I printed everything with 100% infill and 0.1mm layers with PLA. Time will tell if the PLA holds up tot he heat from the print bed but I am confident. I am able to fit it all in 3 print files on the stock Select Mini. It took a long time but it is very rigid and looks good IMO.
Cutting Aluminum:
Cut aluminum to 150mm for the front and rear and approximately 2-5mm shorter than your rods for the left and right sides. Its ok for the aluminum to be a few mm short but not a few mm long.
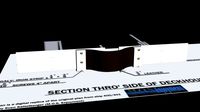
Drilling:
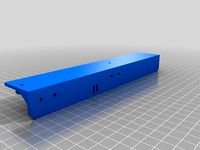
Assemble and square the frame off of the printer. Ensure that the 8mm rods are against the aluminum and are the same spacing as on the printer. Use a 1/8" drill bit to drill through the holes in the 3D printer parts. Expand the holes shown in the pictures in the aluminum only. The expanded holes are to allow for some adjustability in the system.
Assembly:
When the frame is initially assembled on the printer, do not tighten the 2 screws in the front and rear that were drilled oversized. Push the frame to the farthest back point of travel and tighten the front screw and vise versa. This prevent binding.
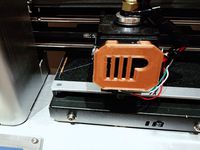
Installing the bed
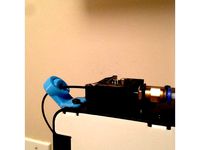
When installing the bed, I placed the connector for the electronics toward the outside of the printer. It will bind if placed on the inside.
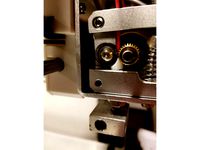
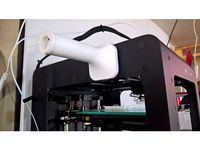
Installing the belt:
The belt loops through this frame differently than the stock printer. However, it still goes through the stepper motors the same way and the layout in the frame should be obvious. The ribs in the belt will sit in the ribs on the inside edge of the frame.
This is a modification to expand the MonoPrice Select Mini's print bed depth to 230mm on the cheap. I am able to utilize a printable area of 130mm x 220mm with just these modifications. The price once built was approximately $60 for me. This is nearly the same price as the unheated version of the "4th dimension modifications" "Maximus" kit but my build includes a heated bed. Note that you will need to upgrade the Select Mini's power supply to utilize the heater but I hope to be making a basic guide for that as well soon.
Some notes about this project:
No special tools (except a 3D printer) are needed for this project. I used a hacksaw to cut the aluminum, scissors, a drill with 1/8" and 5/32" drill bits, and a measuring device.
Most of the non-3D printer specific parts (8mm rod, belt, and the bed itself) were purchased from my local Ace Hardware.
I used a lot of Imperial sized (6-32) bolts instead of Metric (M3 or M4) bolts. Im in the US, so they are WAY cheaper locally. Seriously, like 1/3 to 1/2 the price. Sorry, I'd rather use metric too... M4 will PROBABLY work fine and allow use of the nut inserts.
Links to what I used:
Print Bed:https://www.amazon.com/gp/product/B01AAYY70Y/ref=oh_aui_detailpage_o01_s00?ie=UTF8&psc=1
Belt (note: this is WAY too much belt. You only need ~30cm and could save money by buying a smaller quantity):https://www.amazon.com/gp/product/B00F2IQNX8/ref=oh_aui_detailpage_o00_s00?ie=UTF8&psc=1
Rods:https://www.ebay.com/itm/300-350-400mm-8mm-Chromed-Rod-Parts-DIY-CNC-Linear-Rail-Shaft-for-3D-Printer/122850462999?hash=item1c9a754d17:m:m3bE2vd9IhcoeTMEq0XmC7Q
Everything else was locally purchased at Ace Hardware.
A REALLY REALLY BRIEF BUILD GUIDE:
Looking at your printer as it comes apart is crucial. This "guide" is very broad and skips a lot of stuff that you should be able to figure out on your own.
Printing
I printed everything with 100% infill and 0.1mm layers with PLA. Time will tell if the PLA holds up tot he heat from the print bed but I am confident. I am able to fit it all in 3 print files on the stock Select Mini. It took a long time but it is very rigid and looks good IMO.
Cutting Aluminum:
Cut aluminum to 150mm for the front and rear and approximately 2-5mm shorter than your rods for the left and right sides. Its ok for the aluminum to be a few mm short but not a few mm long.
Drilling:
Assemble and square the frame off of the printer. Ensure that the 8mm rods are against the aluminum and are the same spacing as on the printer. Use a 1/8" drill bit to drill through the holes in the 3D printer parts. Expand the holes shown in the pictures in the aluminum only. The expanded holes are to allow for some adjustability in the system.
Assembly:
When the frame is initially assembled on the printer, do not tighten the 2 screws in the front and rear that were drilled oversized. Push the frame to the farthest back point of travel and tighten the front screw and vise versa. This prevent binding.
Installing the bed
When installing the bed, I placed the connector for the electronics toward the outside of the printer. It will bind if placed on the inside.
Installing the belt:
The belt loops through this frame differently than the stock printer. However, it still goes through the stepper motors the same way and the layout in the frame should be obvious. The ribs in the belt will sit in the ribs on the inside edge of the frame.
Similar models
thingiverse
free

MonoPrice Select Mini Bed Expansion (150mmx230mm) by YourDrunkle
...ame way and the layout in the frame should be obvious. the ribs in the belt will sit in the ribs on the inside edge of the frame.
thingiverse
free

Arcade1Up SwitchBracket_v2 for Monoprice Select Mini by Hilux74
... the edges of bumbumbum's arcade1up switchbracket v2 so it will fit the print bed area of the monoprice select mini printer
thingiverse
free

Monoprice Select Mini V2 3mm Glass Bed Z-Spacer by MMDeveloper
...or those needing 3.5mm of offset.
i personally use this one https://www.amazon.com/dp/b075xj5zp1/ref=cm_sw_r_cp_apa_eslhabesgrx0p
thingiverse
free

Monoprice Select Mini Z-Axis Rod Stabilizers by mdsajjad
... printing instrument, on our hack-a-day project page here: https://hackaday.io/project/14823-maximum-3d-printer-bang-for-the-buck
thingiverse
free

Monoprice Select Mini Z-Axis Rod Stabilizers by USWaterRockets
... printing instrument, on our hack-a-day project page here: https://hackaday.io/project/14823-maximum-3d-printer-bang-for-the-buck
thingiverse
free
Monoprice Select Mini extended bed brackets by mfink70
...dard size bed mounts. these fit and are usable but you may lose some bed space.
8/30/17: cleaned up a few things with the mounts.
thingiverse
free
Select Mini X Gantry Supports w/ Bed Rewiring Mod Access Duct by jprochazka
...o be printed on the monoprice select mini. the main problem is retaining rigidity after cutting the model into multiple models.
thingiverse
free
Monoprice MP Select Mini - Z End Stop Spacer by arielrossell
... simpler and "easier to install" z end stop spacer, so you can use a piece of glass on the bed of the mp select mini.
thingiverse
free

Cork insulation for Monoprice Select Mini 3D Printer by noen
...x11" letter sized sheet of paper and use it to cut out your foam and cork. attach together and insert under the bed, enjoy!
thingiverse
free
Monoprice Select Mini Filament Guide by tommytwothousand
...monoprice select mini filament guide by tommytwothousand
thingiverse
here is a filament guide for the monoprice select mini!
150Mmx230Mm
thingiverse
free
MonoPrice Select Mini Bed Expansion (150mmx230mm) by YourDrunkle
...ame way and the layout in the frame should be obvious. the ribs in the belt will sit in the ribs on the inside edge of the frame.
thingiverse
free

CTC Adjustable Glass Bed Corner Clamp by m4t42
...exactly the same shape/size as the aluminium build plate (150mmx230mm. they should allow plates up to 156mm x 236mm....
Ibigntastyi
thingiverse
free
Aurora A3 Flexible Filament Guide by iBigNTastyi
...ns, i finally created a product that works. it's a very tight fit, as seen in the photo, but i've tested it and it works.
thingiverse
free

AC knob for 06 Toyota Tundra by iBigNTastyi
...inted in the designed orientation with supports. the bottom comes out kind of ugly, but that's ok since it won't be seen.
thingiverse
free

Whirlpool/KitchenAid Dishwasher Upper Rack Adjuster W10530376 by iBigNTastyi
...get by until a replacement shows up, and i don't expect it to last long in the high heat conditions of dishwasher operations.
thingiverse
free

Simple Airsoft Suppressor by iBigNTastyi
...omment if you would like to see any changes.
fyi, it doesn't suppress the airsoft gun at all. not functional, but looks cool.
Monoprice
thingiverse
free

Display frame for Monoprice MP10
...display frame for monoprice mp10
thingiverse
display frame for monoprice mp10
thingiverse
free

Bridge covers Monoprice MP10
...bridge covers monoprice mp10
thingiverse
bridge covers monoprice mp10
thingiverse
free
Monoprice Coin by Peyton_Guyot
...monoprice coin by peyton_guyot
thingiverse
print this!
thingiverse
free
Voxel Monoprice spool holder by avalero
...voxel monoprice spool holder by avalero
thingiverse
voxel monoprice spool holder
thingiverse
free
Monoprice select mini knob by BramRausch
...monoprice select mini knob by bramrausch
thingiverse
this is a replacement knob for the monoprice select mini.
thingiverse
free

Monoprice 3d printer hook by dmitriyf
...monoprice 3d printer hook by dmitriyf
thingiverse
this is an attachment to monoprice select 3d printer v2
thingiverse
free
monoprice ultimate spool mount by death4u
...older by danmannert to monoprice ultimate 3d printer. it clips into the slot on the top of the printer for the optional enclosue.
thingiverse
free
Monoprice Mini Delta Foot
...a foot for a monoprice mini delta. it helps to increase airflow under the printer. it also helps to reduce the volume of the fan.
thingiverse
free
Monoprice Select Mini Fan Guard
...y fan protection. this is an essential upgrade.
used it on the monoprice select mini pro (from www.3dprinthings.be).
perfect fit!
thingiverse
free

Monoprice Cable Tie Mount
... but had to cut down the straps a bit to make them work. designed a quick mount that fits the full strap, item 6457 on monoprice.
Expansion
turbosquid
$42

Expansion tank
...d model expansion tank for download as 3ds, max, obj, and fbx on turbosquid: 3d models for games, architecture, videos. (1207393)
3d_export
$50

Expansion Joint 3D Model
...expansion joint 3d model
3dexport
expansion joint 3d model stargazer 4537 3dexport
turbosquid
$25
Titanic Expansion Joint
... available on turbo squid, the world's leading provider of digital 3d models for visualization, films, television, and games.
3d_export
$5
thermostatic expansion valve
...thermostatic expansion valve
3dexport
3d model stl of fusion 360.
3d_ocean
$15

Dungeon Tileset01 Expansion 1
...m/dungeon-tileset01-base/4625640 including stairs, tiles to make large rooms and a new texture that works with the tiles in th...
turbosquid
$20

Cartoon Corgi Banana Costume Expansion Pack
...artoon corgi banana costume expansion pack for download as ma on turbosquid: 3d models for games, architecture, videos. (1445388)
3ddd
$1

Hichory chair Ingold Oval Expansion
...kitchen-furniture/1911-collection/i510089-ingold-oval-expansion-top-mahogany-and-185-11-ingold-3-leg-pedestal-base.aspx
turbosquid
$299
Sci-Fi Dark Space Game Kit plus Expansion Pack
... available on turbo squid, the world's leading provider of digital 3d models for visualization, films, television, and games.
3d_export
$5

Swedish wall
...swedish wall 3dexport swedish wall, expansion wall bars, stairs for children, horizontal bar for...
3d_export
$10

External HDD 3D Model
...hard disk drive external seagate usb storage hdd portable expansion data mobile external hdd 3d model nkfrds 47740...
Select
3ddd
$1

TUBADZIN SELECT
...max 2014, 2011.
fbx 2014, 2013, 2011,
obj
_____________________________________http://www.tubadzin.pl/en/collection/324
3ddd
$1
Плитка Selection
... supergres , плитка
плитка selection - supergres ceramiche
turbosquid
$15
Christmas Selection
...royalty free 3d model christmas selection for download as fbx on turbosquid: 3d models for games, architecture, videos. (1696333)
turbosquid
$39

Vases selection
... available on turbo squid, the world's leading provider of digital 3d models for visualization, films, television, and games.
turbosquid
free

SELECTIVE RACKING SYSTEM
...yalty free 3d model selective racking system for download as on turbosquid: 3d models for games, architecture, videos. (1282512)
turbosquid
$10
Hansgrohe ShowerTablet Select
...ee 3d model hansgrohe showertablet select for download as max on turbosquid: 3d models for games, architecture, videos. (1336955)
turbosquid
$29
Chill selectional sofa
...odel chill selectional sofa for download as max, obj, and fbx on turbosquid: 3d models for games, architecture, videos. (1465691)
3ddd
free

Lunaria - Nova, ASA Selection
... asa selection , dried flowers
ветка лунарии в вазе nova, asa selection
3ddd
$1
inno SELECT SLIM chair
...inno select slim chair
3ddd
inno
high detailed inno select slim chair
turbosquid
$29

Select Chaise Lounge
... available on turbo squid, the world's leading provider of digital 3d models for visualization, films, television, and games.
V2
3d_export
free

Lamp v2
...lamp v2
3dexport
lamp v2 with solar panel
3d_export
$5

hammerhead v2
...hammerhead v2
3dexport
razer hammerhead v2 headphones, modeled in cinema 4d, render in corona
3d_export
$5

manometer v2
...manometer v2
3dexport
3d_export
$5

potato v2
...potato v2
3dexport
turbosquid
$52

Lifebuoys v2
...squid
royalty free 3d model lifebuoys v2 for download as fbx on turbosquid: 3d models for games, architecture, videos. (1560870)
turbosquid
$2

Mask v2
...turbosquid
royalty free 3d model mask v2 for download as stl on turbosquid: 3d models for games, architecture, videos. (1527741)
turbosquid
free

Flashlight V2
...d
free 3d model flashlight v2 for download as , obj, and fbx on turbosquid: 3d models for games, architecture, videos. (1663559)
turbosquid
$29

Thanos v2
...
royalty free 3d model thanos v2 for download as ztl and obj on turbosquid: 3d models for games, architecture, videos. (1651077)
turbosquid
$29

Titan v2
...d
royalty free 3d model titan v2 for download as ztl and obj on turbosquid: 3d models for games, architecture, videos. (1540228)
turbosquid
$29

Frieza v2
...
royalty free 3d model frieza v2 for download as ztl and obj on turbosquid: 3d models for games, architecture, videos. (1701238)
Mini
turbosquid
$10

Mini Mini Luceplan
...
royalty free 3d model mini mini luceplan for download as max on turbosquid: 3d models for games, architecture, videos. (1227359)
3d_ocean
$39

Mini Cooper
...mini cooper
3docean
cabrioler cooper mini
mini cooper cabrioler
3d_export
$30

Mini lathe
...mini lathe
3dexport
mini lathe
3d_export
$5

mini mouse
...mini mouse
3dexport
mini mouse
3d_export
$5

mini house
...mini house
3dexport
mini house
3d_export
free

Mini Mecha
...mini mecha
3dexport
concept of mini mecha
3d_ocean
$20

Mini Gun
...mini gun
3docean
gatling gun gun machine gun mini gun weapon
model of a mini gatling gun.
3ddd
free

Herve mini
... кофейный , herve
http://www.mobiliavenanti.it/ru/products/hervè-mini
3d_export
$5

mini wall
...mini wall
3dexport
mini wall for living room
3d_export
$5

mini bank
...mini bank
3dexport
mini bank 3d model
Bed
3ddd
$1

bed
...bed
3ddd
bed , постельное белье
bed
3ddd
$1

bed
...bed
3ddd
bed , постельное белье
bed
3ddd
$1

bed
...bed
3ddd
bed , постельное белье
bed
3ddd
$1

bed
...bed
3ddd
bed , постельное белье
bed
3ddd
$1

bed
...bed
3ddd
bed , постельное белье
bed
3ddd
$1

bed
...bed
3ddd
bed , постельное белье
bed
3ddd
free

bed
...bed
3ddd
bed , постельное белье
bed
3ddd
free

bed
...bed
3ddd
bed , постельное белье
bed
3ddd
$1

Bed
...bed
3ddd
bed , постельное белье , постель
bed
3d_export
$7

bed adairs bed
...rs bed
3dexport
bed adairs bed in modern style. if you want a smoother surface, please turn on turbosmooth in the modifier list.