Thingiverse
Mold for 3inch compliant wheels
by Thingiverse
Last crawled date: 4 years, 2 months ago
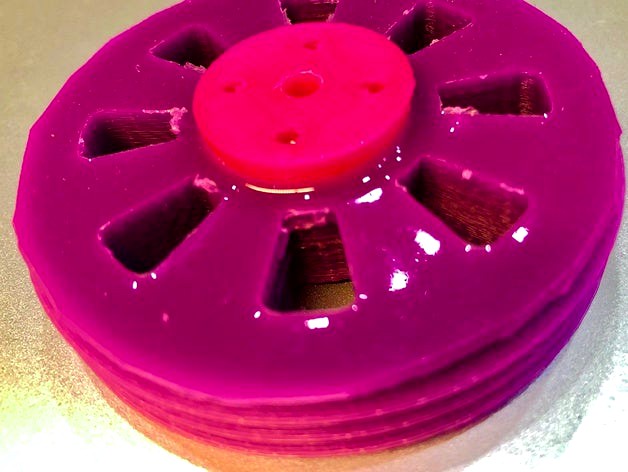
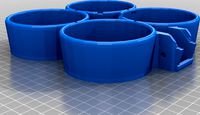
"Gietmal ribbelwiel 3 inch" is our newer design for a 3"wheel with a profiled rim. We designed this to be used with softer (shore 15) silicone, because anything stronger would probably be impossible to get out of the mold.
Many people asked us to include an example of a hub, we have now included a STL for an example hub ("hubje 3 inch ribbelwiel anderhalf hoog zonder gear"). This hub has a 4-hole pattern ready to accept M4 bolts with 16mm spacing (commonly used by GoBilda/Tetrix/REV
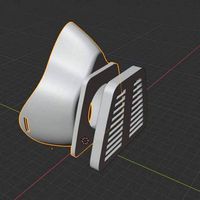
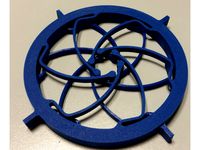
The original mold:
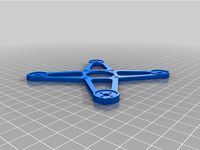
This is the mold FTC team 3954 made to pour our own compliant wheels from 2-component silicone. Our aim was to make the wheels lighter and add custom made hubs to suit our needs. It was a fun side project for a few of our "intake-engineers".
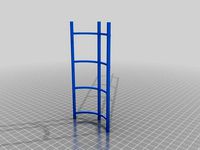
Printing the mold:
material, infill, no of layers or layer resolution does not matter much. As long as it is a smooth surface on the inside. The largest forces on the mold are when the wheel is pushed out afterwards.
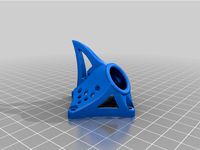
Designing your own hub:
Hub should have a 1 or 2 mm high, 6 mm diameter cylinder to plug the hole in the bottom. This cylinder is used to keep the hub centered in the mold. We designed it with a 4mm diameter hollow shaft, so we could use a long M4 bolt as an axle.
Hub should have a diameter of no more than 22mm to make sure silicone can flow freely around the hub.
Hub can be over 10mm high, but of course only 10mm will be covered in silicone. We designed ours with a 16T sprocket for #25 chain on top.
Hub MUST have holes or "inlets" to "capure" the silicone. we found out silicone does not stick to the PLA of the hub, so you must design a way to physically attach the silicone to the hub. We used a row of thin pillars around the outside of the hub.
Prepare for pouring silicone:
Make sure the molds are slick and free of printing artifacts (blobs/strings). Use a sharp hobby knife or a small file.
Spray the molds with anti adhesive for silicone. we used:https://polyestershoppen.nl/siliconenrubber/lossingsmiddel-voor-siliconen-305.html
Spread the anti-adhesive with a small paintbrush.
Mix the silicone and hardener and mix according to the instructions of supplier. MIX WELL! We added pink coloring (of course).
we used:https://polyestershoppen.nl/siliconenrubber/siliconen-gietrubber-1-1-shore-40-594.htmlhttps://polyestershoppen.nl/siliconenrubber/pigment-voor-siliconen-316.html
Each wheel takes roughly 20 mL of silicone, depending on the volume of the hub you designed.
Pouring the silicone:
"Pouring" silicone is hard, so we used a large syringe (60mL) to suck up the silicone (slowly) and inject it into the molds. Although the silicone may seem thick, is DOES flow quite well into the crevices of the hub AND it levels. So make sure your mold is level, otherwise the wheel will be thicker on one side.
We had a problem with lighter (less infill) hubs because they would "float" out of the center hole, so we prevented the hubs from floating with a small dead weight on top of each hub.
We did not use a vacuum chamber to de-air the silicone. We did find some small air pockets in our wheels but nothing serious. We did mix the silicone more gently at the end to prevent trapping more air in and we tapped the molds on the table a couple of times after they were filled to help free trapped air pockets.
Removing from the mold:
After the suggested curing time (supplier) you are ready for the last stage.
All surfaces in the mold are 6 degrees slanted to assure the wheel comes out easily.
By pushing a 6mm pin (bolt) into the hole you should be able to push the hub out of the mold far enough to grab the silicone. Resist the temptation to push the whole wheel out this way, the silicone CAN tear or come loose from the hub, in both cases the wheel is worthless. just keep pushing and pulling until you can get hold of one of the spokes and pull the wheel free.
THERE you have it! Your own Compliant wheel!
Many people asked us to include an example of a hub, we have now included a STL for an example hub ("hubje 3 inch ribbelwiel anderhalf hoog zonder gear"). This hub has a 4-hole pattern ready to accept M4 bolts with 16mm spacing (commonly used by GoBilda/Tetrix/REV
The original mold:
This is the mold FTC team 3954 made to pour our own compliant wheels from 2-component silicone. Our aim was to make the wheels lighter and add custom made hubs to suit our needs. It was a fun side project for a few of our "intake-engineers".
Printing the mold:
material, infill, no of layers or layer resolution does not matter much. As long as it is a smooth surface on the inside. The largest forces on the mold are when the wheel is pushed out afterwards.
Designing your own hub:
Hub should have a 1 or 2 mm high, 6 mm diameter cylinder to plug the hole in the bottom. This cylinder is used to keep the hub centered in the mold. We designed it with a 4mm diameter hollow shaft, so we could use a long M4 bolt as an axle.
Hub should have a diameter of no more than 22mm to make sure silicone can flow freely around the hub.
Hub can be over 10mm high, but of course only 10mm will be covered in silicone. We designed ours with a 16T sprocket for #25 chain on top.
Hub MUST have holes or "inlets" to "capure" the silicone. we found out silicone does not stick to the PLA of the hub, so you must design a way to physically attach the silicone to the hub. We used a row of thin pillars around the outside of the hub.
Prepare for pouring silicone:
Make sure the molds are slick and free of printing artifacts (blobs/strings). Use a sharp hobby knife or a small file.
Spray the molds with anti adhesive for silicone. we used:https://polyestershoppen.nl/siliconenrubber/lossingsmiddel-voor-siliconen-305.html
Spread the anti-adhesive with a small paintbrush.
Mix the silicone and hardener and mix according to the instructions of supplier. MIX WELL! We added pink coloring (of course).
we used:https://polyestershoppen.nl/siliconenrubber/siliconen-gietrubber-1-1-shore-40-594.htmlhttps://polyestershoppen.nl/siliconenrubber/pigment-voor-siliconen-316.html
Each wheel takes roughly 20 mL of silicone, depending on the volume of the hub you designed.
Pouring the silicone:
"Pouring" silicone is hard, so we used a large syringe (60mL) to suck up the silicone (slowly) and inject it into the molds. Although the silicone may seem thick, is DOES flow quite well into the crevices of the hub AND it levels. So make sure your mold is level, otherwise the wheel will be thicker on one side.
We had a problem with lighter (less infill) hubs because they would "float" out of the center hole, so we prevented the hubs from floating with a small dead weight on top of each hub.
We did not use a vacuum chamber to de-air the silicone. We did find some small air pockets in our wheels but nothing serious. We did mix the silicone more gently at the end to prevent trapping more air in and we tapped the molds on the table a couple of times after they were filled to help free trapped air pockets.
Removing from the mold:
After the suggested curing time (supplier) you are ready for the last stage.
All surfaces in the mold are 6 degrees slanted to assure the wheel comes out easily.
By pushing a 6mm pin (bolt) into the hole you should be able to push the hub out of the mold far enough to grab the silicone. Resist the temptation to push the whole wheel out this way, the silicone CAN tear or come loose from the hub, in both cases the wheel is worthless. just keep pushing and pulling until you can get hold of one of the spokes and pull the wheel free.
THERE you have it! Your own Compliant wheel!
Similar models
thingiverse
free
Coaster Molds by BD3DCUSTOMS
...3dcustoms
thingiverse
4" coaster molds. pour some silicone into the mold pull the silicone out and you have a coaster mold.
thingiverse
free
Casting Flask Mold Box and Mold Cylinder by siderits
...e base of the box and cylinder is about 35mm.
the walls are canted out to make it easier to take the mold out of the casting box.
grabcad
free

Panda silicone mold
...esign if for a small panda model, can be 3d printed directly or mill the mold and pour silicone into it and use the silicone mold
thingiverse
free

silicone wedding band mold by 1337gallagher
...to cure overnight and trim excess. i use a similar mold for robotic wheels designed by team panic. the...
grabcad
free

3D printed silicone overmolding mold
...uot;hole" version is cast in urethane separately, then placed inside the 3d printed mold and flexible silicone is poured in.
thingiverse
free

Fingertech/Liteflite Foam Wheel Hubs 3mm
...it will wear down the foam. you can remove the wheel hub by simply pushing foam asde to expose the grub screw, then loosening it.
thingiverse
free

Senko Fishing Lure Bait by MrBoyle
...gether and clamp them tight. you might need to pour more silicone in through the top holes. make sure you use mold release spray.
thingiverse
free

Mold for Epoxy-Mixing Silicone Mat by KevinArne
...n't level. i recommend using carriage bolts with these knobs for the leveling feet: https://www.thingiverse.com/thing:4591644
thingiverse
free
G920 Wheel Board by DanA8
... make the look of the wheel better.
you will have to drill the holes out depending on your hub size and what wheel you are using.
thingiverse
free

Pouring snowman mold (Soapmen example and more!) by FilamentCorner
...download. just scale them down in a slicer for similar sized prints. update: we made a solid lotion bar...
3Inch
thingiverse
free

3inch Star by robosavvy
...3inch star by robosavvy
thingiverse
a 3inch star to hang on your christmas tree
thingiverse
free
The ButterFly 3inch Frame by Tarkux
...the butterfly 3inch frame by tarkux
thingiverse
just a new tougher version of my 3inch 3d printable frame .
thingiverse
free
Plant support 3inch pot by InsaneFish
...plant support 3inch pot by insanefish
thingiverse
this is a plant support made to fit 3inch net pots. h: 145mm w: 68mm
thingiverse
free

3inch hex frame with canopy by Jandre_fpv
...e with canopy by jandre_fpv
thingiverse
3inch hex frame
3 inch props
1206 to 1507 motors
made for nano fpv cam
20x20 fc and esc.
thingiverse
free

3inch fpv drone frame
...3inch fpv drone frame
thingiverse
simple lightweight fpv drone frame
thingiverse
free

NACA Duct to 3inch Hose for duct & brakes
... & brakes
thingiverse
naca duct to 3inch hose for duct & brakes
as seen here:https://www.youtube.com/watch?v=nrv6kayzwkw
thingiverse
free
3inch hex frame with canopy by Jandre_fpv
... frame
1206 to 1507 motors
20x20 fc and esc
3 inch props
i do suggest you cut the frame out of carbon fiber
made for nano fpv cam
thingiverse
free
X-whoop 3inch by Xfoot
... 650-1050mah lipo
15mm lipo strap
top plate screws: hex m3 20-30mm screws
recommended: xt60 connector. xt30 is a bit to small.
thingiverse
free
3inch hose attachment by meetar
...y meetar
thingiverse
this connects a standard 80mm computer fan to a 3" hose, and fits makerbot m3 hex-head machine screws.
thingiverse
free

Donut 3inch ducts - new profile
...donut 3inch ducts - new profile
thingiverse
new duct profile. fast print.
print as the last picture, no supports are needed.
Compliant
3d_export
$5
coronavirus antivirus mask covid-19 compliant
...t;br>- filters needs to be buy.<br>- elastic to attach the mask<br>tell me if modifications needed<br>enjoy!
3ddd
$1
Capital Lighting Midtown 3 Light Bath Vanity Light
...60 watts (w) number of lights: 3 energy star compliant no shade material: fabric dimensions: overall: 13.5" h x...
3ddd
free

Adesso Architect 31 H Table Lamp with Empire Shade
...switch cul listed: no ul listed: no energy star compliant no dimensions: max overall: max: 742.95mm" h x 558.8mm"...
3d_export
$35

Ambient food display
...movement placement & cleaning easy<br>830l capacity<br>corrosion-resistant construction ensures longevity<br>fully compliant with australian safety standards and regulations<br>2 years bromic extra...
3d_export
$10

bola disc table
...efficacy: 57 lumens/watt<br>color rendition index: 95 cri<br>ada compliant<br>title 20 compliantlt;br>50k hour lifespan<br>cable length: 8’ (244cm)<br>designer<br>pablo studio<br>the pablo studio is...
3d_export
$25

Ambient food display 900 mm
...make movement, placement & cleaning easy<br>corrosion-resistant construction ensures longevity<br>fully compliant with australian safety standards and regulations<br>2 years bromic extra...
thingiverse
free

Compliant Pliers / Gripper
... to get into compliant mechanisms and test for fatigue on different materials. inspired by the fully compliant pliers by byu_cmr.
thingiverse
free
COMPLIANT HAND GRIP by maxbraindevices
...compliant hand grip by maxbraindevices
thingiverse
single piece compliant hand grip print in place
thingiverse
free
Compliant Iris by AJ_Daedalus
...s or glue or screws.
just print two of the similar parts and put it together.
i hope you will enjoy this satisfying mechanism :-)
thingiverse
free

(CMC) Compliant Mechanism Clip by ThusEnverHoxha
...(cmc) compliant mechanism clip by thusenverhoxha
thingiverse
a simple compliant mechanism clip
Mold
3ddd
$1
molding
...molding
3ddd
молдинг
molding
3ddd
$1

molding
...molding
3ddd
молдинг , резьба
molding
3d_export
$10

molding
...molding
3dexport
molding, casting, baguette, decoration
3d_export
$10

molding
...molding
3dexport
molding, casting, baguette, decoration
3d_export
$10

molding
...molding
3dexport
molding, casting, baguette, decoration
3d_export
$10

molding
...molding
3dexport
molding, casting, baguette, decoration
3d_export
$10

molding
...molding
3dexport
molding, casting, baguette, decoration
3d_export
$10

molding
...molding
3dexport
molding, casting, baguette, decoration
3d_export
$10

molding
...molding
3dexport
molding, casting, baguette, decoration
design_connected
$16

Mold
...mold
designconnected
eternit mold computer generated 3d model. designed by charlot, michel.
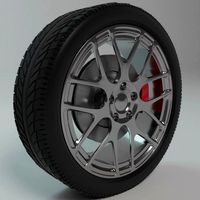
Wheels
archibase_planet
free
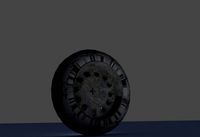
Wheel
...l steering control steering wheel
wheel ship steering wheel n060215 - 3d model (*.gsm+*.3ds+*.max) for exterior 3d visualization.
3d_ocean
$14
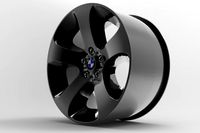
Wheel
...wheel
3docean
car rim car wheel rim wheel
high poly car wheel design. 16,840 polys
3d_export
free
wheel
...wheel
3dexport
wheel
3d_export
free
wheel
...wheel
3dexport
wheel
3d_export
free
Wheel
...wheel
3dexport
wheel
3d_export
$5

wheel
...wheel
3dexport
wheel for car.
3d_export
$5
wheel
...wheel
3dexport
car wheel
3d_export
$5
wheel
...wheel
3dexport
car wheel
3d_export
$5
wheel
...wheel
3dexport
car wheel
3d_export
$5
wheel
...wheel
3dexport
car wheel