Thingiverse
Minn Kota Steering by Theo_Frieling
by Thingiverse
Last crawled date: 3 years, 4 months ago
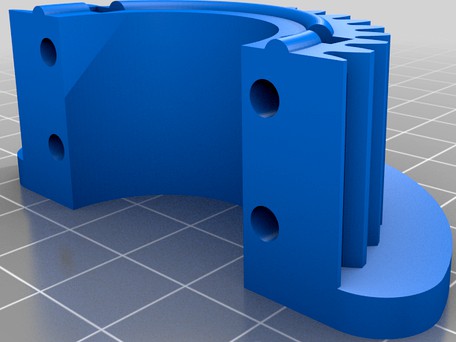
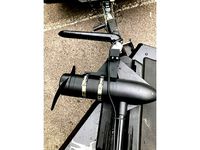
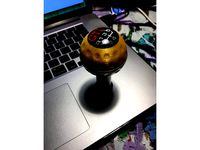
A new design of the Minn Kota Steering Controller.
I'm a Belly Boat angler ...
... so my Minn Kota is positioned behind my back. Not very handy to reach backwards to control the motor. So some kind of automation was needed so I started up Fusion 360 and gave it a go.
My first trials where based on an 18KG servo (TD8120MG). I needed more power and went for a 60KG version. That was more like it.
The result was a cheap solution for steering a Minn Kota trolling motor with an AliExpress 60KG Servo
For some videos see this YT playlist.
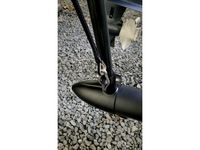
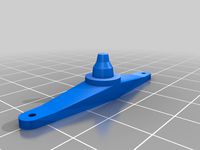
You do not need to remove the Minn Kota head to attach this thing (see the videos).
I'm using it for my Minn Kota Endura MAX 40LBS which has a shaft diameter of 29mm.
I'm still experimenting with the right filament to use. PolyLite ASA was not a good choice (the black gears in the videos), ABS was better and now I'm experimenting with PET-G.
This is a Work in Progress thing! It is working as is, but there is some friction here and there so some lubrication is advised.
To control the Servo wireless I use a Wemos & LM2596. I guess a Servo tester instead of the Wemos would also work.
==========
Added a new Shaft gear.
A firmer design of the shaft gear with a roof to protect the gears and a tread for less friction.
The V markings must face each other and is the top (only for the 92cm version)
==========
For a ~92cm shaft, use holder_for_92_cm_shaft and closecap_for_92cm_shaft
The servo holder has room for a servo which should be mounted using 4 M3x20mm screws and M3 nuts. Put the nuts in first, fix with some tape so they won't fall out during servo insertion.
The servo gear was designed for the metal round part which comes with the servo. I used a vise to insert the metal round part. Make shore the small holes are aligned so you can insert the 8 small screws which comes with the servo.
The gear is mounted on the servo with a M3x12mm
The 'half' gear is mounted on the shaft with M3x20mm & 3mm nut as the closecap to mount the servo housing on the shaft do.
The servo holder has in the bottom room for the components needed to control the servo which are:
5A step down module (servo power): https://www.aliexpress.com/item/32674720245.html
Trim the step down module down to 7V! Default they are at 12V. I'm not sure if the servo can handle 12V so be careful!
On/Off Switch: https://www.aliexpress.com/item/4000340830341.html
Fuse holder (5x20mm): https://www.aliexpress.com/item/32987605353.html
Wemos D1 Mini: https://www.aliexpress.com/item/32651747570.html
Power shield for Wemos Power: https://www.aliexpress.com/item/4000970382990.html
Remove the black jack connector on the power shield.
You have to develop the software to control the servo yourself, so don't ask.
I'm a Belly Boat angler ...
... so my Minn Kota is positioned behind my back. Not very handy to reach backwards to control the motor. So some kind of automation was needed so I started up Fusion 360 and gave it a go.
My first trials where based on an 18KG servo (TD8120MG). I needed more power and went for a 60KG version. That was more like it.
The result was a cheap solution for steering a Minn Kota trolling motor with an AliExpress 60KG Servo
For some videos see this YT playlist.
You do not need to remove the Minn Kota head to attach this thing (see the videos).
I'm using it for my Minn Kota Endura MAX 40LBS which has a shaft diameter of 29mm.
I'm still experimenting with the right filament to use. PolyLite ASA was not a good choice (the black gears in the videos), ABS was better and now I'm experimenting with PET-G.
This is a Work in Progress thing! It is working as is, but there is some friction here and there so some lubrication is advised.
To control the Servo wireless I use a Wemos & LM2596. I guess a Servo tester instead of the Wemos would also work.
==========
Added a new Shaft gear.
A firmer design of the shaft gear with a roof to protect the gears and a tread for less friction.
The V markings must face each other and is the top (only for the 92cm version)
==========
For a ~92cm shaft, use holder_for_92_cm_shaft and closecap_for_92cm_shaft
The servo holder has room for a servo which should be mounted using 4 M3x20mm screws and M3 nuts. Put the nuts in first, fix with some tape so they won't fall out during servo insertion.
The servo gear was designed for the metal round part which comes with the servo. I used a vise to insert the metal round part. Make shore the small holes are aligned so you can insert the 8 small screws which comes with the servo.
The gear is mounted on the servo with a M3x12mm
The 'half' gear is mounted on the shaft with M3x20mm & 3mm nut as the closecap to mount the servo housing on the shaft do.
The servo holder has in the bottom room for the components needed to control the servo which are:
5A step down module (servo power): https://www.aliexpress.com/item/32674720245.html
Trim the step down module down to 7V! Default they are at 12V. I'm not sure if the servo can handle 12V so be careful!
On/Off Switch: https://www.aliexpress.com/item/4000340830341.html
Fuse holder (5x20mm): https://www.aliexpress.com/item/32987605353.html
Wemos D1 Mini: https://www.aliexpress.com/item/32651747570.html
Power shield for Wemos Power: https://www.aliexpress.com/item/4000970382990.html
Remove the black jack connector on the power shield.
You have to develop the software to control the servo yourself, so don't ask.
Similar models
thingiverse
free

steering bracket
...steering bracket
thingiverse
steering bracket for minn kota trolling motor shaft
thingiverse
free

CC2530 + CC2591 Enclosure by Hatsjoe
...wer supply: https://www.aliexpress.com/item/32408565688.html
m3x3 brass inserts: https://www.aliexpress.com/item/32961915881.html
thingiverse
free

5-liter Bucket UV Curing Station
...iexpress.com/item/4000275351594.html
solar powered (and uv powered!!) turntable; https://www.aliexpress.com/item/33050904039.html
thingiverse
free

Flyingbear-P902 -Auto Bed Leveling by ealtech
...ps://www.aliexpress.com/item/freeshipping-hui-sheng9-grams-of-servo-motor-sg90-towerpro-9grams-steering-gear-25cm/1393036152.html
thingiverse
free
Ka-Radio WiFi Internet radio
...k, so i used https://www.aliexpress.com/item/32574110297.html )
2" speakers https://www.aliexpress.com/item/32593991938.html
thingiverse
free

DPS5005 Case w/ USB C
...0.html
banana plugs: https://www.aliexpress.com/item/32472097225.html
usb-c psu: https://www.aliexpress.com/item/33000561002.html
thingiverse
free
Minn Kota Trolling Motor Steering Bracket/ Triangle by AGrgic
...nd it works perfect. print it as follows:
petg
230/ 75 temp
100% infill
supports not required, but you can put them if you want.
thingiverse
free
XT60 to USB power converter by Tiitan
...ews inside
mounted to my printer with m216 t-nut bolt
i use it to power my printer octopi directly from my printer power supply.
thingiverse
free

PZEM 004T V3 Din Rail Case by eyalco
...picture and it is still not tested!
i use wire wrapping for 5v / 3.3v / tx / rx
buy me a coffeee
if you like it, buy me a coffee
thingiverse
free

Flysky FS-CT6B Transmitter FPV Mount
...
p.s. : sorry, thingiverse is cropping / shrinking the pictures taken in portrait mode... i will try to find a solution for that.
Minn
thingiverse
free
Drafan Minn by Roundpiece
...drafan minn by roundpiece
thingiverse
a sith lord called drafan minn. i belive she is quite evil. but who knows.
thingiverse
free
Minn Kota Trolling Motor Steering Bracket/ Triangle by AGrgic
...nd it works perfect. print it as follows:
petg
230/ 75 temp
100% infill
supports not required, but you can put them if you want.
thingiverse
free
Up!mini 3D Spoolholder by minne
...!mini 3d spoolholder by minne
thingiverse
i create a new 80mm spoolholder for the up mini 3d.
use for 1kg formfutura abs and pla
thingiverse
free
Minn Kota Edge Transducer Bracket by wilsonrn22
...ork as well.
i suggest using petg with supports.
i have tested this print on my trolling motor for a year and has worked great.
thingiverse
free
Minn Kota Trolling Motor Lift System
...s00?ie=utf8&psc=1
1/4 ropehttps://smile.amazon.com/gp/product/b07p1mwwm8/ref=ppx_yo_dt_b_asin_title_o02_s00?ie=utf8&psc=1
thingiverse
free
Minn Kota Endura prop variations by tamas
...prop. so i created some and also added more blades for higher pitch. this is related to my previous designs for the same topic...
thingiverse
free
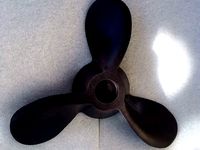
Prop for Minn Kota Endura electric boat motor by tamas
...roces..... brilliant results....
we have not tried using the printed plastic on the motor...i think this is not strong enough....
thingiverse
free
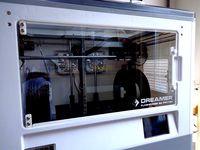
Frontdoor Flashforge Dreamer by minne
... the magnetholders and the top and bottom hinges.
magnetholders pressfit in holes d7.1mm
pressfit m3 in hinges
magnets are d4x4mm
thingiverse
free

Minn Kota i-Pilot remote holder (+ stronger version) by pregananant
...pilot_holder_w_stronger_clips.stl).
mounting:
4 screws or 2 cable ties
update 2018-02-26: i added a version with stronger clips.
Kota
thingiverse
free
Kota Reliquary Figure by Bengal12
...kota reliquary figure by bengal12
thingiverse
this is a scan of a kota reliquary figure.
thingiverse
free
Minn Kota Trolling Motor Steering Bracket/ Triangle by AGrgic
...nd it works perfect. print it as follows:
petg
230/ 75 temp
100% infill
supports not required, but you can put them if you want.
thingiverse
free
Minn Kota Edge Transducer Bracket by wilsonrn22
...ork as well.
i suggest using petg with supports.
i have tested this print on my trolling motor for a year and has worked great.
thingiverse
free
Minn Kota Trolling Motor Lift System
...s00?ie=utf8&psc=1
1/4 ropehttps://smile.amazon.com/gp/product/b07p1mwwm8/ref=ppx_yo_dt_b_asin_title_o02_s00?ie=utf8&psc=1
thingiverse
free

Kota Kinabalu 's souvenir figure by nick_han
...his item here,https://itmoulds.com/gallery/deco-objects/3d-model-gunung-kinabalu-malaysian-god/
used material - torwell pla black
thingiverse
free
Minn Kota Endura prop variations by tamas
...prop. so i created some and also added more blades for higher pitch. this is related to my previous designs for the same topic...
thingiverse
free
Prop for Minn Kota Endura electric boat motor by tamas
...roces..... brilliant results....
we have not tried using the printed plastic on the motor...i think this is not strong enough....
thingiverse
free
Minn Kota i-Pilot remote holder (+ stronger version) by pregananant
...pilot_holder_w_stronger_clips.stl).
mounting:
4 screws or 2 cable ties
update 2018-02-26: i added a version with stronger clips.
thingiverse
free
Volkswagen GTI Shift Knob Top by Kota
...art, but i decided to include the top and base as files. i printed it in pla at 195c and 60c print bed. seems to fit really well.
Theo
thingiverse
free

Theo (name) by mjschapira
...theo (name) by mjschapira
thingiverse
the name theo
thingiverse
free

Theo the Hairdresser by MakerBot
...ason why everyone in the neighborhood is so well coiffed. he can create any 1950۪s hairdo with a little hair wax and a hairdryer.
thingiverse
free

Theo Jansen by punkrockid
...theo jansen by punkrockid
thingiverse
robotics engineering project
thingiverse
free

Theo Klein Bosch Tool Holder
...theo klein bosch tool holder
thingiverse
theo klein bosch tool holder
thingiverse
free

Bit holder Bosch - Theo Klein
...bit holder bosch - theo klein
thingiverse
bit holder for the theo klein bosch cordless drill.
thingiverse
free

Theo klein Tassimo cap by MrShortmann
...theo klein tassimo cap by mrshortmann
thingiverse
kapsel für die theo klein tassimo kaffeemaschine
thingiverse
free

Theo Klein Service Car Screw Schraube by Smoothy89
...theo klein service car screw schraube by smoothy89
thingiverse
this is a spare parts screw for the theo klein service car.
thingiverse
free

Theo Jansen walking mechanism by Ijon
... build a complete walking robot, you'll need this thing 4 times and some construction for the two motors and control of them.
thingiverse
free

Zeiss Theo 010 theodolite (not 100% accurate)
... 010 inspired theodolite...
pdf drawing does not correspond to actual model, real life photos are accurate, printed at 50% scale.
thingiverse
free

Theo Jansen Leg Mechanism by kylekorn
... pictures and instructions i've included for how to assemble it.
inspiration:
http://www.youtube.com/watch?v=hskyhmjyrka
Steering
thingiverse
free
Steering Arm
...steering arm
thingiverse
steering arm
thingiverse
free

Radio steering
...radio steering
thingiverse
radio steering
thingiverse
free

Steering arm for steering bracket by marshal1960
...ring bracket by marshal1960
thingiverse
this is the steering arm for the steerable nose gear bracket. 4mm wire nose gear bracket
thingiverse
free
steering bracket
...steering bracket
thingiverse
steering bracket for minn kota trolling motor shaft
thingiverse
free

canoe steering by Sandmann344
...canoe steering by sandmann344
thingiverse
canoe steering
thingiverse
free

Steering Wheel by Alien_Identity
...steering wheel by alien_identity
thingiverse
steering wheel
thingiverse
free

Steering Wheel by fevold
...steering wheel by fevold
thingiverse
a steering wheel
thingiverse
free

steering wheel by fevold
...steering wheel by fevold
thingiverse
steering wheel
thingiverse
free

Steer stop by Almqvistt
...steer stop by almqvistt thingiverse steering stop...
thingiverse
free

Steering Wheel by lsapozhnik
...steering wheel by lsapozhnik
thingiverse
simple model of a steering wheel.