Thingiverse

Minimalist Desk Light by gh0stw0lf
by Thingiverse
Last crawled date: 3 years, 4 months ago
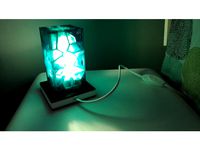
This is a minimalist desk light, it serves to create a nice glow for a night light or enough to provide decoration for a hallway.
Design Intent:
To make an 3D LED Light that required minimal screws, long printing jobs, and maximizing filament. This is my first version of the lamp, I will be making changes as time goes along and realize better ways of design.
Please note that the links I'm posting for products are AFFILIATE LINKS, they are a small way to make some ad revenue to be able to fund future products and cost nothing extra on your end when Amazon shopping. Please consider purchasing from these links.
Requirements before printing:
White PLA for the diffuser.
G9 LEDs: https://amzn.to/2XUy2KM
G9 LED Sockets: https://amzn.to/33Zh9mh
Power Cord with Exposed Wire (you can purchase this, but I just cut one off an old appliance I was not using anymore): https://amzn.to/2DFflnI
Optional: HeatShrink Tubing: https://amzn.to/3kxQsuJ
Step 1:
Download the two STL files. At the time of writing 08/13/2020, these are labelled (Base V1 & Bulb V0 for the base of the lamp and the diffuser of the lamp, respectively).
Step 2:
Print the files. For the base, the layer height does not need to be small, I recommend using a layer height from .2 to .3 to save time. Ideally, the base print should only take 2.5 hours.
The base should not need to be anymore than 20% infill.
For the Bulb Diffuser, this will take a bit longer as I printed with .18 layer height to reduce the visibility of layer lines after the print was complete. There are also some more parameters here that are important. Infill should be 99% for diffuser.
Shells: This number controls the amount of light that will be able to get through your diffuser, the higher the number, the lower the amount of visible light. In the picture I used 10 shells, and it produces enough light to be a pleasant evening night light for a hallway.
-Supports: There is close to a 90 degree angle towards the top of the diffuser, this may trigger some of your Slicers to put in supports. Depending on how well your printer is calibrated, this may not be necessary. Please ensure your fan is at 100% towards the top of the print.
Step 3:
The two prints are now complete! Now for the electronics portion.
Go ahead and push the LED mount into the slot for in the base (this should be a form fit, so push tight to get a good fit. There is a spot in the base for you to guide the electrical wires through.
Next, go ahead and connect the LED Mount wires to your power cord. If you are feeling capable, you can solder them. However by turning the exposed wires on the power cords into "hook shapes" you can hook the power cord exposed wires to the LED mount exposed wires and then apply a heat shrink over them and this will make perfectly fine connections.
Step 4:
You're all done! You can plug in the light and see how it works. I have not designed this lamp with a switch, that will be probably on my next design.
Please let me know what you think in the comments! You can also follow me on instagram: @jguevar5 to ask me questions and look at my upcoming projects.Feel free to reach out to me at: jorge@disrupt3dp.com as well!
Similar models
thingiverse
free

Lithophanes G9 LED Lamp Base by Seelenkind
...r. solder the power cable with the switch and hide the connection point in the base.
https://www.tinkercad.com/things/bvhet2k2zka
grabcad
free

Short Power Cord, Exposed Wires
...s. intended for aesthetic use.
cord length 4" plus plug and exposed wires.
can be extruded or coiled to any desired length.
thingiverse
free
Base for voronoi lamp with G9 connector for led light by r0tule
...iverse
a support for the voronoi lamp by markellov, the power cable passes through the base to a custom g9 light bulb connector.
thingiverse
free

FLOOR LAMP | LED Lighted | Smart ALEXA - Google Light
...zn.to/366izee
$26 | us weight tailgater canopy weights with no-pinch design for easy, safe, installation |https://amzn.to/2jhx0wo
thingiverse
free

LED strip stands for aluminium extrusion by nodashi
...strip or directly to the power supply. make sure to find out if your power supply is 12v. cr-10 and tevo tarantula's are 12v.
thingiverse
free

LED G4 Light Fixture by skartz
...nicely for under cabinets, inside cabinets, behind entertainment centres or anywhere you want bright economical lighting options.
cults
$1

230V LED light
... can see the making of here https://youtu.be/opqejeysde4
if you prefer light switch, go to my other light, pyramid looks.
thingiverse
free

CageLight6 by bbinnard
... a cutout for a wall plug power cord. you can find several types of suitable lights by searching online for "led puck."
thingiverse
free

CageLight4 by bbinnard
...cagelight4 by bbinnard thingiverse this lamp is similar to cagelight2 but with the hex grid replaced by...
thingiverse
free

Cute Cthulhu LED by Passavopercaso
...on batteries and used the hole for a switch but you can also use it to pass a power cord if you like better a long lasting light.

Minimalist
3d_export
$20
minimalist rings
...minimalist rings
3dexport
minimalist rings
3d_export
$5

minimalistic beach
...minimalistic beach
3dexport
minimalistic scenes for your symbols or other ideas
3d_ocean
$2
Minimalist Ring
...ring design. its shape is inspired by a fish that is native to the lake near my home town. and it’s patent pending at the moment.
3d_ocean
$15
minimalist house
...minimalist house
3docean
architecture minimalist modern
a simple modern house, ready to render in mental ray
3d_export
$15

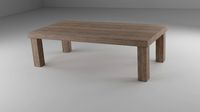
minimalist table
...list table
3dexport
this is a minimalist table with wood and aluminum materials. in the rar file i've included .stl and .obj
3d_export
$7
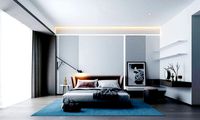
modern minimalist bedroom
...modern minimalist bedroom
3dexport
modern minimalist bedroom
turbosquid
$100

Minimalist homes
...d
royalty free 3d model minimalist homes for download as rvt on turbosquid: 3d models for games, architecture, videos. (1253698)
turbosquid
$70

minimalist apartment
...oyalty free 3d model minimalist apartment for download as max on turbosquid: 3d models for games, architecture, videos. (1566613)
turbosquid
$25

The House is Minimalist
...lty free 3d model the house is minimalist for download as skp on turbosquid: 3d models for games, architecture, videos. (1246947)
turbosquid
$18

Tableware minimalistic
...alty free 3d model tableware minimalistic for download as max on turbosquid: 3d models for games, architecture, videos. (1545233)
Desk
3d_ocean
$6
Desk
...desk
3docean
bureau desk desktop office plywood study table work desk writing
a desk made of plywood
3d_ocean
$8

Desk
...oom or university. it can be used as an office desk or as a teacher’s desk, for example. the layer names are self explanatory....
3d_export
$5
Desk
...desk
3dexport
desk
3d_export
$5
Desk
...desk
3dexport
desk
3d_export
$5

desk
...desk
3dexport
desk
3d_export
$5
desk
...desk
3dexport
desk
3d_export
free
desk
...desk
3dexport
desk
3d_export
free
desk
...desk
3dexport
desk
3d_export
$5

desk
...desk
3dexport
computer desk
archibase_planet
free
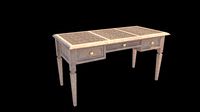
Desk
...rchibase planet
bureau desk writing-desk
desk giorgetti epi 51610 n231010 - 3d model (*.gsm+*.3ds) for interior 3d visualization.
Light
archibase_planet
free

Light
...light
archibase planet
lamp lighting light
light - s2 - 3d model for interior 3d visualization.
archibase_planet
free

Light
...light
archibase planet
light luminaire lighting
light l0465 - 3d model (*.gsm+*.3ds) for interior 3d visualization.
3d_export
$5

lighting
...lighting
3dexport
lighting
3d_export
$5

lighting
...lighting
3dexport
lighting in livingroom
turbosquid
$3

Lighting Tree with Lights
...d model lighting tree with lights for download as max and 3ds on turbosquid: 3d models for games, architecture, videos. (1585507)
archibase_planet
free

Light
...light
archibase planet
luster lighting solution
light - s - 3d model for interior 3d visualization.
archibase_planet
free

Light
...light
archibase planet
luster lamp lighting
light 1 - 3d model for interior 3d visualization.
archibase_planet
free

Lights
...lights
archibase planet
surgical lights surgical lamp
surgical lights (floor) - 3d model for interior 3d visualization.
archibase_planet
free

Light
...light
archibase planet
lighting luminaire candlelight
light l0463 - 3d model (*.gsm+*.3ds) for interior 3d visualization.
3d_export
$18

street light-lighting-light-xia bing
...
3dexport
street light-lighting-light-xia bing<br>max 2015 v-ray 3 max 2015<br>textures<br>all files in zip...