Thingiverse
Mini Sumo Robot Chassis by drgfreeman
by Thingiverse
Last crawled date: 4 years, 8 months ago
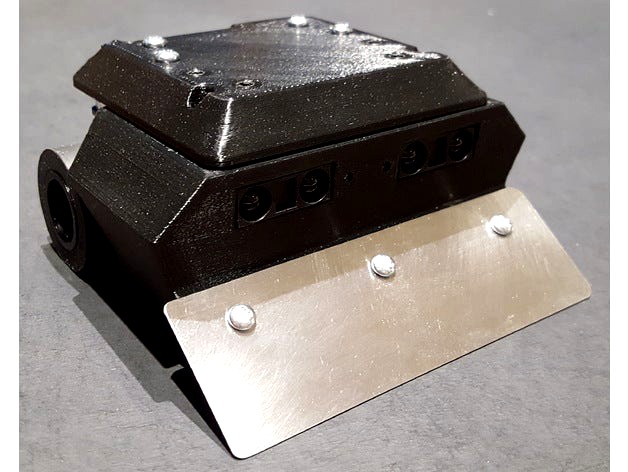
Chassis for mini-sumo robot designed for use with Pololu components.
Details and updates: https://forum.pololu.com/t/new-mini-sumo-project/12072
Specifications:
Overall dimensions: W: 96mm, L: 95mm, H: 49mm (3.78" x 3.71" x 1.93" approx) including cover
Weight: 215 g (chassis, cover and components without added weights), up to ~375g with added weights.
Motors*: 2 x 75:1 Micro Metal Gearmotor HPCB 6V or 2 x 50:1 Micro Metal Gearmotor HPCB 6V with Pololu Micro Metal Gearmotor Brackets
Wheels: 2 x Solarbotics RW2 Wheel (external set screw)
Battery: 2S Li-Po 800 mAh (55 mm x 31 mm x 17 mm max size)
Microcontroller: A-Star 32U4 Robot Controller LV with Raspberry Pi Bridge (SMT Components Only)
Sensors: 2 x Sharp GP2Y0A60SZLF Analog Distance Sensor, 2 x QTR-1RC Reflectance Sensors and 1 x MinIMU-9 v5 Inertial Measurement Unit.
Build notes:
Holes in the 3D model are smaller than finished size. Print the model as-is and finish the holes after printing as per instructions below:
Blade holes: Finish with 1/8" drill. Use #4-40 x 5/16" screws and nuts.
Sharp sensor carrier holes: Finish minor diameter with 3/32" drill. Tap #4-40 screws directly in chassis.
Motor bracket holes: Finish with 3/32" drill. Use #2-56 x 7/16" screws and nuts (provided with the brackets).
IMU and A-Star robot controller holes: Finish minor diameter with 1/16" drill. Tap #2-56 x 1/4" screws directly in chassis (making a very shallow hole with a 5/64" drill helps the screw thread to engage in the plastic). Use 1/4" standoffs on top of the A-Star robot controller, these will serve to mount the cover.
QTR sensors holes need no additional finishing. Use #2-56 x 1/4" screws and nuts.
Cover mounting holes: Finish with 3/32" drill. Use #2-56 x 1/4" screws.
Cover weight mounting holes: Finish with 1/8" drill as needed. Use #4 x 1/2" screws and nuts to hold the weights.
For the blade, I used a stainless steel ruler similar to the type with cork backing except mine has a synthetic foam backing instead. I used scotchbrite to erase the ruler graduation markings.
The weights mounted in the cover are made from 1/2" x 1/8" mild steel bar. Adjust the number and position of the weights to achieve the desired weight and weight distribution between the wheels and the blade.