Thingiverse
Mini SNES - Raspberry Pi 2/3 Case by AndrewBougie
by Thingiverse
Last crawled date: 3 years ago
License Update
I have been getting many inquiries about using this design commercially. If you want print these and sell them to people, go right ahead! The license is now CC - Attribution, so I just ask that you credit me as the source of the original case design and link to my website andrewbougie.com. Thanks!
Update 05/08/16
I've uploaded a STEP file for easy modification in most CAD software. Have fun remixing!
Description
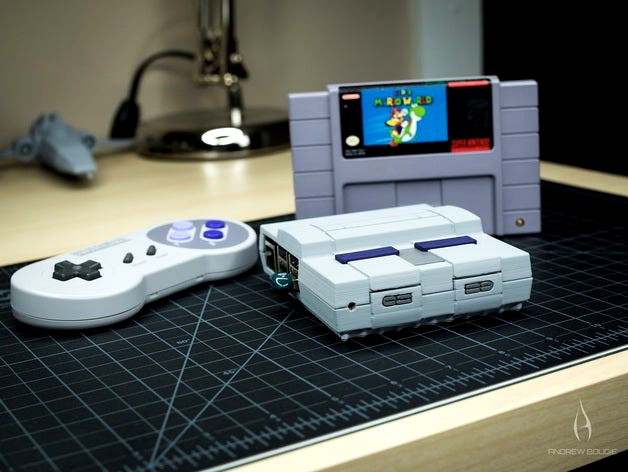
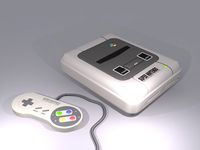
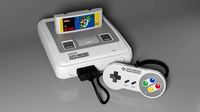
It's a mini SNES that can do anything the Raspberry Pi 2 or 3 is able to do! Skip to the instructions below if you don't care about the back story.
I have two sons that are getting old enough to take an interest in video games. I had my wife's old SNES in storage so we pulled that out late last year. The boys loved it, but having wires everywhere in true 90's fashion wasn't going to cut it. I made this Mini SNES to run Recalbox with a bluetooth controller so my boys and I can enjoy the games I loved as a kid and not have to deal with the inconvenience of being tethered. It also gives you the advantage of having modern audio and video connections so it will work with most current AV systems.
Credit for the base full-size SNES design goes to RSants over on GrabCAD:https://grabcad.com/library/snes-console-2 . His model saved me a lot of time that would have been spent measuring and modeling from my original SNES.
If you print this, be sure to share your make here on Thingiverse and tag @andrewbougie on Twitter and Instagram. I love to see what others do with my models!
Instructions
The print instructions are short, but the print may not be the easiest if you don't have your support settings dialed in.
Print [1] top and [1] bottom with supports enabled.
Print [2] controller connections
Print [2] power/reset buttons
Print [1] Eject button
The buttons are separate so you can paint or print them in a different color and then glue them to the main case. I use Gorilla Glue super glue gel for ABS and PLA.
Screw everything together with tiny screws. I designed the case to use these:https://www.amazon.com/dp/B00GDYNHL6/ref=cm_sw_su_dp
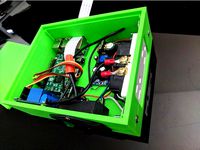
The board is held in place by 4 of the above screws. The two halves are fastened with only two screws toward the front of the case. Based on the way this case is used, this should be sufficient for most people.
You can see there is some empty space in the front of the case for additional electronics should you want to get fancier with the design and add a power LED to the front or add other (very) small boards for more functionality.
You are done if you have your own plans for this case.
Full Mini SNES Parts List
If you want this to play SNES (or NES, Genesis, Gameboy, etc) games, you'll need RecalBox or a similar emulator OS for the Raspberry Pi. Here is a full list of parts as well as relevant software links. You won't find ROM links here, but this is 2016 after all. Google it.
Hardware
Raspberry Pi 2 (https://www.amazon.com/dp/B00GDYNHL6/ref=cm_sw_su_dp) or 3 (https://www.amazon.com/dp/B00GDYNHL6/ref=cm_sw_su_dp)
Bluetooth game controller. PS3 or PS4 controllers work. You can also use wired USB controllers or a keyboard. Check the RecalBox compatibility list. I bought this retro SNES controller - https://www.amazon.com/dp/B00GDYNHL6/ref=cm_sw_su_dp
Bluetooth adaptor since Raspberry Pi 2 doesn't have it built in and current version of RecalBox doesn't support RPi3 build in bluetooth: https://www.amazon.com/dp/B00GDYNHL6/ref=cm_sw_su_dp
MicroSD card - https://www.amazon.com/dp/B00GDYNHL6/ref=cm_sw_su_dp
USB A to Micro B - Get the two pack. You'll be happy you did. 3 feet was long enough for me, but you might need longer. - https://www.amazon.com/dp/B00GDYNHL6/ref=cm_sw_su_dp
Good power adapter for your Rasperry Pi 2 or 3 - https://www.amazon.com/dp/B00GDYNHL6/ref=cm_sw_su_dp
Software
All you need for software is RecalBox. Full instructions here:http://www.recalbox.com/diyrecalbox
I have been getting many inquiries about using this design commercially. If you want print these and sell them to people, go right ahead! The license is now CC - Attribution, so I just ask that you credit me as the source of the original case design and link to my website andrewbougie.com. Thanks!
Update 05/08/16
I've uploaded a STEP file for easy modification in most CAD software. Have fun remixing!
Description
It's a mini SNES that can do anything the Raspberry Pi 2 or 3 is able to do! Skip to the instructions below if you don't care about the back story.
I have two sons that are getting old enough to take an interest in video games. I had my wife's old SNES in storage so we pulled that out late last year. The boys loved it, but having wires everywhere in true 90's fashion wasn't going to cut it. I made this Mini SNES to run Recalbox with a bluetooth controller so my boys and I can enjoy the games I loved as a kid and not have to deal with the inconvenience of being tethered. It also gives you the advantage of having modern audio and video connections so it will work with most current AV systems.
Credit for the base full-size SNES design goes to RSants over on GrabCAD:https://grabcad.com/library/snes-console-2 . His model saved me a lot of time that would have been spent measuring and modeling from my original SNES.
If you print this, be sure to share your make here on Thingiverse and tag @andrewbougie on Twitter and Instagram. I love to see what others do with my models!
Instructions
The print instructions are short, but the print may not be the easiest if you don't have your support settings dialed in.
Print [1] top and [1] bottom with supports enabled.
Print [2] controller connections
Print [2] power/reset buttons
Print [1] Eject button
The buttons are separate so you can paint or print them in a different color and then glue them to the main case. I use Gorilla Glue super glue gel for ABS and PLA.
Screw everything together with tiny screws. I designed the case to use these:https://www.amazon.com/dp/B00GDYNHL6/ref=cm_sw_su_dp
The board is held in place by 4 of the above screws. The two halves are fastened with only two screws toward the front of the case. Based on the way this case is used, this should be sufficient for most people.
You can see there is some empty space in the front of the case for additional electronics should you want to get fancier with the design and add a power LED to the front or add other (very) small boards for more functionality.
You are done if you have your own plans for this case.
Full Mini SNES Parts List
If you want this to play SNES (or NES, Genesis, Gameboy, etc) games, you'll need RecalBox or a similar emulator OS for the Raspberry Pi. Here is a full list of parts as well as relevant software links. You won't find ROM links here, but this is 2016 after all. Google it.
Hardware
Raspberry Pi 2 (https://www.amazon.com/dp/B00GDYNHL6/ref=cm_sw_su_dp) or 3 (https://www.amazon.com/dp/B00GDYNHL6/ref=cm_sw_su_dp)
Bluetooth game controller. PS3 or PS4 controllers work. You can also use wired USB controllers or a keyboard. Check the RecalBox compatibility list. I bought this retro SNES controller - https://www.amazon.com/dp/B00GDYNHL6/ref=cm_sw_su_dp
Bluetooth adaptor since Raspberry Pi 2 doesn't have it built in and current version of RecalBox doesn't support RPi3 build in bluetooth: https://www.amazon.com/dp/B00GDYNHL6/ref=cm_sw_su_dp
MicroSD card - https://www.amazon.com/dp/B00GDYNHL6/ref=cm_sw_su_dp
USB A to Micro B - Get the two pack. You'll be happy you did. 3 feet was long enough for me, but you might need longer. - https://www.amazon.com/dp/B00GDYNHL6/ref=cm_sw_su_dp
Good power adapter for your Rasperry Pi 2 or 3 - https://www.amazon.com/dp/B00GDYNHL6/ref=cm_sw_su_dp
Software
All you need for software is RecalBox. Full instructions here:http://www.recalbox.com/diyrecalbox
Similar models
thingiverse
free

Raspberry Pi Case With 2 30mm fans by ndemberger
...sink-raspberry-heatsinks/dp/b018bgrdvs
fans: https://www.amazon.com/raspberry-iuniker-30x30x7mm-brushless-retroflag/dp/b076h3tkbp
thingiverse
free

Raspberry Pi 4 RGB Case by Rav3Design
...7m5/ref=sr_1_4?dchild=1&keywords=raspberry+pi+4+fans+rgb&qid=1601240534&sr=8-4
.
leave any questions in the comments!
thingiverse
free

SNES Raspberry Pi 3 with functional switches, LED, and USB ports by xfcrowman
... are complete and sufficient for making your own mini snes.
please see the parts list and guide below to make your own mini snes!
thingiverse
free
Raspberry Pi Print Controller Enclosuer by supersaiyen
...7ih6/ref=cm_sw_r_tw_dp_u_x_tmf3abhydrg74
decora outlet - https://www.amazon.com/dp/b000bwi02w/ref=cm_sw_r_tw_dp_u_x_jnf3ab42ardc5
thingiverse
free

Raspberry Pi Tablet by Jrberendt
...and hot glue it to the sides of the case.
4.) slide the rim on (optional).
https://hackaday.io/project/178372-raspberry-pi-tablet
thingiverse
free

Raspberry pi 2/3 Recalbox by Gathnobrain
...raspberry pi 2/3 recalbox by gathnobrain
thingiverse
recalbox themed case for rpi 2/3
thingiverse
free

SNES mini Raspberry Pi Case by Classic-Cases
...e the need for connector extensions
-features an easily removable top for quick access
-snug and secure fit for your raspberry pi
thingiverse
free

Raspberry PI CNC Controller by familyRoots
...e
i design this case for my cnc controller base on raspberry pi
you can see the instructions here :
https://youtu.be/iunxhqo2lte
thingiverse
free
iPhone 6 (with OtterBox Defender case) Stand by mattanonymous
...
made this for a friend. it fits the iphone 6 with otterbox defender case (https://www.amazon.com/dp/b00n1ag5bo/ref=cm_sw_su_dp)
thingiverse
free
Raspberry PI 3 case with LCD & Battery by katascope
...ww.amazon.com/gp/product/b01n7andlc
keyboard : https://www.amazon.com/iclever-portable-keyboard-bluetooth-wireless/dp/b00ywljnpq/
Andrewbougie
thingiverse
free

SciFi Pistol by AndrewBougie
...ints upside down without supports.
my prints were abs with 0.25mm layers, but this should print well in many different materials.
thingiverse
free

Small Robots by AndrewBougie
... a kick out of having some actual robots to play with so i created these simple models to serve as inexpensive stocking stuffers.
thingiverse
free

Desk Shrooms by AndrewBougie
...t the full color sandstone version like you see in the pics? get them here:
red: http://shpws.me/lmhe
green: http://shpws.me/lmhi
thingiverse
free

SciFi Small Part Storage Crates by AndrewBougie
...l in the featured image is about a 90mm cube with some extra depth from the handles on the drawers. prints well without supports!
thingiverse
free

Battat Driver Set with Part Organizer by AndrewBougie
...reverse-engineer the screws, nuts, and other small parts for custom projects.
timelapse of the print:https://youtu.be/xvigyaj2jyc
thingiverse
free

Super Mario Pen/Pencil Holder by AndrewBougie
...bit to get the right fit if needed.
the mushrooms are my design as well. get those here: http://www.thingiverse.com/thing:1375575
thingiverse
free

Star Wars Coins - Modular Insert Design by AndrewBougie
...room that is left, you can put a small piece (or two) of standard office paper in between the inserts to get rid of the movement.
thingiverse
free

Apple Pencil Holder w/ Magnetic Cap Closure by AndrewBougie
...a.co/8pq1une
the snap-fit cap hinge is loose enough that it should snap in fairly easily while not falling out during normal use.
thingiverse
free

SD Card Block Insert by Tripplepin
...an insert for the sci fi crates designed by andrewbougie that holds sd cards. might need light sanding before...
Snes
turbosquid
$5

SNES
...nes
turbosquid
royalty free 3d model snes for download as ma on turbosquid: 3d models for games, architecture, videos. (1287350)
3d_export
$10
SNES 3D Model
...d model
3dexport
snes nintento supernintento supernintendo supernintendoentertainmentsystem
snes 3d model slottet 100563 3dexport
turbosquid
$10

Cartucho Snes
...bosquid
royalty free 3d model cartucho snes for download as on turbosquid: 3d models for games, architecture, videos. (1571131)
turbosquid
$10

Cartucho Snes
...bosquid
royalty free 3d model cartucho snes for download as on turbosquid: 3d models for games, architecture, videos. (1571132)
turbosquid
$1

SNES (Low Poly)
...squid
royalty free 3d model snes (low poly) for download as on turbosquid: 3d models for games, architecture, videos. (1355578)
turbosquid
$20

8-Bit SNES Controller
...ee 3d model 8-bit snes controller for download as obj and c4d on turbosquid: 3d models for games, architecture, videos. (1255310)
turbosquid
$20

Super Nintendo Entertainment System SNES PAL 3D model
...em snes pal 3d model for download as blend, fbx, stl, and obj on turbosquid: 3d models for games, architecture, videos. (1657619)
3d_export
$17

Super Nintendo SNES
...br>formats<br>max (3ds max 2015 vray 3,20)<br>fbx multi format<br>obj multi format<br>3ds multi format
3d_export
$20
super nintendo entertainment system snes pal
...riginal file. -fbx, obj and stl formats.<br>preview renders done in cycles but the model works perfectly well on eevee too.
cg_studio
$69

Nintendo SNES3d model
...game console tv streetfighter lwo
.lws - nintendo snes 3d model, royalty free license available, instant download after purchase.
Raspberry
3d_export
free

raspberry
...raspberry
3dexport
3d model of a raspberry. i tried to make it realistic.
turbosquid
$27

Raspberries
...y free 3d model raspberries for download as max, obj, and stl on turbosquid: 3d models for games, architecture, videos. (1354176)
turbosquid
$14

Raspberries
...y free 3d model raspberries for download as max, obj, and fbx on turbosquid: 3d models for games, architecture, videos. (1364663)
3d_export
$5

raspberry pi
...raspberry pi
3dexport
carcasa para la raspberry pi
turbosquid
$99

Raspberry
... available on turbo squid, the world's leading provider of digital 3d models for visualization, films, television, and games.
turbosquid
$10

raspberries
... available on turbo squid, the world's leading provider of digital 3d models for visualization, films, television, and games.
archive3d
free

Raspberries 3D Model
...raspberries 3d model archive3d raspberries raspberry raspberries n300911 - 3d model (*.3ds) for interior 3d...
3d_export
$5

raspberry fruit
...raspberry fruit
3dexport
3d_export
$5

raspberry
...y different sizes. their color ranges from light burgundy to pink. there are formats: obj, 3ds, blend, dae, fbx, mtl.<br>:)
evermotion
$12

raspberries 23 am130
...evermotion raspberries 23 am130 evermotion key 23 food fruit raspberry fruits am130 raspberries highly detailed 3d model of raspberries...
Pi
design_connected
$11

Pi
...pi
designconnected
ligne roset pi chairs computer generated 3d model. designed by thibault desombre.
3d_export
$5
raspberry pi
...raspberry pi
3dexport
carcasa para la raspberry pi
turbosquid
$18

pied
... available on turbo squid, the world's leading provider of digital 3d models for visualization, films, television, and games.
3ddd
$1

Emme pi light
...emme pi light
3ddd
emme pi light
люста emme pi light
3ddd
$1

Emme pi light
...emme pi light
3ddd
emme pi light
бра классическое emme pi light
3ddd
$1

Emme Pi Light
...emme pi light
3ddd
emme pi light
3ddd
$1

Emme Pi Light
...emme pi light
3ddd
emme pi light
design_connected
$16

Pi-Air
...pi-air
designconnected
living divani pi-air lounge chairs computer generated 3d model. designed by harry & camila.
3d_ocean
$15

Manneken Pis
...picting a naked little boy urinating into a fountain’s basin. (wikipedia) the model was sculpted in blender 2.70a rendered wit...
3ddd
$1

Emme pi light
...emme pi light
3ddd
emme pi light
люстра классическая фирма: emme pi light
артикул: 3595/5/cot/12/wh
Mini
turbosquid
$10

Mini Mini Luceplan
...
royalty free 3d model mini mini luceplan for download as max on turbosquid: 3d models for games, architecture, videos. (1227359)
3d_ocean
$39

Mini Cooper
...mini cooper
3docean
cabrioler cooper mini
mini cooper cabrioler
3d_export
$30

Mini lathe
...mini lathe
3dexport
mini lathe
3d_export
$5

mini mouse
...mini mouse
3dexport
mini mouse
3d_export
$5

mini house
...mini house
3dexport
mini house
3d_export
free

Mini Mecha
...mini mecha
3dexport
concept of mini mecha
3d_ocean
$20

Mini Gun
...mini gun
3docean
gatling gun gun machine gun mini gun weapon
model of a mini gatling gun.
3ddd
free

Herve mini
... кофейный , herve
http://www.mobiliavenanti.it/ru/products/hervè-mini
3d_export
$5

mini wall
...mini wall
3dexport
mini wall for living room
3d_export
$5

mini bank
...mini bank
3dexport
mini bank 3d model
Case
3d_export
$1

case
...case
3dexport
case
archibase_planet
free

Case
...case
archibase planet
showcase show-case glass case
glass-case + cakes - 3d model for interior 3d visualization.
archibase_planet
free

Case
...case
archibase planet
showcase show-case glass case
glass-case for chips - 3d model for interior 3d visualization.
archibase_planet
free

Case
...case
archibase planet
case shelving drawer
case - 3d model for interior 3d visualization.
archibase_planet
free

Case
...case
archibase planet
case rack locker
case - 3d model for interior 3d visualization.
archibase_planet
free

Case
...case
archibase planet
case drawer kitchen furniture
case - 3d model for interior 3d visualization.
archibase_planet
free

Case
...case
archibase planet
case cupboard shelving
glass case - 3d model for interior 3d visualization.
archibase_planet
free

Case
...case
archibase planet
case handbag suitcase
case - 3d model (*.gsm+*.3ds) for interior 3d visualization.
archibase_planet
free

Case
...case
archibase planet
case suitcase
case 5 - 3d model (*.gsm+*.3ds) for interior 3d visualization.
archibase_planet
free

Case
...case
archibase planet
locker case dresser
case - 3d model (*.gsm+*.3ds) for interior 3d visualization.
3
turbosquid
$10

Mountain Bike 3 -3 of 3
...model mountain bike 3 (#3 of 3) for download as fbx and blend on turbosquid: 3d models for games, architecture, videos. (1438752)
turbosquid
$6

Rock 3-3
...urbosquid
royalty free 3d model rock 3-3 for download as obj on turbosquid: 3d models for games, architecture, videos. (1628065)
turbosquid
$29

Books 150 pieces 3-3-3
...books 150 pieces 3-3-3 for download as max, obj, fbx, and stl on turbosquid: 3d models for games, architecture, videos. (1384033)
turbosquid
$3

Genesis 3 Clothing 3
... available on turbo squid, the world's leading provider of digital 3d models for visualization, films, television, and games.
3d_export
$5

hinge 3
...hinge 3
3dexport
hinge 3
3ddd
$1

Розетка 3
...розетка 3
3ddd
розетка
розетка 3
turbosquid
$50

is-3
... available on turbo squid, the world's leading provider of digital 3d models for visualization, films, television, and games.
turbosquid
$10

Mountain Bike 3 -2 of 3
...model mountain bike 3 (#2 of 3) for download as fbx and blend on turbosquid: 3d models for games, architecture, videos. (1438750)
turbosquid
$10

Mountain Bike 1 -3 of 3
...model mountain bike 1 (#3 of 3) for download as fbx and blend on turbosquid: 3d models for games, architecture, videos. (1438743)
3d_export
$5

3 CATS
...3 cats
3dexport
3 cats pen holder
2
design_connected
$11

No 2
...no 2
designconnected
sibast no 2 computer generated 3d model. designed by sibast, helge.
turbosquid
$6

Cliff Rock 2-2
...uid
royalty free 3d model cliff rock 2-2 for download as obj on turbosquid: 3d models for games, architecture, videos. (1619161)
turbosquid
$29

Book variation 2 2
...3d model book variation 2 2 for download as max, obj, and fbx on turbosquid: 3d models for games, architecture, videos. (1366868)
turbosquid
$22

Classic baluster (2) (2)
...assic baluster (2) (2) for download as max, obj, fbx, and stl on turbosquid: 3d models for games, architecture, videos. (1483789)
turbosquid
$99

Smilodon 2 Pose 2
... available on turbo squid, the world's leading provider of digital 3d models for visualization, films, television, and games.
turbosquid
$20

Barrel Barricade 2-2
... available on turbo squid, the world's leading provider of digital 3d models for visualization, films, television, and games.
turbosquid
$6

Wall Trophy (2) (2)
... available on turbo squid, the world's leading provider of digital 3d models for visualization, films, television, and games.
turbosquid
free

Tire label 2 of 2
... available on turbo squid, the world's leading provider of digital 3d models for visualization, films, television, and games.
3ddd
$1

Кровать, 2 тумбочки, 2 светильника
...кровать, 2 тумбочки, 2 светильника
3ddd
кровать, 2 тумбочки, 2 светильника
нормальное качество
формат 3ds max
без текстур
3ddd
free

Кровать, 2 тумбочки, 2 светильника
...кровать, 2 тумбочки, 2 светильника
3ddd
кровать, 2 тумбочки, 2 светильника
нормальное качество
формат 3ds max
без текстур