Thingiverse

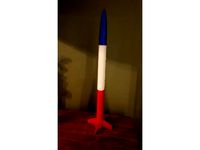
Mini M&M Rocket
by Thingiverse
Last crawled date: 4 years, 3 months ago
While joking with my son that I need to stop buying Pringles because I keep making rockets out of the tubes, he held up a package of mini M&Ms we'd just bought for my grandson and said "I bet you'd make a rocket out of this!"
So I did. And here it is.
Build instructions:
There are two different versions of the fin unit.
1) Uses a BT-5 (13mm) motor tube. You'll need a motor block if you build that one. It's slightly lighter than the all plastic one, but more hassle. It works though. I built one this way. I believe the weight difference is negligible but this one may hold up better long term than the all plastic one.
2) An all plastic one sized for Estes 13mm motors. Held up fine for the one launch I've done so far, time will tell if it lasts for long.
Build Notes:
I use 250lb kevlar string as a shock cord. It's fire proof...enough.
I also use a small square of nomex cloth instead of wadding. These are both visible in the photo.
Use a streamer for recovery, it's a light rocket.
Drill a hole in the cap and run the shock cord through it, knotting it above the cap and gluing it in place. Then cut off the hinge. I didn't do this at first and 3 of the five rockets lost their cap at apogee when it got blown off the rocket. That hinge is NOT strong enough.
I had to glue 3 10-24 hex nuts to the lid for weight. They came off on the initial launch, you can kind of tell as it reaches max height in the video. Be sure to sand the lid before you epoxy them down (which is what I did the second time - and photo'd).
As an alternative, you can print the nosecone I've now included with this thing. 20% infill should be fine and it will weight the nose without gluing on nuts. There is a recess in the nosecone for the knot from the shock cord to fit.
This nose cone doesn't look as "stock", but it works fine and may improve performance.
These mini M&M containers have a seam from the molding you can see about 2mm from the bottom, I just cut there and sanded smooth. The fin unit then slips inside. Epoxy it in, then epoxy the fins down.
It's meant to be a fun cheap disposable rocket, basically, and I expect that over a few launches the tube might warp from the heat. But its easy to build and fun to launch.
I used an A10-3T in the video, but I think it was a bad batch as none of the four launches I did went as high as they should have. This rocket empty is only 27g, so I expected the flight to be higher. Nevertheless it flew fine as you can see in the video below.
https://www.youtube.com/watch?v=DaicyF86u1s&feature=youtu.be
Similar models
thingiverse
free

Mini M&M Rocket for 18mm Motors
... launched this on an a8-3 as seen in this video...https://www.youtube.com/watch?v=gjyxiius168
...but it should take up to a c6-7.
thingiverse
free
Model Rocket I by daves28104
...s member to keep wadding and chute from sliding down.
integrated 1/8" launch lug.
for use with estes 18mm motor (b6-5; c6-5)
thingiverse
free

Model Rocket by ThePyroCreator
...l rolls, these are odd sized tubes but they're all i had lying around, please adapt my project to suit your own requirements.
thingiverse
free

Rear Eject Bomb Rocket (18mm motors) by Aslansmonkey
...an 18mm design. so here it is. assembly is similar to the 24mm versions so see my things on...
thingiverse
free

18mm Rocket Kits by Aslansmonkey
...fnuknoa
ellipsis (b6-4): https://www.youtube.com/watch?v=pr781x4bs-m
stiletto (c6-3): https://www.youtube.com/watch?v=ov_a_whr3xa
thingiverse
free

Euripides Space Liner by Aslansmonkey
...o this. that way you can add washers for weight. or you can do what i did and just dump bb's in the nose and epoxy them in.
thingiverse
free

Rapier Modular Model Rocket by Wyatt_in3D
...ur videos, photos, and feedback. due to corona virus, taking a trip to a safe test site is not possible at this time for myself.
thingiverse
free

Missile Toe v2.0 - flying tree ornament by Works-Of-Claye
...add weight to the nose cone so that the rocket balances about 1" above the fins
7) fly it, and god speed to the missile toe!
thingiverse
free
Printer Roll Rocket
...which is why i didn't suggest epoxying them together.
i haven't built it yet so build it, edit it, have fun, and be safe!
thingiverse
free

Special Delivery/Rear Eject Bomb Rocket
... it but it flew fine for me on that. attached is a video poorly taken with my phone.
https://www.youtube.com/watch?v=zxtobejfvtu
Rocket
3d_export
$5
rocket
...rocket
3dexport
rocket 3d model low poly
3d_export
$5

rocket
...rocket
3dexport
rocket low poly 3d model cartoon
archibase_planet
free

Rocket
...rocket
archibase planet
rocket toy
rocket tintin's n290813 - 3d model (*.gsm+*.3ds+*.max) for interior 3d visualization.
3d_export
$5

Rocket
...rocket
3dexport
the rocket is made from a cylinder made in blender 3.0
turbosquid
$6

Rocket Baby Rocket Stool
...el rocket baby rocket stool for download as max, obj, and fbx on turbosquid: 3d models for games, architecture, videos. (1502645)
turbosquid
$15

rocket
...ket
turbosquid
royalty free 3d model rocket for download as on turbosquid: 3d models for games, architecture, videos. (1340796)
turbosquid
$10
Rocket
...ket
turbosquid
royalty free 3d model rocket for download as on turbosquid: 3d models for games, architecture, videos. (1247547)
3d_export
$5

scifi rocket
...scifi rocket
3dexport
scifi rocket
turbosquid
$199

rockets
...turbosquid
royalty free 3d model rockets for download as max on turbosquid: 3d models for games, architecture, videos. (1233135)
turbosquid
$30
Rocket
...
turbosquid
royalty free 3d model rocket for download as fbx on turbosquid: 3d models for games, architecture, videos. (1290260)
Mini
turbosquid
$10

Mini Mini Luceplan
...
royalty free 3d model mini mini luceplan for download as max on turbosquid: 3d models for games, architecture, videos. (1227359)
3d_ocean
$39

Mini Cooper
...mini cooper
3docean
cabrioler cooper mini
mini cooper cabrioler
3d_export
$30

Mini lathe
...mini lathe
3dexport
mini lathe
3d_export
$5

mini mouse
...mini mouse
3dexport
mini mouse
3d_export
$5

mini house
...mini house
3dexport
mini house
3d_export
free

Mini Mecha
...mini mecha
3dexport
concept of mini mecha
3d_ocean
$20

Mini Gun
...mini gun
3docean
gatling gun gun machine gun mini gun weapon
model of a mini gatling gun.
3ddd
free

Herve mini
... кофейный , herve
http://www.mobiliavenanti.it/ru/products/hervè-mini
3d_export
$5

mini wall
...mini wall
3dexport
mini wall for living room
3d_export
$5

mini bank
...mini bank
3dexport
mini bank 3d model
M
turbosquid
$20
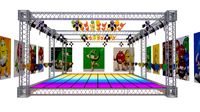
Stage M&M
... available on turbo squid, the world's leading provider of digital 3d models for visualization, films, television, and games.
3ddd
$1
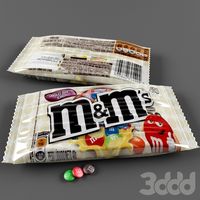
bag m&m's
...bag m&m's
3ddd
bag m&m's
bag m&m;'s
3d_export
$35
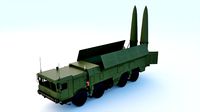
iskander m
...iskander m
3dexport
iskander m 3d model
design_connected
$7
barstool m
...barstool m
designconnected
barstool m computer generated 3d model.
3ddd
free
CACTUS M
...cactus m
3ddd
cactus , lzf
настольный светильник cactus m
производитель lzf
design_connected
$13

Anfora M
...anfora m
designconnected
lzf anfora m computer generated 3d model. designed by herranz, miguel.
3ddd
$1
зеркало M Gastone
...зеркало m gastone
3ddd
зеркало m gastone
зеркало m gastone
design_connected
$16

Dogon M
...dogon m
designconnected
emmemobili dogon m chairs computer generated 3d model. designed by ferruccio laviani.
design_connected
$9
Sunlight M
...sunlight m
designconnected
bonacina pierantonio sunlight m computer generated 3d model. designed by bizzozzero, franco.
3ddd
$1
Karman / Norma-M
...arman , norma-m
http://www.karmanitalia.it/en/prodotto/norma-m/norma-m-ap640n/