Thingiverse
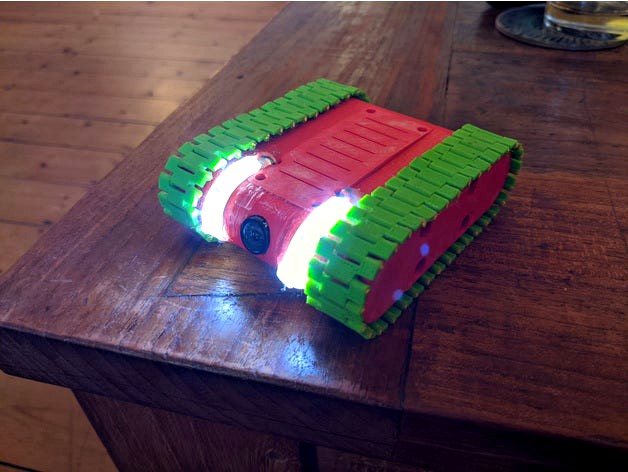
Mini FPV Rover by AdamHelbing
by Thingiverse
Last crawled date: 2 years, 9 months ago
Check my rover in action: https://www.youtube.com/watch?v=WTT5baSq0dM
This rover is a modification of this one:https://www.instructables.com/Mini-FPV-Rover/https://www.thingiverse.com/thing:2478547
Props go out to Markus Purtz for inventing that lil thing.
However, I changed a various things and thats why I publish this mod.
My modifications:
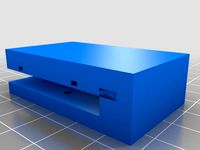
I created a new cover because the original one cover was not fitting,
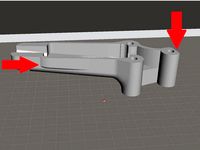
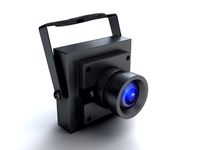
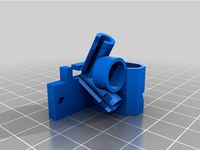
The original rover's cam mount was made for that whoop AIO nano cams and image was crap. I modified it to hold a good quality 19mm micro cam at 20° angle
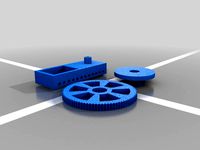
motor mounts did not fit the geared motors I used so I made them fit
body was to wide for my liking, I made it slimmer
I added LEDs (non-LED cover STL is available as well) to explore dark reas of my house
changed various small details, will mention them in the assembly instructions
BOM
Here is a complete BOM. Most parts are the same as the original rover but a few original parts are not needed anymore.
This are the required ones for the rover:
2x 4Pcs bearings: https://banggood.app.link/VxrvY3sxfhb
2x Motors: Orlandoo OH35P01 KIT RC Car Parts Gear Motor 300RPM version:https://banggood.app.link/YKkaZ6Dxfhb
2x ESC: DORCRCMAN DIY Micro Mini 3A Brushed ESChttps://banggood.app.link/pUTbUlNxfhb
8x 3mm screws 10mm length - no link because you'll have some at home
If you want LEDs:
1x 5V BEC: https://banggood.app.link/QMxULlXxfhb
1x 5V LED Strip: 200CM 3528 120LED 9.6W USB LED Strip Light TV Background Lighting IP65 Kit 5Vhttps://banggood.app.link/6F5kpA4xfhb
FPV Gear:
1x Camera: Foxeer Micro Predator Naked: https://banggood.app.link/Mq3gLBkyfhb
1x VTX: TBS Unify Pro32 nano: https://www.team-blacksheep.com/products/prod:unifypro32_nano
1x FPV Antenna: Short linear antenna which came with the VTX
1x Receiver+Goggles: I use my Fatshark HDO Goggles with Rapidfire module and Powerplay recorder. Use what you own or buy what you can afford.
RC components:
1x Transmitter: I use a FrSky Taranis X9D
1x Receiver: I used a FrSky X8R because I had ony lying around. Its basically to big but still fit in, however, you'll need 2 pwm channels
Power:
1x Battery: I use this one: https://hobbyking.com/de_de/turnigy-nano-tech-300mah-2s-45-90c-lipo-pack.html But every 2S lipo will do which fits inside the frame
1x Battery Plug: I use JST plugs: https://banggood.app.link/8UMFBSGzfhb
Printing materials:
I used ASA for all parts but the track elements, PLA should do as well but just in case the VTX is running hot I used ASA to prevent the rover from melting. However, the VTX is not that hot after all and it does not touch any printed parts because I glued it to the receiver.
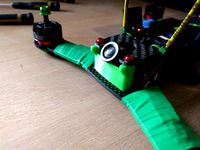
I printed the tracks with flexible material. I used Ninjaflex Semiflex but TPU etc will do as well.
Construction
Check out Markus Purtz' instructions, they are pretty clear. However, there are some differences:
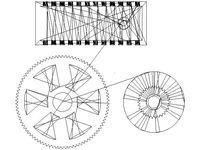
This rover uses 34 elements per track because its flexible. You don't need the drills as well, simply stick some filament through and you are good to go.
You don't need magnets for the lid. it sits tight enough. however, I added fitting holes so you can still use magnets if you like.
Fix everything with your glue of choice, I simply hot glued everything.
Electronics are pretty straightforward with one caveat: This rover runs on 2S, so you should make sure that your receiver can handle that. VTX, cam, escs are all fine with 8.4V. simply use the receiver for power distribution. plug battery to it, plug ESCs into channels 1+2, plug vtx and cam into it.
Btw, the cam offers a VSEN pin. connect it to receivers positive pole and you'll get voltage display in OSD. I however first disabled it in camera menu and then lost the remote control because I'm not a smart man.
The LEDs are 5V only. so set up the BEC to output 5V, solder led wires to it, a power plug and plug it into the receiver as well.
Finally you should set up channel mixing for tracked models in your transmitter. I added 2 photos of my mixer setup, but this video here explains it very well: https://tinyurl.com/bdns4pj5 It took me half an hour of trial&error negating channels and mixers until it was fine. I'm sure you figure it out faster.
Alright, have fun. One more thing: You'll find FreeCAD files of all my modifications. Modify and publish everything and make that thing even better :)
This rover is a modification of this one:https://www.instructables.com/Mini-FPV-Rover/https://www.thingiverse.com/thing:2478547
Props go out to Markus Purtz for inventing that lil thing.
However, I changed a various things and thats why I publish this mod.
My modifications:
I created a new cover because the original one cover was not fitting,
The original rover's cam mount was made for that whoop AIO nano cams and image was crap. I modified it to hold a good quality 19mm micro cam at 20° angle
motor mounts did not fit the geared motors I used so I made them fit
body was to wide for my liking, I made it slimmer
I added LEDs (non-LED cover STL is available as well) to explore dark reas of my house
changed various small details, will mention them in the assembly instructions
BOM
Here is a complete BOM. Most parts are the same as the original rover but a few original parts are not needed anymore.
This are the required ones for the rover:
2x 4Pcs bearings: https://banggood.app.link/VxrvY3sxfhb
2x Motors: Orlandoo OH35P01 KIT RC Car Parts Gear Motor 300RPM version:https://banggood.app.link/YKkaZ6Dxfhb
2x ESC: DORCRCMAN DIY Micro Mini 3A Brushed ESChttps://banggood.app.link/pUTbUlNxfhb
8x 3mm screws 10mm length - no link because you'll have some at home
If you want LEDs:
1x 5V BEC: https://banggood.app.link/QMxULlXxfhb
1x 5V LED Strip: 200CM 3528 120LED 9.6W USB LED Strip Light TV Background Lighting IP65 Kit 5Vhttps://banggood.app.link/6F5kpA4xfhb
FPV Gear:
1x Camera: Foxeer Micro Predator Naked: https://banggood.app.link/Mq3gLBkyfhb
1x VTX: TBS Unify Pro32 nano: https://www.team-blacksheep.com/products/prod:unifypro32_nano
1x FPV Antenna: Short linear antenna which came with the VTX
1x Receiver+Goggles: I use my Fatshark HDO Goggles with Rapidfire module and Powerplay recorder. Use what you own or buy what you can afford.
RC components:
1x Transmitter: I use a FrSky Taranis X9D
1x Receiver: I used a FrSky X8R because I had ony lying around. Its basically to big but still fit in, however, you'll need 2 pwm channels
Power:
1x Battery: I use this one: https://hobbyking.com/de_de/turnigy-nano-tech-300mah-2s-45-90c-lipo-pack.html But every 2S lipo will do which fits inside the frame
1x Battery Plug: I use JST plugs: https://banggood.app.link/8UMFBSGzfhb
Printing materials:
I used ASA for all parts but the track elements, PLA should do as well but just in case the VTX is running hot I used ASA to prevent the rover from melting. However, the VTX is not that hot after all and it does not touch any printed parts because I glued it to the receiver.
I printed the tracks with flexible material. I used Ninjaflex Semiflex but TPU etc will do as well.
Construction
Check out Markus Purtz' instructions, they are pretty clear. However, there are some differences:
This rover uses 34 elements per track because its flexible. You don't need the drills as well, simply stick some filament through and you are good to go.
You don't need magnets for the lid. it sits tight enough. however, I added fitting holes so you can still use magnets if you like.
Fix everything with your glue of choice, I simply hot glued everything.
Electronics are pretty straightforward with one caveat: This rover runs on 2S, so you should make sure that your receiver can handle that. VTX, cam, escs are all fine with 8.4V. simply use the receiver for power distribution. plug battery to it, plug ESCs into channels 1+2, plug vtx and cam into it.
Btw, the cam offers a VSEN pin. connect it to receivers positive pole and you'll get voltage display in OSD. I however first disabled it in camera menu and then lost the remote control because I'm not a smart man.
The LEDs are 5V only. so set up the BEC to output 5V, solder led wires to it, a power plug and plug it into the receiver as well.
Finally you should set up channel mixing for tracked models in your transmitter. I added 2 photos of my mixer setup, but this video here explains it very well: https://tinyurl.com/bdns4pj5 It took me half an hour of trial&error negating channels and mixers until it was fine. I'm sure you figure it out faster.
Alright, have fun. One more thing: You'll find FreeCAD files of all my modifications. Modify and publish everything and make that thing even better :)
Similar models
thingiverse
free

FPV-Rover (Tank) by markus_p
...for 7,4v)
use 4 motor pinions for the tuning motors (sigma 4 9z m50 nylon)
20x m3 screw 25mm long
4x m4 screw 20mm long
4x m4 nut
thingiverse
free

FPV Pod (Runcam Micro Swift + 5.8G VTX) by ABLomas
...ane. 2.1mm lens on runcam micro swift looks much better to me and i'm not limited to 5v power supply (like most aio cams do).
thingiverse
free

FPV-Rover V2.0 big tracks gluing clamp support by sky022
...the track parts together while clamping/gluing.
one side fits the base tracks, the other one fits the "big_track" part.
thingiverse
free

Snow Plow for FPV Rover by markus_p
...mount
1x body
1x plow left
1x plow right
1x servo arm extension
1x servo pivot
1x servo mount
1x servo arm extension
1x top mount
thingiverse
free
30a ESC Arms (Wider/Longer slot) by TaylarRoids
...ccommodate my larger vtx. this is exactly that.
here's the link to the escs i used: https://goo.gl/u7vddx they fit perfect.
thingiverse
free
100mm Micro Hellbender by Electroluxe
...00mah lipo)
(imho, this one works better, if you happen to have 25mm spacers... check: https://www.thingiverse.com/thing:2298770)
thingiverse
free

Axial SCX24 Deadbolt - FPV CAM HOLDER
...era. i also created a flat spot on the bar so the holes aligns better.
the camera/vtx is powered in the aux (5v) of the receiver.
thingiverse
free

FPV-Rover V2.31 (Tank)
...ng:1936491
upgrade 04:https://www.thingiverse.com/thing:3686505
upgrade 05nerf dart launcher
upgrade 06robotic arm eezybotarm mk2
thingiverse
free

MICRo PoW! X POD by mojobromley
...s 18a esc
bolt lihv 500mah 7.4v 2s
altitude rc 25mw vtx
bangood 170deg fpv cam
118g auw w/2s battery
https://youtu.be/jcibofxszdm
thingiverse
free

Mini FPV-Rover (Tank) by markus_p
...nly if needed)
1x top
2x inner track frame
2x outer track frame
4x cog
last update: 28.08.2017
scroll down for the latest updates
Adamhelbing
thingiverse
free

CP180FPV Xiaomi Yi Mount by AdamHelbing
...v xiaomi yi mount by adamhelbing
thingiverse
this mount was made by dennis dinslage, i got the permission to upload and share :)
thingiverse
free
Rotorama H5 40° Camera tilt by AdamHelbing
...rotorama h5 40° camera tilt by adamhelbing
thingiverse
this bumper lets the camera rest at 40°.
thingiverse
free

Quadrysteria QR200 PRO Plates Front Bumper by AdamHelbing
...quadrysteria qr200 pro plates front bumper by adamhelbing
thingiverse
front bumpers :)
thingiverse
free

Kodama Trinus Filament Spool Holder by AdamHelbing
...kodama trinus filament spool holder by adamhelbing
thingiverse
a simple spool holder. max spool width ~60cm
thingiverse
free

Shendrones Krieger Front Bumper by AdamHelbing
...his are front bumpers for your krieger. will work with flexible filament only, because you have to put them over the side plates.
thingiverse
free

Quadrysteria QR200 concave side plates by AdamHelbing
...e plates by adamhelbing
thingiverse
optimizes air flow and protects your electronics.
updated: added another hole at the front.
thingiverse
free

Rotorama H5 Unify VTX Antenna mount by AdamHelbing
...rotorama h5 unify vtx antenna mount by adamhelbing
thingiverse
made it for tbs unify hv but will work with unify pro, too.
thingiverse
free

QR200 Foxeer Legend 1 Bumper by AdamHelbing
...e
this is a case for the foxeer legend 1 camera.
print with low infill (20%) and a flexible filament, so it swallows vibrations.
thingiverse
free

C-4rce Cyclone Motor Soft Mount Bumper by AdamHelbing
...rce cyclone motor soft mount bumper by adamhelbing
thingiverse
a soft mount and a bumper for motors with standard 16/19 spacing.
thingiverse
free

SKY RC500 Skysight FPV Monitor Display Antenna Protector Case by AdamHelbing
...sky rc500 skysight fpv monitor display antenna protector case by adamhelbing
thingiverse
a simple protector for this monitor
Rover
3d_ocean
$89

Land-Rover Range Rover 2011
...andling have been transformed with the introduction of new engines, transmission and chassis systems. combine these enhancemen...
3d_export
$20

land rover
...land rover
3dexport
land rover
3d_export
$14

Land Rover Range Rover 2022
...land rover range rover 2022
3dexport
3d_export
$39

land rover range rover iii
... rover iii
3dexport
land rover range rover iii, year 2002.<br>model with high quality finishing on the outside and inside.
3d_export
$7

the rover
...the rover
3dexport
turbosquid
$5
Rover
...royalty free 3d model rover for download as max, obj, and fbx on turbosquid: 3d models for games, architecture, videos. (1673120)
3d_ocean
$89

Land Rover Range Rover 1986
...y, in real units of measurement, qualitatively and maximally close to the original. model formats: - *.max (3ds max 2008 scanl...
3d_export
$29

Land Rover Range Rover 1993 3D Model
... rover range rover 1993 3d model
3dexport
land rover range 1993
land rover range rover 1993 3d model 3dlogicline 39509 3dexport
3d_export
$69

Land Rover Range Rover Velar 2023
...land rover range rover velar 2023
3dexport
3d_export
$20

land rover range rover
...e apps.<br>car textures:png - 2k resolution other available formats: obj, 3ds, fbx, max. polycount: 35742 poly / 37163 tris
Fpv
turbosquid
$1
FPV VTX Antenna
...e 3d model fpv vtx antenna for download as obj, fbx, and stl on turbosquid: 3d models for games, architecture, videos. (1230317)
3d_export
$9
Fpv logo 3D Model
...onogram vehicle part of auto transport 3d model logo emblem detailed high quality badge
fpv logo 3d model rmodeler 59628 3dexport
3d_export
$8
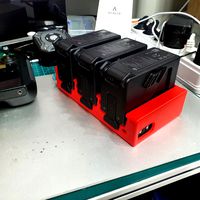
dji fpv battery slot holder
...er for 3 dji fpv batteries. holds perfectly without shaking. need 1 m3 countersunk head bolt. need to print 6 pin, 1 case, 1 cap.
3d_export
$10
fpv camera hd 700tvl
...aterials are logically named<br>the main format is in 3ds max 2009.<br>satisfcation garranteed..<br>thank you !
thingiverse
free
FpV Mount (SOPORTE FPV) by elborjas1987
...fpv mount (soporte fpv) by elborjas1987
thingiverse
this is a fpv mount with the same holes of naza base.
thingiverse
free
fpv by tbutera
...fpv by tbutera
thingiverse
fpv
thingiverse
free
fpv by tbutera
...fpv by tbutera
thingiverse
fpv
thingiverse
free
FPV DRONE ROOSTER DJI FPV PART
...fpv drone rooster dji fpv part
thingiverse
fpv drone rooster dji fpv install part
thingiverse
free
FPV monitor
...tml?rmmds=myorder&cur_warehouse=cn
link for download : https://cults3d.com/fr/mod%c3%a8le-3d/divers/fpv-monitor-ecran-fpv-faf
thingiverse
free
FPV receiver mount for FPV display by petrex
...eceiver mount for fpv display by petrex
thingiverse
aomway receiver mount for field view 777 fpv monitor. with small cable tray.
Mini
3d_ocean
$39

Mini Cooper
...mini cooper
3docean
cabrioler cooper mini
mini cooper cabrioler
3d_export
$30

Mini lathe
...mini lathe
3dexport
mini lathe
3d_export
$5

mini mouse
...mini mouse
3dexport
mini mouse
3d_export
$5

mini house
...mini house
3dexport
mini house
3d_export
free

Mini Mecha
...mini mecha
3dexport
concept of mini mecha
3d_ocean
$20

Mini Gun
...mini gun
3docean
gatling gun gun machine gun mini gun weapon
model of a mini gatling gun.
3ddd
free

Herve mini
... кофейный , herve
http://www.mobiliavenanti.it/ru/products/hervè-mini
3d_export
$5

mini wall
...mini wall
3dexport
mini wall for living room
3d_export
$5

mini bank
...mini bank
3dexport
mini bank 3d model
3ddd
$1

LEGO Star Wars Mini AT-AT and Mini-AT-TE
... star wars , конструктор
набор lego star wars mini at-at and mini-at-te.