Thingiverse

mikroY4 by DAquad
by Thingiverse
Last crawled date: 3 years, 1 month ago
mikroY4
After the success of
drunK131 I wanted to challange myself to follow the line of one part print style and create even smaller racing quadcopter.
In my 3D printedquadcopters fleet that I have designed you can find a Tricopter, Racing quadcopter and Tiny Whoops. This time I was looking for something new a 16*16 Flight controller size micro Y4.
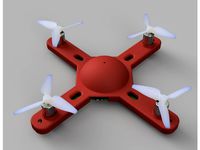
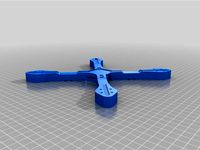
The idea behind mikroY4 is to create one part printed Y4 frame, mainting one part print add durabilty to the 3D printed frame.
Printing the frame
This is my first attempt to print Nylon, I'm using ePA from Esun and printing at 215°c on my Tevo Tarntula stock was smooth and without any problem.
Instructions
1. Print Main_Frame and Upper_back_tail_motor_mount
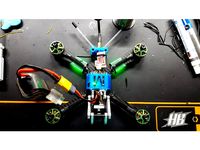
2. Add your electronics, check my part suggestions below for my built
2a. First I mount all the motors and place the motor wirings through their holes
2b. Then I place the 4in1 Esc's with the FC stack, receiver and AIO camera. Dont forget to pre solder everything!
2c. Solder the motor wires to the 4in1 Esc's
3. Load Y4 configuration in your favorite FW, Im using BetaFlight
Part list
16*16mm
F4 Flight controller and 4in1 Esc's STACK
AIO cam
FrSky compatible receiver
4
1102 11500Kv brushless motors
2" props set
JST connector
1M screws for plastic
2S 350mah Lipo battery
--------------------------------------------------------------------------------------------------------------------------
Recommended Tools I used:
Highly recommended Soldering station
.
Free Hands.
Cable cutter.
I own two printers CR-10 and Tevo Tarntula
Multi tool
I always like to check my connections with a Multimeter
Hot glue gun
My phone Meizu Pro 6 Plus
--------------------------------------------------------------------------------------------------------------------------
Happy building (-:
After the success of
drunK131 I wanted to challange myself to follow the line of one part print style and create even smaller racing quadcopter.
In my 3D printedquadcopters fleet that I have designed you can find a Tricopter, Racing quadcopter and Tiny Whoops. This time I was looking for something new a 16*16 Flight controller size micro Y4.
The idea behind mikroY4 is to create one part printed Y4 frame, mainting one part print add durabilty to the 3D printed frame.
Printing the frame
This is my first attempt to print Nylon, I'm using ePA from Esun and printing at 215°c on my Tevo Tarntula stock was smooth and without any problem.
Instructions
1. Print Main_Frame and Upper_back_tail_motor_mount
2. Add your electronics, check my part suggestions below for my built
2a. First I mount all the motors and place the motor wirings through their holes
2b. Then I place the 4in1 Esc's with the FC stack, receiver and AIO camera. Dont forget to pre solder everything!
2c. Solder the motor wires to the 4in1 Esc's
3. Load Y4 configuration in your favorite FW, Im using BetaFlight
Part list
16*16mm
F4 Flight controller and 4in1 Esc's STACK
AIO cam
FrSky compatible receiver
4
1102 11500Kv brushless motors
2" props set
JST connector
1M screws for plastic
2S 350mah Lipo battery
--------------------------------------------------------------------------------------------------------------------------
Recommended Tools I used:
Highly recommended Soldering station
.
Free Hands.
Cable cutter.
I own two printers CR-10 and Tevo Tarntula
Multi tool
I always like to check my connections with a Multimeter
Hot glue gun
My phone Meizu Pro 6 Plus
--------------------------------------------------------------------------------------------------------------------------
Happy building (-:
Similar models
thingiverse
free

Micro Y4 fpv by zeocool
...
thingiverse
micro or nano 105mm y4 quadcopter
1102/1103 motors 10.000kv
20x20mm fc esc or single esc
aio fpv can or runcam nano
thingiverse
free
AIO Quadcopter Frame by MichaelD33
...//github.com/michaeld33/aio-quadcopter-flight-controllerhttps://delaney.nyc/programming-an-embedded-quadcopter-flight-controller/
thingiverse
free
200 mm quadcopter frame by UncleMcNuts
...s for cable ties, space for a 36x36mm 4in1 esc or board on the bottom
motor wire cable routing
11mm at thinnest point on the arms
thingiverse
free

QAV250 Cheap Racing FPV Quadcopter by JasonDr
...
micro ccd camera. $7.99
foam box
or get this fpv goggles i've already posted here: http://www.thingiverse.com/thing:1427970
thingiverse
free

3 inch enclosed drone frame by RichMaxx
...rone frame by richmaxx
thingiverse
11xx motors
or
1306 motors
20x20 flight controller
4in1 20a esc
3" props
450 mha battery
thingiverse
free

Brushless Whoop 95 by SUJAMES
...opeller : 2030
motor : 1104 6000kv
esc : 4in1 10a dshot600
battery : 2s 500mah li-po
vtx : aio 25/100/200mw
receiver : lemon dsmx
thingiverse
free
Chameleon Electronics Cover by Rayenator
...ller wires
-protect the electronics from debris if running the motors in reverse
i print with sain smart tpu at 195 c, 20% infill
thingiverse
free

120mm Quadcopter frame by MarcoDesigns
...jh57cxa
battery/s: https://www.stefansliposhop.de/akkus/sls-spielzeugakkus-spezialakkus/sls-xtron-600mah-1s1p-3-7v-20c::1579.html
thingiverse
free

Drone frame 110mm 1103motors 65mm props by RichMaxx
...props by richmaxx
thingiverse
110mm drone frame
1103 brushless motors
super_s flight controller + esc 16x16
wolfwhoop aio camera
thingiverse
free

DAwhoopy80 by DAquad
...lity cr-10.
tevo tornado.
nice filaments
abs 1kg.
another brand i use: abs 1kg.
want the frame from carbon? please contact me
Daquad
thingiverse
free

20*20mm AIO cam mount by DAquad
...eric 5v buzzer.
designed for fpv at 30 degrees cam angle.
recommended printing material is tpu since its easier to mount the cam.
thingiverse
free

Wireless Heart Charger by DAquad
...rew driver.
3d solutech transparent pla.
instructions:
print the parts
dont forget to share your makes and click the like (:
thingiverse
free

Klom140 by DAquad
... omnibus f4 flight controller 28a 2-4s tx.
brother hobby 1407 4100kv.
runcam micro swift v2.
printed with
cr-10 3d printer .
thingiverse
free
DAwhoopy80 by DAquad
...lity cr-10.
tevo tornado.
nice filaments
abs 1kg.
another brand i use: abs 1kg.
want the frame from carbon? please contact me
thingiverse
free

RoboCar by DAquad
...------
instructions
detailed wiring, codes and app can be found in this link robot with bluetooth remote app.
happy building (-:
thingiverse
free

DIY FPV racing gate by DAquad
...use:
laser cut machine 600mm*400mm 60w
you can print out and cut it by hand as well
follow images to plug'n'play
enjoy (:
thingiverse
free

drunK131 by DAquad
... omnibus f4 flight controller 28a 2-4s tx.
brother hobby 1407 4100kv.
runcam micro swift v2.
printed with
cr-10 3d printer .
thingiverse
free

TriCOPTER600 by DAquad
...ve
look at the pictures to get an idea on how to place everything
got confused? need help? please comment below (;
enjoy building
thingiverse
free

FlexTruder by DAquad
..., check here if you not sure how to do it.
happy flexible printing (:
please dont forget to like, comment and share your makes