Thingiverse
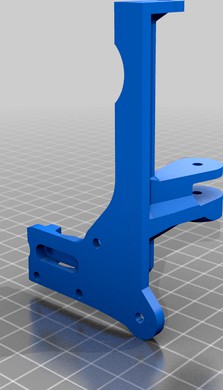
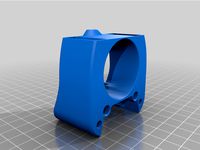
Microswiss Direct-Drive Mosquito Mount and Shroud by susop
by Thingiverse
Last crawled date: 3 years, 4 months ago
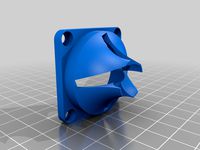
Did you buy a Microswiss Direct Drive then decide to grab a Mosquito hot end just to find out you can't use both? Me too.
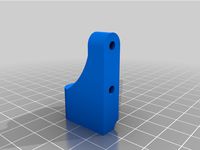
For using the BLTouch, you will need to print Main Mount Rear BLTouch, Mosquito Front End Top, Part Cooling Nozzle, Cooling Fan Mount. X-Axis Bracket. The BLTouch has a nozzle offset of x=30.75, y=17.35. The X-axis bracket isn't 100% necessary, but it fixes the misalignment created by the Microswiss Direct Drive as it doesn't hit the endstop until after it's supposed to.
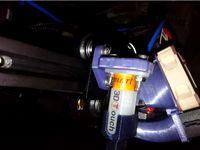
If using a dial indicator instead of the BLTouch, you will need to exchange the Main Mount Rear BLTouch with Main Mount Rear Dial, then print the Dial Indicator Donut. The Dial I used was the Clockwise Tools DICR-0105. If you use a different dial, you can make your own, The top of the dial mount is 75.85mm from the nozzle tip.
For those curious on why I ditched the BLTouch for a dial indicator, I started getting the common sawtooth pattern error on my height map that ruined all accuracy, so I just levelled all 4 corners of the bed with the dial and locked all the bed adjustment knobs with jamnuts. I also swapped the bed springs with silicone compression cylinders.
For supplies you need a 40mm axial fan, a 5015 blower fan, an adapter to convert the Mosquito to an E3D mount, spare filament guide tube, and adjustable Z-axis endstop (for dial indicator variant).
I also used a nylon fabric sleeve like what Prusa installs on their printers. If you plan on routing your wiring differently, you'll need to move your x-axis endstop towards the hot end to ensure your hot end is centered.
Hardware: in addition to the included mosquito hot end, BLTouch, and CR-10 hardware, I also used 1ea M4x8mm screw, 2ea M5x20mm screws, 2x M3x20mm screws, 4ea M3x16mm screws, 1ea M3x6mm screw, 3ea M3 hex nuts, and 2ea M3 square nuts. I also recommend a nylon sleeve like Prusa uses, as well as small zipties.
The dial indicator donut uses an M3x16mm screw.
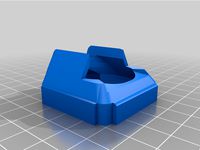
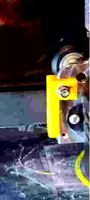
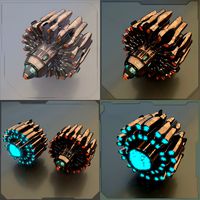
I had to use a drill to remove some metal from the E3D adapter (see picture). You can use a rounded file, but I just used a drill bit, and used my printed parts as drill guides. The mount screws will not want to go in if you don't remove material.
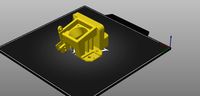
I recommend printing these parts with a high-temp filament. I used ASA and it's doing just fine. I cannot verify if PETG will hold up, but if you wrap your heat block with a thermal sock like I did, I'd imagine PETG would be fine.
For using the BLTouch, you will need to print Main Mount Rear BLTouch, Mosquito Front End Top, Part Cooling Nozzle, Cooling Fan Mount. X-Axis Bracket. The BLTouch has a nozzle offset of x=30.75, y=17.35. The X-axis bracket isn't 100% necessary, but it fixes the misalignment created by the Microswiss Direct Drive as it doesn't hit the endstop until after it's supposed to.
If using a dial indicator instead of the BLTouch, you will need to exchange the Main Mount Rear BLTouch with Main Mount Rear Dial, then print the Dial Indicator Donut. The Dial I used was the Clockwise Tools DICR-0105. If you use a different dial, you can make your own, The top of the dial mount is 75.85mm from the nozzle tip.
For those curious on why I ditched the BLTouch for a dial indicator, I started getting the common sawtooth pattern error on my height map that ruined all accuracy, so I just levelled all 4 corners of the bed with the dial and locked all the bed adjustment knobs with jamnuts. I also swapped the bed springs with silicone compression cylinders.
For supplies you need a 40mm axial fan, a 5015 blower fan, an adapter to convert the Mosquito to an E3D mount, spare filament guide tube, and adjustable Z-axis endstop (for dial indicator variant).
I also used a nylon fabric sleeve like what Prusa installs on their printers. If you plan on routing your wiring differently, you'll need to move your x-axis endstop towards the hot end to ensure your hot end is centered.
Hardware: in addition to the included mosquito hot end, BLTouch, and CR-10 hardware, I also used 1ea M4x8mm screw, 2ea M5x20mm screws, 2x M3x20mm screws, 4ea M3x16mm screws, 1ea M3x6mm screw, 3ea M3 hex nuts, and 2ea M3 square nuts. I also recommend a nylon sleeve like Prusa uses, as well as small zipties.
The dial indicator donut uses an M3x16mm screw.
I had to use a drill to remove some metal from the E3D adapter (see picture). You can use a rounded file, but I just used a drill bit, and used my printed parts as drill guides. The mount screws will not want to go in if you don't remove material.
I recommend printing these parts with a high-temp filament. I used ASA and it's doing just fine. I cannot verify if PETG will hold up, but if you wrap your heat block with a thermal sock like I did, I'd imagine PETG would be fine.
Similar models
thingiverse
free

MicroSwiss Direct Drive hotend cable tidy by jonosaur
...d somewhere to be attached so i used the fixing points for 'bltouch' i think to mount this bracket and secure the cables.
thingiverse
free
CR-10 FANG dual 5015 and BLtouch for MicroSwiss direct drive with Phaetus Dragon hot end by bogdi1988
...m lower than previous hot ends. the duct for the smaller fan also had to be adjusted to fit around the wider body of the hot end.
thingiverse
free
BLTouch Mount for Ender 3 with Microswiss Direct Drive Extruder by lawrence1024
...1024
thingiverse
use this mount to connect your bltouch to the solid aluminum block that comes with the microswiss extruder kit.
grabcad
free

Proforge3 DSH for Mosquito Hot End
...crews. to mount the mosquitos to the rocker.
(2) 20mm fans. the stock fans are 30mm, so will not work with the mosquito hot ends.
thingiverse
free

Dial indicator (53mm) holder for Prusa i3 MK2 by pafprint
...2 screws)
mount holder to the place of nozzle fan
insert dial indicator
short screws are in your spare bag from prusa printer :)
thingiverse
free
Microswiss X Axis Endstop for DirectDrive by ericthetazman
... by ericthetazman
thingiverse
i made this to account for new position of x endstop with microswiss direct drive on my longer lk4
thingiverse
free

Biqu B1 Mosquito BMG Direct Drive by Blue281
...
set scale to 1000% when printing!!
please check out my hero gen 5 mod for biqu b1 herehttps://www.thingiverse.com/thing:4698016
grabcad
free

Afterburner adapter for MicroSwiss direct drive with BLTouch
...fterburner adapter for microswiss direct drive with bltouch
grabcad
afterburner adapter for microswiss direct drive with bltouch
thingiverse
free

Dial Indicator Mount for Stock Rostock Max V2 by PannDemic
... is designed to work with 3/8" barrels on the dial indicator.
you will need 2 #6-32x2in screws to mount this to your rostock
thingiverse
free

Raise3D N1/N2 V2 dual hot-end Dial indicator Mount by unclegeek
...n.. so it may not mount right on the right side of a single nozzle.. i have a dual and it works on either side of the dual (v2)
Susop
thingiverse
free

Creality CR-10 Bed Lock Knobs by susop
...y equivalent to .25mm or .001" of bed height.
i bought an assorted metric square nuts kit made by kinpar and sold on amazon.
thingiverse
free

Microswiss Direct-Drive Mosquito Mount and Shroud 2 by susop
...te the switch more aggressively. i didn't have problems with mine, so i'm hoping the current version works for everybody.
Microswiss
thingiverse
free

Microswiss Ender 3 by Joferval
...microswiss ender 3 by joferval
thingiverse
microswiss direct drive adapter for ender 3
thingiverse
free

Precision Piezo Orion Microswiss clamp by Moriquendi
...nted parts required to use the orion with a microswiss hotend.
i have not personally tested these parts with a microswiss hotend.
thingiverse
free
VORON printhead for MicroSwiss hotend by phil245
...3d v6 hotend but i do have the microswiss so i set to making it fit.
i hope this helps someone, if it does please post a make.
thingiverse
free

BLTouch adjuster for Ender 3 with MicroSwiss hotend
... adjuster for ender 3 with microswiss hotend
thingiverse
bl touch (creality version) adjuster for ender 3 with microswiss hotend
thingiverse
free
Microswiss X Axis Endstop for DirectDrive by ericthetazman
... by ericthetazman
thingiverse
i made this to account for new position of x endstop with microswiss direct drive on my longer lk4
thingiverse
free

microswiss dd cr10s pro by deshi
...thingiverse
modified for the ender 3 microswiss dd to fit cr10s pro.
had to raise bed 5mm set x axis off set to -35 and y to -25
thingiverse
free

CR-10S fan nozzle for microswiss hotendf by jfmvoers
...hotendf by jfmvoers
thingiverse
cooling nozzle for a creality cr10s with microswiss hotend.also fits on other creality printers.
thingiverse
free
Satsana Ender 3 v2 MicroSwiss 5010 by Annikamint
...giverse.com/thing:4787797/files
and
https://www.thingiverse.com/thing:4647053 to fit on ender 3 v2 with microswiss and 5010 fan
thingiverse
free
ender 3 v2 bltouch microswiss by Mampo112
...sured 1.4mm shorter than creality stock hotend.
use m3 screws to fit it.
thats my first post in thingiverse
sorry my poor english
thingiverse
free

CR10 / Ender2 Microswiss Fang by 2bedom
...all metall 300°c microswiss hotend.
(https://store.micro-swiss.com/products/all-metal-hotend-kit-for-cr-10)
the fang fits good ..
Mosquito
design_connected
$16

Mosquito
...mosquito
designconnected
rex kralj mosquito computer generated 3d model. designed by kralj, niko.
3d_export
$5

Mosquito
...of some place that is destroyed or abandoned long ago. with such models the application would top the charts and prove its worth.
turbosquid
$100

Mosquito
... available on turbo squid, the world's leading provider of digital 3d models for visualization, films, television, and games.
turbosquid
$69

Mosquito
... available on turbo squid, the world's leading provider of digital 3d models for visualization, films, television, and games.
turbosquid
$22

mosquito
... available on turbo squid, the world's leading provider of digital 3d models for visualization, films, television, and games.
turbosquid
$20

Mosquito
... available on turbo squid, the world's leading provider of digital 3d models for visualization, films, television, and games.
turbosquid
$15

mosquito
... available on turbo squid, the world's leading provider of digital 3d models for visualization, films, television, and games.
turbosquid
$3
Mosquito
... model mosquito for download as 3ds, obj, fbx, blend, and dae on turbosquid: 3d models for games, architecture, videos. (1311331)
3d_export
$25

mosquito
...mosquito
3dexport
simple rendering of the scene file
3d_export
$10

Mosquito 3D Model
...mosquito 3d model
3dexport
mosquito insect bug hexapod flyer
mosquito 3d model def 19400 3dexport
Shroud
3d_export
$500

Centrifugal pump volute casing with impeller
...casing with impeller 3dexport volute casing with impeller and shroud ...
3d_export
$35
The Holy Face base relief 3D Model
...the holy face base relief 3d model 3dexport shroud turin veronica veronica's veil gospel ikon jesus holy face...
3d_export
$20
present car cloth presentation transport transportation shape concepts show celebration cover showro
...transportation shape concepts show celebration cover showroom covered revealin shroudd cover covering tarp draped fabric cloth showroom reveal revealing...
3d_export
$5

Lockheed F-117 Nighthawk lowpoly stealth bomber
...initial operating capability status in 1983. the aircraft was shroudd in secrecy until it was revealed to the public...
3d_export
$49
kriss vector gen 2 sub-d
...rear flip sight.<br>- vector ejection port.<br>- vector crb square shroud / 16"" sliencer.<br>- ds150 stock.<br>- .ma (maya 2020 ascii)<br>-...
3d_export
$10

vichy dining table
...in oak, sycamore and walnut marquetry.<br>even if the restaurant shroud the vichy in a long table cloth, two slender...
3d_export
$500

us navy pcu sterett ddg-104 arleigh burke class destroyer flight iia max
...the position has been shifted.<br>q. where are the exhaust shroud for the stacks?<br>a. since ddg-89, the exhaust system was...
thingiverse
free

shroud by samshay317
...shroud by samshay317
thingiverse
shroud
thingiverse
free

Fan Shroud
...fan shroud
thingiverse
this is a fan shroud for a 140mm fan
thingiverse
free
40mm fan shroud
...40mm fan shroud
thingiverse
40mm fan shroud
Direct
design_connected
free

Compas Direction
...compas direction
designconnected
free 3d model of compas direction by vitra designed by prouvé, jean.
design_connected
$18

Direction Pivotant
...direction pivotant
designconnected
vitra direction pivotant computer generated 3d model. designed by prouvé, jean.
turbosquid
$6
not direct the front
...oyalty free 3d model not direct the front for download as max on turbosquid: 3d models for games, architecture, videos. (1213034)
turbosquid
$10

Rails Direct
... available on turbo squid, the world's leading provider of digital 3d models for visualization, films, television, and games.
3d_export
$5

Picto toilet directions
...lude 3d files next to rhino6: x3dv, step, igus, obj and stl. double-sided, flipping changes the gender directions to the toilets.
3ddd
$1
fauteuli direction
...d
chair , vitra , fauteuli
fauteuli vitra chair
design_connected
$18

Fauteuil Direction, 1951
...fauteuil direction, 1951
designconnected
vitra fauteuil direction, 1951 computer generated 3d model. designed by prouvé, jean.
3d_export
$5
Directional tactile 3D Model
...tactile 3d model
3dexport
directional tactile braille tile flooring interior
directional tactile 3d model renob000 71068 3dexport
turbosquid
$26

Radio direction finder A
...ty free 3d model radio direction finder a for download as fbx on turbosquid: 3d models for games, architecture, videos. (1212490)
turbosquid
$7

Wooden direction signage
...ty free 3d model wooden direction signage for download as max on turbosquid: 3d models for games, architecture, videos. (1453747)
Drive
turbosquid
$90
Drive
...turbosquid
royalty free 3d model drive for download as blend on turbosquid: 3d models for games, architecture, videos. (1654393)
3d_export
$10

cycloidal drive
...cycloidal drive
3dexport
cycloidal drive
3d_ocean
$5

Flash Drive
...h drive included : – materials – scene ( lighs / room ) – .c4d + .obj for any questions please feel free to contact me thank you.
3d_ocean
$5

Usb drive
...s shaders and a lighting setup. it also has a small animation of it going in and out. i saved it out as both a .blend file and...
3d_ocean
$5

Pen Drive
...est computer drive game model good low poly new pen pen drive textured unwrapped uv very low poly
a very beautiful low poly model
3d_ocean
$10

External hard drive
... is a detailed model of a trekstor external hard drive. you can easily modify the label on the top. simply edit the text objects.
turbosquid
$60

Star Drive
...squid
royalty free 3d model star drive for download as blend on turbosquid: 3d models for games, architecture, videos. (1254314)
turbosquid
$50

Star Drive
...squid
royalty free 3d model star drive for download as blend on turbosquid: 3d models for games, architecture, videos. (1263524)
turbosquid
$45

Star Drive
...squid
royalty free 3d model star drive for download as blend on turbosquid: 3d models for games, architecture, videos. (1287060)
turbosquid
$40
Star Drive
...squid
royalty free 3d model star drive for download as blend on turbosquid: 3d models for games, architecture, videos. (1261902)
Mount
3d_export
free

mounting bracket
...mounting plate is the portion of a hinge that attaches to the wood. mounting plates can be used indoors, cabinetry and furniture.
turbosquid
$2

MOUNTING
... available on turbo squid, the world's leading provider of digital 3d models for visualization, films, television, and games.
turbosquid
free

Mounts
... available on turbo squid, the world's leading provider of digital 3d models for visualization, films, television, and games.
turbosquid
free

Mount Fuji
...fuji
turbosquid
free 3d model mount fuji for download as obj on turbosquid: 3d models for games, architecture, videos. (1579977)
3d_export
$5

Headphone mount LR
...headphone mount lr
3dexport
headphone mount l+r
turbosquid
$39

Mount rainier
...quid
royalty free 3d model mount rainier for download as fbx on turbosquid: 3d models for games, architecture, videos. (1492586)
turbosquid
$5

pipe mounting
...quid
royalty free 3d model pipe mounting for download as obj on turbosquid: 3d models for games, architecture, videos. (1293744)
turbosquid
$3

Mounting Tires
...uid
royalty free 3d model mounting tires for download as fbx on turbosquid: 3d models for games, architecture, videos. (1708511)
3d_export
$5

Magnetic GoPro Mount
...pro mount
3dexport
cool magnetic mount for gopro. allows you to mount the camera on flat metal surfaces and get exclusive shots.
turbosquid
$5

Stone Mount
...ty free 3d model stone mount for download as ma, obj, and fbx on turbosquid: 3d models for games, architecture, videos. (1370306)