Thingiverse

MicroSwiss Direct Drive CR10-V2 Conversion by Siganberg
by Thingiverse
Last crawled date: 3 years, 5 months ago
Update: Version 2 is thicker and I use PLA+ to print it to get more rigid especially on the area where BL Touch is mounted.
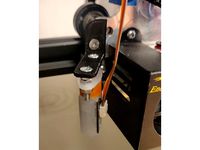
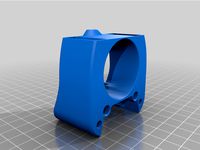
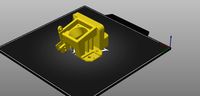
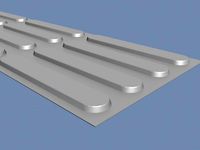
Custom Mount of MicroSwiss Direct Drive Extruder. The housing design leverage the existing front cover since it already has a nice duct air cooler and to achieve close to original looks of CR-10 V2.
Materials needed.
Printed in PETG material with .2mm resolution.
You need one M3x8mm screw to mount the backing housing to the plate.
You also need to replace the X-axis timing belt. The existing one will be shorter for the MicroSwiss mount. Here's the link for the timing belt: https://amzn.to/3fiKZpd
Instructions on how to install:
Assemble first the heater block. These include the extruder head and heater and sensor.
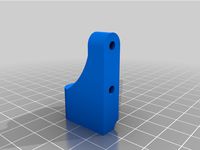
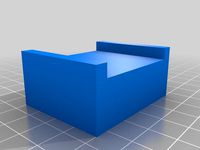
Alight the heater block to the new back housing. Slide the PTFE tube from the top all the way through the heater block.
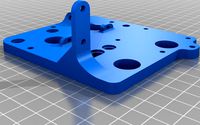
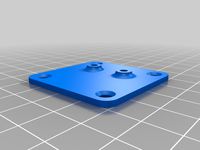
Install the back housing by sliding the top side of the PTFE tube to the MicroSwiss plate, align it with the hole, and then push up.
Use the 2 screws for the heater block to mount it to the backplate.
Use an additional 1 M3x8mm screw to secure the back housing. This screw and the heating black pressing the back housing is enough to hold it in place.
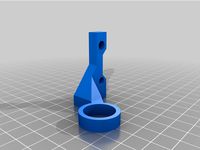
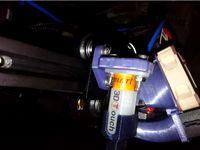
Route the heater and sensor wire to the channel of the back housing.
Put the front housing and screw the 2 fans. This will join and hole the housing completely.
Mount the BL-Touch (if you have one)
Follow the rest of the MicroSwiss instruction to connect the rest of the wires.
For Creality firmware adjustment, we need to adjust the extruder step and the BL-Touch.
For me, these are the adjustment I did.
Extruder Step: 138.00
BL Touch Offset: X45.00 Y-13.00 Z-2.70 - Mostly you need to figure your own Z offset. You can use the same X and Y offset as mine.
Note: For Printing TPU or flexible material, I highly suggest not to use the Filament guide and just go straight to the direct drive extruder as PTFE create a lot of friction on flexible materials.
The command I use adjusting using octopi Terminal:
M851 Z-2.70 //-- Adjust Z BL-Touch Offset
M92 E138 //-- Adjust Extruder Step
G28 //-- Home Extruder
G29 //-- Perform BL Touch Calibration
M500 //-- Save
M501 //-- Restore/Retrieve current Settings
Custom Mount of MicroSwiss Direct Drive Extruder. The housing design leverage the existing front cover since it already has a nice duct air cooler and to achieve close to original looks of CR-10 V2.
Materials needed.
Printed in PETG material with .2mm resolution.
You need one M3x8mm screw to mount the backing housing to the plate.
You also need to replace the X-axis timing belt. The existing one will be shorter for the MicroSwiss mount. Here's the link for the timing belt: https://amzn.to/3fiKZpd
Instructions on how to install:
Assemble first the heater block. These include the extruder head and heater and sensor.
Alight the heater block to the new back housing. Slide the PTFE tube from the top all the way through the heater block.
Install the back housing by sliding the top side of the PTFE tube to the MicroSwiss plate, align it with the hole, and then push up.
Use the 2 screws for the heater block to mount it to the backplate.
Use an additional 1 M3x8mm screw to secure the back housing. This screw and the heating black pressing the back housing is enough to hold it in place.
Route the heater and sensor wire to the channel of the back housing.
Put the front housing and screw the 2 fans. This will join and hole the housing completely.
Mount the BL-Touch (if you have one)
Follow the rest of the MicroSwiss instruction to connect the rest of the wires.
For Creality firmware adjustment, we need to adjust the extruder step and the BL-Touch.
For me, these are the adjustment I did.
Extruder Step: 138.00
BL Touch Offset: X45.00 Y-13.00 Z-2.70 - Mostly you need to figure your own Z offset. You can use the same X and Y offset as mine.
Note: For Printing TPU or flexible material, I highly suggest not to use the Filament guide and just go straight to the direct drive extruder as PTFE create a lot of friction on flexible materials.
The command I use adjusting using octopi Terminal:
M851 Z-2.70 //-- Adjust Z BL-Touch Offset
M92 E138 //-- Adjust Extruder Step
G28 //-- Home Extruder
G29 //-- Perform BL Touch Calibration
M500 //-- Save
M501 //-- Restore/Retrieve current Settings
Similar models
thingiverse
free

Ender3 Direct Drive Mount with support for BL Touch and Dual Gear Extruder by furconc
... the stock plastic extruder or an upgraded metal single-gear extruder.
no extra hardware should be needed to install this part.
thingiverse
free

Dual gear extruder direct mount with BL Touch mount
... mounts together in shapr3d and printed in petg.
you will need to add spacers under the bl touch to adjust this to your hotend.
thingiverse
free

BMG Wind / BMG Aero Mounting Plate for Artillery Genius / Sidewinder X1 with BL-Touch & V6 Heater Block by bl00me
... slots of the back from square nuts to normal hexagonal nuts.
you will need three m4x12 screws and thre m4 nuts for installation.
thingiverse
free
BL Touch Holder for MicroSwiss Direct Drive Ender 3 pro by Lindegaard
...microswiss direct drive kit, offsets the blt 60 degrees, enabling you to take the standard ender shroud off without removing blt.
thingiverse
free

Sovol SV01 & SV03 Hemera Mounting plate by GreameGB
...otor current needs to be set to 940)
(filament sensor for some reason i had to set filament sensor inverting to "true")
thingiverse
free
Sovol SV01 & SV03 Hemera Mounting plate by GreameGB
...otor current needs to be set to 940)
(filament sensor for some reason i had to set filament sensor inverting to "true")
thingiverse
free

Tevo Tornado Titan extruder Direct Drive w/BL Touch by cosworth99
... direct drive w/bl touch by cosworth99
thingiverse
remixed to add a bl touch. with my tornado, z offset is about -0.8 with this.
thingiverse
free
BLTouch Mount for Ender 3 with Microswiss Direct Drive Extruder by lawrence1024
...1024
thingiverse
use this mount to connect your bltouch to the solid aluminum block that comes with the microswiss extruder kit.
thingiverse
free
EZABL Mount for CR-10 With Microswiss Direct Drive by jamiej831
...g a microswiss direct drive extruder and all metal hotend. cutout to be use with a fang mounting plate.
offsets:
x: -64.5
y: -8
thingiverse
free

E3D BigBox - Minimalist BL Touch Mount by hugofitz
...proof washers to stop it falling off! simple
probe offset from nozzle
y = 0mm
x = 38mm
z = adjustable using m1.5 washers as shims
Siganberg
thingiverse
free

Shapeoko 2 Controller Case by Siganberg
...shapeoko 2 controller case by siganberg
thingiverse
enclosure case for andruino and grblshield
thingiverse
free

Naza GPS Top Shell by Siganberg
...naza gps top shell by siganberg
thingiverse
https://www.youtube.com/watch?v=eajpznhnz7q
thingiverse
free
Tarot 16mm Boom Drill Guide by Siganberg
... boom drill guide by siganberg
thingiverse
drill guide for drilling screw hole on 16mm carbon fiber boom with tarot motor mount.
thingiverse
free
Flip32+ and PDB Standoff by Siganberg
...http://witespyquad.gostorego.com/mini-power-distribution-board.html
mounting hold distance of pdb and fc are 30mm on all corners.
thingiverse
free

PwnCNC V3 Hose Adapter for Rockler by Siganberg
...e.
i created 2 versions. one require support material during printing and the other one can be printed without support material.
thingiverse
free

Ammo can Lipo Field Charger by Siganberg
...cal ammo can
2 multistart 16000mah 4s lipo
parallel board
xt60 male and female
4s balancer port male and female
silicond wires.
thingiverse
free

Connex GroundStation Accessories by Siganberg
...
lipo holder.
holder for multistart 4s 5200mah
use m5 screw and nuts
dual hanger
hold radio tx and goggle
use m5 screw and nuts
thingiverse
free
OneFinity CNC X-Gantry Lock by Siganberg
...https://youtu.be/mzpnqy9dufo
if you found this useful, tips are always welcome. :d
https://paypal.me/fmarasigan?locale.x=en_us
thingiverse
free

5.8Ghz Helical Antenna with Dowel Template for Turning by Siganberg
...to the center pin as close as possible to the reflector but not touching/grounding it.https://www.youtube.com/watch?v=gagbcynj004
thingiverse
free

Wireless transfer file to 3D Printer by Siganberg
...mputer browser to drag and drop files that i need to print.
i just added some dummy stl so i can make it available to the public.
Microswiss
thingiverse
free

Microswiss Ender 3 by Joferval
...microswiss ender 3 by joferval
thingiverse
microswiss direct drive adapter for ender 3
thingiverse
free

Precision Piezo Orion Microswiss clamp by Moriquendi
...nted parts required to use the orion with a microswiss hotend.
i have not personally tested these parts with a microswiss hotend.
thingiverse
free
VORON printhead for MicroSwiss hotend by phil245
...3d v6 hotend but i do have the microswiss so i set to making it fit.
i hope this helps someone, if it does please post a make.
thingiverse
free

BLTouch adjuster for Ender 3 with MicroSwiss hotend
... adjuster for ender 3 with microswiss hotend
thingiverse
bl touch (creality version) adjuster for ender 3 with microswiss hotend
thingiverse
free

Microswiss X Axis Endstop for DirectDrive by ericthetazman
... by ericthetazman
thingiverse
i made this to account for new position of x endstop with microswiss direct drive on my longer lk4
thingiverse
free

microswiss dd cr10s pro by deshi
...thingiverse
modified for the ender 3 microswiss dd to fit cr10s pro.
had to raise bed 5mm set x axis off set to -35 and y to -25
thingiverse
free

CR-10S fan nozzle for microswiss hotendf by jfmvoers
...hotendf by jfmvoers
thingiverse
cooling nozzle for a creality cr10s with microswiss hotend.also fits on other creality printers.
thingiverse
free
Satsana Ender 3 v2 MicroSwiss 5010 by Annikamint
...giverse.com/thing:4787797/files
and
https://www.thingiverse.com/thing:4647053 to fit on ender 3 v2 with microswiss and 5010 fan
thingiverse
free
ender 3 v2 bltouch microswiss by Mampo112
...sured 1.4mm shorter than creality stock hotend.
use m3 screws to fit it.
thats my first post in thingiverse
sorry my poor english
thingiverse
free

CR10 / Ender2 Microswiss Fang by 2bedom
...all metall 300°c microswiss hotend.
(https://store.micro-swiss.com/products/all-metal-hotend-kit-for-cr-10)
the fang fits good ..
Cr10
3d_export
$21

Hall tree and Clothing Rack CR10
... real object. 3. lights and cameras are included in the scenes renders using vray * renders are made in 3ds max 2018 using vray 5
thingiverse
free

Clips for Ender 3, CR10, CR10S
.... maybe others, but only been tested with these.
these clips makes a tight fit, so that the cable and bowden tube stays in place.
thingiverse
free
X-axis endstop offset for cr10 cr10s Ender 3
...x-axis endstop offset for cr10 cr10s ender 3
thingiverse
x-axis endstop offset for cr10 cr10s ender 3
thingiverse
free

Filament Sensor CR10
...or cr10
thingiverse
remix of the sensor with fixation in order to face directly the extruder and ptfe tube
cr10, cr10s ender3...
thingiverse
free

Fan V4 CR10/CR10S Ender3 Versione 4 by creativesolutions-lab
...fan v4 cr10/cr10s ender3 versione 4 by creativesolutions-lab
thingiverse
fan v4 cr10/cr10s versione 4
thingiverse
free
CR10 Feet by Leighton417
...cr10 feet by leighton417
thingiverse
this is a cr10 feet for people who have short table width.
thingiverse
free

Dremel Attachment for CR10, Ender 3, Cr10s by Conn22_43
...verse
a bracket to hold a dremel onto any ender 3, cr10 bracket. i printed it in petg, but it can be made in any rigid material.
thingiverse
free

CR10S-Plus Hotend by scorpio_man30ro
...cr10s-plus hotend by scorpio_man30ro
thingiverse
cr10s-plus hotend
thingiverse
free
Leveling knob CR10 by JMJacques
...leveling knob cr10 by jmjacques
thingiverse
leveling knob cr10
thingiverse
free

Soporte Superior sensor filamento CR10 v2 - CR10 v3 by Guimir
...3 by guimir
thingiverse
soporte sensor de filamento guia superiror tipo cr10 v3 para convertir la cr10 v2 en extrusión directa.
Conversion
3ddd
$1

Conversation Seat
...шетка
the conversation seat made in englandhttp://www.squintlimited.com/products/the_conversation_seat/gold
+ max 2011
3d_export
$10

Converse 3D Model
...converse 3d model
3dexport
converse shoe pc unix mac
converse 3d model electropainter17075 38067 3dexport
turbosquid
$100

converse-shoe
...quid
royalty free 3d model converse-shoe for download as c4d on turbosquid: 3d models for games, architecture, videos. (1398427)
turbosquid
$10

Conversation Furniture
... available on turbo squid, the world's leading provider of digital 3d models for visualization, films, television, and games.
turbosquid
$7

Converse Allstars
... available on turbo squid, the world's leading provider of digital 3d models for visualization, films, television, and games.
design_connected
$16

Conversation Club Chair
...conversation club chair
designconnected
donghia conversation club chair chairs computer generated 3d model. designed by n/a.
design_connected
$27

Hemicycle Conversation Chair
...rsation chair
designconnected
ligne roset hemicycle conversation chair computer generated 3d model. designed by nigro, philippe.
3d_export
$24

Converse keds 3D Model
...converse keds 3d model
3dexport
converse all star ked shoe clothes sports
converse keds 3d model vermi1ion 26201 3dexport
3ddd
$1

Converse All-Star Shoes
...converse all-star shoes
3ddd
кеды , обувь
converse all-star shoes
design_connected
$18

CONVERSE Jack Purcell Sneakers
...converse jack purcell sneakers
designconnected
converse jack purcell sneakers computer generated 3d model.
Direct
design_connected
free
Compas Direction
...compas direction
designconnected
free 3d model of compas direction by vitra designed by prouvé, jean.
design_connected
$18

Direction Pivotant
...direction pivotant
designconnected
vitra direction pivotant computer generated 3d model. designed by prouvé, jean.
turbosquid
$6
not direct the front
...oyalty free 3d model not direct the front for download as max on turbosquid: 3d models for games, architecture, videos. (1213034)
turbosquid
$10

Rails Direct
... available on turbo squid, the world's leading provider of digital 3d models for visualization, films, television, and games.
3d_export
$5

Picto toilet directions
...lude 3d files next to rhino6: x3dv, step, igus, obj and stl. double-sided, flipping changes the gender directions to the toilets.
3ddd
$1
fauteuli direction
...d
chair , vitra , fauteuli
fauteuli vitra chair
design_connected
$18

Fauteuil Direction, 1951
...fauteuil direction, 1951
designconnected
vitra fauteuil direction, 1951 computer generated 3d model. designed by prouvé, jean.
3d_export
$5
Directional tactile 3D Model
...tactile 3d model
3dexport
directional tactile braille tile flooring interior
directional tactile 3d model renob000 71068 3dexport
turbosquid
$26

Radio direction finder A
...ty free 3d model radio direction finder a for download as fbx on turbosquid: 3d models for games, architecture, videos. (1212490)
turbosquid
$7

Wooden direction signage
...ty free 3d model wooden direction signage for download as max on turbosquid: 3d models for games, architecture, videos. (1453747)
V2
3d_export
free

Lamp v2
...lamp v2
3dexport
lamp v2 with solar panel
3d_export
$5

hammerhead v2
...hammerhead v2
3dexport
razer hammerhead v2 headphones, modeled in cinema 4d, render in corona
3d_export
$5

manometer v2
...manometer v2
3dexport
3d_export
$5

potato v2
...potato v2
3dexport
turbosquid
$52

Lifebuoys v2
...squid
royalty free 3d model lifebuoys v2 for download as fbx on turbosquid: 3d models for games, architecture, videos. (1560870)
turbosquid
$2

Mask v2
...turbosquid
royalty free 3d model mask v2 for download as stl on turbosquid: 3d models for games, architecture, videos. (1527741)
turbosquid
free

Flashlight V2
...d
free 3d model flashlight v2 for download as , obj, and fbx on turbosquid: 3d models for games, architecture, videos. (1663559)
turbosquid
$29

Thanos v2
...
royalty free 3d model thanos v2 for download as ztl and obj on turbosquid: 3d models for games, architecture, videos. (1651077)
turbosquid
$29

Titan v2
...d
royalty free 3d model titan v2 for download as ztl and obj on turbosquid: 3d models for games, architecture, videos. (1540228)
turbosquid
$29

Frieza v2
...
royalty free 3d model frieza v2 for download as ztl and obj on turbosquid: 3d models for games, architecture, videos. (1701238)
Drive
turbosquid
$90
Drive
...turbosquid
royalty free 3d model drive for download as blend on turbosquid: 3d models for games, architecture, videos. (1654393)
3d_export
$10

cycloidal drive
...cycloidal drive
3dexport
cycloidal drive
3d_ocean
$5

Flash Drive
...h drive included : – materials – scene ( lighs / room ) – .c4d + .obj for any questions please feel free to contact me thank you.
3d_ocean
$5

Usb drive
...s shaders and a lighting setup. it also has a small animation of it going in and out. i saved it out as both a .blend file and...
3d_ocean
$5

Pen Drive
...est computer drive game model good low poly new pen pen drive textured unwrapped uv very low poly
a very beautiful low poly model
3d_ocean
$10

External hard drive
... is a detailed model of a trekstor external hard drive. you can easily modify the label on the top. simply edit the text objects.
turbosquid
$60

Star Drive
...squid
royalty free 3d model star drive for download as blend on turbosquid: 3d models for games, architecture, videos. (1254314)
turbosquid
$50

Star Drive
...squid
royalty free 3d model star drive for download as blend on turbosquid: 3d models for games, architecture, videos. (1263524)
turbosquid
$45

Star Drive
...squid
royalty free 3d model star drive for download as blend on turbosquid: 3d models for games, architecture, videos. (1287060)
turbosquid
$40
Star Drive
...squid
royalty free 3d model star drive for download as blend on turbosquid: 3d models for games, architecture, videos. (1261902)